Обзор графического редактора gimp
Содержание:
Options
GIMP accepts the following options:
- -h, —help
- Show GIMP command-line options.
- —help-all
- Show all command-line options.
- —help-gtk
- Show GTK+ command-line options.
- —help-gegl
- Show GEGL command-line options.
- -v, —version
- Output version information and exit. When combined with the —verbose option, version information about libraries used by GIMP is shown as well.
- —license
- Output license information and exit.
- —verbose
- Be verbose and create information on standard output.
- -n, —new-instance
- Do not attempt to reuse an already running GIMP instance. Always start a new one.
- -a, —as-new
- Open filenames passed on the command-line as new images, don’t set the filename on them.
- -i, —no-interface
- Run without a user interface.
- -d, —no-data
- Do not load patterns, gradients, palettes, or brushes. Often useful in non-interactive situations where startup time is to be minimized.
- -f, —no-fonts
- Do not load any fonts. No text functionality will be available if this option is used.
- —display _display_
- Use the designated X display.
- -s, —no-splash
- Do not show the splash screen.
- —no-shm
- Do not use shared memory between GIMP and its plug-ins. Instead of using shared memory, GIMP will send the data via pipe. This will result in slower performance than using shared memory.
- —no-cpu-accel
- Do not use CPU accelerations such as MMX or SSE even if GIMP detects that your CPU provides this functionality.
- —session <name>
- Use a different sessionrc for this GIMP session. The given session name is appended to the default sessionrc filename.
- -g, —gimprc <gimprc>
- Use an alternative gimprc instead of the default one. Useful in cases where plug-in paths or machine specs may be different.
- —system-gimprc <gimprc>
- Use an alternate system gimprc file.
- —dump-gimprc
- Output a gimprc file with default settings.
- —debug-handlers
- Enable debugging signal handlers.
- -c, —console-messages
- Do not popup dialog boxes on errors or warnings. Print the messages on the console instead.
- —stack-trace-mode {never|query|always}
- If a stack-trace should be generated in case of fatal signals.
- —pdb-compat-mode {off|on|warn}
- If the PDB should provide aliases for deprecated functions.
- —batch-interpreter <procedure>
- Specifies the procedure to use to process batch events. The default is to let Script-Fu evaluate the commands.
- -b, —batch <command>
- Execute <command> non-interactively. This option may appear multiple times. The <command> is passed to the batch interpreter. When <command> is — the commands are read from standard input.
Under the Hood
GEGL
Important progress towards high bit-depth and non-destructive editing in GIMP has been made. Most color operations in GIMP are now ported to the powerful graph based image processing framework GEGL, meaning that the internal processing is being done in 32bit floating point linear light RGBA. By default the legacy 8bit code paths are still used, but a curious user can turn on the use of GEGL for the color operations with Colors / Use GEGL.

In addition to porting color operations to GEGL, an experimental GEGL Operation tool has been added, found in the Tools menu. It enables applying GEGL operations to an image and it gives on-canvas previews of the results. The screenshot to the right shows this for a Gaussian Blur.
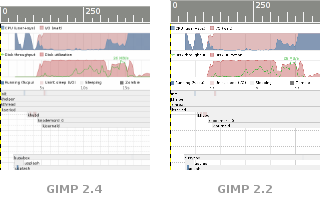
Minor Changes
Ported many widgets to use the 2D graphics library cairo for drawing. See this comparison for an example of how much better this looks.
Возможности редактора Gimp
Графический редактор Gimp позволяет выполнять широкий спектр операций с различными изображениями. Он поддерживает большое количество форматов, имеет множество предустановленных фильтров, кистей и шаблонов. Если вас не устраивает изначальный функционал, его можно расширить за счёт дополнительных модулей. Итак, что же умеет программа?
- Создание и продвинутая обработка графических файлов, фотографий, логотипов, рисунков. Можно менять размер, редактировать цвет, соединить несколько фото в одно, настраивать уровень яркости, контрастности, цветового баланса, искажений, преобразовывать картинки из одного формата в другой.
- Поддержка родного формата XCF, а также JPG, JPEG, GIF, TIFF, PNM, MPEG, PNG, TGA, TIF, PS, XPM, BMP, SGI, PDF, ICO, PCX и множества других. И также предоставляется ограниченная поддержка PSD — оригинального формата Photoshop.
- Рисование. Для создания полноценных рисунков доступен полный набор рабочих инструментов, включающих карандаши, кисти, штампы и другие. Каждый элемент можно тонко настроить, изменить толщину и форму линий, а также прозрачность.
- Создание многослойных проектов. Каждый элемент может наноситься в виде отдельного слоя, который затем в случае необходимости очень легко удалить или подкорректировать. А также доступна полная настройка альфа-канала.
- Полный набор инструментов для преобразования и трансформации: наклон, масштаб, поворот, вращение, отражение.
- Выделение фрагмента изображения. Доступны такие инструменты выделения, как фрагмент свободной формы, эллипс, прямоугольник, а также интеллектуальное выделение.
- Поддержка сканеров и графических планшетов.
- Большое количество встроенных фильтров, возможность как поштучной, так и пакетной обработки файлов.
- История. Все ваши действия хранятся в разделе «История», благодаря чему вы сможете отслеживать все выполненные изменения.
- Анимация. Обработка анимационных файлов формата MNG. Каждый кадр обрабатывается как отдельный слой.
- Многоязычное меню, включая качественный перевод на русский и украинский языки.
- Детальная настройка интерфейса, возможность работать в классическом многооконном меню, так и в более привычном для новичков однооконном.
- Интеграция внешних инструментов, разработанных специально для редактора Gimp.
- Автоматизация ваших операций за счёт скриптов, написанных на языках Perl, Python и Script-Fu.
The Perl Server and stand-alone scripts
So far the scripts have all been started from the menu structure within GIMP. But using Gimp::Fu there is another possibility, and that is to run the scripts from the command line, as a normal Perl program. When run this way the script tries to connect to the Perl-Server, and if it fails it will launch a GIMP of its own. If you plan to run several scripts this way, it is obviously much faster to run the Perl-Server since launching GIMP takes quite a bit of time. The Perl-Server may be started from the Filters/Perl menu.
When a Gimp::Fu script is run from the command line, the result is the same as when it is run through the menus, except that it may be run with the --output parameter. This will save the result to a file instead of displaying it within GIMP. This is great for batch creation of logos, etc.
The filename for the --output has some special magic that allows to set some special image saving parameters, like interlace, quality factor, etc. See the for more detail
Here are two invocations of the scripts declared above, but with output written to a jpg file and a png file.
| perl-gimp-from-shell |
|---|
uni -o /tmp/uni.png --size 100 --color purple basic-logo --font 'utopia 100' -o /tmp/bl.ppm --size 20 --text "Perl rules" |
Another important use of this interface is that it enables running the Perl debugger on the perl scripts.
10.1. A shell for Gimp-Perl
When using the Perl-Server it is not necessary to use Gimp::Fu and the podregister function. Instead you may call Gimp::on_net, which takes as a parameter a reference to a sub routine that is called when your script has connected to a GIMP (or started one up).
For a simple but powerful example of the use of the Gimp without Fu, here is a an interactive Gimp-Perl shell that may be run from the command line:
| (pg-shell) |
|---|
|
#!/usr/bin/perl # An interactive command line shell to GIMP. Gimp::on_net { exit Gimp::main; |
Here is an example of an interactive session with this shell:
| interact |
|---|
Gimp> $img = Gimp::Image->new(100,100,RGB) Gimp> $drw = $img->layer_new(100,100,RGB_IMAGE, "bg", 100, NORMAL_MODE) Gimp> $img->insert_layer($drw,-1, 0) Gimp> Gimp::Display->new($img) Gimp> $drw->edit_clear Gimp> print Gimp::Image->list Gimp::Image->existing(1) |
FTP and Web Mirrors
We had a server move a while back that caused us to lose our existing mirrors (moved from physical to virtual server and to an environment that doesn’t allow FTP access).
On the plus side, we are now able to offer rsync access to download.gimp.org.
If you are running one of the existing GIMP mirrors, or want to create a new one, please contact us to get your rsync credentials.
- Canada
- https://mirror.klaus-uwe.me/gimp/gimp/
- ftp://mirror.klaus-uwe.me/gimp/
- rsync://mirror.klaus-uwe.me/gimp/
- Finland
- https://www.nic.funet.fi/pub/mirrors/ftp.gimp.org/
- ftp://ftp.funet.fi/pub/mirrors/ftp.gimp.org/
- rsync://rsync.nic.funet.fi/ftp/pub/mirrors/ftp.gimp.org/
- France
- http://ftp.iut-bm.univ-fcomte.fr/gimp/
- ftp://ftp.iut-bm.univ-fcomte.fr/gimp/
- rsync://ftp.iut-bm.univ-fcomte.fr/gimp/
- Germany
- https://ftp.fau.de/gimp/gimp/
- ftp://ftp.fau.de/gimp/gimp/
- rsync://ftp.fau.de/gimp/
- https://artfiles.org/gimp.org/pub/gimp/
- https://ftp.gwdg.de/pub/misc/grafik/gimp/
- ftp://ftp.gwdg.de/pub/misc/grafik/gimp/
- Greece
- https://ftp.cc.uoc.gr/mirrors/gimp/
- ftp://ftp.cc.uoc.gr/mirrors/gimp/
- Japan
- http://www.ring.gr.jp/pub/graphics/gimp/
- Netherlands
- https://ftp.snt.utwente.nl/pub/software/gimp/gimp/
- ftp://ftp.snt.utwente.nl/pub/software/gimp/gimp/
- Philippines
- http://mirror.rise.ph/gimp/
- ftp://mirror.rise.ph/gimp/
- Poland
- https://ftp.icm.edu.pl/pub/graphics/gimp/
- ftp://ftp.icm.edu.pl/pub/graphics/gimp/
- rsync://ftp.icm.edu.pl/pub/graphics/gimp/
- gopher://ftp.icm.edu.pl/1/pub/graphics/gimp/
- Sweden
- https://ftp.lysator.liu.se/pub/gimp/
- ftp://ftp.lysator.liu.se/pub/gimp
- rsync://ftp.lysator.liu.se/pub/gimp
- Ukraine
- https://gimp.ip-connect.info/gimp/
- rsync://gimp.ip-connect.info/gimp/
- ftp://gimp.ip-connect.info/mirror/gimp/
- United Kingdom
- https://www.mirrorservice.org/sites/ftp.gimp.org/pub/gimp/
- ftp://ftp.mirrorservice.org/sites/ftp.gimp.org/pub/gimp/
- rsync://rsync.mirrorservice.org/ftp.gimp.org/pub/gimp/
- https://mirrors.ukfast.co.uk/sites/gimp.org/pub/gimp/
- ftp://mirrors.ukfast.co.uk/gimp.org/pub/gimp/
- rsync://mirrors.ukfast.co.uk/gimp.org/pub/gimp/
- United States
- http://gimp.cp-dev.com/
- ftp://devhost.cp-dev.com/gimp
- rsync://gimp.cp-dev.com/gimp
- https://mirrors.dotsrc.org/gimp/gimp/
- ftp://mirrors.dotsrc.org/gimp/
- rsync://mirrors.dotsrc.org/gimp/
- https://mirrors.syringanetworks.net/gimp/gimp/
- ftp://mirrors.syringanetworks.net/gimp/
- rsync://mirrors.syringanetworks.net/gimp/
- https://mirror.jaleco.com/gimp/gimp/
- https://mirror.umd.edu/gimp/gimp/
- https://mirrors.xmission.com/gimp/gimp/
- ftp://mirrors.xmission.com/gimp/gimp/
General Improvements
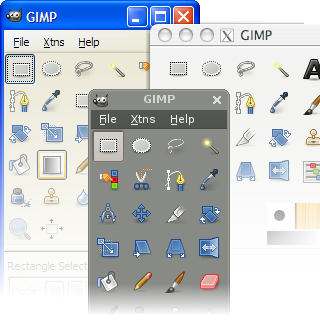
Refreshed Look
A whole new default icon theme has been created for 2.4. The icons comply with the Tango style guidelines so GIMP doesn’t feel out of place on any of the supported platforms. Regardless of whether you run GIMP under Microsoft Windows, Mac OS X or GNU/Linux (GNOME, KDE or Xfce), GIMP provides a polished, consistent look.
Additionally the icons also have enhanced usability on dark widget themes, which is a common setting among digital artists.
For artists preferring more desaturated color theme for their icons, an alternative icon theme is available for download.
Scalable Brushes
The tool options now include a brush size slider that affects both the parametric and bitmap brushes. This has been an oft-requested feature from both digital painters and photo editors.
Unlike previous versions of GIMP, regardless of whether you’re using a bitmap brush, parametric brush or even a picture tube (multiple bitmaps), you can easily set the brush size with either the tool options dock slider or an external device such as a MIDI slider or knob or a USB device like the Griffin Powermate.
Selection Tools

The selection tools have been rewritten from scratch to allow resizing of existing selections. Additionally the rectangular selection tool includes a setting for creating rounded corners as this has been identified as a very common task among web designers.
The learning curve for the tools has been flattened as the key functionality is available without obscure shortcuts that confused GIMP beginners. Most of the existing shortcuts still work, but the functionality is either available through the tool options or made obsolete due to the interactive move and resize on canvas.
While the tools have been redesigned to make them easier to understand for the newbies, all the former functionality is there. You can still constrain aspect ratios or specific sizes.
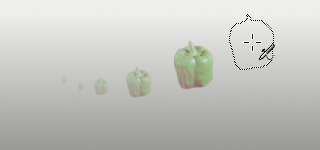
Foreground Select Tool
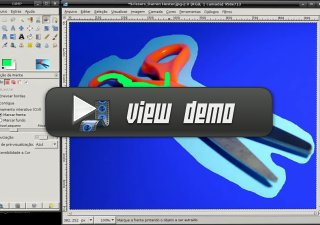
Selecting individual objects on images is easier now with a new foreground select tool. It is done in two steps. First, you make select region of interest which contains the entire object. Then you paint over selected area with a brush, not crossing object’s border. Release mouse button when you’re done and look, if there are dark blue spots on your objects. If there are some, paint with a brush over them again and release to refine selection. When there are no more blue areas inside the object, press Enter and there you have a perfectly selected object.
All video demonstrations can also be viewed or downloaded from a separate page.
Align Tool
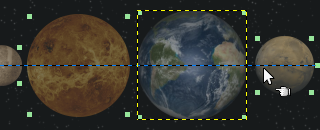
While GIMP has provided a grid and guideline functionality, the actual alignment of objects had to be done manually. In a few clicks, the new Align Tool allows you to align or distribute a list of layers, paths or guides. You can align these objects with another object, with the selection or with the image.
Most notable is the new top-level Color menu that accumulates most tools, plug-ins and scripts that adjust colors in RGB/Grayscale mode and color palettes in Indexed mode. So now you can reach functions like Levels or Curves much faster than before. You can also define your own keyboard shortcuts for them using the improved keyboard shortcuts manager.
In the new version of GIMP, some menu entries have changed their names and position. It was done mostly to simplify learning curve and improve user experience. After all, “HSV Noise” and “RGB Noise” sound more meaningful than “Scatter HSV” and “Scatter RGB”, don’t they? And status bar hints for all plug-ins and scripts are quite helpful too.
Improved display when zooming in or out
Previous versions of GIMP used a fast but inaccurate way of displaying images at various zoom levels. When zooming out, some rows and columns of pixels where simply omitted from the display. The result was sometimes confusing, especially if the image contained many thin lines or small features. GIMP 2.4 avoids these problems and provides a better view of the zoomed-out images.
Support for file formats
- Support for Photoshop ABR brush format;
- Improved reading/writing EXIF in JPEG;
- Importing clipping paths in TIFF;
- Layer masks can be saved to PSD;
- 16/32 bit bitmaps and alpha-channel support in BMP;
- 24 bit and Vista icons can be opened and saved.
darktable as Raw Processing Plug-in
On Linux, GIMP is now capable of using darktable for pre-processing raw images from DSLRs (Canon CR2, Nikon NEF etc.). darktable is an amazing project whose developers stick around at our IRC channel and even contribute to GIMP (most recently, they added reading various metadata from EXR files).
Note that the plug-in is activated only when darktable is built with Lua support. Make sure your build of darktable for Linux is feature-complete.
It is still possible to use other raw development plug-ins like . For cases when multiple plug-ins are installed in your system, we intend to add a preference option.
Tools
Unified Transform
Your browser does not support the video tag.
New Unified Transform tool simplifies making multiple transforms, such as
scaling, rotating, and correcting perspective in one go. The design is based
on a functional spec written by our former UX expert Peter Sikking.
Contributors: Mikael Magnusson…
Warp Transform
The new Warp Transform tool allows doing localized transforms like growing or
shifting pixels with a soft brush and undo support. Such tools are commonly used
in fashion photography for retouching.
Your browser does not support the video tag.
As such, the new tool retires the old iWarp filter that was innovative at the
time of its inception (and pre-dated Photoshop’s Liquify filter), but was
ultimately cumbersome to use. The Warp Transform tool also features an
Eraser mode to selectively remove changes, previously unavailable in the
iWarp filter.
Contributors: Michael Muré, Michael Natterer, Jonathan Tait…
Handle Transform
The new Handle Transform tool provides an interesting approach at applying
scaling, rotating, and perspective correction using handles placed on the
canvas. People who are used to editing on touch surfaces might find this tool
strangely easy to grasp.
Contributors: Johannes Matschke, Michael Natterer, Ell…
Blend tool becomes Gradient tool and gets on-canvas editing
We renamed the Blend tool to Gradient tool and changed its default shortcut
to G. But this pales in comparison to what the tool can actually do now, and
it’s a lot.
The new tool pretty much obsoletes the old Gradient Editor dialog. Now you can
create and delete color stops, select and shift them, assign colors to color
stops, change blending and coloring for segments between color stops and create
new color stops from midpoints right on the canvas.
Your browser does not support the video tag.
All gradients available by default are also “editable” now. What it means is
that when you try to change an existing gradient from a system folder, GIMP will
create a copy of it, call it a Custom Gradient and preserve it across
sessions. Unless, of course, you edit another ‘system’ gradient, in which case
it will become the new custom gradient.
We intend to use the generic implementation of this later for brushes and other
types of resources.
Contributors: Michael Henning, Michael Natterer, Ell, Øyvind Kolås…
Source for version 2.10 (Stable)
GIMP releases available from gimp.org and its contain the source code and have to be compiled in order to be installed on your system.
For instructions, how to build GIMP from source code, please see this page.
GIMP 2.10.24 is now available at https://download.gimp.org/mirror/pub/gimp/v2.10/. You may want to read the Release Notes for GIMP 2.10.
To allow you to check the integrity of the tarballs, here are the hashes of the latest releases:
-
gimp-2.10.24.tar.bz2
(sha256): - bd1bb762368c0dd3175cf05006812dd676949c3707e21f4e6857435cb435989e
-
gimp-2.10.22.tar.bz2
(sha256): - 2db84b57f3778d80b3466d7c21a21d22e315c7b062de2883cbaaeda9a0f618bb
-
gimp-2.10.20.tar.bz2
(sha256): - e12f9f874b1a007c4277b60aa81e0b67330be7e6153e5749ead839b902fc7b3c
-
gimp-2.10.18.tar.bz2
(sha256): - 65bfe111e8eebffd3dde3016ccb507f9948d2663d9497cb438d9bb609e11d716
-
gimp-2.10.16.tar.bz2
(sha256): - cbf9fe9534b913a9487b00cd9710cbc569bfd71fdd2f8c321547701a7d70cbeb
-
gimp-2.10.14.tar.bz2
(sha256): - df9b0f11c2078eea1de3ebc66529a5d3854c5e28636cd25a8dd077bd9d6ddc54
-
gimp-2.10.12.tar.bz2
(sha256): - 7d80b58e0784120d57d327294f6a1fda281ff51a61935c2cd764da281acaac71
-
gimp-2.10.10.tar.bz2
(sha256): - 12d1f243265c7aee1f2c6e97883a5c90ddc0b19b4346cf822e24adbb6c998c77
-
gimp-2.10.8.tar.bz2
(sha256): - d849c1cf35244938ae82e521b92b720ab48b8e9ed092d5de92c2464ef5244b9b
-
gimp-2.10.6.tar.bz2
(sha256): - 4ec8071f828e918384cf7bc7d1219210467c84655123f802bc55a8bf2415101f
-
gimp-2.10.4.tar.bz2
(sha256): - ffb0768de14a2631b3d7ed71f283731441a1b48461766c23f0574dce0706f192
-
gimp-2.10.2.tar.bz2
(sha256): - 1cb0baaecdefe44d371a15f2739a1bcbce4682336b4ccf8eb7b587ce52c333eb
-
gimp-2.10.0.tar.bz2
(sha256): - 7fcc96fb88cb0a0595d2610f63a15dec245bb37bf9db527d37a24fb75e547de2
GIMP help files are available at https://download.gimp.org/mirror/pub/gimp/help/.
Please consider using one of the mirrors listed below.
Changing the Size (Dimensions) of an Image (Scale)
This is a very simple task to accomplish in GIMP easily.
The image we’ll be using to illustrate this with is The Horsehead Nebula in Infrared.
When you first open your image in GIMP, chances are that the image will be zoomed so that the entire image fits in your canvas. The thing to notice for this example is that by default the window decoration at the top of GIMP will show you some information about the image.
![]()
View of the GIMP canvas, with information at the top of the window.
Notice that the information at the top of the window shows the current pixel dimensions of the image (in this case, the pixel size is 1225×1280).
To resize the image to new dimensions, we need only invoke the Scale Image dialog:
Image → Scale Image…
This will then open the Scale Image dialog:
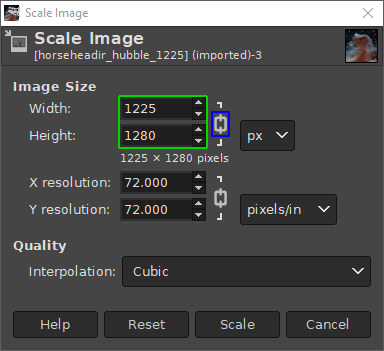
The Scale Image dialog.
In the Scale Image dialog, you’ll find a place to enter new values for Width and Height. If you know one of the new dimensions you’d like for the image, fill in the appropriate one here.
You’ll also notice a small chain just to the right of the Width and Height entry boxes. This icon shows that the Width and Height values are locked with respect to each other, meaning that changing one value will cause the other to change in order to keep the same aspect ratio (no strange compression or stretching in the image).
For example, if you knew that you wanted your image to have a new width of 600px, you can enter that value in the Width input, and the Height will automatically change to maintain the aspect ratio of the image:
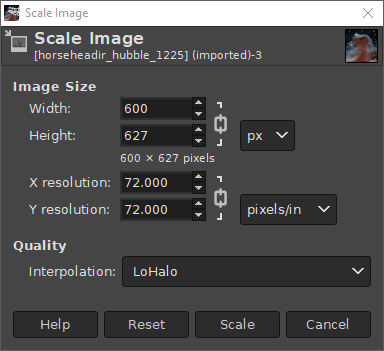
Changing the Width to 600px.
As you can see, entering 600px for the width automatically changes the height to 627px.
Also notice I have shown a different option under Quality → Interpolation. The default value for this is Cubic, but to retain the best quality it would better to use Sinc (Lanczos3).
If you want to specify a new size using a different type of value (other than Pixel size), you can change the type by clicking on the “px” spinner:
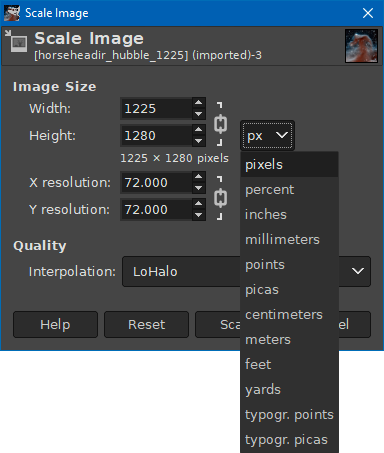
A common use for this could be if you wanted to specify a new size as a percentage of the old one. In this case you could change to “percent”, and then enter 50 in either field to scale the image in half.
Once you are done scaling the image, don’t forget to export the changes you’ve made:
File → Export…
to export as a new filename, or:
File → Overwrite {FILENAME}
to overwrite the original file (use caution).
For more detail about using Scale Image, you can see the documentation.
Negative Darkroom
Additionally to the other improvements, a new very interesting operation
appears in GEGL, contributed by Jonny Robbie: .
This operation is for artists who use hybrid workflow technique of
analog photography. After scanning a developed negative, this operation
is used to invert the scan to create a positive image by simulating the
light behaviour of darkroom enlarger and common photographic papers.
Negative Darkroom operation in GEGL 0.4.30 / GIMP 2.10.24
As all GEGL operations are automatically detected and made available by
GIMP, this new operation can be used in GIMP 2.10.24 through the generic
GEGL tool (menu then select “Negative
Darkroom (negative-darkroom)” in the dropdown list).
Creating a custom dedicated dialog for this operation has been raised
and may happen in an further version of GIMP to even more improve the
usage and experience.
GEGL
GIMP now keeps track of all GEGL-based filters that you used within one session and allows re-running them via the submenu, just like old GIMP plug-ins.
The Posterize and Desaturate color tools have been converted to regular GEGL-based filters, and both the Tile and Pagecurl filters have been converted to use GEGL buffers. A quite popular “photographic” Highpass filter commonly used for enhancing details was added to the submenu.
A way more noticeable new feature, however, is split preview for GEGL-based filters. You can compare before/after versions right on canvas and move a “curtain” around to see more of “before” or “after”, and swap their positions ( on the guide). You can also switch between vertical and horizontal division ().

Hacking
GIMP uses git as its revision control system, and the GNOME Foundation hosts all of our code repositories:
- — the GIMP application itself
- — repo for this website
- — repo for the developer site at https://developer.gnome.org
- — the GIMP user manual
- plus several others
New contributors should first introduce themselves on IRC (the #gimp channel at irc.gimp.org) and/or the relevant mailing lists:
- GIMP Developers mailing list, for those who work on the core GIMP application and plugins
- GEGL Developers mailing list for developers of the GEGL library
- GIMP GUI Developers mailing list, for working on GIMP GUI
- GIMP Web Developers mailing list, for working on this website
- GIMP Documentation mailing list, for working on the user manual
This way you can announce the changes you intend to make, ask questions, and discuss which changes would be best. It’s generally better to focus on one thing at a time. Contributing to a software project for the first time is always the hardest part, which is why we’re here to help each other. There are also websites to give you a good look at how hacking is being done in GIMP.
GIMP has a complex code base, and newcomers that might not be sure where to start should have a look at our list of bugs for newcomers:
List of bugs for new contributors
The site you should keep updated with and the site that is updated all the time with new development help guides is located at https://wiki.gimp.org/. If you have GIMP installed at the moment then there are some files you should look at in the source code that might help you a little.
-
INSTALL
(Contains most up-to-date information on building GIMP from source code) -
HACKING
(Contains a lot of information that you need to know if you want to start coding) -
README
(The main README for GIMP which should be read by everyone) -
README.i18n
(The internationalization README which should be read by translators)
Once you’ve figured out what to do, though, be bold and get to work!