Usbdeview
Содержание:
- Getting the tool
- Silicon Power Flash Drive Recovery Software
- Overview
- Вот преимущества, которые USBDeview предлагает нам в Windows
- Supported devices
- Code tour
- Run the sample
- Frequently Asked Questions
- Conduct an investigation
- Как пользоваться USBDeview
- Краткий обзор всей информации USBDeview
- ADATA USB Flash Drive Online Recovery
- Code tour
- Как найти программу для ремонта флешки
- Могу ли я удалить или удалить usbview.exe?
- Using the tool
Getting the tool
As I mentioned, the USB Device Viewer tool is a part of the Windows Driver Kit. This means that you’ll need to download and install the Kit to get the tool. However, once you find the tool, you can isolate it and then uninstall the Windows Driver Kit. Chances are that you won’t want to have the entire kit sitting around on your hard disk unnecessarily taking up space.
To begin, head over to the Windows 10 SDK page on Microsoft’s Windows Dev Center and click the Download The Standalone SDK button, shown in Figure B.
Figure B
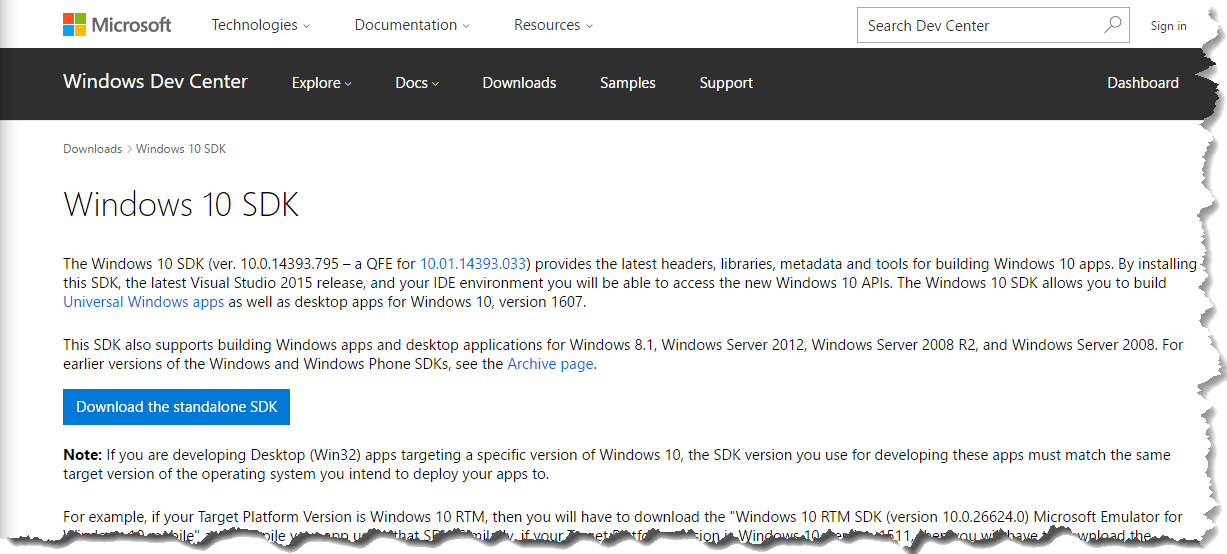
You’ll find the tool on the Windows 10 SDK page.
When the download completes, locate and run the sdksetup.exe installation. On the opening screen, select the Debugging Tools For Windows check box, as shown in Figure C. Clear all the other check boxes, then click Install. The procedure will take a few minutes to complete.
Figure C
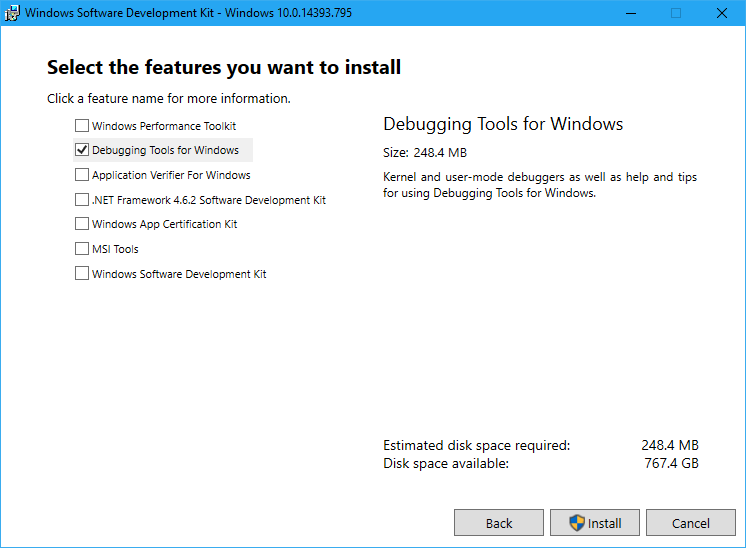
Make sure you select only the Debugging Tools For Windows check box.
Once the Windows 10 SDK is installed, launch File Explorer and navigate to the folder that matches your operating system type.
If you are running a 32-bit version of Windows 10, navigate to:
C:\Program Files (x86)\Windows Kits\10\Debuggers\x86
If you are running a 64-bit version of Windows 10, navigate to:
C:\Program Files (x86)\Windows Kits\10\Debuggers\x64
When you access the folder, locate and select these two files:
usbview.exe
usbview.exe.config
They make up the USB Device Viewer tool, as shown in Figure D.
Figure D
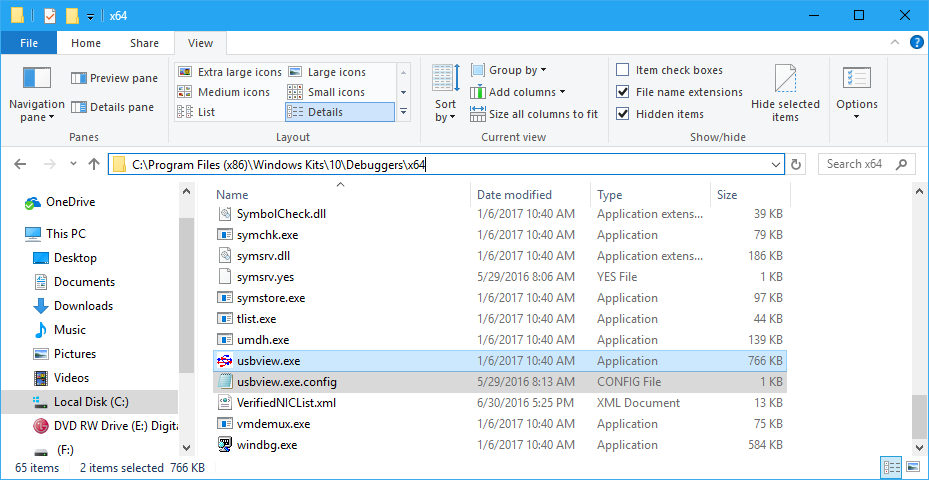
Locate and select the two files that make up the USB Device Viewer tool.
Now, copy these two files to a folder of your choice. Once you have done so, you can access the Programs And Features tool in the Control Panel and uninstall the Windows Software Development Kit, as shown in Figure E.
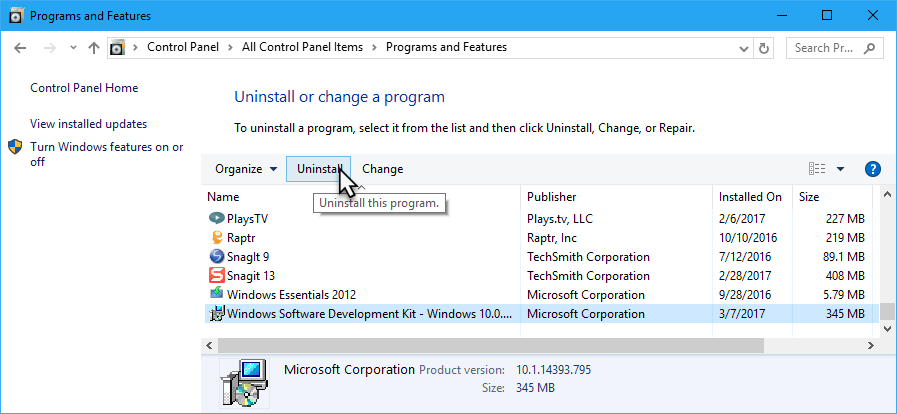
Once you isolate the files, you can uninstall the Windows Software Development Kit.
Silicon Power Flash Drive Recovery Software
На официальном сайте Silicon Power в разделе «Поддержка» представлена программа для ремонта флешек этого производителя — USB Flash Drive Recovery. Для загрузки потребуется ввести адрес электронной почты (не проверяется), затем загружается ZIP-архив UFD_Recover_Tool, в котором находится SP Recovery Utility (требует для работы компоненты .NET Framework 3.5, загрузятся автоматически при необходимости).
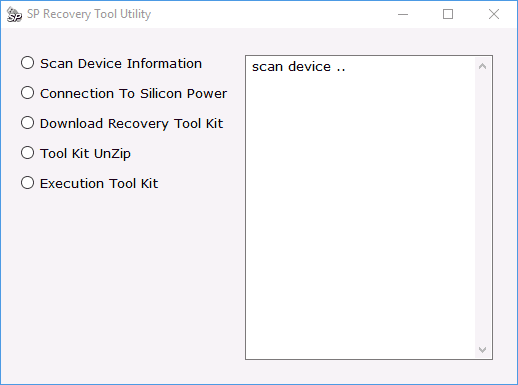
Аналогично предыдущей программе, для работы SP Flash Drive Recovery требуется подключение к Интернету и восстановление работы происходит в несколько этапов — определение параметров USB накопителя, загрузка и распаковка подходящей утилиты для него, затем — автоматическое выполнение необходимых действий.
Скачать программу для ремонта флешек Silicon Power SP Flash Drive Recovery Software можно бесплатно с официального сайта http://www.silicon-power.com/web/download-USBrecovery
Overview
When you launch the USB Device Viewer, shown in Figure F, you may see a variety of host controllers off the main branch on the tree view.
Figure F
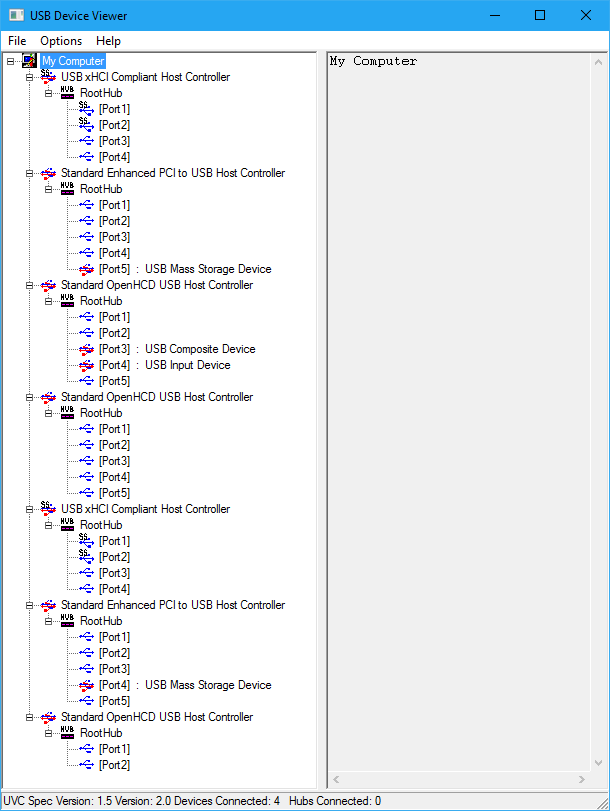
The USB Device Viewer shows all the USB host controllers in your system.
More specifically:
- A Host Controller that is identified as eXtensible or xHCI is a USB 3.0 host controller.
- A Host Controller that is identified as Enhanced or EHCI is a USB 2.0 host controller.
- A Host Controller that is identified as Universal/UHCI or Open/OpenHCD/OHCI is a USB 1.0 host controller.
You’ll also notice that there are more host controllers, hubs, and ports shown in the tree than there appear to be in your system. For example, the tree in Figure F shows seven host controllers and 30 ports, yet my computer has only eight external USB ports: two USB 2.0 ports on the front and six USB ports on the back—4 USB 2.0 and 2 USB 3.0 ports.
In a nutshell, the reason that there are so many items in the tree is that USB ports need to be able to support multiple USB versions. For example, a USB 2.0 port on your system will be connected to two host controllers—a USB 1.0 host controller and a USB 2.0 host controller. That also means that one physical port will be represented by multiple ports in the tree. Furthermore, in addition to the external USB devices that you connect to your system, there are a number of devices integrated into the PC that can be connected via a USB connection, such as an SD Card reader or a webcam.
Of course, the way USB works in Windows is far more technically detailed than my simple description, but I think you get the idea. (If you want to see the level of detail for yourself, check out the USB in Windows — FAQ page in the Microsoft Hardware Dev Center.)
Вот преимущества, которые USBDeview предлагает нам в Windows
Поэтому при необходимости или просто для того, чтобы узнать больше о каждом из ПК Порты USB, мы можем использовать сторонние решения. Мы говорим это потому, что для этого есть очень полезные программы. Фактически, в этих же строках мы собираемся поговорить об одном из них, и это позволяет нам узнать много информации по этому поводу, это USBDeview.
Стоит отметить, что речь идет о бесплатном Nirsoft приложение, которое по сути покажет нам обширный список со всеми параметры связанные с USB. Это позволит нам иметь большой объем информации о каждом из этих портов, что будет полезно в определенных случаях. Фактически, таким образом у нас будет возможность изучить все открытые данные, чтобы попытаться найти ошибки в соединителе. У нас также будет обширный объем данных, связанных с этими элементами, которые мы комментируем.
Это может быть очень полезно при определении того, какое из них использовать для каждого типа периферийного устройства, которое мы собираемся использовать. И это не то же самое, что подключить USB-память к принтеру, например, потребности каждого разные. Здесь важны такие важные вещи, как энергопотребление, скорость передачи, тип поддерживаемого порта и т. Д. Все это делается со здоровой целью — получить максимальную отдачу от наших продуктов подключен к ПК.
Supported devices
USB Network Gate (former USB to Ethernet Connector) easily connects one or more
remote USB devices to your computer over Ethernet.
Equipment
- 3D Printers
- Cameras
- Card readers
- Digital TV Tuners
- Webcams
- Personal video recorder
- Fingerprint readers
- ID card scanners
- Interactive Whiteboards
- Modems
- USB ANT Stick
- Portable Thermometers
- Multifunctionals
- Plotters, Cutters
- Printers
- Scanners
- USB Scales
- Barcode scanners
- Spectrophotometers
- Universal Programmers
- USB Monitors
- USB Wireless Presenter
- Smart Card Readers
- Digital Mixers
Communication
- BlackBerry
- Gamepads
- Graphic Tablets
- Handhelds
- Home Monitoring & Control System
- iPads & iPhones
- iPods
- Keyboards
- MIDI Controllers
- Mouse Devices
- USB Dongles
- USB DVD Drives
- Android Devices
- USB Hard Drives
- Wireless Weather Stations
- USB VOIP (Skype) Phone
- Universal remote control
Data Input/Output
- Bluetooth adapters
- Credit Card Readers
- Depth Sensors
- Elgato Turbo.264HD Hardware Accelerator
- Infrared adapters
- J2534 interface cables
- JTAG/SWD debugging interface
- KNX/EIB USB Interface
- Software Defined Receiver
- USB Adapters
- USB Graphic Adapter
- USB Network interfaces
- USB Satellite Receivers
- USB sound cards/headsets
- USB TAPs
- USB to COM cables
- USB Wi-Fi adapters
Code tour
| File manifest | Description |
|---|---|
| Resource.h | ID definitions for GUI controls |
| Usbdesc.h | USB descriptor type definitions |
| Usbview.h | Main header file for this sample |
| Vndrlist.h | List of USB Vendor IDs and vendor names |
| Debug.c | Assertion routines for the checked build |
| Devnode.c | Routines for accessing DevNode information |
| Dispaud.c | Routines for displaying USB audio class device information |
| Enum.c | Routines for displaying USB device information |
| Usbview.c | Entry point and GUI handling routines |
The major topics covered in this tour are:
-
GUI handling routines
-
Device enumeration routines
-
Device information display routines
The file Usbview.c contains the sample application entry point and GUI handling routines. On entry, the main application window is created, which is actually a dialog box as defined in Usbview.rc. The dialog box consists of a split window with a tree view control on the left side and an edit control on the right side.
The routine RefreshTree() is called to enumerate USB host controller, hubs, and attached devices and to populate the device tree view control. RefreshTree() calls the routine EnumerateHostControllers() in Enum.c to enumerate USB host controller, hubs, and attached devices. After the device tree view control has been populated, USBView_OnNotify() is called when an item is selected in the device tree view control. This calls UpdateEditControl() in Display.c to display information about the selected item in the edit control.
The file Enum.c contains the routines that enumerate the USB bus and populate the tree view control. The USB device enumeration and information collection process is the main point of this sample application. The enumeration process starts at EnumerateHostControllers() and goes like this:
-
Enumerate Host Controllers and Root Hubs. Host controllers have symbolic link names of the form HCDx, where x starts at 0. Use CreateFile() to open each host controller symbolic link. Create a node in the tree view to represent each host controller. After a host controller has been opened, send the host controller an IOCTL_USB_GET_ROOT_HUB_NAME request to get the symbolic link name of the root hub that is part of the host controller.
-
Enumerate Hubs (Root Hubs and External Hubs). Given the name of a hub, use CreateFile() to open the hub. Send the hub an IOCTL_USB_GET_NODE_INFORMATION request to get info about the hub, such as the number of downstream ports. Create a node in the tree view to represent each hub.
-
Enumerate Downstream Ports. Given a handle to an open hub and the number of downstream ports on the hub, send the hub an IOCTL_USB_GET_NODE_CONNECTION_INFORMATION request for each downstream port of the hub to get info about the device (if any) attached to each port. If there is a device attached to a port, send the hub an IOCTL_USB_GET_NODE_CONNECTION_NAME request to get the symbolic link name of the hub attached to the downstream port. If there is a hub attached to the downstream port, recurse to step (2). Create a node in the tree view to represent each hub port and attached device. USB configuration and string descriptors are retrieved from attached devices in GetConfigDescriptor() and GetStringDescriptor() by sending an IOCTL_USB_GET_DESCRIPTOR_FROM_NODE_CONNECTION() to the hub to which the device is attached.
The file Display.c contains routines that display information about selected devices in the application edit control. Information about the device was collected during the enumeration of the device tree. This information includes USB device, configuration, and string descriptors and connection and configuration information that is maintained by the USB stack. The routines in this file simply parse and print the data structures for the device that were collected when it was enumerated. The file Dispaud.c parses and prints data structures that are specific to USB audio class devices.
Run the sample
Manual deployment to a remote target computer
If you want to debug the sample app on a remote computer,
-
Copy the executable to a folder on the remote computer.
-
Specify project properties as per the instructions given in Remote Debugging.
-
Change Debugger to launch to Remote Windows Debugger.
-
On the Debug menu, select Start debugging or hit F5.
View a USB device in Usbview
-
Attach a USB device to one of USB ports on the computer that has Usbview running.
-
In the device tree, locate the device. For example the device might be under the Intel(R) ICH10 Family USB Universal Host Controller — 3A34 > Root Hub node.
-
View host controller and port properties on the right pane.
Frequently Asked Questions
The USB server is a machine to which the USB gadget you need to share is connected physically. The client is a computer from which you will connect to the shared USB over the Internet.
No, the software license is not required for establishing client connections to shared devices. However, you will need to register your USB Network Gate copy on the server computer to be able to share your devices over the network.
You can share a device on a USB Network Gate server even if the device drivers are not installed locally. The device drivers need to be installed only on the client machine from which you will remotely connect to the shared device.
USB Network Gate works with USB devices of virtually any type. The software is not limited to particular device models. The program is compatible with specialized USB equipment including fingerprint readers, ID card scanners, interactive whiteboards, modems, etc. Plus, with a wide range of other popular devices, e.i. USB dongle keys, USB DVD drives, Android devices, USB hard drives, Bluetooth adapters, USB sound headsets, keyboards, and many others.
Yes, USB Network Gate makes it possible to connect to iPhones and other iOS devices remotely without a hardware adapter by providing access to them over both your local network and the Internet.
Conduct an investigation
Now that you have an idea of how you can track USB devices in the USB Device Viewer and what kind of information it displays, you can begin a more detailed investigation of the USB ports in your PC. For example, I took a USB mouse and two USB flash drives—one a USB 2.0 device and one a USB 3 device—and one by one connected them to each of the ports on my PC and monitored the tree in USB Device Viewer. I then noted each host controller and the port number that was used for each connection.
Microsoft Weekly Newsletter
Be your company’s Microsoft insider by reading these Windows and Office tips, tricks, and cheat sheets.
Delivered Mondays and Wednesdays
Sign up today
Как пользоваться USBDeview
Запускаем программу, просто кликнув по ярлыку в папке, куда мы ее разархивировали. Появится окно, в котором представлено огромное количество данных – название устройств, их номера, когда были подключены впервые, прошивка устройства, характеристики и мн. др.
Если какие-то пункты с информацией вам не важны, вы запросто можете их отключить в Меню -Вид.
Также в настройках программы вы можете адаптировать ее под собственные нужды – здесь очень много параметров настраиваются.
Кроме того, вы можете посмотреть развернутую информацию о том устройстве, который выберите из представленного списка.
Итак, USBDeview – это незаменимая программа для тех, кто сталкивается с необходимостью контролировать или собирать информацию о USB-устройствах, подключаемых к компьютеру. На сегодняшний день это самая простая и эффективная утилита для подобных задач.
Может быть полезной статья: USB Disk Security — программа для лечения флешки от вирусов.
- https://remontka.pro/usb-repair-software/
- https://download-software.ru/usbdeview.html
- https://comp-doma.ru/usbdeview.html
Краткий обзор всей информации USBDeview
Как мы уже упоминали ранее, количество дата относящихся к каждому USB оборудования, которое здесь предлагается, очень много. Чтобы их прочитать, нам нужно пройти через интерфейс USBDeview, но мы предложим вам более удобный способ. Таким образом, например, если у нас есть проблема с конкретным портом, и мы хотим сразу увидеть всю его информацию, мы снова получаем доступ к Контекстное меню того, что порт .
Таким образом, после щелчка по нему второй кнопкой мыши в данном случае мы выбрали параметр «Свойства». Затем на экране появится новое окно, где мы увидим все данные, предлагаемые в основном интерфейсе, но гораздо более доступным способом.
ADATA USB Flash Drive Online Recovery
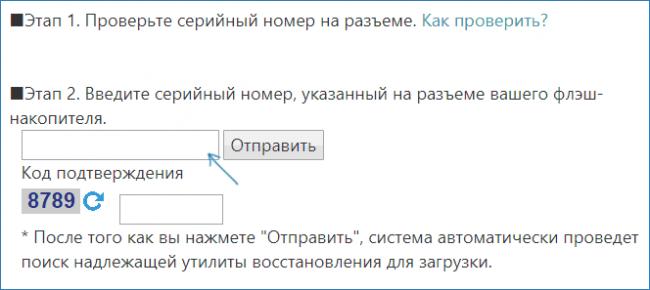
У производителя Adata также имеется своя утилита, которая поможет исправить ошибки флешки, если не удается прочитать содержимое флешки, Windows сообщает, что диск не отформатирован или вы видите другие ошибки, связанные с накопителем. Для загрузки программы потребуется ввести серийный номер флешки (чтобы загрузилось именно то, что требуется) как на скриншоте ниже.
После загрузки — запустить скачанную утилиту и выполнить несколько простых шагов по восстановлению работы USB устройства.
Официальная страница, где можно скачать ADATA USB Flash Drive Online Recovery и прочитать об использовании программы — http://www.adata.com/ru/ss/usbdiy/
Code tour
| File manifest | Description |
|---|---|
| Resource.h | ID definitions for GUI controls |
| Usbdesc.h | USB descriptor type definitions |
| Usbview.h | Main header file for this sample |
| Vndrlist.h | List of USB Vendor IDs and vendor names |
| Debug.c | Assertion routines for the checked build |
| Devnode.c | Routines for accessing DevNode information |
| Dispaud.c | Routines for displaying USB audio class device information |
| Enum.c | Routines for displaying USB device information |
| Usbview.c | Entry point and GUI handling routines |
The major topics covered in this tour are:
- GUI handling routines
- Device enumeration routines
- Device information display routines
The file Usbview.c contains the sample application entry point and GUI handling routines. On entry, the main application window is created, which is actually a dialog box as defined in Usbview.rc. The dialog box consists of a split window with a tree view control on the left side and an edit control on the right side.
The routine RefreshTree() is called to enumerate USB host controller, hubs, and attached devices and to populate the device tree view control. RefreshTree() calls the routine EnumerateHostControllers() in Enum.c to enumerate USB host controller, hubs, and attached devices. After the device tree view control has been populated, USBView_OnNotify() is called when an item is selected in the device tree view control. This calls UpdateEditControl() in Display.c to display information about the selected item in the edit control.
The file Enum.c contains the routines that enumerate the USB bus and populate the tree view control. The USB device enumeration and information collection process is the main point of this sample application. The enumeration process starts at EnumerateHostControllers() and goes like this:
- Enumerate Host Controllers and Root Hubs. Host controllers have symbolic link names of the form HCDx, where x starts at 0. Use CreateFile() to open each host controller symbolic link. Create a node in the tree view to represent each host controller. After a host controller has been opened, send the host controller an IOCTL_USB_GET_ROOT_HUB_NAME request to get the symbolic link name of the root hub that is part of the host controller.
- Enumerate Hubs (Root Hubs and External Hubs). Given the name of a hub, use CreateFile() to open the hub. Send the hub an IOCTL_USB_GET_NODE_INFORMATION request to get info about the hub, such as the number of downstream ports. Create a node in the tree view to represent each hub.
- Enumerate Downstream Ports. Given a handle to an open hub and the number of downstream ports on the hub, send the hub an IOCTL_USB_GET_NODE_CONNECTION_INFORMATION request for each downstream port of the hub to get info about the device (if any) attached to each port. If there is a device attached to a port, send the hub an IOCTL_USB_GET_NODE_CONNECTION_NAME request to get the symbolic link name of the hub attached to the downstream port. If there is a hub attached to the downstream port, recurse to step (2). Create a node in the tree view to represent each hub port and attached device. USB configuration and string descriptors are retrieved from attached devices in GetConfigDescriptor() and GetStringDescriptor() by sending an IOCTL_USB_GET_DESCRIPTOR_FROM_NODE_CONNECTION() to the hub to which the device is attached.
The file Display.c contains routines that display information about selected devices in the application edit control. Information about the device was collected during the enumeration of the device tree. This information includes USB device, configuration, and string descriptors and connection and configuration information that is maintained by the USB stack. The routines in this file simply parse and print the data structures for the device that were collected when it was enumerated. The file Dispaud.c parses and prints data structures that are specific to USB audio class devices.
Как найти программу для ремонта флешки
На самом деле такого рода бесплатных утилит для ремонта флешек куда больше, чем здесь перечислено: я постарался учесть лишь относительно «универсальные» инструменты для USB накопителей разных производителей.
Вполне возможно, что ни одна из вышеперечисленных утилит не подходит для того, чтобы восстановить работоспособность вашего USB накопителя. В этом случае, вы можете воспользоваться следующими шагами, чтобы найти нужную программу.
Загрузите утилиту Chip Genius или Flash Drive Information Extractor, с помощью нее вы можете узнать, какой контроллер памяти используется в вашем накопителе, а также получить данные VID и PID, которые пригодятся на следующем шаге. Загрузить утилиты можно со страниц: http://www.usbdev.ru/files/chipgenius/ и http://www.usbdev.ru/files/usbflashinfo/ соответственно
После того, как эти данные вам известны, зайдите на сайт iFlash http://flashboot.ru/iflash/ и введите в поле поиска VID и PID, полученные в предыдущей программе.
В результатах поиска, в столбце Chip Model обратите внимание на те накопители, в которых используется тот же контроллер, что и у вас и посмотрите на предлагаемые утилиты для ремонта флешки в столбце Utils. Остается только найти и скачать соответствующую программу, после чего посмотреть, подходит ли она для ваших задач.
Дополнительно: если все описанные способы отремонтировать USB накопитель не помогли, попробуйте Низкоуровневое форматирование флешки.
USBDeview2.85
USBDeview – бесплатная утилита, представляющая собой инструмент ведущий учёт любых подключённых к компьютеру USB девайсов (флеш-карты, смартфоны, фотоаппараты и пр.) и позволяющий управлять ими. Скачать программу USBDeview бесплатно на русском языке предлагаем по прямой ссылке в конце страницы.
| Версия | 2.85 |
|---|---|
| Обновлено | 26.11.2019 |
| Размер | 0,084 Мб / 0,111 Мб x64 |
| Категория | Система / Утилиты |
| Разработчик | NirSoft |
| Система | Windows 7, Windows 8, Windows 8.1, Windows 10, Vista, Windows XP |
| Интерфейс | Русский, Английский |
| Лицензия | Бесплатно |
Возможности этой утилиты не только в отображении списка подключённых USB устройств, но и получить полную информацию о подключении (дата и время добавления устройства, время последнего использования, название, тип, серийный номер и прочие технические характеристики). Эта информация может быть выгружена в TXT, HTML, XML форматы.
Могу ли я удалить или удалить usbview.exe?
Не следует удалять безопасный исполняемый файл без уважительной причины, так как это может повлиять на производительность любых связанных программ, использующих этот файл. Не забывайте регулярно обновлять программное обеспечение и программы, чтобы избежать будущих проблем, вызванных поврежденными файлами. Что касается проблем с функциональностью программного обеспечения, проверяйте обновления драйверов и программного обеспечения чаще, чтобы избежать или вообще не возникало таких проблем.
Согласно различным источникам онлайн,
2% людей удаляют этот файл, поэтому он может быть безвредным, но рекомендуется проверить надежность этого исполняемого файла самостоятельно, чтобы определить, является ли он безопасным или вирусом. Лучшая диагностика для этих подозрительных файлов — полный системный анализ с , Если файл классифицирован как вредоносный, эти приложения также удалят usbview.exe и избавятся от связанных вредоносных программ.
Однако, если это не вирус, и вам нужно удалить usbview.exe, вы можете удалить X86 Debuggers And Tools с вашего компьютера, используя его деинсталлятор, который должен находиться по адресу: MsiExec.exe / I {9CDA0CA0-521C-7DC2- A170-7610A8342062}. Если вы не можете найти его деинсталлятор, вам может понадобиться удалить X86 Debuggers And Tools, чтобы полностью удалить usbview.exe. Вы можете использовать функцию «Установка и удаление программ» на панели управления Windows.
1. в Меню Пуск (для Windows 8 щелкните правой кнопкой мыши в нижнем левом углу экрана), нажмите Панель управления, а затем под Программы:
o Windows Vista / 7 / 8.1 / 10: нажмите Удаление программы.
o Windows XP: нажмите Установка и удаление программ.
2. Когда вы найдете программу Отладчики и инструменты X86щелкните по нему, а затем:
o Windows Vista / 7 / 8.1 / 10: нажмите Удалить.
o Windows XP: нажмите Удалить or Изменить / Удалить вкладка (справа от программы).
3. Следуйте инструкциям по удалению Отладчики и инструменты X86.
Using the tool
Despite the complexity of USB in Windows, the USB Device Viewer is easy to use for tracking down USB connections. As you can see, the tree shows which ports have devices connected to them and which don’t. Ports with connected devices show a blue and red USB icon, while ports not currently in use show a blue USB icon. Adjacent to the ports in use you’ll also see a generic name on the right.
When you select a port that is in use, you’ll see a screen full of detailed information about the connected USB device. As you can see in Figure G, I’ve selected Port 5 on the first Enhanced host controller. The information in the accompanying screen tells me that 1) it is a mass storage device, 2) it is an internal port, 3) it supports multiple USB versions, and 4) the vendor is Realtek Semiconductor. As such, I can deduce that this USB port runs the SD card reader on the front of my PC.
Figure G
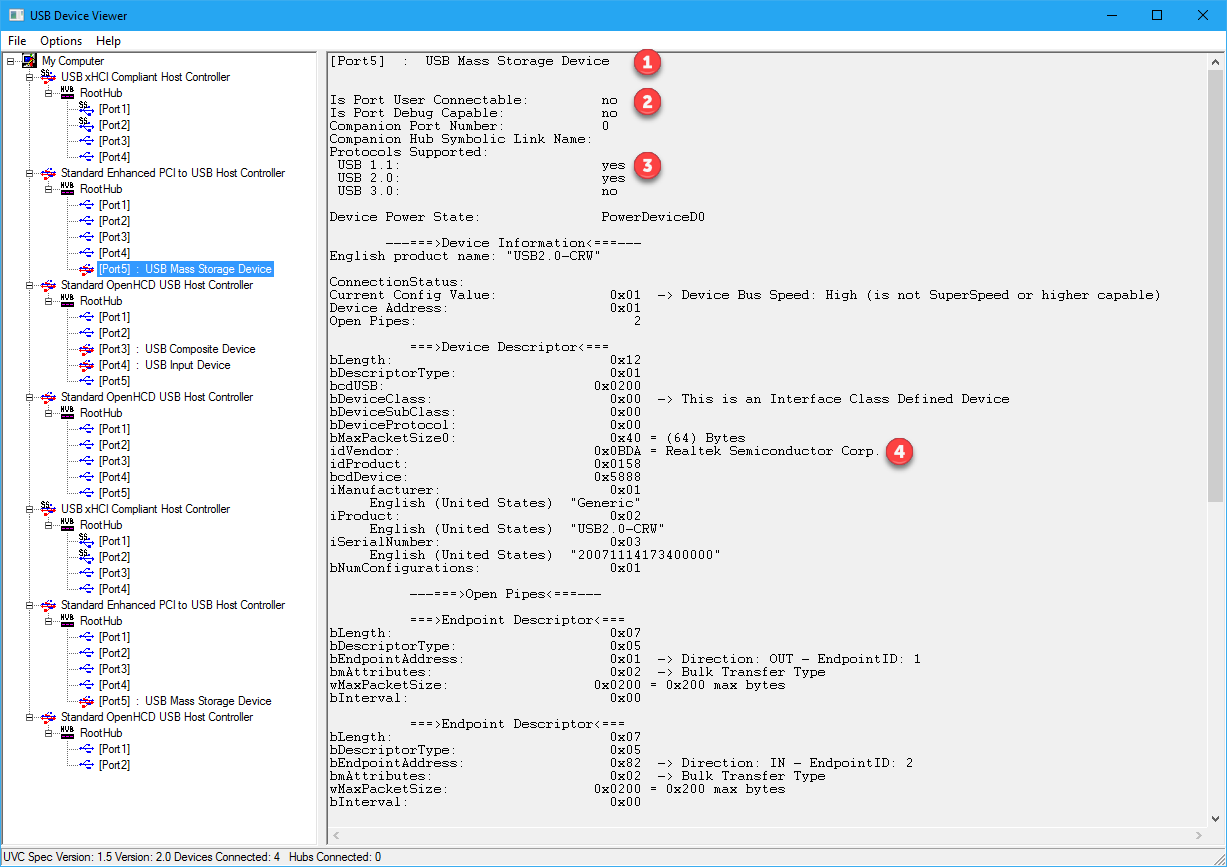
When you select a port that’s in use, you’ll see a screen full of detailed information.
In Figure H, you can see that I’ve selected Port 5 on the second Enhanced host controller. The information in the accompanying screen tells me that 1) it is a mass storage device, 2) it is an external port, 3) it supports multiple USB versions, 4) it is a USB 3.0 device, and 5) the vendor is SanDisk. So I can deduce that the device plugged to this USB port is my 4GB SanDisk USB 3 flash drive, and since it is connected to the USB 2.0 port on the front of my PC, I can now specifically identify this port and host controller.
Figure H

This is Port 5 on the second Enhanced host controller.
In Figure I, you can see that I’ve selected Port 4 on the first Open HCD host controller. The information in the accompanying screen tells me that 1) it is a input device, 2) it is an external port, 3) it does not support multiple USB versions, 4) it is a USB 1.0 device, and 5) this is the Microsoft mouse connected to the USB 2.0 port on the back of my PC.