Установка gcc в windows 10
Содержание:
- Step through the code
- See Also
- Introduction
- About This Article
- Pre-built toolchains and packages
- Step through the code
- Устанавливаем драйвера на st-link v2
- Установка
- GCC 10.3
- Установка MinGW
- 3- Installing MSYS2 on your PC
- Prerequisites
- Test the New Compiler
- Microsoft Windows
- Install Cygwin
- Install C on Windows
- Интерпретатор C / C++ Ch Embeddable (стандартная версия)
- Архитектура
- Install C on MAC
- Debug helloworld.cpp
Step through the code
Now you’re ready to start stepping through the code.
-
Select the Step over icon in the debugging control panel until the statement is highlighted.
The Step Over command skip over all the internal function calls within the and classes that are invoked when the variable is created and initialized. Notice the change in the Variables window on the left. In this case, the errors are expected because, although the variable names for the loop are now visible to the debugger, the statement has not executed yet, so there is nothing to read at this point. The contents of are visible, however, because that statement has completed.
-
Press Step over again to advance to the next statement in this program (skipping over all the internal code that is executed to initialize the loop). Now, the Variables window shows information about the loop variables.
-
Press Step over again to execute the statement. Note As of the March 2019 version of the extension, no output is displayed until the loop completes.
-
If you like, you can keep pressing Step over until all the words in the vector have been printed to the console. But if you are curious, try pressing the Step Into button to step through source code in the C++ standard library!
To return to your own code, one way is to keep pressing Step over. Another way is to set a breakpoint in your code by switching to the tab in the code editor, putting the insertion point somewhere on the statement inside the loop, and pressing F9. A red dot appears in the gutter on the left to indicate that a breakpoint has been set on this line.
Then press F5 to start execution from the current line in the standard library header. Execution will break on . If you like, you can press F9 again to toggle off the breakpoint.
See Also
Articles
- Cross-Compiler Successful Builds — combinations of GCC and Binutils which have been shown to work with this tutorial by OSDev.org members.
- Target Triplet — on target triplets and their use
- OS Specific Toolchain — going a step further and adding your own target.
- LLVM Cross-Compiler — some compilers make things much easier.
- Canadian Cross — making things yet more complicated.
Prebuilt Toolchains
These were built by people in the OSdev community for their own building needs and shared at will, without guaranteeing any support or that it will even work on your setup. YMMV.
Latests versions for Linux (many arch)
kernel.org various hosts/targets
For Linux i686 host
For Linux x86_64 host
i386-elf & i686-elf 7.1.0 target uploaded by TheAlmostGenius
The packages from phillid.tk below have been shrunk to about 10 MiB for each pair of packages (GCC & Binutils).
Please note that this has been achieved by enabling only the C front-end for GCC.
If you’re going to write your OS in any language but C or Assembly, these packages aren’t for you.
These are actually Pacman packages, but untarring them to / and rm-ing /.MTREE and other clutter dotfiles contained in the package will work the same.
For Windows host
For Windows Subsystem for Linux (Beta) host
i686-elf 6.1.0 target (extracts to a directory called «cross», don’t forget to install ‘make’ — I would recommend «apt-get install build-essential» to also add additional useful tools)
For macOS host
$ brew install x86_64-elf-gcc
ARM prebuilt toolchains for multiple host platforms
ARM provides it’s own prebuilt toolchain based upon GNU utilities for development targeting ARM systems.
GNU ARM Embedded Toolchain
Docker image
i686-elf 8.1.0 target
Introduction
Generally speaking, a cross-compiler is a compiler that runs on platform A (the host), but generates executables for platform B (the target). These two platforms may (but do not need to) differ in CPU, operating system, and/or executable format. In our case, the host platform is your current operating system and the target platform is the operating system you are about to make. It is important to realize that these two platforms are not the same; the operating system you are developing is always going to be different from the operating system you currently use. This is why we need to build a cross-compiler first, you will most certainly run into trouble otherwise.
Why cross-compilers are necessary
- Main article: Why do I need a Cross Compiler?
You need to use a cross-compiler unless you are developing on your own operating system. The compiler must know the correct target platform (CPU, operating system), otherwise you will run into trouble. If you use the compiler that comes with your system, then the compiler won’t know it is compiling something else entirely. Some tutorials suggest using your system compiler and passing a lot of problematic options to the compiler. This will certainly give you a lot of problems in the future and the solution is build a cross-compiler. If you have already attempted to make an operating system without using a cross-compiler, please read the article Why do I need a Cross Compiler?.
Which compiler version to choose
- Main article: Building GCC
The newest GCC is recommended as it is the latest and greatest release. For instance, you may run into trouble if you use GCC 4.6.3 to build a GCC 4.8.0 cross-compiler. If you are not using the latest major GCC release for your system compiler, we recommend that you build the newest GCC as your system compiler.
You can also use older releases as they are usually reasonably good. If your local system compiler isn’t too terribly old (at least GCC 4.6.0), you may wish to save yourself the trouble and just pick the latest minor release (such as 4.6.3 if your system compiler is 4.6.1) for your cross-compiler.
You can view your current compiler version by invoking:
gcc --version
You may be able to use an older major GCC release to build a cross-compiler of a newer major GCC release. For instance, GCC 4.7.3 may be able to build a GCC 4.8.0 cross-compiler. However, if you want to use the latest and greatest GCC version for your cross-compiler, we recommend that you bootstrap the newest GCC as your system compiler first. Individuals using OS X 10.7 or earlier might want to invest in either building a system GCC (that outputs native Mach-O), or upgrading the local LLVM/Clang installation. Users with 10.8 and above should install the Command Line Tools from Apple’s developer website and use Clang to cross-compile GCC.
Which binutils version to choose
- Main article: Cross-Compiler Successful Builds
We recommend that you use the latest and greatest Binutils release. Note, however, that not all combinations of GCC and Binutils work. If you run into trouble, use a Binutils that was released at roughly the same time as your desired compiler version. You probably need at least Binutils 2.22, or preferably the latest 2.23.2 release. It doesn’t matter what Binutils version you have installed on your current operating system. You can find out the binutils version for example by this command:
ld --version
Deciding on the target platform
- Main article: Target Triplet
You should already know this. If you are following the Bare Bones tutorial, you wish to build a cross-compiler for i686-elf.
Note on arm-none-eabi-gcc
There is the prebuilt package gcc-arm-none-eabi on apt-get for Debiab/Ubuntu, but you shouldn’t use it because it neither contains a libgcc.a nor freestanding C header files like stdint.h.
Instead you should build it yourself with arm-none-eabi being the $TARGET.
About This Article
Written by:
Nicole Levine, MFA
Tech Specialist
This article was written by Nicole Levine, MFA. Nicole Levine is a Technology Writer and Editor for wikiHow. She has more than 20 years of experience creating technical documentation and leading support teams at major web hosting and software companies. Nicole also holds an MFA in Creative Writing from Portland State University and teaches composition, fiction-writing, and zine-making at various institutions. This article has been viewed 873,045 times.
How helpful is this?
Co-authors: 36
Updated: September 29, 2020
Views: 873,045
Categories: C Programming Languages
1. Open the Terminal in Linux.
2. Type «sudo apt update» and press Enter.
3. Type «sudo apt install build-essential» and press Enter to install GCC and other packages.
4. Type «gcc —version» to verify the GCC installation.
5. Use the «CD» command to navigate to the folder with your source code.
6. Type «gcc .c –o » to compile the program.
7. Type «»./» to run the newly compiled program.
Did this summary help you?YesNo
Español:compilar un programa en C usando el compilador GNU (GCC)
Italiano:Compilare un Programma C Utilizzando il Compilatore GNU GCC
Português:Compilar um Programa Usando o Compilador GNU (GCC)
Русский:скомпилировать программу C, используя компилятор GNU Compiler (GCC)
Deutsch:Ein C Programm mit dem GNU Compiler (GCC) kompilieren
Bahasa Indonesia:Mengompilasi Program C dengan GNU C Compiler (GCC)
Français:compiler un programme en C avec le compilateur GNU GCC
ไทย:Compile โปรแกรมภาษา C ด้วย GNU Compiler (GCC)
Nederlands:Een C programma compileren met de GNU compiler
العربية:ترجمة برنامج بلغة سي باستخدام مترجم جي إن يو
Tiếng Việt:Biên dịch chương trình C bằng GNU (GCC)
中文:使用GNU编译器(GCC)编译C程序
Türkçe:C Programları GNU Compiler (GCC) ile Nasıl Derlenir
한국어:GNU 컴파일러로(GCC) C 프로그램 컴파일 하는 법
हिन्दी:जीएनयू कम्पाइलर से C प्रोग्राम कंपाइल करें (Compile a C Program Using the GNU Compiler (GCC)
日本語:GNUコンパイラコレクション(GCC)でCプログラムをコンパイルする
Pre-built toolchains and packages
| Version | Host | GCC / Mingw-w64 Version | Languages | Additional Software in Package Manager | |
|---|---|---|---|---|---|
| Arch Linux | Ada, C, C++, Fortran, Obj-C, Obj-C++ | many | |||
| Rolling | Windows | 5.4.0/5.0.2 | Ada, C, C++, Fortran, Obj-C | 5 (bzip2, libgcrypt, libgpg-error, minizip, xz, zlib) | |
| Debian 7 (Wheezy) | 4.6.3/2.0.3 | Ada, C, C++, Fortran, Obj-C, Obj-C++, OCaml | 2 (gdb, nsis) | ||
| Debian 8 (Jessie) | 4.9.1/3.2.0 | ||||
| Debian 9 (Stretch) | 6.3.0/5.0.0 | 9 (gdb, libassuan, libgcrypt, libgpg-error, libksba, libnpth, nsis, win-iconv, zlib) | |||
| Debian 10 (Buster) | 8.3.0/6.0.0 | ||||
| Fedora 19 | 4.8.1/? | Ada, C, C++, Fortran, Obj-C, Obj-C++ | 149+ | ||
| 20210423 | Windows, Linux | LLVM 12.0.0/trunk | C, C++ | make | |
| Rolling | macOS | C, C++, Fortran, Obj-C, Obj-C++ | 1 (nsis) | ||
| Rolling | Windows | 7.2.0/5.0.3 | C, C++, Fortran | 4 (gdb, libiconf, python, zlib) | |
| Rolling | Windows | Ada, C, C++, Fortran, Obj-C, Obj-C++, OCaml | many | ||
| 12.04 Precise Pangolin | 4.6.3/2.0.1 | Ada, C, C++, Fortran, Obj-C, Obj-C++, OCaml | 2 (nsis, gdb) | ||
| 14.04 Trusty Tahr | 4.8.2/3.1.0 | ||||
| 14.10 Utopic Unicorn | 4.9.1/3.1.0 | ||||
| 15.04 Vivid Vervet | 4.9.2/3.2.0 | ||||
| 15.10 Wily Werewolf | 4.9.2/4.0.2 | ||||
| 16.04 Xenial Xerus | 5.3.1/4.0.4 | 3 (nsis, gdb, zlib) | |||
| 1.5 | Windows, Linux | 4.8.3/3.3.0 | C, C++ | 91+ |
Installation:
- Community repository (toolchain)
- AUR repository (additional packages)
Cygwin
Cygwin is a Unix-like environment and command-line
interface for Microsoft Windows. Its core is the cygwin1.dll library which
provides POSIX functionality on top of the Win32 API. It can be used as a build
environment which targets Windows directly and for which output doesn’t depend
on cygwin1.dll.
Installation is done through cygwin’s package manager:
setup.exe.
As part of the numerous packages in cygwin, there are cross-compilation
toolchains which target both 32 bits and 64 bits; their names start with
“mingw64-”.
Once they are installed, they should be used according to the general
cross-compilation approach.
LLVM-MinGW
LLVM-MinGW is a toolchain built with Clang, LLD, libc++, targeting
i686, x86_64, arm and aarch64 (ARM64), with releases both for running
as a cross compiler from Linux and for running on Windows. It supports
Address Sanitizer, Undefined Behaviour Sanitizer, and generating debug
info in PDB format.
MacPorts
To install just the 32-bit or just 64-bit compiler with dependencies, use:
A shortcut to install both:
Here is the list of Mingw-w64 packages on MacPorts.
Win-Builds
Win-builds is a cross-platform project that makes building for Windows easy. It
supports building from both Windows and Linux systems and provides many
pre-built libraries which can be installed through a graphical package manager.
It aims for stability while still providing recent versions of software
packages.
Installation: http://win-builds.org.
Step through the code
Now you’re ready to start stepping through the code.
-
Click or press the Step over icon in the debugging control panel.
This will advance program execution to the first line of the for loop, and skip over all the internal function calls within the and classes that are invoked when the variable is created and initialized. Notice the change in the Variables window on the left.
In this case, the errors are expected because, although the variable names for the loop are now visible to the debugger, the statement has not executed yet, so there is nothing to read at this point. The contents of are visible, however, because that statement has completed.
-
Press Step over again to advance to the next statement in this program (skipping over all the internal code that is executed to initialize the loop). Now, the Variables window shows information about the loop variables.
-
Press Step over again to execute the statement. (Note that as of the March 2019 release, the C++ extension does not print any output to the Debug Console until the loop exits.)
-
If you like, you can keep pressing Step over until all the words in the vector have been printed to the console. But if you are curious, try pressing the Step Into button to step through source code in the C++ standard library!
To return to your own code, one way is to keep pressing Step over. Another way is to set a breakpoint in your code by switching to the tab in the code editor, putting the insertion point somewhere on the statement inside the loop, and pressing F9. A red dot appears in the gutter on the left to indicate that a breakpoint has been set on this line.
Then press F5 to start execution from the current line in the standard library header. Execution will break on . If you like, you can press F9 again to toggle off the breakpoint.
When the loop has completed, you can see the output in the Debug Console tab of the integrated terminal, along with some other diagnostic information that is output by GDB.
Устанавливаем драйвера на st-link v2
Внизу страницы скачиваем файл «STSW-LINK009» с описанием «ST-LINK, ST-LINK/V2, ST-LINK/V2-1 USB driver signed for Windows7, Windows8, Windows10».
При переходе на другую страницу нажимаем «Download» в нижней части страницы
Тут важно заметить, что если вы сидите в интернете не через VPN, то вам придется зарегистрироваться. Как это делать, я описывать не буду
После чего файл будет скачен.
Разархивировав архив выбираем файл установки драйвера согласно разрядности ОС. В моем случае, это «dpinst_amd64.exe».
Во время установки соглашаемся со всеми требованиями. И выбираем чекбокс «Всегда доверять программному обеспечению STMicroelectronics».
Установка
Далее действуйте по инструкции
Двойной клик на mingw-17.1.exe


После установки нужно добавить C:\MinGW\bin в системную переменную среды PATH.
Если Вы не знаете как это сделать, прочитайте мою статью
Теперь команда gcc —version должна возвращать версию компилятора.
gcc —version
Microsoft Windows
(c) 2019 Microsoft Corporation. All rights reserved.
C:\Users\Andrei>gcc —version
gcc (GCC) 9.2.0
Copyright (C) 2019 Free Software Foundation, Inc.
This is free software; see the source for copying conditions. There is NO
warranty; not even for MERCHANTABILITY or FITNESS FOR A PARTICULAR PURPOSE.
Если этого не происходит — перезапустите консоль. Если не помогло — перезапустите
Windows.
GCC 10.3
This is the list
of problem reports (PRs) from GCC’s bug tracking system that are
known to be fixed in the 10.3 release. This list might not be
complete (that is, it is possible that some PRs that have been fixed
are not listed here).
Target Specific Changes
AArch64
-
A bug with the Random Number intrinsics in the header
that resulted in an incorrect status result being returned has been fixed. - GCC now supports the Fujitsu A64FX. The associated
and options are and
respectively. In particular,
generates code for Armv8.2-A with SVE and
tunes the code for the A64FX. This includes tuning the SVE code,
although by default the code is still length-agnostic and so works for
all SVE implementations. Adding
makes the code specific to 512-bit SVE.
GCC 10.3 supports AMD CPUs based on the znver3 core
via -march=znver3.
Установка MinGW
Для установки требуется подключение к сети интернет.
Запустите установщик, он скачает и установит все необходимые файлы.
Жмите «Next».
Диалог сообщает нам, что программа запущена администратором компьютера и будет установлена для всех пользователей.
На этом этапе укажем загружать последнюю версию программного обеспечения.
Соглашаемся с условиями лицензионного соглашения и жмём «Next».
Укажем путь для установки. Не рекомендуется устанавливать в директорию или субдиректорию имеющюю в своём имени пробелы.
Рзмещайте все файлы по стандартному пути, например, «C:\MinGW».
Настройка ярлыков, можно оставить как есть и нажать «Next».
Выбор компонентов для установки.
В данном случае выбраны компилятор С и С++, инструменты для разработки и комплект утилит командной строки — MSYS.
Подтверждение настроек.
Если всё выбрано правильно, жмём «Install».
Начало установки — ожидаем начала загрузки компонентов.
Автоматически запускается консольное окно, в котором отражается весь ход процесса — в данный момент загружаются списки пакетов.
В следующем окне мы можем наблюдать за прогрессом загрузки.
Установка окончена, если вы не хотите читать подробный отчёт о процессе установки, снимите галочку.
Закройте окно установщика — нажмите «Finish».
Проверим, готова ли операционная система для полноценной работы с MinGW. В свойствах компьютера на вкладке «Дополнительно» кликните по кнопке «Переменные среды».
Нам потребуется значение переменной PATH, там должны быть прописаны пути к папкам с исполняемыми файлами MinGW и MSYS, в данном случае это директории «C:\MinGW\bin» и «C:\MinGW\msys\1.0\bin».
Если эти значения не были автоматически добавлены в переменную в процессе установки, допишите их вручную, добавте в начало строку «C:\MinGW\bin;C:\MinGW\msys\1.0\bin;», только без кавычек.
Если в вашей операционной системе отсутствует переменная PATH, то создайте её самостоятельно.
Теперь, когда все инструменты установлены, можно использовать GCC компиляторы в режиме командной строки или настроить их использование в своей IDE.
3- Installing MSYS2 on your PC
What is MSYS2?
According to their website, MSYS2 is a software distribution and building platform for Windows
The Website: https://www.msys2.org/
Installing it is actually a peace of cake
Just download the correct installer and launch it with admin rights and you are good to go

Expected something more complex?
Sorry about that
Once you installed it, you will see 3 programs appear in your list of programs:
- MSYS2 MinGW 32-bit
- MSYS2 MinGW 64-bit
- MSYS2 MSYS
Run the 3rd one MSYS2 MSYS to open a special command window in which you can input commands and start to install programs
The package management system which is equivalent to apt-get on linux is called pacman
When you install MSYS2 for the first time, you have to update pacman using the following command:
pacman -Syu
Prerequisites
To successfully complete this tutorial, you must do the following steps:
-
Install Visual Studio Code.
-
Install the C/C++ extension for VS Code. You can install the C/C++ extension by searching for ‘c++’ in the Extensions view (⇧⌘X (Windows, Linux Ctrl+Shift+X)).
-
Get the latest version of Mingw-w64 via MSYS2, which provides up-to-date native builds of GCC, Mingw-w64, and other helpful C++ tools and libraries. Click here to download the MSYS2 installer. Then follow the instructions on the MSYS2 website to install Mingw-w64.
-
Add the path to your Mingw-w64 folder to the Windows environment variable by using the following steps:
- In the Windows search bar, type ‘settings’ to open your Windows Settings.
- Search for Edit environment variables for your account.
- Choose the variable and then select Edit.
- Select New and add the Mingw-w64 destination folder path to the system path. The exact path depends on which version of Mingw-w64 you have installed and where you installed it. If you used the settings above to install Mingw-w64, then add this to the path: .
- Select OK to save the updated PATH. You will need to reopen any console windows for the new PATH location to be available.
Check your MinGW installation
To check that your Mingw-w64 tools are correctly installed and available, open a new Command Prompt and type:
If you don’t see the expected output or or is not a recognized command, make sure your PATH entry matches the Mingw-w64 binary location where the compilers are located.
Test the New Compiler
All right, let’s compile some code that uses generic lambdas! Generic lambdas are part of the C++14 standard. They let you pass arguments to lambda functions as (or any templated type), like the one highlighted below. Create a file named with the following contents:
#include <iostream>

int main()
{
    auto lambda = [](auto x){ return x; };
    std::cout << lambda("Hello generic lambda!\n");
    return 0;
}
You can add files to your home directory in Cygwin using any Windows-based text editor; just save them to the folder (or similar) in Windows.
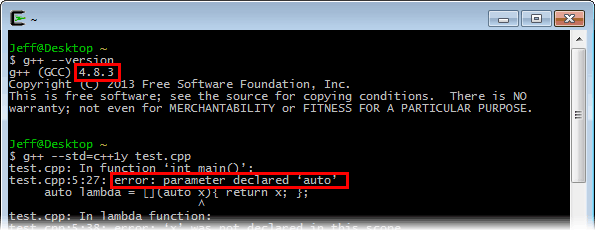
First, let’s see what happens when we try to compile it using the system GCC compiler provided by Cygwin:
If the system compiler version is less than 4.9, compilation will fail:
Now, let’s try it again using our freshly built GCC compiler. The new compiler is already configured to locate its include files in and its static libraries in . All we need to do is run it:

It works!
Microsoft Windows
| File | Download from |
|---|---|
| codeblocks-20.03-setup.exe | FossHUB or Sourceforge.net |
| codeblocks-20.03-setup-nonadmin.exe | FossHUB or Sourceforge.net |
| codeblocks-20.03-nosetup.zip | FossHUB or Sourceforge.net |
| codeblocks-20.03mingw-setup.exe | FossHUB or Sourceforge.net |
| codeblocks-20.03mingw-nosetup.zip | FossHUB or Sourceforge.net |
| codeblocks-20.03-32bit-setup.exe | FossHUB or Sourceforge.net |
| codeblocks-20.03-32bit-setup-nonadmin.exe | FossHUB or Sourceforge.net |
| codeblocks-20.03-32bit-nosetup.zip | FossHUB or Sourceforge.net |
| codeblocks-20.03mingw-32bit-setup.exe | FossHUB or Sourceforge.net |
| codeblocks-20.03mingw-32bit-nosetup.zip | FossHUB or Sourceforge.net |
NOTE: The codeblocks-20.03-setup.exe file includes Code::Blocks with all plugins. The codeblocks-20.03-setup-nonadmin.exe file is provided for convenience to users that do not have administrator rights on their machine(s).
NOTE: The codeblocks-20.03mingw-setup.exe file includes additionally the GCC/G++/GFortran compiler and GDB debugger from MinGW-W64 project (version 8.1.0, 32/64 bit, SEH).
NOTE: The codeblocks-20.03(mingw)-nosetup.zip files are provided for convenience to users that are allergic against installers. However, it will not allow to select plugins / features to install (it includes everything) and not create any menu shortcuts. For the “installation” you are on your own.
If unsure, please use codeblocks-20.03mingw-setup.exe!
Install Cygwin
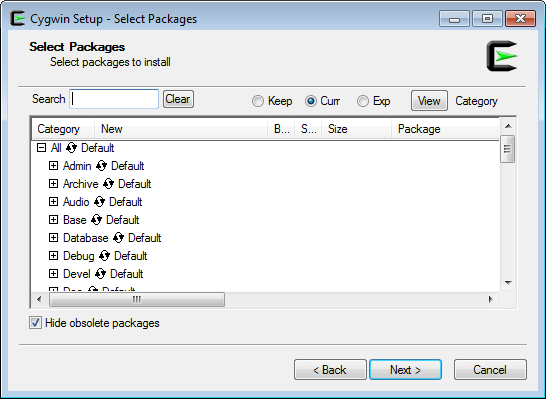
First, download and run either the 32- or 64-bit version of the Cygwin installer, depending on your version of Windows. Cygwin’s setup wizard will walk you through a series of steps. If your machine is located behind a proxy server, make sure to check “Use Internet Explorer Proxy Settings” when you get to the “Select Your Internet Connection” step.
When you reach the “Select Packages” step (shown below), don’t bother selecting any packages yet. Just go ahead and click Next. We’ll add additional packages from the command line later.
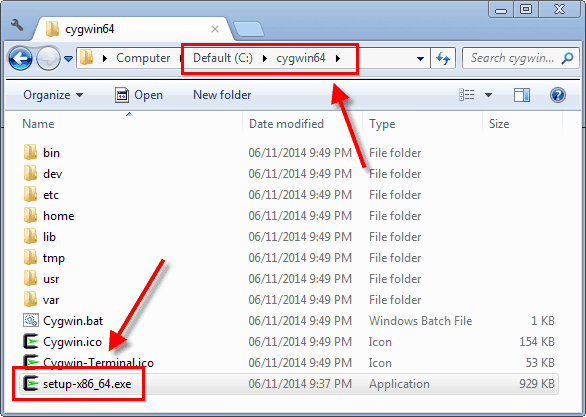
After the Cygwin installer completes, it’s very important to keep the installer around. The installer is an executable named either or , and you’ll need it to add or remove Cygwin packages in the future. I suggest moving the installer to the same folder where you installed Cygwin itself; typically or .
If you already have Cygwin installed, it’s a good idea to re-run the installer to make sure it has the latest available packages. Alternatively, you can install a new instance of Cygwin in a different folder.
Install C on Windows
We will use an open-source Integrated Development environment named Code::Blocks which bundles a compiler (named gcc offered by Free Software Foundation GNU), editor and debugger in a neat package.
Step 1) Download Binary release
Go to http://www.codeblocks.org/downloads and click Binary Release.

Step 2) Select the installer with GCC for Windows compiler
Choose the installer with GCC Compiler, e.g., codeblocks-17.12mingw-setup.exe which includes MinGW’s GNU GCC compiler download and GNU GDB debugger with Code::Blocks source files.

Step 3) Start installation
Run the downloaded installer and accept the default options to install GCC Windows file.

Step 4) Accept the terms and conditions
Accept the Agreement

Step 5) Keep default component selection
Keep the component selection default and click Next.

Step 6) Locate the installation path
You may change the installation folder and click Next.

Step 7) Find and double-click on the CodeBlocks icon
To launch Code::Blocks double click on the icon.
Step 8) Let it detect the compiler itself
It will detect the GCC compiler for Windows automatically, set it as default.

Associate C/C++ files with code::blocks
Step 9) Open the IDE and start using
You will see the IDE Home screen.

Интерпретатор C / C++ Ch Embeddable (стандартная версия)
Интерпретатор C / C++, поддерживающий стандарт ISO 1990 C (C90), основные функции C99, классы C++, а также расширения к языку С, такие как вложенные функции, строковый тип и т. д. Он может быть встроен в другие приложения и аппаратные средства, использоваться в качестве языка сценариев. Код C / C++ интерпретируется напрямую без компиляции промежуточного кода. Поскольку этот интерпретатор поддерживает Linux, Windows, MacOS X, Solaris и HP-UX, созданный вами код можно перенести на любую из этих платформ. Стандартная версия бесплатна для личного, академического и коммерческого использования. Для загрузки пакета необходимо зарегистрироваться.
Архитектура
GCC компилирует Hello World в Windows
Семейства целевых процессоров GCC, начиная с версии 11.1, включают:
- Альфа
- РУКА
- AVR
- Blackfin
- (GCC 4.8)
- H8 / 300
- HC12
- IA-32 ( x86 )
- IA-64 (Intel Itanium)
- MIPS
- Motorola 68000
- PA-RISC
- PDP-11
- PowerPC
- R8C / M16C / M32C
- SPARC
- SuperH
- Система / 390 / zSeries
- VAX
- x86-64
- Графический процессор Nvidia
- Nvidia PTX
- AArch64
- RISC-V
- MSP430
- eBPF
Менее известные целевые процессоры, поддерживаемые в стандартной версии, включают:
- 68HC11
- A29K
- CR16
- C6x
- D30V
- DSP16xx
- ETRAX CRIS
- FR-30
- FR-V
- Intel i960
- IP2000
- M32R
- MCORE
- MIL-STD-1750A
- MMIX
- MN10200
- MN10300
- Motorola 88000
- NS32K
- IBM ROMP
- RL78
- Бурный16
- V850
- Xtensa
Дополнительные процессоры поддерживаются версиями GCC, поддерживаемыми отдельно от версии FSF:
- Cortus APS3
- ARC
- AVR32
- C166 и C167
- D10V
- EISC
- eSi-RISC
- Шестиугольник
- Решетка
- Решетка
- MeP
- MicroBlaze
- Motorola 6809
- MSP430
- Архитектура NEC SX
- Ниос II и Ниос
- OpenRISC
- PDP-10
- Пропеллер
- Сатурн (HP48XGCC)
- Система / 370
- TIGCC ( вариант m68k )
- TMS9900
- TriCore
- Z8000
- ЗПУ
GCJ компилятор Java может выбрать либо родной язык архитектуры машины или виртуальной машины Java «s Java байткод . При перенацеливании GCC на новую платформу часто используется самозагрузка . Motorola 68000, Zilog Z80 и другие процессоры также используются в версиях GCC, разработанных для различных программируемых графических калькуляторов Texas Instruments, Hewlett Packard, Sharp и Casio.
Install C on MAC
To set up a ‘C’ programming environment on MAC operating system, follow the given steps:
1. Visit the given link https://developer.apple.com/downloads/index.action and download. You will need an Apple developer ID
“Command Line Tools for X-Code,” pick any version (latest version is always recommended) and download the .dmg file.
2. After the file is being downloaded on the machine, double click and follow the wizard and install the file. Always keep the default settings as suggested by the installation wizard.
3. After the installation process, open a terminal and run gcc -v command to check if everything is successfully installed.
Debug helloworld.cpp
Next, you’ll create a file to configure VS Code to launch the Microsoft C++ debugger when you press F5 to debug the program. From the main menu, choose Run > Add Configuration… and then choose C++ (Windows).
You’ll then see a dropdown for various predefined debugging configurations. Choose cl.exe build and debug active file.

VS Code creates a file, opens it in the editor, and builds and runs ‘helloworld’.
The setting specifies the program you want to debug. Here it is set to the active file folder and active filename with the extension , which if is the active file will be .
By default, the C++ extension won’t add any breakpoints to your source code and the value is set to . Change the value to to cause the debugger to stop on the method when you start debugging.
Start a debugging session
- Go back to so that it is the active file.
- Press F5 or from the main menu choose Run > Start Debugging. Before you start stepping through the source code, let’s take a moment to notice several changes in the user interface:
-
The Integrated Terminal appears at the bottom of the source code editor. In the Debug Output tab, you see output that indicates the debugger is up and running.
-
The editor highlights the first statement in the method. This is a breakpoint that the C++ extension automatically sets for you:
-
The Run view on the left shows debugging information. You’ll see an example later in the tutorial.
-
At the top of the code editor, a debugging control panel appears. You can move this around the screen by grabbing the dots on the left side.
