Using the gnu compiler collection (gcc)
Содержание:
- Run VS Code in WSL
- 1- What I want to teach you here
- Ставим Eclipse Neon 3
- C++23 Language Features
- Technical Specifications
- Intro
- 4- Installing GCC and other development tools with the pacman package management system
- Install C on Windows
- Install C on MAC
- Debug helloworld.cpp
- Programs for query ″download gnu gcc compiler″
- Installing macOS Developer Tools
- C/C++ configurations
- C++17 Language Features
- Quick Start: Unix
- Установка необходимых инструментов
- A note about msys vs mingw64 repos
- About This Article
- Test the New Compiler
- Step through the code
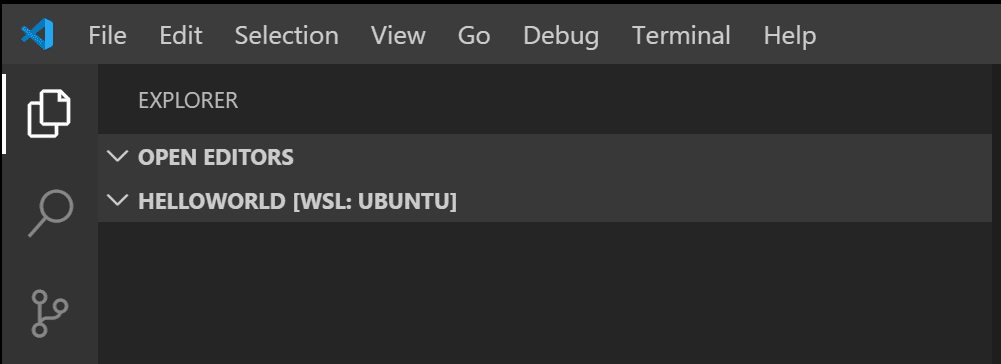
Run VS Code in WSL
Navigate to your helloworld project folder and launch VS Code from the WSL terminal with :
You’ll see a message about «Installing VS Code Server». VS Code is downloading and installing a small server on the Linux side that the desktop VS Code will then talk to. VS Code will then start and open the folder. The File Explorer shows that VS Code is now running in the context of WSL with the title bar .
You can also tell the remote context from the Status bar.

If you click on the Remote Status bar item, you will see a dropdown of Remote commands appropriate for the session. For example, if you want to end your session running in WSL, you can select the Close Remote Connection command from the dropdown. Running from your WSL command prompt will restart VS Code running in WSL.
The code . command opened VS Code in the current working folder, which becomes your «workspace». As you go through the tutorial, you will see three files created in a folder in the workspace:
- (compiler path and IntelliSense settings)
- (build instructions)
- (debugger settings)
1- What I want to teach you here
If you want a simple way to create programs based on C, C++, Fortran, etc… you will have to install a software with can compile the code you write into code that the machine understands
Such program is called a “compiler”
The most well know compiler for C language is the GNU compiler called GCC.
There are actually several compilers which go together like a suite:
- for C++, you have the compiler g++
- for Fortran, the compiler is called gfortran
Why using the gcc compiler?
If you are on Windows, you probably heard about software such as visual studio from Microsoft which also you to write and compile C and C++ code as well.
That’s true, and it’s totally fine if you want to use it…
I am personally not such a big fan of Visual Studio because of the following reasons:
- It is huge to download and install (between 10 and 20 GB if I remember)
- It’s a big pain to set up the first time
- Building even a very simple project takes much more time than it should
Because of that, I find that I kind of takes out the fun of programming and seeing immediately the result of what you did…
Now, for large pieces of software, visual studio is probably the way to go
Ставим Eclipse Neon 3
Скачиваем установщик Eclipse
- Справа вверху нажимаем download.
- В открывшейся окне слева выбираем download (x64/x32 должно подобраться автоматически).
- Ну и нажимаем download по центру, после чего начнется загрузка. При желании, можно про спонсировать создателей IDE…
Устанавливаем JRE
- Запускаем скаченный нами установщик. Получаем ошибку о том, что отсутствует JRE.
- Нажимаем «нет» и ждем перехода на сайт.
- На сайте выбираем пункт «Oracle JRE 1.8.0».
- Выбираем «Accept License Agreement».
- Скачиваем Offline версию, согласно разрядности вашей Windows.
- Запускаем скаченный файл. Дальнейшая установка проблем не вызывает.
Устанавливаем Eclipse
- Запускаем скаченный нами установщик.
- Выбираем версию для C/C++.
- Указываем путь установки (я оставил по умолчанию, и вам советую).
- Принимаем соглашение.
- Ждем окончания установки.
- Нажимаем «LAUNCH», чтобы запустить среду.
- Указываем путь, который будет использовать Eclipse для ваших проектов по умолчанию (я оставил по умолчанию), а так же ставим галочку, чтобы данное окно больше не появлялось.
- Убеждаемся, что IDE запустилась, закрываем.
- Во время закрытия можем поставить галочку, чтобы окно предупреждения о закрытии более не появлялось.
Устанавливаем в Eclipse плагин GNU ARM Eclipse
В правом столбце, под строкой «Downloads» выбираем «Plug-ins».
Далее под строкой «The GNU ARM Eclipse plug-ins update site URL is still on SourceForge:» копируем ссылку на плагин
На момент написания статьи это была:
Открываем Eclipse.
Переходим «Help» -> «Install New Software…».
В открывшемся окне нажимаем на «Add…».
В еще одном открывшимся окне в пункте «Name:» пишем, например, «ARM» (название не важно), а в строку «Location:» вставляем скопированную нами с сайта ссылку.
Нажимаем «ОК»
Окно закроется и в списке строк появится пустой чекбокс с надписью «Pending…».
Далее в случае, если вы встретитесь с ошибкой, представленной ниже, то перейдите к пункту «Патчим JRE», а затем вернитесь и повторите всё с пункта 4.
В случае, если ошибки не возникло или вы ее уже исправили, продолжаем дальше.
После того, как появится строка «GNU ARM C/C++ Cross Development Tools», необходимо выбрать чекбокс слева от нее и нажать «Next».
После еще раз «Next».
Далее принимаем лицензионное соглашение и нажимаем «Finish». Начнется процесс установки.
В процессе установки появится предупреждение о безопасности
Жмем «ОК».
По окончании установки потребуется перезагрузить Eclipse, для этого нажимаем «Yes» в появившемся окне.
На этом установка этого плагина завершена.
Патчим JRE (если в пункте выше произошла ошибка)
- Выбираем пункт «Accept License Agreement».
- Скачиваем «.zip» архив.
- Распаковываем. В архиве 2 файла («local_policy.jar» и «US_export_policy.jar») патча и текстовый файл. Копируем эти 2 файла с разрешением «.jar» и заменяем ими файлы по адресу установленной java. В случае 64-х битной windows 10, это путь
Путь может быть другим в случае, если выйдет новая версия jre или у вас ОС с другой разрядностью. Главное, что вы должны зайти в папку «\lib\security» и туда скопировать с заменой эти 2 файла. На этом патч можно считать завершенным. Можно снова запустить eclipse и установить плагин.
Устанавливаем GNU ARM Eclipse Windows Build Tools
- Скачиваем «.exe» файл под свою платформу. На момент написания статьи самая актуальная версия «gnuarmeclipse-build-tools-win64-2.8-201611221915-setup.exe».
- Запускаем скаченный файл и просто жмем «Next», «A Agree», «Next», «Install», «Finish».
C++23 Language Features
| Language Feature | Proposal | Available in GCC? | SD-6 Feature Test |
|---|---|---|---|
| Literal Suffix for (signed) size_t | P0330R8 | __cpp_size_t_suffix >= 202006L | |
| Make () more optional for lambdas | P1102R2 | ||
| DR: Declarations and where to find them | P1787R6 | No | |
| P1938R3 | __cpp_if_consteval >= 202106L | ||
| C++ Identifier Syntax using Unicode Standard Annex 31 | P1949R7 | ||
| Allow Duplicate Attributes | P2156R1 | ||
| Narrowing contextual conversions to bool | P1401R5 | 9 | |
| Trimming whitespaces before line splicing | P2223R2 | Yes | |
| Mixed string literal concatenation | P2201R1 | Yes | |
| Make declaration order layout mandated | P1847R4 | Yes | |
| Removing Garbage Collection Support | P2186R2 | ||
| CWG 2397: auto specifier for pointers and references to arrays | CWG2397 | ||
| CWG 2481: Cv-qualification of temporary to which a reference is bound | CWG2481 | Yes |
Technical Specifications
GCC also implements experimental support for some language Technical
Specifications published by the C++ committee.
Important: Because these Technical Specifications are
still evolving toward future inclusion in a C++ standard, GCC’s support
is experimental. No attempt will be made to maintain
backward compatibility with implementations of features that do not reflect
the final standard.
| Technical Specification | Document | Available in GCC? | Compiler Option | SD-6 Feature Test |
|---|---|---|---|---|
| Concepts | N4377 | -fconcepts | __cpp_concepts >= 201507 | |
| Transactional Memory | N4514 | (no atomic_cancel) | -fgnu-tm | __cpp_transactional_memory >= 201505 |
| Coroutines | N4649 | -fcoroutines | __cpp_impl_coroutine >= 201902L | |
| Modules | N4720 | -fmodules-ts | __cpp_modules >= 201810L |
Intro
There are a variety of toolchains you can install on Windows for compiling C and C++ applications. Microsoft provides Visual Studio Community for free, and is a great IDE and toolchain. If you are developing exclusively for Windows, that is the tool I would recommend. For those who need or prefer the cross-platform GNU toolchain, you can install it using MSYS2. We will cover how to install gcc using MSYS2.
Another option for using gcc in Windows is to download Code::Blocks. They provide binary releases that come with the Mingw toolchain. For example, http://www.codeblocks.org/downloads/.
Qt Creator is another free IDE that optionally comes with the mingw toolchain. Check out https://www.qt.io/download and https://www.qt.io/qt-features-libraries-apis-tools-and-ide/ for more information.
If you do not need to target Windows specifically, but you are just looking to learn and play with the GNU toolchain and you have a windows machine, I recommend installing Ubuntu or Suse on Windows through the Microsoft Store. This will provide a Linux environment in Windows for you to work with. Alternatively you could install a distribution like Ubuntu inside a VirtualBox or VMWare Player virtual machine.
4- Installing GCC and other development tools with the pacman package management system
Then you can start to install gcc and other developer tools using pacman like this:
# Install make, autoconf, etc to C:\msys64\usr\bin
pacman -S base-devel gcc vim cmake
This command will install first a set of development software included in a package called base-devel and then it will install gcc, vim and cmake
vim is optional, but always good to have 😉
(You can also install emacs very easily in the same way)
In the package base-devel, you have 53 useful developement tools that can be installed:
# pacman -S base-devel
   1) asciidoc  2) autoconf  3) autoconf2.13  4) autogen  5) automake-wrapper
   6) automake1.10  7) automake1.11  8) automake1.12  9) automake1.13
   10) automake1.14  11) automake1.15  12) automake1.16  13) automake1.6
   14) automake1.7  15) automake1.8  16) automake1.9  17) bison  18) diffstat
   19) diffutils  20) dos2unix  21) file  22) flex  23) gawk  24) gdb
   25) gettext  26) gettext-devel  27) gperf  28) grep  29) groff  30) help2man
   31) intltool  32) lemon  33) libtool  34) libunrar  35) libunrar-devel
   36) m4  37) make  38) man-db  39) pacman  40) pactoys-git  41) patch
   42) patchutils  43) perl  44) pkg-config  45) pkgfile  46) quilt  47) rcs
   48) scons  49) sed  50) swig  51) texinfo  52) texinfo-tex  53) ttyrec

# pacman -S gcc
   binutils-2.30-1  isl-0.19-1  mpc-1.1.0-1
   msys2-runtime-devel-2.11.1-2
   msys2-w32api-headers-6.0.0.5223.7f9d8753-1
   msys2-w32api-runtime-6.0.0.5223.7f9d8753-1
   windows-default-manifest-6.4-1  gcc-7.3.0-3
Install C on Windows
We will use an open-source Integrated Development environment named Code::Blocks which bundles a compiler (named gcc offered by Free Software Foundation GNU), editor and debugger in a neat package.
Step 1) Download Binary release
Go to http://www.codeblocks.org/downloads and click Binary Release.

Step 2) Select the installer with GCC for Windows compiler
Choose the installer with GCC Compiler, e.g., codeblocks-17.12mingw-setup.exe which includes MinGW’s GNU GCC compiler download and GNU GDB debugger with Code::Blocks source files.

Step 3) Start installation
Run the downloaded installer and accept the default options to install GCC Windows file.

Step 4) Accept the terms and conditions
Accept the Agreement

Step 5) Keep default component selection
Keep the component selection default and click Next.

Step 6) Locate the installation path
You may change the installation folder and click Next.

Step 7) Find and double-click on the CodeBlocks icon
To launch Code::Blocks double click on the icon.
Step 8) Let it detect the compiler itself
It will detect the GCC compiler for Windows automatically, set it as default.

Associate C/C++ files with code::blocks
Step 9) Open the IDE and start using
You will see the IDE Home screen.

Install C on MAC
To set up a ‘C’ programming environment on MAC operating system, follow the given steps:
1. Visit the given link https://developer.apple.com/downloads/index.action and download. You will need an Apple developer ID
“Command Line Tools for X-Code,” pick any version (latest version is always recommended) and download the .dmg file.
2. After the file is being downloaded on the machine, double click and follow the wizard and install the file. Always keep the default settings as suggested by the installation wizard.
3. After the installation process, open a terminal and run gcc -v command to check if everything is successfully installed.
Debug helloworld.cpp
Next, you’ll create a file to configure VS Code to launch the GDB debugger when you press F5 to debug the program.
- From the main menu, choose Run > Add Configuration… and then choose C++ (GDB/LLDB).
- You’ll then see a dropdown for various predefined debugging configurations. Choose g++.exe build and debug active file.

VS Code creates a file, opens it in the editor, and builds and runs ‘helloworld’.
The setting specifies the program you want to debug. Here it is set to the active file folder and active filename with the extension , which if is the active file will be .
By default, the C++ extension won’t add any breakpoints to your source code and the value is set to .
Change the value to to cause the debugger to stop on the method when you start debugging.
Start a debugging session
- Go back to so that it is the active file.
- Press F5 or from the main menu choose Run > Start Debugging. Before you start stepping through the source code, let’s take a moment to notice several changes in the user interface:
-
The Integrated Terminal appears at the bottom of the source code editor. In the Debug Output tab, you see output that indicates the debugger is up and running.
-
The editor highlights the first statement in the method. This is a breakpoint that the C++ extension automatically sets for you:
-
The Run view on the left shows debugging information. You’ll see an example later in the tutorial.
-
At the top of the code editor, a debugging control panel appears. You can move this around the screen by grabbing the dots on the left side.
Programs for query ″download gnu gcc compiler″
Bloodshed Dev-C++
Download
3 on 10 votes
Bloodshed Dev-C is a full-featured Integrated Development Environment (IDE) for the C/C programming language.
… port of GCC (GNU Compiler Collection) as …
Hitex Development Tools GNU C/C++ Tools for ARM
Download
5 on 2 votes
The GNU Compiler Collection (GCC) is a set of compilers produced for various programming languages by the GNU Project.
… GNU Compiler Collection (GCC) is a set of compilers … as «GNU C Compiler» the GCC has been …
Dev-C++
Download
4 on 481 votes
This application uses the MinGW port of GCC (GNU Compiler Collection) as its compiler.
… port of GCC (GNU Compiler Collection) as … its compiler. It is …
GNUARM
Download
5 on 1 vote
GNUARM is a pre-compiled binary distribution for the latest GNU ARM/Newlib toolchain for Cygwin, Linux and MacOS.
… pre-compiled binary … GNU binutils, compiler set (GCC) … and C compilers. Details …
Embarcadero Dev C++
Download
5 on 88 votes
A fast, portable, simple, and free IDE for C/C++ programming on Windows.
… port of GCC (GNU Compiler Collection) as … —GCC 9.2.0 32/64bit
Support GCC-based compilers …
Phyton CodeMaster-52
Download
5 on 1 vote
CodeMaster-52 compiler options CodeMaster-52 IDE provides most flexible, user-friendly and cost-effective integration …
… -52 compiler options
… emulator. The compiler, assembler, …
—GNU (SDCC) http://gcc.gnu.org …
TIGCC Calculator SDK
Download
TIGCC is mainly a C compiler for the Texas Instruments TI-89, TI-89 Titanium, TI-92 Plus and Voyage 200 calculators.
… mainly a C compiler for the … on GCC, the GNU Compiler Collection … to compile everything …
Amontec sdk4arm ide
Download
Amontec sdk4arm is a complete Software Development Kit for ARM processors based on GNU tools ( full sources), but it comes pre-compiled for Win32.
… based on GNU tools ( … pre-compiled for …
— a Compiler : GNU ARM GCC
— a Debugger : GNU ARM …
Kinetis Design Studio
Download
2 on 2 votes
The Kinetis Design Studio IDE is a complimentary integrated development environment for Kinetis MCUs that enables …
… editing, compiling and debugging … Eclipse, GNU Compiler Collection (GCC), GNU Debugger ( …
GNU Prolog
Download
5 on 3 votes
GNU Prolog is a free Prolog compiler with constraint solving over finite domains.
… binaries (like gcc does from … native-code compilation, GNU Prolog offers …
Installing macOS Developer Tools
On macOS 10.15, the only thing you should need to do is run the following in your terminal:
$ xcode-select --install
Then follow along with the prompts in the windows that comes up.
On macOS 10.14 and previous, you’ll also need to install g++ from homebrew;
follow the instructions in the following section.
Installing GCC for macOS before 10.15
This will only be necessary if you’re using a macOS version from before 10.15.
Installing homebrew should be very easy; check out <brew.sh> for more information,
but at its simplest, run the following command:
$ /bin/bash -c "$(curl -fsSL https://raw.githubusercontent.com/Homebrew/install/master/install.sh)"
Then, in order to grab an up-to-date version of gcc, run the following:
$ brew install gcc
You’ll then be able to bootstrap vcpkg along with the
C/C++ configurations
If you want more control over the C/C++ extension, you can create a file, which will allow you to change settings such as the path to the compiler, include paths, C++ standard (default is C++17), and more.
You can view the C/C++ configuration UI by running the command C/C++: Edit Configurations (UI) from the Command Palette (⇧⌘P (Windows, Linux Ctrl+Shift+P)).

This opens the C/C++ Configurations page. When you make changes here, VS Code writes them to a file called in the folder.
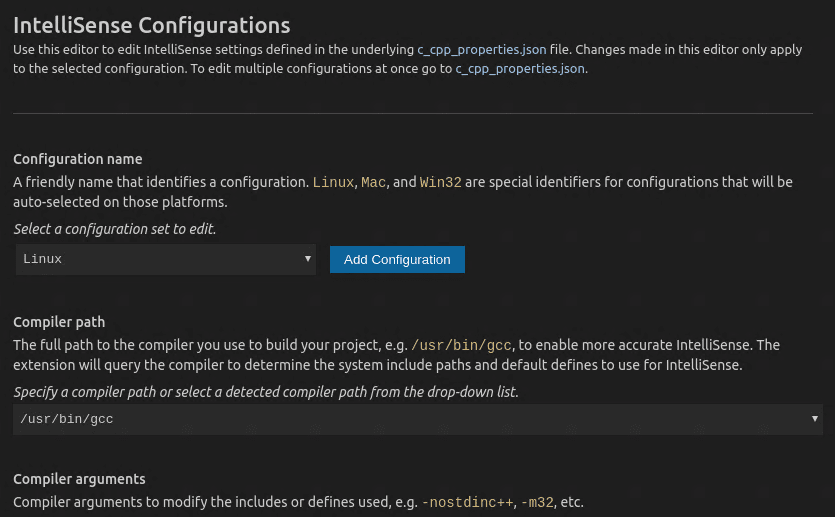
You only need to modify the Include path setting if your program includes header files that are not in your workspace or in the standard library path.
Visual Studio Code places these settings in . If you open that file directly, it should look something like this:
C++17 Language Features
The following table lists new language features that have been
accepted into the C++17 working draft. The «Proposal» column
provides a link to the ISO C++ committee proposal that describes the
feature, while the «Available in GCC?» column indicates the first
version of GCC that contains an implementation of this feature (if
it has been implemented).
| Language Feature | Proposal | Available in GCC? | SD-6 Feature Test |
|---|---|---|---|
| Removing trigraphs | N4086 | ||
| character literals | N4267 | __cpp_unicode_characters >= 201411 | |
| Folding expressions | N4295 | __cpp_fold_expressions >= 201411 | |
| Attributes for namespaces and enumerators | N4266 | (namespaces) (enumerators) |
__cpp_namespace_attributes >= 201411 __cpp_enumerator_attributes >= 201411 |
| Nested namespace definitions | N4230 | __cpp_nested_namespace_definitions >= 201411 | |
| Allow constant evaluation for all non-type template arguments | N4268 | __cpp_nontype_template_args >= 201411 | |
| Extending | N3928 | __cpp_static_assert >= 201411 | |
| New Rules for auto deduction from braced-init-list | N3922 | ||
| Allow typename in a template template parameter | N4051 | ||
| attribute | P0188R1 | __has_cpp_attribute(fallthrough) | |
| attribute | P0189R1 | () (P0189R1) | __has_cpp_attribute(nodiscard) |
| attribute | P0212R1 | () (P0212R1) | __has_cpp_attribute(maybe_unused) |
| Extension to aggregate initialization | P0017R1 | __cpp_aggregate_bases >= 201603 | |
| Wording for lambda | P0170R1 | __cpp_constexpr >= 201603 | |
| Unary Folds and Empty Parameter Packs | P0036R0 | __cpp_fold_expressions >= 201603 | |
| Generalizing the Range-Based For Loop | P0184R0 | __cpp_range_based_for >= 201603 | |
| Lambda capture of by Value | P0018R3 | __cpp_capture_star_this >= 201603 | |
| Construction Rules for variables | P0138R2 | ||
| Hexadecimal floating literals for C++ | P0245R1 | 3.0 | __cpp_hex_float >= 201603 |
| Dynamic memory allocation for over-aligned data | P0035R4 | __cpp_aligned_new >= 201606 | |
| Guaranteed copy elision | P0135R1 | __cpp_guaranteed_copy_elision >= 201606 | |
| Refining Expression Evaluation Order for Idiomatic C++ | P0145R3 | ||
| if | P0292R2 | __cpp_if_constexpr >= 201606 | |
| Selection statements with initializer | P0305R1 | ||
| Template argument deduction for class templates | P0091R3P0512R0 | __cpp_deduction_guides >= 201606 __cpp_deduction_guides >= 201611 |
|
| Declaring non-type template parameters with auto | P0127R2 | __cpp_template_auto >= 201606 __cpp_nontype_template_parameter_auto >= 201606 |
|
| Using attribute namespaces without repetition | P0028R4 | ||
| Ignoring unsupported non-standard attributes | P0283R2 | Yes | |
| Structured bindings | P0217R3 | __cpp_structured_bindings >= 201606 | |
| Remove Deprecated Use of the Keyword | P0001R1 | ||
| Remove Deprecated | P0002R1 | ||
| Make exception specifications be part of the type system | P0012R1 | __cpp_noexcept_function_type >= 201510 | |
| for C++17 | P0061R1 | ||
| Rewording inheriting constructors (core issue 1941 et al) | P0136R1 | __cpp_inheriting_constructors >= 201511 | |
| Inline variables | P0386R2 | __cpp_inline_variables >= 201606 | |
| DR 150, Matching of template template arguments | P0522R0 | __cpp_template_template_args >= 201611 | |
| Removing dynamic exception specifications | P0003R5 | ||
| Pack expansions in using-declarations | P0195R2 | __cpp_variadic_using >= 201611 | |
| A type definition | P0298R0 |
Quick Start: Unix
Prerequisites for Linux:
- >= 6
Prerequisites for macOS:
- On macOS 10.14 or below, you will also need:
- >= 6 from Homebrew
First, download and bootstrap vcpkg itself; it can be installed anywhere,
but generally we recommend using vcpkg as a submodule for CMake projects.
$ git clone https://github.com/microsoft/vcpkg
$ ./vcpkg/bootstrap-vcpkg.sh
To install the libraries for your project, run:
$ ./vcpkg/vcpkg install
You can also search for the libraries you need with the subcommand:
$ ./vcpkg/vcpkg search
In order to use vcpkg with CMake, you can use the toolchain file:
$ cmake -B  -S . -DCMAKE_TOOLCHAIN_FILE=/scripts/buildsystems/vcpkg.cmake
$ cmake --build
With CMake, you will still need to and the like to use the libraries.
Check out the
for more information on how best to use vcpkg with CMake,
and CMake Tools for VSCode.
For any other tools, check out the integration guide.
Установка необходимых инструментов
Как вы, наверное, уже понимаете, для запуска кода нужно установить необходимые инструменты и компиляторы для работы. Ниже мы опишем как установить все инструменты разработки в Linux.
Для работы и тестирования у нас должен быть сервер с Linux. Лучший вариант — это VPS. В зависимости от географии проекта обычно выбирают две страны для серверов — VPS США и VPS России.
В этом кратком руководстве мы обсудим, как установить средства разработки в такие дистрибутивы Linux, как Arch Linux, CentOS, RHEL, Fedora, Debian, Ubuntu, openSUSE и др.
Эти средства разработки включают в себя все необходимые приложения, такие как компиляторы GNU GCC C/C++, make, отладчики, man-страницы и другие, которые необходимы для компиляции и сборки нового программного обеспечения и пакетов.
Инструменты разработчика могут быть установлены как по отдельности, так и все сразу. Мы собираемся установить все сразу, чтобы нам было намного проще работать.
Установка в Arch Linux
Для установки средств разработки в Arch Linux и его дистрибутивов, таких как Antergos, Manjaro Linux, просто запустите:
Вышеуказанная команда установит следующие пакеты в ваши системы на базе Arch:
- autoconf
- automake
- binutils
- bison
- fakeroot
- file
- findutils
- flex
- gawk
- gcc
- gettext
- grep
- groff
- gzip
- libtool
- m4
- make
- pacman
- patch
- pkg-config
- sed
- sudo
- texinfo
- util-linux
- which
Просто нажми ENTER, чтобы установить их все.
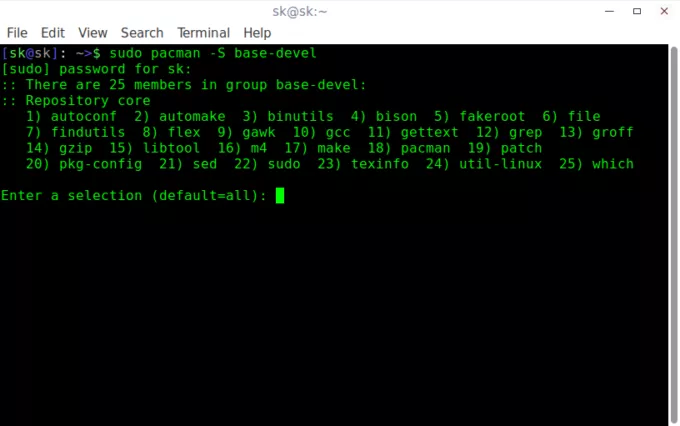
Если вы хотите установить пакет в определенную группу пакетов, просто введите его номер и нажмите ENTER, чтобы продолжить установку.
Установка средств разработки в RHEL, CentOS
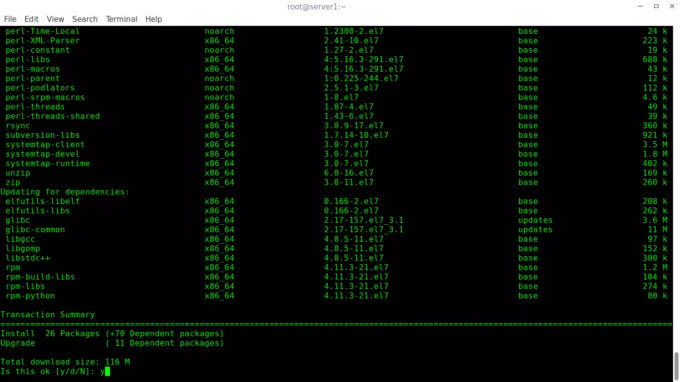
Для установки средств разработки в Fedora, RHEL и его клонах, таких как CentOS, Scientific Linux, выполните следующие команды как пользователь root:
Вышеуказанная команда установит все необходимые инструменты разработчика, например:
- autoconf
- automake
- bison
- byacc
- cscope
- ctags
- diffstat
- doxygen
- elfutils
- flex
- gcc/gcc-c++/gcc-gfortran
- git
- indent
- intltool
- libtool
- patch
- patchutils
- rcs
- subversion
- swig
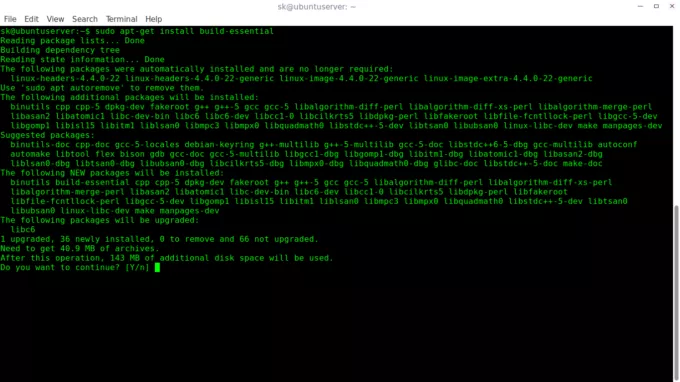
Установка инструментов разработки в Debian, Ubuntu и дистрибутивы
Для установки необходимых инструментов разработчика в системах на базе DEB, запустите:
Эта команда предоставит все необходимые пакеты для настройки среды разработки в Debian, Ubuntu и его дистрибутивов.
- binutils
- cpp
- gcc-5-locales
- g++-multilib
- g++-5-multilib
- gcc-5-doc
- gcc-multilib
- autoconf
- automake
- libtool
- flex
- bison
- gdb
- gcc-doc
- gcc-5-multilib
- and many.
Теперь у Вас есть необходимые средства разработки для создания программного обеспечения в Linux.
Скрипт Mangi
Если Вам не нравится метод установки средств разработки выше, есть также скрипт под названием «сценарий манги» (mangi), доступный для легкой настройки среды разработки в DEB-системах, таких как Ubuntu, Linux Mint и других производных Ubuntu.
После свежей установки Ubuntu возьмите этот скрипт из репозитория GitHub, сделайте его исполняемым и начните установку всех необходимых инструментов и пакетов для настройки полной среды разработки. Вам не нужно устанавливать инструменты один за другим.
Этот скрипт установит следующие среды разработки и инструменты на вашу систему Linux:
- Node.js
- NVM
- NPM
- Nodemon
- MongoDB
- Forever
- git
- grunt
- bower
- vim
- Maven
- Loopback
- curl
- python
- jre/jdk
- gimp
- zip unzip and rar tools
- filezilla
- tlp
- erlang
- xpad sticky notes
- cpu checker
- kvm acceleration
- Calibre Ebook Reader (I often use it to read programming books
- Dict – Ubuntu Dictionary Database and Client (CLI based)
Сначала установите следующее:
Скачайте скрипт манги, используя команду:
Извлеките загруженный архив:
Вышеуказанная команда распакует zip-файл в папку под названием mangi-script-master в вашей текущей рабочей директории. Перейдите в каталог и сделайте скрипт исполняемым, используя следующие команды:
Наконец, запустите скрипт с помощью команды:
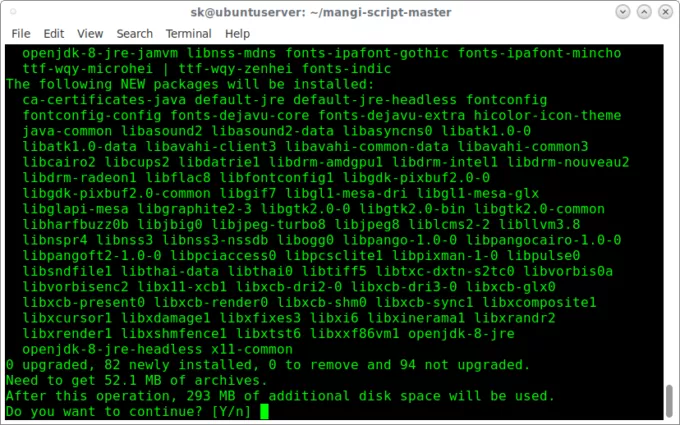
Пожалуйста, имейте в виду, что этот скрипт не полностью автоматизирован. Вам необходимо ответить на ряд вопросов «Да/Нет» для установки всех инструментов разработки.
Установка инструментов разработки в openSUSE/SUSE
Для настройки среды разработки в openSUSE и SUSE enterprise выполните следующие команды от имени root пользователя:
Проверка установки
Теперь проверим, были ли установлены средства разработки или нет. Для этого запустите:
Как видно из приведенного выше вывода, средства разработки были успешно установлены. Теперь можно начать разрабатывать свои приложения.
A note about msys vs mingw64 repos
Some things are only available in the msys/ repo like vim and git, and will only be available in \usr\bin\. Some things like gcc are available in msys\, mingw32\, and mingw64\ repos and can potentially end up being installed in both \usr\bin\ and \mingw64\bin\. This is where you have to be careful about how you set up your PATH environment variable. If you add \usr\bin\ in order to make vim or git available, you will also add everything in that directory, which may conflict with something if you also add the \mingw64\bin\ directory to your path. If you only want the toolchain without as much extra stuff, use the mingw64 packages. Then you can add only the \mingw64\bin directory to your PATH if desired. The mingw64 repository generally has more libraries available for install that are unavailable in the general msys repo (e.g. SDL, exif, freeglut). The msys packages are intended to be used inside the msys shell, and the mingw packages are intended to be used outside of msys2.
About This Article
Written by:
Nicole Levine, MFA
Tech Specialist
This article was written by Nicole Levine, MFA. Nicole Levine is a Technology Writer and Editor for wikiHow. She has more than 20 years of experience creating technical documentation and leading support teams at major web hosting and software companies. Nicole also holds an MFA in Creative Writing from Portland State University and teaches composition, fiction-writing, and zine-making at various institutions. This article has been viewed 873,045 times.
How helpful is this?
Co-authors: 36
Updated: September 29, 2020
Views: 873,045
Categories: C Programming Languages
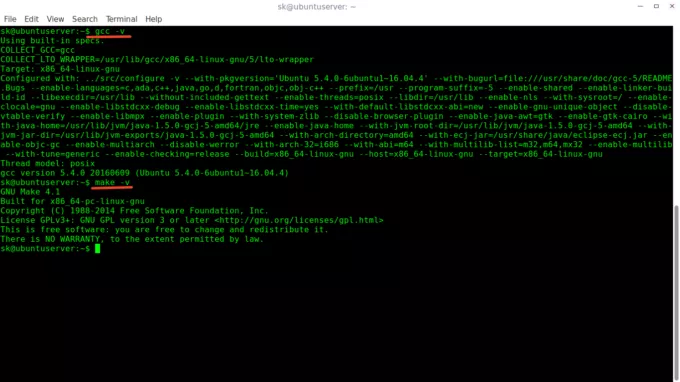
1. Open the Terminal in Linux.
2. Type «sudo apt update» and press Enter.
3. Type «sudo apt install build-essential» and press Enter to install GCC and other packages.
4. Type «gcc —version» to verify the GCC installation.
5. Use the «CD» command to navigate to the folder with your source code.
6. Type «gcc .c –o » to compile the program.
7. Type «»./» to run the newly compiled program.
Did this summary help you?YesNo
Español:compilar un programa en C usando el compilador GNU (GCC)
Italiano:Compilare un Programma C Utilizzando il Compilatore GNU GCC
Português:Compilar um Programa Usando o Compilador GNU (GCC)
Русский:скомпилировать программу C, используя компилятор GNU Compiler (GCC)
Deutsch:Ein C Programm mit dem GNU Compiler (GCC) kompilieren
Bahasa Indonesia:Mengompilasi Program C dengan GNU C Compiler (GCC)
Français:compiler un programme en C avec le compilateur GNU GCC
ไทย:Compile โปรแกรมภาษา C ด้วย GNU Compiler (GCC)
Nederlands:Een C programma compileren met de GNU compiler
العربية:ترجمة برنامج بلغة سي باستخدام مترجم جي إن يو
Tiếng Việt:Biên dịch chương trình C bằng GNU (GCC)
中文:使用GNU编译器(GCC)编译C程序
Türkçe:C Programları GNU Compiler (GCC) ile Nasıl Derlenir
한국어:GNU 컴파일러로(GCC) C 프로그램 컴파일 하는 법
हिन्दी:जीएनयू कम्पाइलर से C प्रोग्राम कंपाइल करें (Compile a C Program Using the GNU Compiler (GCC)
日本語:GNUコンパイラコレクション(GCC)でCプログラムをコンパイルする
Test the New Compiler
All right, let’s compile some code that uses generic lambdas! Generic lambdas are part of the C++14 standard. They let you pass arguments to lambda functions as (or any templated type), like the one highlighted below. Create a file named with the following contents:
#include <iostream>

int main()
{
    auto lambda = [](auto x){ return x; };
    std::cout << lambda("Hello generic lambda!\n");
    return 0;
}
You can add files to your home directory in Cygwin using any Windows-based text editor; just save them to the folder (or similar) in Windows.
First, let’s see what happens when we try to compile it using the system GCC compiler provided by Cygwin:
If the system compiler version is less than 4.9, compilation will fail:
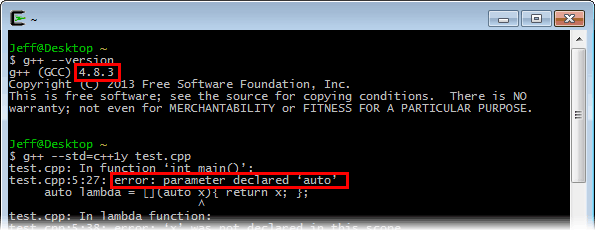
Now, let’s try it again using our freshly built GCC compiler. The new compiler is already configured to locate its include files in and its static libraries in . All we need to do is run it:

It works!
Step through the code
Now you’re ready to start stepping through the code.
-
Click or press the Step over icon in the debugging control panel.
This will advance program execution to the first line of the for loop, and skip over all the internal function calls within the and classes that are invoked when the variable is created and initialized. Notice the change in the Variables window on the left.
In this case, the errors are expected because, although the variable names for the loop are now visible to the debugger, the statement has not executed yet, so there is nothing to read at this point. The contents of are visible, however, because that statement has completed.
-
Press Step over again to advance to the next statement in this program (skipping over all the internal code that is executed to initialize the loop). Now, the Variables window shows information about the loop variables.
-
Press Step over again to execute the statement. (Note that as of the March 2019 release, the C++ extension does not print any output to the Debug Console until the loop exits.)
-
If you like, you can keep pressing Step over until all the words in the vector have been printed to the console. But if you are curious, try pressing the Step Into button to step through source code in the C++ standard library!
To return to your own code, one way is to keep pressing Step over. Another way is to set a breakpoint in your code by switching to the tab in the code editor, putting the insertion point somewhere on the statement inside the loop, and pressing F9. A red dot appears in the gutter on the left to indicate that a breakpoint has been set on this line.
Then press F5 to start execution from the current line in the standard library header. Execution will break on . If you like, you can press F9 again to toggle off the breakpoint.
When the loop has completed, you can see the output in the Debug Console tab of the integrated terminal, along with some other diagnostic information that is output by GDB.
