Getting started with github desktop
Содержание:
- Вариант 2. Я вообще ничего не знаю
- GitHub’s Logos
- Open-Source Notices
- Работа с репозиторием. Меняем файлы и сохраняем обратно
- Part 5: Making, committing, and pushing changes
- Introduction
- Github командная строка
- Step 3. Make and commit changes
- Система контроля версий GIT
- Клиенты Git GUI для Windows:
- Респект за пост! Спасибо за работу!
- Learn GitHub with GitHub
- Подмодули
- Part 1: Installing and authenticating
- Languages and Tools
- Miscellanea
- Our most popular courses
- Quick Start: Windows
Вариант 2. Я вообще ничего не знаю
Этот вариант выбирают совсем новички в разработке. Вполне возможно, у вас уже есть целая папка с файлами проекта для размещения на GitHub, но вы не знаете, с чего начать.
Ну что ж, приступим к делу!
Допустим, вы хотите создать новый репозиторий. Это место, где будет «жить » ваш проект. Если вы не хотите создавать новый репозиторий, то можете склонировать уже существующий. Именно так вы копируете чужой проект или берете нужную вам информацию для работы/учебы. Мы еще к этому вернемся, но чуть позже.
Репозиторий — это место, в котором вы систематизируете свой проект. Здесь вы храните файлы, папки, видео, изображения, блокноты Jupyter Notebook, наборы данных и т.д. Перед началом работы с Git необходимо инициализировать репозиторий для проекта и правильно его подготовить. Это можно сделать на сайте GitHub.
Лучше сразу добавлять в репозиторий README-файл с информацией о проекте. Это можно сделать в момент создания репозитория, поставив галочку в соответствующем поле.
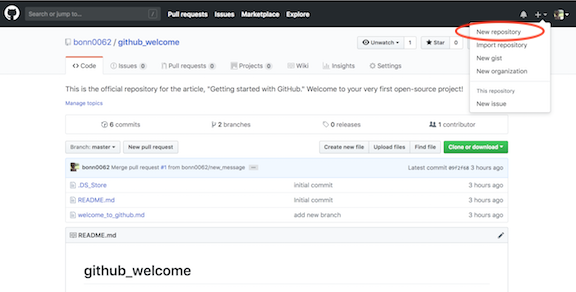
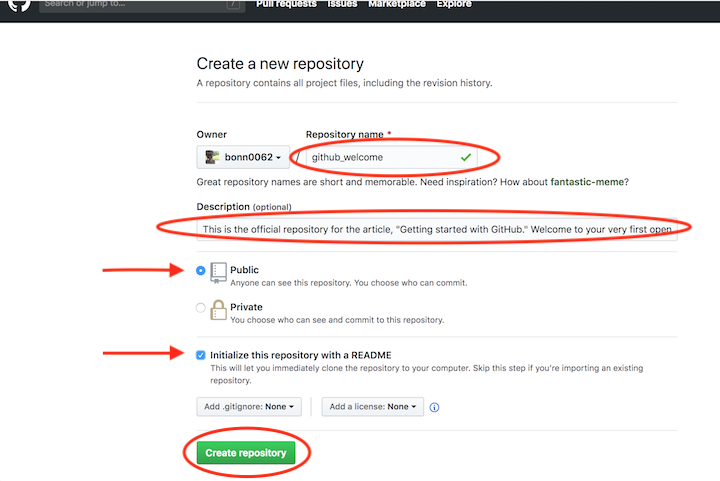
Перейдите на сайт GitHub. Нажмите на значок + в верхнем правом углу, а затем выберите New repository.
Придумайте имя репозитория и добавьте короткое описание.
Решите, будет ли этот репозиторий размещаться в открытом доступе или останется закрытым для просмотра.
Нажмите Initialize this repository with a README для добавления README-файла
Настоятельно рекомендую снабжать все ваши проекты файлом-описанием, ведь README — это первая вещь, на которую люди обращают внимание при просмотре репозитория. К тому же, здесь можно разместить нужную информацию для понимания или запуска проекта.
Новый репозиторий
Создание нового репозитория
При желании можете уже сейчас начинать работать над проектом. Добавляйте файлы, вносите в них изменения и т.д. напрямую с сайта GitHub. Однако конечный результат подобной деятельности может вас немного огорчить.
Вносить изменения в проект можно двумя способами. Вы можете изменять файлы/блокноты на компьютере либо делать это на сайте GitHub.
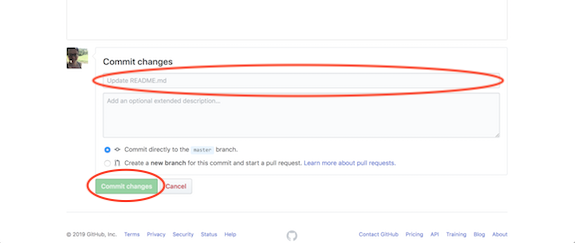
Допустим, вам захотелось подкорректировать README-файл на сайте GitHub.
- Для начала перейдите в ваш репозиторий.
- Для выбора файла кликните по его названию (например, кликните по README.md для перехода к файлу-описанию).
- В верхнем правом углу вы увидите иконку с карандашом. Нажмите на нее для внесения изменений.
- Напишите короткое сообщение, передающее суть изменений (и подробное описание, если сочтете это нужным).
- Нажмите кнопку Commit changes.

Изменение файла на GitHub
Подготовка коммита с изменениями
Вы успешно внесли изменения в README-файл своего нового репозитория! Обратите внимание на небольшую кнопку на картинке выше. Она позволяет создавать новую ветку этого коммита и добавлять Pull request
Запомните ее, скоро к ней вернемся.
Как вы видите — ничего сложного!
Лично я предпочитаю работать с файлами на локальном компьютере, а не на сайте GitHub. Поэтому давайте научимся и этому.
GitHub’s Logos
The license grant included with the Software is not for GitHub’s
trademarks, which include the Software logo designs. GitHub reserves
all trademark and copyright rights in and to all GitHub trademarks.
GitHub’s logos include, for instance, the stylized designs that
include «logo» in the file title in the «logos» folder.
The names GitHub, GitHub Desktop, GitHub for Mac, GitHub for
Windows, Atom, the Octocat, and related GitHub logos and/or stylized
names are trademarks of GitHub. You agree not to display or use
these trademarks in any manner without GitHub’s prior, written
permission, except as allowed by GitHub’s Logos and Usage Policy: https://github.com/logos.
Open-Source Notices
Certain components of the Software may be subject to open-source software licenses («Open-Source Components»), which means any software license approved as open-source licenses by the Open Source Initiative or any substantially similar licenses, including without limitation any license that, as a condition of distribution of the software licensed under such license, requires that the distributor make the software available in source code format. The Software documentation includes copies of the licenses applicable to the Open-Source Components.
To the extent there is conflict between the license terms covering the Open-Source Components and this EULA, the terms of such licenses will apply in lieu of the terms of this EULA. To the extent the terms of the licenses applicable to Open-Source Components prohibit any of the restrictions in this Agreement with respect to such Open-Source Component, such restrictions will not apply to such Open-Source Component. To the extent the terms of the licenses applicable to Open-Source Components require Licensor to make an offer to provide source code in connection with the Product, such offer is hereby made, and you may exercise it by contacting support@github.com
Работа с репозиторием. Меняем файлы и сохраняем обратно
Вне зависимости от того, создали вы репозиторий или клонировали его, так выглядит GitHub Desktop с открытым репозиторием, в котором мы пока ничего не меняли.
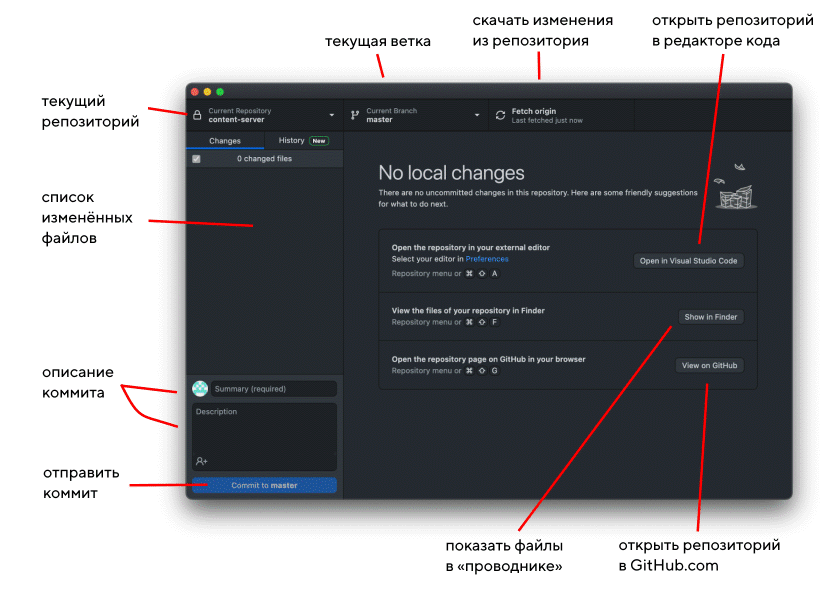
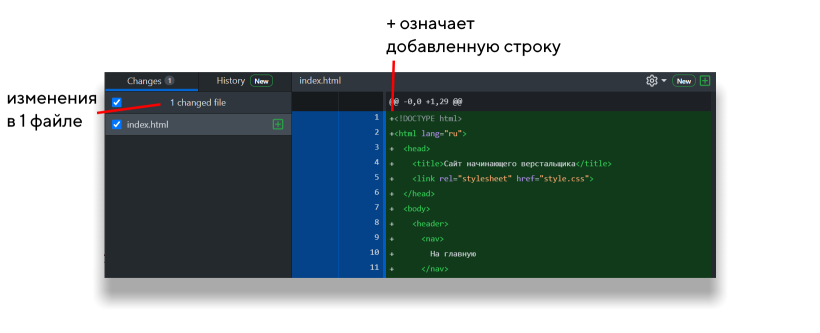
Слева — поле для измененных файлов, справа — служебная информация. Слева снизу — поле для коммитов.
Если не усложнять, то склонированный репозиторий это просто каталог на компьютере. Можно нажать «Show in Finder» на Mac или «Show in Explorer» в Windows и откроется папка, где лежат все файлы, которые есть в репозитории.
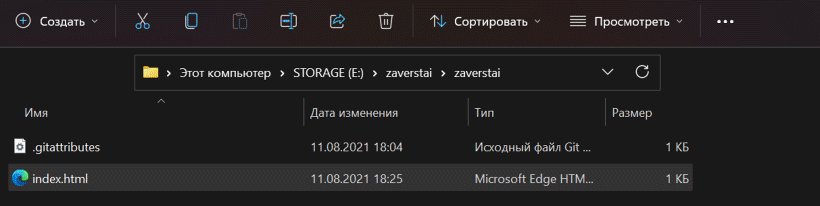
Давайте добавим какой-нибудь файл. Например, я добавил в локальный репозиторий (скопировал в папку) файл index.html, который взял отсюда. Вы можете загрузить файл с кодом вашего проекта или изменить уже существующий.
Сразу после добавления или изменения файла в окне GitHub Desktop будет видно, что изменилось — если мы добавили целый новый файл, то все строчки будут с плюсиками и зелёные. Это значит, что они были добавлены в файл и GitHub Desktop раньше их никогда не видел.
Part 5: Making, committing, and pushing changes
Now that you’ve created and published your repository, you’re ready to make changes to your project and start crafting your first commit to your repository.
-
To launch your external editor from within GitHub Desktop, click Repository, then click Open in EDITOR. For more information, see «Configuring a default editor.»
-
Make some changes to the README.md file that you previously created. You can add information that describes your project, like what it does and why it is useful. When you are satisfied with your changes, save them in your text editor.
-
In GitHub Desktop, navigate to the Changes view. In the file list, you should see your README.md. The checkmark to the left of the README.md file indicates that the changes you’ve made to the file will be part of the commit you make. In the future, you might make changes to multiple files but only want to commit the changes you’ve made to some of the files. If you click the checkmark next to a file, that file will not be included in the commit.
-
At the bottom of the Changes list, enter a commit message. To the right of your profile picture, type a short description of the commit. Since we’re changing the README.md file, «Add information about purpose of project» would be a good commit summary. Below the summary, you’ll see a «Description» text field where you can type a longer description of the changes in the commit, which is helpful when looking back at the history of a project and understanding why changes were made. Since you’re making a basic update of a README.md file, you can skip the description.
-
Click Commit to BRANCH NAME. The commit button shows your current branch so you can be sure to commit to the branch you want.
-
To push your changes to the remote repository on GitHub, click Push origin.
- The Push origin button is the same one that you clicked to publish your repository to GitHub. This button changes contextually based on where you are at in the Git workflow. It should now say with a next to it, indicating that there is one commit that has not been pushed up to GitHub.
- The «origin» in Push origin means that you are pushing changes to the remote called , which in this case is your project’s repository on GitHub.com. Until you push any new commits to GitHub, there will be differences between your project’s repository on your computer and your project’s repository on GitHub.com. This allows you to work locally and only push your changes to GitHub.com when you’re ready.
-
In the window to the right of the Changes view, you’ll see suggestions for actions you can do next. To open the repository on GitHub in your browser, click View on GitHub.
-
In your browser, click 2 commits. You’ll see a list of the commits in this repository on GitHub. The first commit should be the commit you just made in GitHub Desktop.
Introduction
GitHub Desktop extends and simplifies your GitHub.com workflow, using a visual interface instead of text commands on the command line. By the end of this guide, you’ll have used GitHub Desktop to create a repository, make changes to the repository, and publish the changes to GitHub.
After installing GitHub Desktop and signing into GitHub or GitHub Enterprise you can create and clone a tutorial repository. The tutorial will introduce the basics of working with Git and GitHub, including installing a text editor, creating a branch, making a commit, pushing to GitHub.com, and opening a pull request. The tutorial is available if you do not have any repositories on GitHub Desktop yet.
We recommend completing the tutorial, but if you want to explore GitHub Desktop by creating a new repository, this guide will walk you through using GitHub Desktop to work on a Git repository.
Github командная строка
Консоль — ваш друг. По моему опыту, освоение работы с Github через командную строку — лучшая трата времени, когда работаешь с open source-технологиями. Да, существует много хороших графических интерфейсов, но все они менее гибки в использовании. Кроме того, есть инструменты только под командную строку, которые сильно упрощают жизнь и повышают эффективность разработки:
hub — обёртка для Git, облегчающая работу
Не важно, новичок вы или опытный open source-разработчик, hub облегчит извлечение репозиториев, навигацию по страницам проекта, работу с форками и даже отправку pull request’ов. И всё это из командной строки. hub.github.com
tj/git-extras — набор Git-утилит, таких как сводка по репозиторию, repl, журнал изменений, статистика коммитов по авторам, и многое другое. github.com/tj/git-extras
Step 3. Make and commit changes
Bravo! Now, you’re on the code view for your branch, which is a copy of . Let’s make some edits.
On GitHub, saved changes are called commits. Each commit has an associated commit message, which is a description explaining why a particular change was made. Commit messages capture the history of your changes, so other contributors can understand what you’ve done and why.
Make and commit changes
- Click the file.
- Click the pencil icon in the upper right corner of the file view to edit.
- In the editor, write a bit about yourself.
- Write a commit message that describes your changes.
- Click Commit changes button.
These changes will be made to just the README file on your branch, so now this branch contains content that’s different from .
Система контроля версий GIT
Во время работы у программиста часто бывает следующая ситуация:
- Написал фрагмент кода, проверил, программа работает.
- Написал следующий фрагмент, проверил, а программа уже не работает.
Нужно понять, что именно нарушилось, а для этого нужно вернуться к работающей версии. Для этого нужно где-то сохранить копию предыдущей версии.
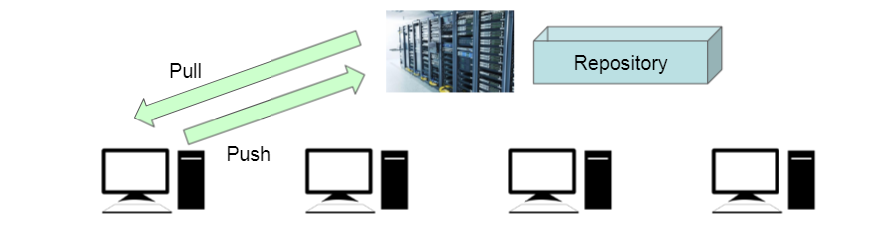
Для этого существуют системы контроля версий, которые называются VCS (Version Control System). Хотя каждая система управления версиями имеет свои специфические особенности, но общий принцип работы у всех один:
- Существует центральное хранилище (Repository), где хранится информация о всех версиях программы.
- Программист перед началом работы получает копию текущей версии (Pull).
- После внесения изменений в программу программист заносит в хранилище следующую версию (Push).
- При ведется журнал изменений и можно в любой момент получить любую версию программы.
На данный момент самой популярной системой контроля версий является GIT. Ядро Git представляет собой набор утилит командной строки с параметрами.
Среди проектов, использующих Git — ядро Linux, Android, jQuery, PHP.
Клиенты Git GUI для Windows:
1. GitHub Desktop
Рабочий стол GitHub в основном является расширением рабочего процесса GitHub. Вы можете войти в систему, используя свои учетные данные GitHub и начать работу с вашими репозиториями. Есть возможность создавать новые репозитории, добавлять локальные репозитории и выполнять большинство операций Git из пользовательского интерфейса. GitHub Desktop является полностью открытым исходным кодом, и он доступен для MacOS и Windows. Нажмите здесь, чтобы загрузить GitHub Desktop.
2. GitKraken
GitKraken — это независимый разработчик Git для Windows. Он поддерживает GitHub, Bitbucket и Gitlab. GitKraken доступен в бесплатных, премиальных и корпоративных вариантах. Бесплатная версия подходит для небольших команд и стартапов, но вам может потребоваться обновиться после того, как ваша команда и работа будут расширяться. Перед использованием этого инструмента вам необходимо зарегистрироваться на сайте. Нажмите здесь, чтобы скачать GitKraken.
3. SmartGit
SmartGit — отличный клиент Git профессионального уровня, который можно использовать для некоммерческих организаций. Вы можете свободно использовать его для разработки open-source и бесплатного программного обеспечения. Но вам может потребоваться приобрести лицензию, если вы собираетесь использовать этот инструмент для коммерческих целей. SmartGit охватывает все функции Git и поставляется со всеми функциями для совместной работы. Инструмент даже поддерживает создание pull-запросов на GitHub. Нажмите здесь, чтобы загрузить SmartGit.
4. SourceTree
SourceTree — бесплатный клиент Git, разработанный Atlassian, компанией, стоящей за Jira и Bitbucket. Этот бесплатный клиент Git показывает огромную поддержку репозиториев, размещенных Bitbucket и GitHub. Перед использованием SourceTree вам необходимо создать учетную запись Atlassian. Нажмите здесь, чтобы загрузить SourceTree.
Итог
Итак, это были некоторые из клиентов Git, которые я использовал и нашел полезными. Если вы просто новичок, я бы рекомендовал использовать такой инструмент, как GitHub Desktop или Source Tree. И если вы опытный разработчик, идите на GitKraken и Smart Git.
Спасибо, что читаете! Подписывайтесь на мои каналы в Telegram, и . Только там последние обновления блога и новости мира информационных технологий.
Респект за пост! Спасибо за работу!
Хотите больше постов? Узнавать новости технологий? Читать обзоры на гаджеты? Для всего этого, а также для продвижения сайта, покупки нового дизайна и оплаты хостинга, мне необходима помощь от вас, преданные и благодарные читатели. Подробнее о донатах читайте на специальной странице.
Есть возможность стать патроном, чтобы ежемесячно поддерживать блог донатом, или воспользоваться Яндекс.Деньгами, WebMoney, QIWI или PayPal:
Заранее спасибо! Все собранные средства будут пущены на развитие сайта. Поддержка проекта является подарком владельцу сайта.
Learn GitHub with GitHub
Learn how to create a site or blog from your GitHub repositories with GitHub Pages.
GitHub
GitHub Pages
Community starter kit
There are millions of projects on GitHub, all competing for attention from the millions of open source contributors available to help. Learn how to help your project stand out.
GitHub
Open Source
Uploading your project to GitHub
You’re an upload away from using a full suite of development tools and premier third-party apps on GitHub. This course helps you seamlessly upload your code to GitHub and introduces you to exciting next steps to elevate your project.
Git
GitHub
Migrating your repository to GitHub
You’re a migration away from using a full suite of development tools and premier third-party apps on GitHub. This course helps you seamlessly move code to GitHub and sets you up to do more after you make the move.
Git
GitHub
See how collaboration works on GitHub and start building great things, together.
GitHub
Managing merge conflicts
Merge conflicts are a normal part of working in Git. Learn why they happen and how to resolve them with ease.
Git
Merge conflicts
GitHub
Security strategy essentials
Learn security best practices and keep your project’s contributions—and contributors—safe.
Security
Dependency management
Rebasing
Auditing
Dependabot
Learn security best practices and keep your project’s contributions—and contributors—safe.
Git
GitHub
Подмодули
Клонирование репозитория с подмодулями
При клонировании репозитория вам необходимо инициализировать и обновить подмодули:
Запуск данной команды эквивалентен запуску команды:
после обычного клонирования репозитория
Обновление подмодулей
Подмодуль ссылается на конкретную коммит в другом репозитории. Чтобы получить
точное состояние всех подмодулей необходимо запустить:
Для получения состояния последнего коммита всех подмодулей необходимо выполнить
следующую команду:
или использовать аргументы по умолчанию команды git pull:
Эта команда просто обновляет локальную рабочую копию. При запуске команды git status
каталоги подмодулей будут показаны изменёнными. Чтобы обновить репозиторий необходимо
зафиксировать изменения:
Для получения состояние последнего коммита конкретного подмодуля необходимо использовать команду:
Добавление подмодулей
В текущий проект можно включить другой репозиторий Git в качестве папки, отслеживаемый Git:
После этого необходимо добавить и зафиксировать новый файл .gitmodules. В нём описано
какие подмодули следует клонировать при запуске команды git submodule update
Part 1: Installing and authenticating
You can install GitHub Desktop on any supported operating system. For more information, see «Supported operating systems.»
To install GitHub Desktop, visit the download page for GitHub Desktop. For more information, see «Installing GitHub Desktop.»
After you have installed GitHub Desktop, you can authenticate the application with your account on GitHub or GitHub Enterprise. Authenticating allows you to connect to remote repositories on GitHub or GitHub Enterprise.
-
Before you can authenticate to GitHub or GitHub Enterprise, you will need an account. For more information about creating an account, see «Signing up for a new GitHub account» or contact your GitHub Enterprise site administrator.
-
In the GitHub Desktop drop-down menu, click Preferences. In the preferences window, click Accounts and follow the steps to sign in. For more information on authenticating, see «Authenticating to GitHub.»
-
Before you can authenticate to GitHub or GitHub Enterprise, you will need an account. For more information about creating an account, see «Signing up for a new GitHub account» or contact your GitHub Enterprise site administrator.
-
In the File drop-down menu, click Options. In the options window, click Accounts and follow the steps to sign in. For more information on authenticating, see «Authenticating to GitHub.»
Languages and Tools
Introduction to HTML
If you are looking for a quick and fun introduction to the exciting world of programming, this course is for you. Learn fundamental HTML skills and build your first webpage in less than an hour.
GitHub Pages
Introduction to Node with Express
Node.js gives you the ability to run JavaScript files on the server-side. Express is a library for Node.js, that allows you to make requests to different «endpoints» and get a response back.
Node
Express
JavaScript
JSON
API
Go from Hello World to writing a short random quote generator using Python.
Python
Learn how to create a dice-rolling app with Python!
Python
Intermediate NodeJS Course
This tutorial expands on concepts in the intro to Node.js and Express.js course. You will learn how to use a database (MongoDB) to Create, Read, Update, and Delete data.
node.js
express.js
mongoose.js
JavaScript
MongoDB
Learn the basics of Ruby. Make a hello world program, then include if/else statements
Ruby
TensorFlow Image Processing
Get started with Machine Learning (ML)/Neural Network (NN) tools
TensorFlow
Python
Machine learning
Neural network
Predict Pokemon stats with the help of the TensorFlow library
TensorFlow
Python
Machine learning
Neural network
Java is an object oriented programming language, which is popular for multi-platform apps.
Java
Introduction to PHP
PHP is a server-side programming language that can insert dynamic code into your HTML. PHP is used in popular content management systems, such as WordPress and Drupal.
PHP
Introduction to Design Thinking
Design Thinking is a human-centric approach to creating solutions. This course will teach you the principles of Design Thinking and walk you through applying its five phases to your projects.
Setting up a Reason React App
Hello and welcome!
In this lab we will cover the basic setup needed to build Reason React applications, covering testing, documenting them, building, and releasing them!
reason
bucklescript
reason-react
react
Learn the basics to create an Express server and follow the REST principles.
NodeJS
JavaScript
Express
Server
In this course you will learn how to create an Android application that displays a TomTom Map
android
tomtom-sdk
maps
Notating with LilyPond
LilyPond is an open source technology for notating music in plain text files. In this course, we’ll cover the fundamentals of music notation in LilyPond.
Introduction to React
In this course, you will learn the basics of React.js through building a gradebook web application to manage assignments, students, and grades.
Common Continuous Integration Team Scenarios
The course guides participants through situations commonly encountered when integrating continuously as a team.
CI
Continuous Integration
Git
DevOps
Team Work
Miscellanea
- If you configure the Software to work with one or more accounts on the GitHub.com website or with an instance of GitHub Enterprise, your use of the Software will also be governed by the GitHub.com website Terms of Service and/or the license agreement applicable to your instance of GitHub Enterprise.
- The failure of GitHub to exercise or enforce any right or provision of this EULA shall not constitute a waiver of such right or provision.
- This EULA constitutes the entire agreement between you and GitHub and governs your use of the Software, superseding any prior agreements between you and GitHub (including, but not limited to, any prior versions of the EULA).
- You agree that this EULA and your use of the Software are governed under California law and any dispute related to the Software must be brought in a tribunal of competent jurisdiction located in or near San Francisco, California.
- Please send any questions about this EULA to support@github.com.
Our most popular courses
Introduction to GitHub
If you are looking for a quick and fun introduction to GitHub, you’ve found it. This class will get you started using GitHub in less than an hour.
Git
GitHub Pages
Branches
Commits
Pull Requests
Create a GitHub Action and use it in a workflow.
GitHub Actions
Workflows
Hello World
Communicating using Markdown
This course will walk you through everything you need to start organizing ideas and collaborating using Markdown, a lightweight language for text formatting.
GitHub
Markdown
Learning should be fun
There are no simulations or boring tutorials here, just hands-on lessons created with by the GitHub community and taught by the friendly Learning Lab bot.
Quick Start: Windows
Prerequisites:
- Windows 7 or newer
First, download and bootstrap vcpkg itself; it can be installed anywhere,
but generally we recommend using vcpkg as a submodule for CMake projects,
and installing it globally for Visual Studio projects.
We recommend somewhere like or ,
since otherwise you may run into path issues for some port build systems.
> git clone https://github.com/microsoft/vcpkg
> .\vcpkg\bootstrap-vcpkg.bat
To install the libraries for your project, run:
> .\vcpkg\vcpkg install
Note: This will install x86 libraries by default. To install x64, run:
> .\vcpkg\vcpkg install :x64-windows
Or
> .\vcpkg\vcpkg install --triplet=x64-windows
You can also search for the libraries you need with the subcommand:
> .\vcpkg\vcpkg search
In order to use vcpkg with Visual Studio,
run the following command (may require administrator elevation):
> .\vcpkg\vcpkg integrate install
After this, you can now create a New non-CMake Project (or open an existing one).
All installed libraries are immediately ready to be ‘d and used
in your project without additional configuration.
If you’re using CMake with Visual Studio,
continue .
In order to use vcpkg with CMake outside of an IDE,
you can use the toolchain file:
> cmake -B  -S . -DCMAKE_TOOLCHAIN_FILE=/scripts/buildsystems/vcpkg.cmake
> cmake --build
With CMake, you will still need to and the like to use the libraries.
Check out the for more information,
including on using CMake with an IDE.
For any other tools, including Visual Studio Code,
check out the integration guide.
