Downloads
Содержание:
- Pre-built toolchains and packages
- Building from source
- Step 3
- Установка и настройка Clion
- Set a watch
- Build helloworld.cpp
- Download & install a build / development environment
- Настройка Netbeans
- See (some) bibliography below:
- Сборка
- Установка и настройка Code::Blocks
- Unsorted complementary list
- Step 4
- Most Recent Activity
- PDB support
- Установка MinGW
- Mingw-w64
- Version 9 has been released
- Headers, Libraries and Runtime
- Tools
- Qt-builds
- Debug helloworld.cpp
- Now we have to actually install the packages needed for programming.
- Step 2
- Microsoft Visual Studio Community
Pre-built toolchains and packages
| Version | Host | GCC / Mingw-w64 Version | Languages | Additional Software in Package Manager | |
|---|---|---|---|---|---|
| Arch Linux | Ada, C, C++, Fortran, Obj-C, Obj-C++ | many | |||
| Rolling | Windows | 5.4.0/5.0.2 | Ada, C, C++, Fortran, Obj-C | 5 (bzip2, libgcrypt, libgpg-error, minizip, xz, zlib) | |
| Debian 7 (Wheezy) | 4.6.3/2.0.3 | Ada, C, C++, Fortran, Obj-C, Obj-C++, OCaml | 2 (gdb, nsis) | ||
| Debian 8 (Jessie) | 4.9.1/3.2.0 | ||||
| Debian 9 (Stretch) | 6.3.0/5.0.0 | 9 (gdb, libassuan, libgcrypt, libgpg-error, libksba, libnpth, nsis, win-iconv, zlib) | |||
| Debian 10 (Buster) | 8.3.0/6.0.0 | ||||
| Fedora 19 | 4.8.1/? | Ada, C, C++, Fortran, Obj-C, Obj-C++ | 149+ | ||
| 20210423 | Windows, Linux | LLVM 12.0.0/trunk | C, C++ | make | |
| Rolling | macOS | C, C++, Fortran, Obj-C, Obj-C++ | 1 (nsis) | ||
| Rolling | Windows | 7.2.0/5.0.3 | C, C++, Fortran | 4 (gdb, libiconf, python, zlib) | |
| Rolling | Windows | Ada, C, C++, Fortran, Obj-C, Obj-C++, OCaml | many | ||
| 12.04 Precise Pangolin | 4.6.3/2.0.1 | Ada, C, C++, Fortran, Obj-C, Obj-C++, OCaml | 2 (nsis, gdb) | ||
| 14.04 Trusty Tahr | 4.8.2/3.1.0 | ||||
| 14.10 Utopic Unicorn | 4.9.1/3.1.0 | ||||
| 15.04 Vivid Vervet | 4.9.2/3.2.0 | ||||
| 15.10 Wily Werewolf | 4.9.2/4.0.2 | ||||
| 16.04 Xenial Xerus | 5.3.1/4.0.4 | 3 (nsis, gdb, zlib) | |||
| 1.5 | Windows, Linux | 4.8.3/3.3.0 | C, C++ | 91+ |
Installation:
- Community repository (toolchain)
- AUR repository (additional packages)
Cygwin
Cygwin is a Unix-like environment and command-line
interface for Microsoft Windows. Its core is the cygwin1.dll library which
provides POSIX functionality on top of the Win32 API. It can be used as a build
environment which targets Windows directly and for which output doesn’t depend
on cygwin1.dll.
Installation is done through cygwin’s package manager:
setup.exe.
As part of the numerous packages in cygwin, there are cross-compilation
toolchains which target both 32 bits and 64 bits; their names start with
“mingw64-”.
Once they are installed, they should be used according to the general
cross-compilation approach.
LLVM-MinGW
LLVM-MinGW is a toolchain built with Clang, LLD, libc++, targeting
i686, x86_64, arm and aarch64 (ARM64), with releases both for running
as a cross compiler from Linux and for running on Windows. It supports
Address Sanitizer, Undefined Behaviour Sanitizer, and generating debug
info in PDB format.
MacPorts
To install just the 32-bit or just 64-bit compiler with dependencies, use:
A shortcut to install both:
Here is the list of Mingw-w64 packages on MacPorts.
Win-Builds
Win-builds is a cross-platform project that makes building for Windows easy. It
supports building from both Windows and Linux systems and provides many
pre-built libraries which can be installed through a graphical package manager.
It aims for stability while still providing recent versions of software
packages.
Installation: http://win-builds.org.
Building from source
The toolchain can be compiled for installation in the current Unix
environment, fetching sources as needed:
To reduce the size of the installation, removing some files that
aren’t necessary after building, run:
It can also be built, reproducibly, into a Docker image:
Individual components of the toolchain can be (re)built by running
the standalone shellscripts listed within . However, if
the source already is checked out, no effort is made to check out a
different version (if the build scripts have been updated to prefer
a different version) — and likewise, if configure flags in the build-*.sh
scripts have changed, you might need to wipe the build directory under
each project for the new configure options to be taken into use.
Step 3
Once done install Cmake. Open Cmake and do the following
- Choose a source code path and a binaries path. Make sure they are separate.
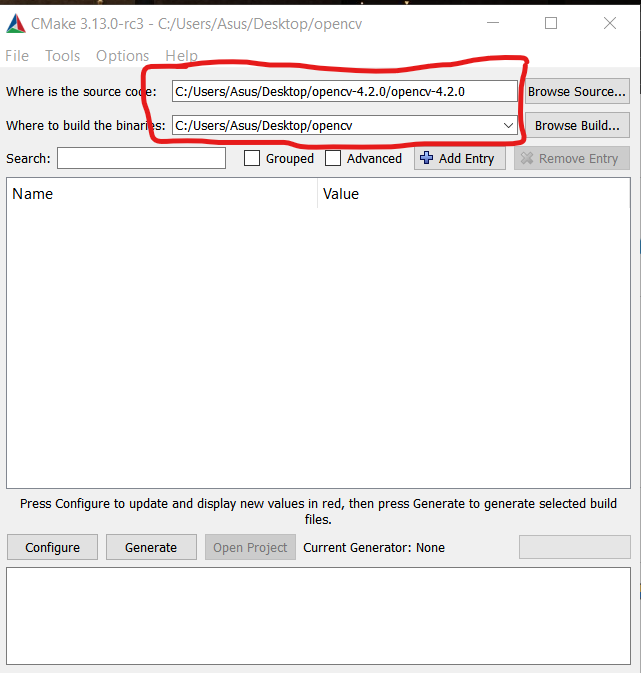
Fig: Make sure this is how it is
2. Once done click on configure.A dialogue box will appear select MinGW Makefiles. This will make sure that the OpenCV new makefiles are compatible to mingw.
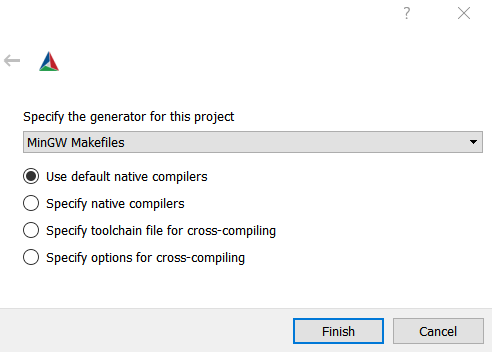
Fig: Make sure this is how it is.
3. Click Finish. Let it generate some stuff. At this stage you should have some list of options to tick on. I did not needed any special attention to any of those options. So go on and click on Generate. Match the output from below, it should say “Configuration done” and “Generating done”
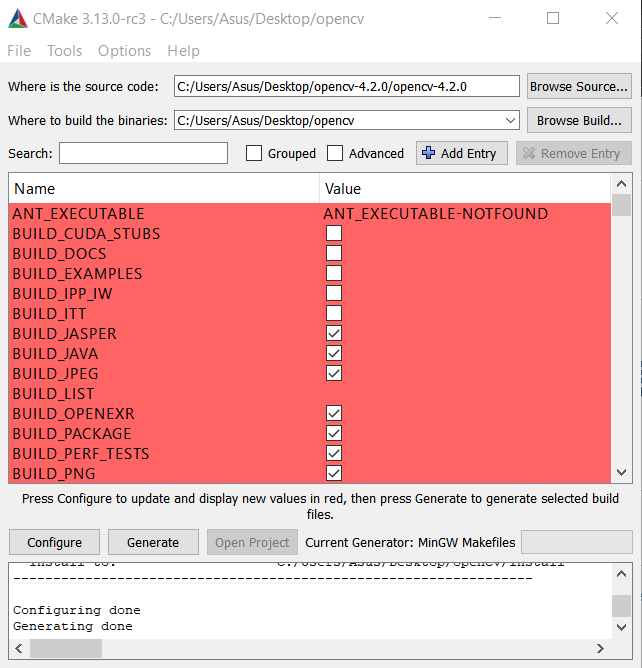
Fig: look ate the output
Установка и настройка Clion
Установка Clion никакой сложности не представляет. Жмём «Next» на всех экранах. Более сложна настройка CLion после запуска.
1. Здесь можно просто нажать OK. На других экранах, которые не упомянуты ниже, можно просто нажимать «Next».file:clion1.png
2. Здесь нужно получить лицензию на использование Clion, для этого нужно ввести свой логин и пароль от кабинета на сайте jetbrains.com. Предварительно необходимо самостоятельно регистрироваться и получать лицензии на странице https://www.jetbrains.com/student/, при этом в качестве адреса электронной почты нужно указать адрес в домене @179.ru – тогда вы получите академическую лицензию на все продукты.file:clion2.png
3. Здесь нужно добавить компилятор MinGW. Кликайте на ссылку MinGW.file:clion2.png
4. На следующем экране нужно ввести выбрать путь к каталогу, куда установлен MinGW («Use MinGW home»). Дождитесь, пока clion определит версии компилятора и gdb.file:clion4.png
5. На следующих экранах настраиваются дополнительные плагины, они вам не нужны, просто жмем Next.
Set a watch
Sometimes you might want to keep track of the value of a variable as your program executes. You can do this by setting a watch on the variable.
-
Place the insertion point inside the loop. In the Watch window, click the plus sign and in the text box, type , which is the name of the loop variable. Now view the Watch window as you step through the loop.
-
Add another watch by adding this statement before the loop: . Then, inside the loop, add this statement: . Now add a watch for as you did in the previous step.
-
To quickly view the value of any variable while execution is paused on a breakpoint, you can hover over it with the mouse pointer.
Build helloworld.cpp
Next, you’ll create a file to tell VS Code how to build (compile) the program. This task will invoke the g++ compiler to create an executable file based on the source code.
From the main menu, choose Terminal > Configure Default Build Task. In the dropdown, which will display a tasks dropdown listing various predefined build tasks for C++ compilers. Choose g++.exe build active file, which will build the file that is currently displayed (active) in the editor.

This will create a file in a folder and open it in the editor.
Your new file should look similar to the JSON below:
The setting specifies the program to run; in this case that is g++. The array specifies the command-line arguments that will be passed to g++. These arguments must be specified in the order expected by the compiler. This task tells g++ to take the active file (), compile it, and create an executable file in the current directory () with the same name as the active file but with the extension (), resulting in for our example.
The value is what you will see in the tasks list; you can name this whatever you like.
The value in the object specifies that this task will be run when you press ⇧⌘B (Windows, Linux Ctrl+Shift+B). This property is for convenience only; if you set it to false, you can still run it from the Terminal menu with Tasks: Run Build Task.
Running the build
-
Go back to . Your task builds the active file and you want to build .
-
To run the build task defined in , press ⇧⌘B (Windows, Linux Ctrl+Shift+B) or from the Terminal main menu choose Run Build Task.
-
When the task starts, you should see the Integrated Terminal panel appear below the source code editor. After the task completes, the terminal shows output from the compiler that indicates whether the build succeeded or failed. For a successful g++ build, the output looks something like this:
-
Create a new terminal using the + button and you’ll have a new terminal with the folder as the working directory. Run and you should now see the executable .
-
You can run in the terminal by typing (or if you use a PowerShell terminal).
Modifying tasks.json
You can modify your to build multiple C++ files by using an argument like instead of . This will build all files in your current folder. You can also modify the output filename by replacing with a hard-coded filename (for example ).
Download & install a build / development environment
Note however, that the programs resulted are not totally «portable» as they are dependent on some libraries.
Based on my experience:
- MinGW is simple to install,
- but some tools are missing or not working as they should from the default installation (e.g. make or clang).
- the installer is ok(ish), but the process of selection is tedious.
- the uninstall is a little tricky (even while is not actually «installing» something but rather creating some folders and extracting some files there) — but basically means deleting some folder(s) and files.
(Another parenthesis: the fact that there are multiple versions of MinGW, and the discussion about what is Cygwin vs MinGW vs MSYS will be left for some other time… see for example here https://github.com/msys2/msys2/wiki/How-does-MSYS2-differ-from-Cygwin)
-
Please keep the default path for installation (i.e. ), even try to shorten it as much as possible. For example, or — see more in the link above. Just hit «Next».
It will ask to launch the console, proceed to it. Otherwise look from the in the base directory (the one chosen above).
Настройка Netbeans
Netbeans следует указать, где найти файлы заголовков и скомпилированные
библиотеки (которые были созданы в предыдущем разделе).
Файлы заголовков необходимы по двум причинам: для компиляции и для кода
завершение. Скомпилированные библиотеки необходимы для этапа компоновки.
Примечание. Чтобы отладка работала, должна быть доступна DLL OpenCV,
поэтому мы добавили каталог, который содержит их в систему PATH
(предыдущий раздел, шаг 5.4).
Во-первых, вы должны убедиться, что Netbeans настроен правильно для работы с
MinGW. Посмотрите снимок экрана ниже и убедитесь, что ваши настройки верны
(учитывая изменения путей в соответствии с вашей собственной установкой)
Также обратите внимание
что команда должна быть от msys и не от Cygwin
Далее, для каждого нового проекта, который вы создаете в Netbeans, вы должны определить
include path (каталог, который содержит файлы заголовков), библиотеки
путь и конкретные библиотеки, которые вы собираетесь использовать. Щелкните правой кнопкой мыши проект
имя в области «проекты» и выберите «свойства». Добавить путь включения
(измените путь в соответствии с вашей собственной установкой):
Добавить путь к библиотекам:
Добавьте конкретные библиотеки, которые вы собираетесь использовать. Эти библиотеки будут
динамически связанные с вашей программой на этапе компоновки. Обычно вам понадобится
библиотеки и любых других библиотек в соответствии с конкретными потребностями
вашей программы.
Чтобы это, вы теперь готовы использовать OpenCV!
See (some) bibliography below:
My tasks.json
{
    // See https://go.microsoft.com/fwlink/?LinkId=733558
    // for the documentation about the tasks.json format
    "version" "2.0.0",
    "tasks":
}
My launch.json (works well enough for debugging purposes)
{
    // Use IntelliSense to learn about possible attributes.
    // Hover to view descriptions of existing attributes.
    // For more information, visit: https://go.microsoft.com/fwlink/?linkid=830387
    "version" "0.2.0",
    "configurations": [
        {
            "name": "(gdb) Launch",
            "type": "cppdbg",
            "request": "launch",
            "program": "${workspaceFolder}/${fileBasenameNoExtension}.exe",
            "args": [],
            "stopAtEntry": false,
            "cwd": "${workspaceFolder}",
            "environment": [],
            "externalConsole": true,
            "MIMode": "gdb",
            "miDebuggerPath": "C:/msys64/mingw64/bin/gdb.exe",
            "setupCommands":
        }
    ]
}
There are better configurations though 🙂
Note the use of forward slashes «/» in the paths specifications above — VSC recognizes them. Otherwise one can put escaped backslashes «\».
${workspaceFolder} - the path of the folder opened in VS Code
${workspaceFolderBasename} - the name of the folder opened in VS Code without any slashes (/)
${file} - the current opened file
${relativeFile} - the current opened file relative to workspaceFolder
${fileBasename} - the current opened file's basename
${fileBasenameNoExtension} - the current opened file's basename with no file extension
${fileDirname} - the current opened file's dirname
${fileExtname} - the current opened file's extension
${cwd} - the task runner's current working directory on startup
${lineNumber} - the current selected line number in the active file
${selectedText} - the current selected text in the active file
Note: The ${workspaceRoot} variable is deprecated in favor of the ${workspaceFolder} variable.
Сборка
При необходимости задайте флаги сборки:
64 бита:
export CFLAGS="-g0 -O2 -pipe -Wl,-S"
export CXXFLAGS="-g0 -O2 -pipe -Wl,-S"
32 бита:
export CFLAGS="-g0 -O2 -pipe -Wl,-S -march=pentium -mtune=i686"
export CXXFLAGS="-g0 -O2 -pipe -Wl,-S -march=pentium -march=i686"
Сборка GMP
Создайте поддиректорию build для сборки gmp:
cd build
mkdir gmp
cd gmp
Находясь в директории build запустите скрипт конфигурирования gmp:
../../src/gmp/configure --prefix=/support --host=i686-w64-mingw32 --build=i686-w64-mingw32 --enable-cxx --disable-shared
Теперь соберите всё остальное.
make CPPFLAGS="-fexceptions"
И, наконец, установите GMP.
make install
Сборка MPFR
Создайте поддиректорию build для сборки mpfr:
cd build
mkdir mpfr
cd mpfr
Находясь в директории build запустите скрипт конфигурирования mpfr:
../../src/mpfr/configure --prefix=/support --host=i686-w64-mingw32 --build=i686-w64-mingw32 --with-gmp=/support --disable-shared
Теперь соберите всё остальное.
make
И, наконец, установите MPFR.
make install
Сборка MPC
Создайте поддиректорию build для сборки mpc:
cd build
mkdir mpc
cd mpc
Находясь в директории build запустите скрипт конфигурирования mpc:
../../src/mpc/configure --prefix=/support --host=i686-w64-mingw32 --build=i686-w64-mingw32 --with-gmp=/support --with-mpfr=/support
 --disable-shared
Теперь соберите всё остальное.
make
И, наконец, установите MPC.
make install
Сборка binutils
Создайте поддиректорию build для сборки binutils:
cd build
mkdir binutils
cd binutils
Находясь в директории build запустите скрипт конфигурирования binutils:
64 бита:
../../src/binutils/configure --prefix=/RosBE64 --host=i686-w64-mingw32 --build=i686-w64-mingw32 --target=x86_64-w64-mingw32
--disable-nls --disable-werror --disable-multilib --with-sysroot=/RosBE64
32 бита:
../../src/binutils/configure --prefix=/RosBE64 --host=i686-w64-mingw32 --build=i686-w64-mingw32 --target=i686-w64-mingw32
--disable-nls --disable-werror --disable-multilib --with-sysroot=/RosBE64
Теперь соберите всё остальное.
make
И, наконец, установите binutils.
make install
Сборка gcc-core
Перейдите в директорию build:
cd ..
mkdir gcc
cd gcc
Теперь запустите запустите скрипт конфигурирования:
64 бита:
../../src/gcc/configure --prefix=/RosBE64 --host=i686-w64-mingw32 --build=i686-w64-mingw32 --target=x86_64-w64-mingw32
--with-gmp=/support --with-mpfr=/support --with-mpc=/support --with-pkgversion="RosBE-Windows"
--enable-languages=c,c++ --enable-checking=release --disable-win32-registry --disable-shared --disable-nls --disable-werror
--disable-multilib --with-sysroot=/RosBE64 --enable-version-specific-runtime-libs --with-host-libstdcxx="-lstdc++ -lsupc++"
32 бита:
../../src/gcc/configure --prefix=/RosBE64 --host=i686-w64-mingw32 --build=i686-w64-mingw32 --target=i686-w64-mingw32
--with-gmp=/support --with-mpfr=/support --with-mpc=/support  --with-pkgversion="RosBE-Windows"
--enable-languages=c,c++ --enable-checking=release --disable-win32-registry --disable-shared --disable-nls --disable-werror
--disable-multilib --with-sysroot=/RosBE64 --enable-version-specific-runtime-libs --with-host-libstdcxx="-lstdc++ -lsupc++"
Скомпилируйте gcc-core
make all-gcc
и установите его
make install-gcc
и, наконец, добавьте его в переменную PATH.
PATH=$PATH:/RosBE64/bin ; export PATH
Сборка crt
Создайте директорию для сборки.
cd ..
mkdir mingw-w64-crt
cd mingw-w64-crt
Запустите скрипт конфигурирования
64 бита:
../../src/mingw-w64/mingw-w64-crt/configure --prefix=/RosBE64 --host=x86_64-w64-mingw32 --build=i686-w64-mingw32 --with-sysroot=/RosBE64
32 бита:
../../src/mingw-w64/mingw-w64-crt/configure --prefix=/RosBE64 --host=i686-w64-mingw32 --build=i686-w64-mingw32 --with-sysroot=/RosBE64
Скомпилируйте
make
И установите
make install
Скопируйте директорию /RosBE64/x86_64-w64-mingw32 (64 бита) или /RosBE64/i686-w64-mingw32 (32 бита) в /RosBE64/mingw.
Перейдите в директорию сборки gcc build directory.
cd ..
cd gcc
И скомпилируйте всё остальное.
make
make install
Распространённые ошибки
При компилировании crt:
configure: error: Please check if the mingw-w64 header set and the build/host option are set properly.
- Убедитесь, что скопировали директорию mingw-headers/include directory как в /RosBE64/x86_64-w64-mingw32 так и в /RosBE64/mingw
- Убедитесь, что вы правильно установили путь к новому компилятору в переменной PATH
- Убедитесь, что новый компилятор установлен правильно («make install-gcc»)
Установка и настройка Code::Blocks
1. Рекомендуется скачивать Code::Blocks, содержащий компилятор MinGW, а потом исправить настройки MinGW. Ссылка для скачивания: https://sourceforge.net/projecw-setup.exe/download
2. Установка Code::Blocks затруднений не представляет.
3. При первом запуске Code::Blocks обнаруживает Gnu GCC Compiler – скорее всего встроенный. Его нужно заменить на установленный MinGW. Нужно открыть меню «Settings – Compiler», На вкладке «Toolchain exacutables» Compiler’s installation directory заменить на каталог с MinGW (например, C:\soft\mingw-w64\i686-7.2.0-posix-dwarf-rt_v5-rev1\mingw32)
В этом же окне ниже пути к компиляторам. Три первых пути нужно
отредактировать (убрать «mingw32-» из имен файлов) на
gcc.exe
g++.exe
g++.exe
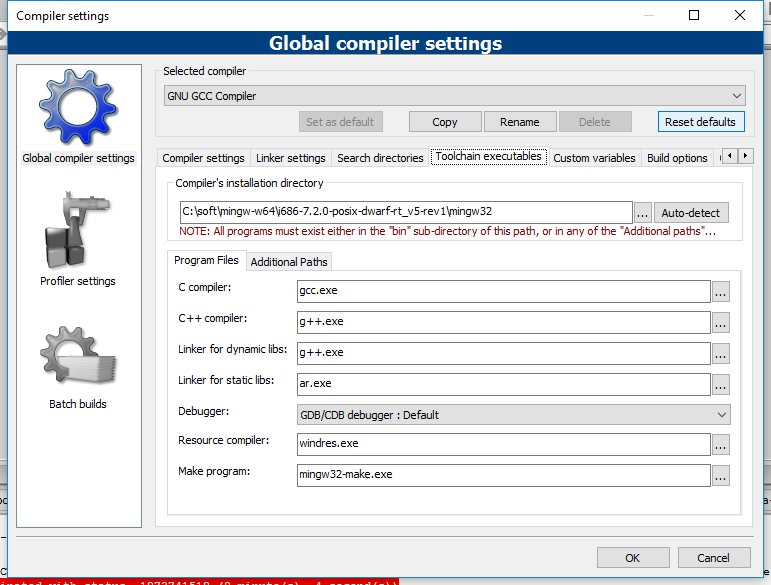
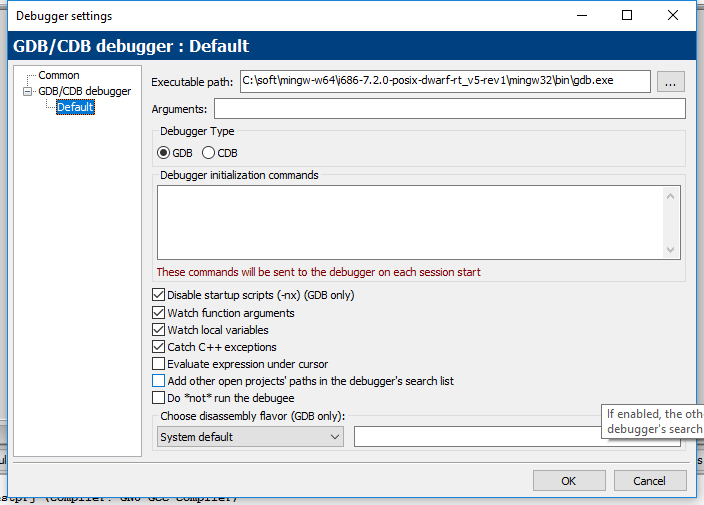
4. Также нужно настроить путь к отладчику gdb.exe, для этого открыть меню «Settings – Debugger»
На левой панели окна настроек выбрать «GDB/CDB Debugger – default»
В поле «Executable path» ввести пусть к файлу gdb.exe из установки MinGW, например,
C:\soft\mingw-w64\i686-7.2.0-posix-dwarf-rt_v5-rev1\mingw32\bin\gdb.exe
Unsorted complementary list
Darwin/Mac OS X
The existing Darwin binaries have been built through buildbot in 2013 and links
to them can be found on the dedicated
page.
Rubenvb
Rubenvb has built a number of toolchains including some for less common setups.
They are split into two categories: toolchains targeting
Win32
or
Win64.
GCC with the MCF thread model
GCC with the MCF thread model is a series of x86
and x64 native toolchains built by LH_Mouse. The MCF thread model involves the
mcfgthread library to provide minimum
yet complete C++11 thread support. Disregarding POSIX or Windows XP
compatibility, it implements (hopefully the most) efficient mutexes and
condition variables that are competitive with even native slim reader/write
(SRW) locks and condition variables since Windows Vista.
Store of binaries on SourceForge
A very large number of other binaries and sources are hosted in the File
Release System on Sourceforge which
might have what you are after.
Step 4
Remember we chose a binaries folder, keep that in mind. Now navigate to that folder and open a terminal. In my case the folder I will have to navigate is. “ C:\Users\Asus\Desktop\opencv”. Open a terminal in this folder. I use git-bash and you can use too. hit command “mingw32-make install” and pray that it builds hopefully. Because if it does my tutorial was successful.
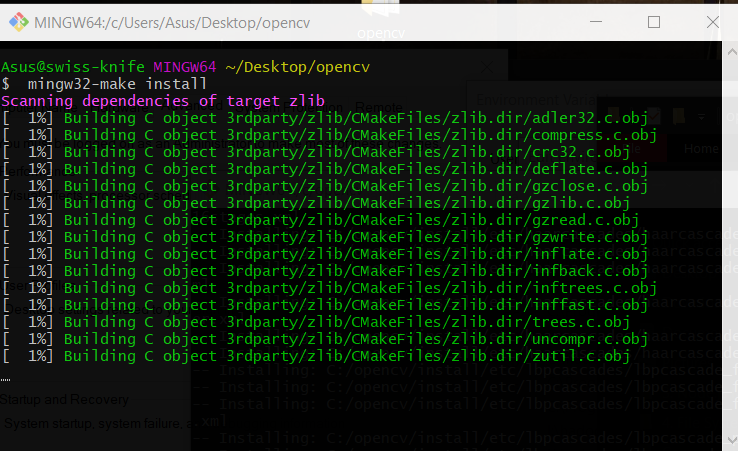
Fig: During build process
After it’s done it should look like this. Also C++ compilation process takes a lot of time, LOT OF TIME !!! There are conference discussion on the same !! So you understand how serious is this problem.
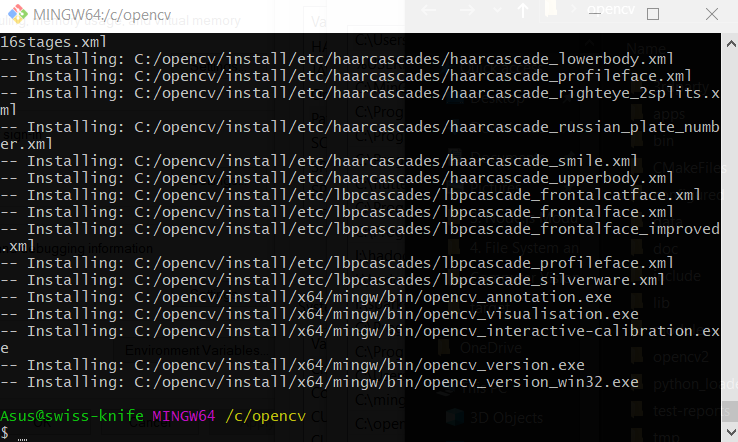
Fig: One eternity later. your build is done.
At this point a new folder install will be created in your targeted build folder. We are concerned with the contents of this folder. So let’s do one thing. Lets move our build folder to “C:” drive root path that contains the install folder also. Now we add the binary path. Refer from the above image. In the environment variable there is a second path that points at the bin folder add that to environment variable also. Path “C:\opencv\install\x64\mingw\bin” must be included in environment variable. This was in our case. These paths are IMPORTANT !!! Make sure it is there. The bin folder consist of all the various compiled binaries that are required for our OpenCV C++ compiled application. So you can choose to ship your application but then you will require the dll inside the bin to be shipped with your application also. Also since they are dll you cannot statically link them. So “-static” does not works. At least I could not get it done.
Most Recent Activity
Martin Storsjö committed 07.09.2021
crt: Expand mixed tabs/space indentation in mingw_pformat.c to plain spaces
07.09.2021
Fair point, should indeed likely just use copysign.
David James created ticket #91607.09.2021
asinh incorrect for large values
07.09.2021
I don’t think return ( x >= 0.0 ? z : -z); would be correct, since it would then give 0.0 for asinh(-0.0) (it should give -0.0, which it currently does). (I think atanh is coded per the suggestion, and gives the incorrect 0.0 for atanh(-0.0)). Isn’t it possible to just use copysign?
04.09.2021
This turned out to be a bug on my end with my configuration fortunately. Sorry for the confusion. I dont see were to close this issue so i cant do it.
04.09.2021
This turned out to be a bug on my end with my configuration fortunately. Sorry for the confusion.
01.09.2021
First, there was no issue with the code, since all versions worked fine under linux compiler. It was just issues with messages when cross-compiling the code for windows. Seems some C functions require extra dll support files. I was able to rewrite functions to use other code like fopen to access files, and then use a loop to use fprintf to write binary data. Have tested all of those programs, and they all run fine on a real windows 10 machine with no additional dll files. Didn’t try the compile that…
31.08.2021
On Sat, Aug 28, 2021, 16:58 Michael Setzer II msetzerii@users.sourceforge.net wrote: I have never installed the ming compiler in either windows or in wine. Only have the program installed in the standard linux. That would seem strange that you would have to install the compiler on any machine that wanted to run the exe program to have the dll files available?? You need the language Runtime library available. If you choose to link dynamically, you need to make sure it’s available when linking and…
Martin Storsjö committed 31.08.2021
Fix hexadecimal formatting of long doubles.
30.08.2021
Had copied code and pasted into codebuilder and saved it. Assumed it was saving as .cpp, but it was saving it as .c, and that is why it was making the changes necessary. Had tried the code in linux codebuilder and it compiled with no changes needed. Then went back to the windows codebuiler, and recompiled using source files with .cpp, and they compiled with no changes. Did notice that the .cpp code produces larger exe files. from .cpp from .c % .c/.cpp changex.exe 86,263 55,921 64.83% fixf2b6.exe…
PDB support
To produce debug info in PDB format, you currently need to do the following
changes:
- Add to the compilation commands (e.g. in
), together with using as usual to
enable debug info in general. - Add to linking commands. This creates a PDB file at the same
location as the output EXE/DLL, but with a PDB extension. (By passing
or one can explicitly specify
the name of the output PDB file.)
Even though LLVM supports this, there are a few caveats with using it when
building in MinGW mode:
- Microsoft debuggers might have assumptions about the C++ ABI used, which
doesn’t hold up with the Itanium ABI used in MinGW. - This is unimplemented for the armv7 target, and while implemented for aarch64,
it doesn’t seem to work properly there yet.
Установка MinGW
Для установки требуется подключение к сети интернет.
Запустите установщик, он скачает и установит все необходимые файлы.
Жмите «Next».
Диалог сообщает нам, что программа запущена администратором компьютера и будет установлена для всех пользователей.
На этом этапе укажем загружать последнюю версию программного обеспечения.
Соглашаемся с условиями лицензионного соглашения и жмём «Next».
Укажем путь для установки. Не рекомендуется устанавливать в директорию или субдиректорию имеющюю в своём имени пробелы.
Рзмещайте все файлы по стандартному пути, например, «C:\MinGW».
Настройка ярлыков, можно оставить как есть и нажать «Next».
Выбор компонентов для установки.
В данном случае выбраны компилятор С и С++, инструменты для разработки и комплект утилит командной строки — MSYS.
Подтверждение настроек.
Если всё выбрано правильно, жмём «Install».
Начало установки — ожидаем начала загрузки компонентов.
Автоматически запускается консольное окно, в котором отражается весь ход процесса — в данный момент загружаются списки пакетов.
В следующем окне мы можем наблюдать за прогрессом загрузки.
Установка окончена, если вы не хотите читать подробный отчёт о процессе установки, снимите галочку.
Закройте окно установщика — нажмите «Finish».
Проверим, готова ли операционная система для полноценной работы с MinGW. В свойствах компьютера на вкладке «Дополнительно» кликните по кнопке «Переменные среды».
Нам потребуется значение переменной PATH, там должны быть прописаны пути к папкам с исполняемыми файлами MinGW и MSYS, в данном случае это директории «C:\MinGW\bin» и «C:\MinGW\msys\1.0\bin».
Если эти значения не были автоматически добавлены в переменную в процессе установки, допишите их вручную, добавте в начало строку «C:\MinGW\bin;C:\MinGW\msys\1.0\bin;», только без кавычек.
Если в вашей операционной системе отсутствует переменная PATH, то создайте её самостоятельно.
Теперь, когда все инструменты установлены, можно использовать GCC компиляторы в режиме командной строки или настроить их использование в своей IDE.
Mingw-w64
Mingw-w64 is an advancement of the original mingw.org project, created to support the GCC compiler on Windows systems. It has forked it in 2007 in order to provide support for 64 bits and new APIs. It has since then gained widespread use and distribution.
The development and community are very active and welcoming with new contributors every month and simple installers.
Version 9 has been released
Notable changes:
- UCRT updates by Biswapriyo Nath
- Wine updates by Jacek Caban
- Various new and updated API headers by Biswapriyo Nath and Liu Hao
- Various UCRT and MSVCRT fixes by Martin Storsjö
- at_quick_exit implementation by Martin Storsjö
- dism API by Biswapriyo Nath
- idl fixes by Steve Lhomme
- Winpthreads fixes by Liu Hao
- gettimeofday precision increase by Christian Franke
You can also look at the full list of versions.
Headers, Libraries and Runtime
- More than a million lines of headers are provided, not counting generated ones, and regularly expanded to track new Windows APIs.
- Everything needed for linking and running your code on Windows.
- Winpthreads, a pthreads library for C++11 threading support and simple integration with existing project.
- Winstorecompat, a work-in-progress convenience library that eases conformance with the Windows Store.
- Better-conforming and faster math support compared to Visual Studio’s.
Tools
- gendef: generate Visual Studio .def files from .dll files.
- genidl: generate .idl files from .dll files.
- widl: compile .idl files.
Qt-builds
Notes
This is the set of scripts to build Qt : either with «MinGW-builds» based toolchains under MSYS, or, to build Qt : with
MSYS2 repo (also based on «MinGW-builds») based toolchains under MSYS2.
- If you want to use pre-compiled or pre-built Qt & QtCreator binary files, then follow one of these:
- The «MSYS2» based Qt binary builds (pre-built) can be downloaded from
Prerequisites
To build Qt, these are required:
- Internet connection
- Either use MSYS or MSYS2. Do not use both, (unless you know what you are doing).
Initial Setup
- Either use MSYS, or MSYS2. Do not use both, (unless you know what you are doing).
- If you are going to use MSYS: extract or install MSYS into C:directory
- If you are going to use MSYS2: extract or install MSYS2 into C:2 directory
- Prepare MSYS or MSYS2 for development environment: pre-install build related required dependencies & components.
- Run MSYS (or MSYS2)
- run git checkout scripts:
Building Qt
Now scripts provide building Qt-4.8.4, Qt-5.0.0, Qt-5.0.1, Qt-5.0.2, Qt5 from git with latest release of QtCreator, qbs(from git). Buildinq Qt is simple by run:
For example,
build 32-bit Qt-5.0.0 with QtCreator-2.7.0 and install them into C:/QtSDK/Qt32-5.0.0, Qt dependencies and prerequisites will be installed into C:/QtSDK/ported32.
For building Qt5 from git you need specify branch what you want to build. If you don’t specify branch then by default building stable branch.
This command download qt5 from git stable branch and try to build 32-bit version of Qt5.
Note: If you want to move Qt directory elsewhere than after moving you need to execute from QTDIR:
Other useful options are:
Notes: Do not use (or try to avoid using) different type of toolchains for building different sub-components for the same/main project, when targeted for same platform/OS. If you are using MinGW-w64 based toolchains from MSYS2\mingw32 or MSYS2\mingw64, then for all sub-components build and for main project build, use same MSYS2 toolchains. If you are using MinGW toolchain, then for all of your sub-components & main project build, use same MinGW toolchain. If you are using MinGW-w64 toolchains from «MinGW-builds», then for all sub-components and for main project build, use same MinGW-builds toolchains.
Debug helloworld.cpp
Next, you’ll create a file to configure VS Code to launch the GDB debugger when you press F5 to debug the program.
- From the main menu, choose Run > Add Configuration… and then choose C++ (GDB/LLDB).
- You’ll then see a dropdown for various predefined debugging configurations. Choose g++.exe build and debug active file.

VS Code creates a file, opens it in the editor, and builds and runs ‘helloworld’.
The setting specifies the program you want to debug. Here it is set to the active file folder and active filename with the extension , which if is the active file will be .
By default, the C++ extension won’t add any breakpoints to your source code and the value is set to .
Change the value to to cause the debugger to stop on the method when you start debugging.
Start a debugging session
- Go back to so that it is the active file.
- Press F5 or from the main menu choose Run > Start Debugging. Before you start stepping through the source code, let’s take a moment to notice several changes in the user interface:
-
The Integrated Terminal appears at the bottom of the source code editor. In the Debug Output tab, you see output that indicates the debugger is up and running.
-
The editor highlights the first statement in the method. This is a breakpoint that the C++ extension automatically sets for you:
-
The Run view on the left shows debugging information. You’ll see an example later in the tutorial.
-
At the top of the code editor, a debugging control panel appears. You can move this around the screen by grabbing the dots on the left side.
Now we have to actually install the packages needed for programming.
- Run in the console (this is the same pacman package manager form Arch Linux). If the version is smaller than 5.0.1 run first (but I doubt you will need to use such «older» versions).
- Launch .
- You will get some errors about catgets — choose .
- At some moment the console will freeze as it tries to update itself. Just close it (from Windows) and launch again until it does nothing at pacman -Syuu. The update will take a while. The «freeze» may happen also when you do periodical checks for updates (when updating bash or some base libraries)
- Install the build packages.
- The first one is . There will be over 70 packages and more than 200 MB. Just choose . This will install basic tools and libraries needed for basic development (you will have and included, also , and so on.)
- Then install for building mingw64 packages. (you can query — see below — and choose the package name). This will have like 40 packages and over 700 MB (deflated). There will be some overhead as not all of them are really needed.
- Optionally you can install for building mingw32 packages.
- Also optionally CLANG (search first with ) or Cmake (),
Some pacman commands useful for General Package Management
- Query about the existence of some package: . It will indicate the correct name for the package and also if it’s installed or not. For example,
- Installing new packages:
For example, . In this example is a package group which contains many packages. If you try to install a package group, will ask you whether you want to install one package from the group or all of the packages from the group. - Removing packages:
- Searching for packages:
After MSYS installation:
- Modify the system variable in Windows (through «Edit the system variables» in Control Panel — you can edit it system-wide or per-user) to contain the paths for MSYS and MinGW installations.
Step 2
Setup Mingw-w64. In case you had trouble finding the link. Look here . Go for the link that says Online Installer for MinGW-GW64. Direct link , may break in future.
- Install MinGW-GW64 with the following setting
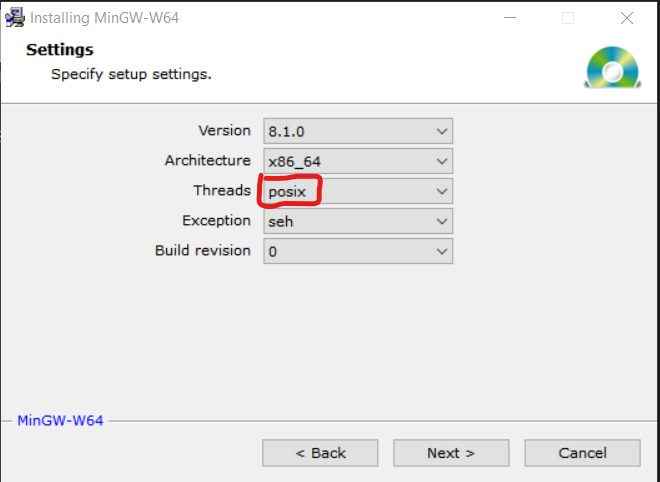
Fig: Posix thread must be chosen. MUST BE.
Make sure posix is selected. Otherwise the OpenCV installation will fail with unable to find mutex error. Which is part of pthreads library and specs. Architecture can be x86(32/64 bit machin) or x86_64(64bit machine) based on your working system.
2. Click next configure path of installation and let the binaries install.
3. After installation make sure to include MinGW bin folder in your path. It should be inside “..basePath/x86_64–8.1.0-posix***/mingw64/bin”
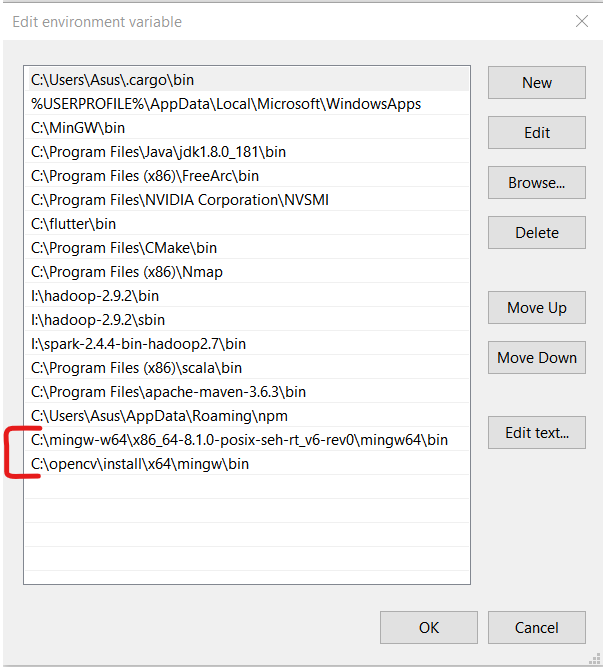
Fig: The path is based on your installation folder so do accordingly.
After this just test the installation by opening a terminal and type command “g++ — version”. If it says command not found. It could not get the path ,path was not set right, restart terminal or the machine. It should work! Google for the same !
Microsoft Visual Studio Community
Для индивидуальных или начинающих программистов Microsoft Visual Studio Community включает в себя много важных инструментов из коммерческих версий проекта. Вы получите в свое распоряжение IDE, отладчик, оптимизирующий компилятор, редактор, средства отладки и профилирования. С помощью этого пакета можно разрабатывать программы для настольных и мобильных версий Windows, а также Android. Компилятор C++ поддерживает большинство функций ISO C++ 11, некоторые из ISO C++ 14 и C++ 17. В то же время компилятор C уже безнадежно устарел и не имеет даже надлежащей поддержки C99.
Программное обеспечение также поставляется с поддержкой построения программ на C#, Visual Basic, F# и Python. В то время, когда я писал эту статью, на сайте проекта утверждалось, что Visual Studio Community 2015 «бесплатный инструмент для индивидуальных разработчиков, проектов с открытым исходным кодом, научных исследований, образовательных проектов и небольших профессиональных групп».
