Qemu/kvm и установка windows
Содержание:
- Additional Options
- Получение отладочных сообщений
- Виртуализация операционных систем в QEMU
- Linux User space emulator
- Troubleshooting
- Virtual FAT disk images
- Подготовка
- Настройка параметров QEMU
- Configuration
- Настраиваем SSH на виртуалке
- Конвертация образа диска qemu-img convert
- Запуск и инсталляция
- VM snapshots
- QEMU 4.2.
- Конкретный пример
- NVMe disk images
- Проверка оборудования
- Qemu-system-ppc installation
- Создание файла образа
- Advanced usage
Additional Options
Sharing Files With XP and Networking
It’s not much use having an XP installation if you can’t transfer files between Ubuntu and XP. Fortunately, QEMU sets up a virtual LAN and DHCP server for you. You can transfer files to and from XP just as if it was on a real LAN. You can also browse the net and download files and do all the network stuff you would do on a real networked XP box.
Sharing Files between the Host and VM
QEmu supports file sharing between the VM and host if you have Samba configured on the host system. The following assumes you have a share called ‘qemu_share’ in your home directory intended to transfer files between Ubuntu and Windows.
To set this up, start QEmu with the following command:
qemu -smb $HOME/qemu_share -m 384 -localtime windows.img
Inside Windows, you can access the shared drive with the following command from a DOS prompt. For example, to map Windows drive ‘e’ to the share
net use e: \\10.0.2.2\qemu_share
The IP address of Ubuntu will always be 10.0.2.2. If you have running servers on your Ubuntu box, they can also be accessed at this IP address (e.g. ftp://10.0.2.2)
USB Tablet Emulation
NOTE: Changes made to the Ubuntu Gutsy Gibbon and Hardy Heron distribution code have broken the USB functionality in QEMU. If you need USB functionality with QEMU please see the details here: here .
QEmu can emulate a USB tablet input device instead of an ordinary mouse. Since a tablet reports the pointer position in absolute coordinates, it is possible to have the guest pointer track the host pointer position directly without a mouse grab. Running QEmu with the command line options «-usb -usbdevice tablet» enables USB emulation and the tablet input device:
qemu -m 384 -localtime -usb -usbdevice tablet windows.img
Windows XP automatically uses the tablet without having to install any additional drivers.
(TODO: Maybe these options should simply be added to the default ones at the top of the page. Not everyone will find this paragraph, and the feature is so useful that it should probably be recommended for general use. —DanielElstner)
Mounting A Virtual Drive
You can also mount the QEmu virtual disk just like any other drive. QCOW images cannot be mounted. If the drive was created in qcow format you’ll need to convert it first, see .
Make sure you are NOT running QEMU when you do this. Windows will not recognize anything you write while running QEMU. Even worse, it will perceive that something changed and will run the chkdsk the next time you start QEMU. Also, you may only be able to read something wrote by windows after the windows is closed.
To mount the drive, create a directory ‘/media/qemu’. Then run
sudo mount -t ntfs -o loop,offset=32256 windows.raw /media/qemu
Or you can have it automatically mounted by adding the following line to /etc/fstab
/home/user/windows.raw /media/qemu ntfs rw,user,loop,offset=32256 0 0
Saving and Restoring the State of the VM
You can quickly save and restore the state of your Windows System using QEmu’s ‘overlay images’. Once you have done your initial install, you can create an overlay image and run QEMU off this. The overlay image is very much smaller that the original image and will only contain changes made since the original install. If you trash your XP installation, you can simply delete the overlay image and create a new one from the original image.
To create an overlay image, use the qemu-image program. To create an image windows.ovl from windows.img, issue the following
qemu-img create -b windows.img -f qcow windows.ovl
To run Windows, you would now use
qemu windows.ovl -enable-audio -user-net -localtime -smb qemu_share
If the winxp.ovl installation is ruined, you can delete it, and start QEmu using the winxp.img file. But you will lose changes made since the original install.
Snapshot mode
With the option -snapshot, QEmu writes to temporary files instead of disk image files. In this case, the raw disk image you use is not written back. You can however force the write back by pressing C-a s. The snapshot mode if useful to try a program that you don’t trust (you should never trust a closed source program).
QEmu Monitor
QEmu also accepts commands from the shell while it is running. To do this, though, you need to press CTRL+ALT+2 with the QEmu window active. This brings up the QEmu Monitor. From here, you can swap CDs, send keypresses to the emulator, suspend to disk and so on. See the official documentation for full details.
eject cdrom
change cdrom /path/to/some.iso
To exit the QEmu monitor press CTRL+ALT+1
Converting a qcow image to a raw file
To convert a qcow image, ‘windows.img’, to a raw ‘windows.raw’ file , run
qemu-img convert windows.img -O raw windows.raw
qemu-img convert windows.img -O qcow windows.qcow
Получение отладочных сообщений
По умолчанию, отладочные сообщения ReactOS отправляются в последовательный порт (COM1).
Для получения этих данных, вам потребуется QEMU версии 0.6.1 или более поздней, позволяющие задать параметр -serial.
Примеры:
-serial file:"C:\roslog.txt" -serial pipe:"\\pipe1\" -serial COM4
Перенаправление в файл
Если вы используете виртуальную машину QEMU и хотите, чтобы данные, передоваемые через последовательный порт, перенаправлялись в файл, добавьте следующий параметр в командную строку QEMU:
-serial file:FILENAME
Замените FILENAME именем файла, в который будут выводиться отладочные сообщения.
Перенаправление в консоль
Описанный выше метод перенаправляет вывод в файл. Если вы хотите переадресовать его в консоль, то существует два различных метода. Они зависят от операционной системы, в которой вы запускаете QEMU.
В Windows, добавьте следующий параметр в командную строку QEMU:
-serial file:CON
В Unix-системе, добавьте следующий параметр в командную строку QEMU:
-serial stdio
Соединение с последовательным портом при использовании com0com
Установите драйвер com0com как описано в руководстве по Com0com.
Добавьте следующий параметр в командную строку QEMU
-serial COM4
Пишите «COM4» только заглавными буквами, иначе QEMU не сможет использовать последовательный порт!
Откройте клиент терминала и подключитесь ко второму виртуальному порту. Если этого порта в списке нет, то попробуйте COM4.
Виртуализация операционных систем в QEMU
В отличие от VirtualBox и подобных гипервизоров, QEMU не имеет графического интерфейса, работа с ней ведется через командную строку. Команд и параметров для создания и управления виртуальными машинами много, но для начала вам нужно знать хотя бы эти шесть.
• qemu-system — задает архитектуру виртуальной машины.• qemu-img create — создает файл виртуального IMG-диска, на который будет устанавливаться операционная система.• -m — выделяет виртуальной ОС указанный объем оперативной памяти.• -hda — подключает созданный виртуальный диск.• -boot IMG — указывает, что загрузка должна производиться с виртуального диска, вместо IMG следует указать имя IMG-файла.• cdrom — содержит путь к установочному образу ISO, эмулирует дисковод.
Примечание: для запуска операционных систем, работающих в режиме LiveCD достаточно будет трех команд/параметров — первой, третьей и шестой.
Чтобы вам стало всё немного понятнее, установим и запустим с помощью QEMU какую-нибудь операционную систему. Для примера мы выбрали Windows XP, так как она легкая и занимает на диске мало места. QEMU у нас уже установлен, открываем командную строку, переходим в каталог установки и создаем виртуальный жесткий диск следующей командой:
qemu-img.exe create -f raw c.img 5000M
Файл qemu-img.exe в эмуляторе отвечает за создание IMG-образов, с — это название образа, 5000 — размер виртуального диска в мегабайтах. По умолчанию образ будет создан в папке QEMU.
Теперь сформируем следующую команду:
qemu-system-i386w.exe -boot c -m 350 -hda c.img -cdrom «E:\WinXP_SP3.iso»
Исполняемый файл в начале команды отвечает за создание виртуальной машины с архитектурой х86, -boot с ключом -с сообщает, что грузиться она будет с диска, в значение параметра -hda подставляем созданный образ, а в качестве значения параметра –cdrom указываем путь к дистрибутиву Windows.
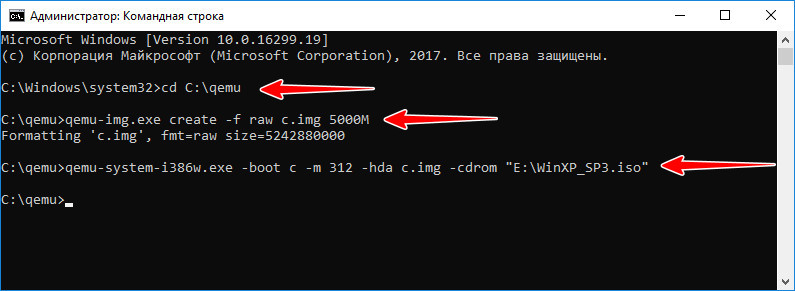
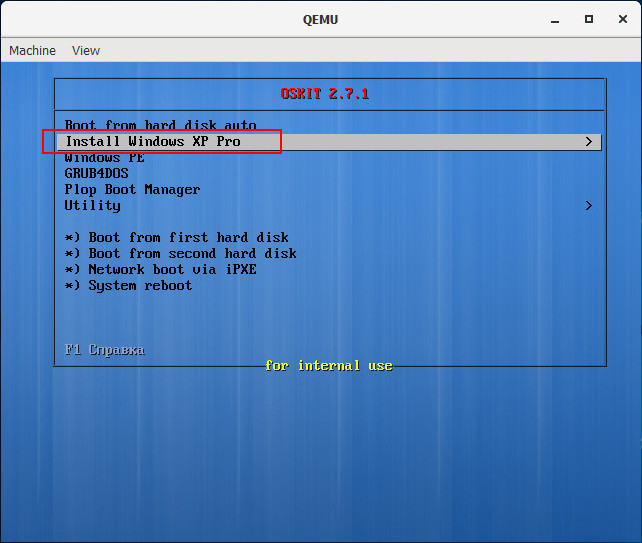
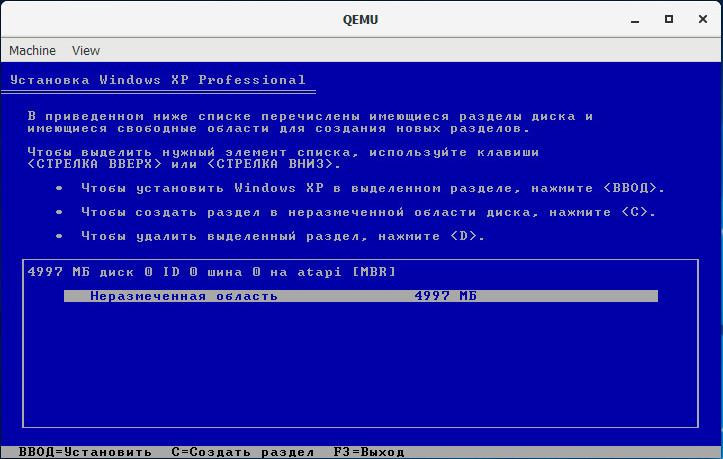
После выполнения команды появляется окошко QEMU с загрузочным меню, в котором мы выбираем установку на диск.
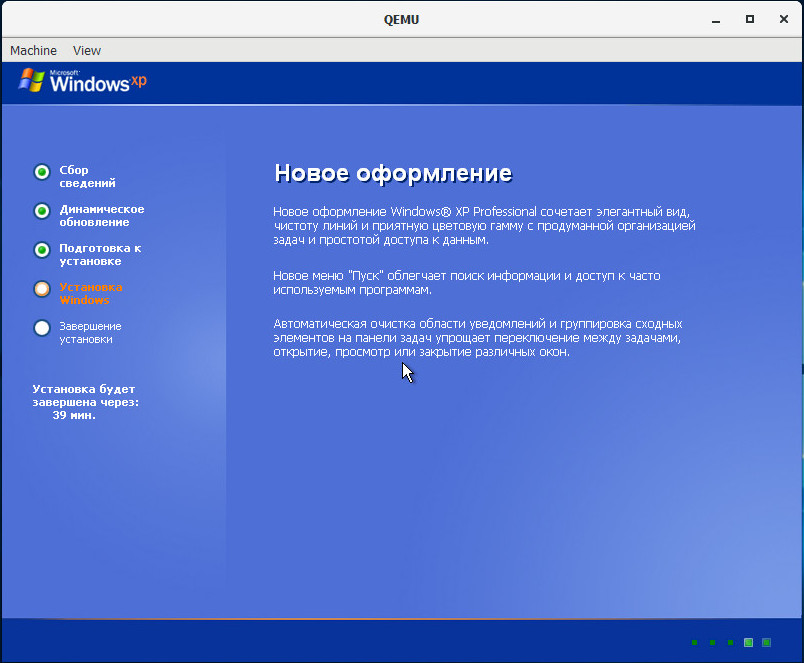
Далее проходим все этапы установки операционной системы вплоть до локальных настроек и загрузки рабочего стола.

Чтобы запустить закрытую виртуальную машину, выполните команду qemu-system-i386w.exe -hda name.img, где name — название вашего виртуального диска, чтобы удалить ставшую ненужной VM, просто удалите из каталога установки QEMU созданный IMG-образ.
Управлять QEMU можно с помощью клавиатуры и мыши, для переключения между эмулятором и хостовой машиной используйте комбинацию Ctrl+Alt+G. Запущенная с минимальными настройками ОС не будет иметь доступа к аудио- и сетевой карте, не будет также возможности обмена файлами между виртуальной и хостовой системами.
Нельзя сказать, что QEMU лучше или хуже VirtualBox либо VMware, это альтернативное средство виртуализации, имеющие как свои плюсы, так и минусы. QEMU менее удобен, требует знания документации и демонстрирует весьма небольшую производительность. Для ускорения работы в Windows требуется установка и настройка Диспетчера аппаратного ускорения HAXM, в Linux – подключение загружаемого модуля ядра KVM. С другой стороны, инструмент позволяет эмулировать работу устройств на базе разных архитектур, не поддерживаемые популярными гипервизорами.
Linux User space emulator
Command line options
qemu-i386 -h -d -L path -s size -cpu model -g port -B offset -R size program arguments...
- Print the help
- Set the x86 elf interpreter prefix (default=/usr/local/qemu-i386)
- Set the x86 stack size in bytes (default=524288)
- Select CPU model (-cpu help for list and additional feature
selection) - Set environment var to value.
- Remove var from the environment.
- Offset guest address by the specified number of bytes. This is useful
when the address region required by guest applications is reserved on
the host. This option is currently only supported on some hosts. - Pre-allocate a guest virtual address space of the given size (in
bytes). “G”, “M”, and “k” suffixes may be used when specifying
the size.
Debug options:
- Activate logging of the specified items (use ‘-d help’ for a list of
log items) - Act as if the host page size was ‘pagesize’ bytes
- Wait gdb connection to port
- Run the emulation in single step mode.
Environment variables:
- QEMU_STRACE
- Print system calls and arguments similar to the ‘strace’ program
(NOTE: the actual ‘strace’ program will not work because the user
space emulator hasn’t implemented ptrace). At the moment this is
incomplete. All system calls that don’t have a specific argument
format are printed with information for six arguments. Many
flag-style arguments don’t have decoders and will show up as numbers.
Troubleshooting
«kvm: already loaded the other module»
Sometimes during the early boot splash the error message «kvm: already loaded the other module» can be seen. This message indicates both the Intel and the AMD kernel virtual machine settings have been enabled in the kernel. To fix this, enable as a module or disable either the Intel or AMD KVM option specific to the system’s processor in the kernel configuration. For example, if the system has an Intel processor enable the Intel KVM, then make sure the AMD KVM is set as a module (M) or is disabled (N). The relevant options to enable or disable can be found in the kernel’s .config file via the CONFIG_KVM_INTEL and CONFIG_KVM_AMD variables or in the configuration section above.
Creating TUN/TAP device — No such file or directory
Sometimes this error can occur if TUN/TAP support cannot be found in the kernel.
To solve this, try loading the driver:
If that works, add this to a file in /etc/modules-load.d/ to load on startup:
FILE
tun
Virtual FAT disk images
QEMU can automatically create a virtual FAT disk image from a
directory tree. In order to use it, just type:
qemu-system-x86_64 linux.img -hdb fat:/my_directory
Then you access access to all the files in the
directory without having to copy them in a disk image or to export
them via SAMBA or NFS. The default access is read-only.
Floppies can be emulated with the option:
qemu-system-x86_64 linux.img -fda fat:floppy:/my_directory
A read/write support is available for testing (beta stage) with the
option:
qemu-system-x86_64 linux.img -fda fat:floppy:rw:/my_directory
What you should never do:
Подготовка
Самый первый шаг — настройка параметров ядра. Обязательна поддержка и , желательна поддержка туннельных интерфейсов и сетевого моста. Полный список на .
Подготовьте дисковое пространство. Я выделил 70 GiB, и Windows 8.1 за пару месяцев использовала почти 50 GiB так, что для обновления до 10-й версии места на диске не хватило.
Далее, нам понадобится набор редхатовских драйверов . Если у вас установлен RedHat, достаточно запустить
и образ iso будет записан в каталог . Также можно его скачать с репозитариев Fedora.Убедитесь, что поддержка аппаратной виртуализация включена в BIOS/UEFI. Без этого не будет активирован, а выдаст вот такую ошибку.

В качестве проверки можно прочитать файл устройства.
Если файл не обнаружен, а опции ядра выставлены верно, значит дело в настройках .
Устанавливаем нужные пакеты.
Для RedHat 7 достаточно установить только , так как устанавливается по умолчанию.
Дебианщикам надо установить пакет .
Можно теперь переходить к установке.
Настройка параметров QEMU
Отредактируйте файл настроек:
/etc/libvirt/qemu.conf
# Позволит vnc слушать на всех адресах
vnc_listen = "0.0.0.0"

# Отключим tls (если виртуальны машины используются не для тестирования, то лучше tls включить и настроить)
vnc_tls =

# Пароль по умолчанию для vnc - он будет использоваться в том случае, если для виртуальной машины не указан свой пароль
vnc_password = "XYZ12345"

# Пользователь от которого будет запускаться QEMU
user = "root"

# Группа от которой будет запускаться QEMU
group = "root"

# Формат сохранения и дампов, gzip или другое сжатие позволит уменьшить место, занимаемое образами, но притом увеличит время сохранения образов.
save_image_format = "gzip"
dump_image_format = "gzip"
Запустите демон libvirt и добавьте его в автозагрузку:
/etc/init.d/libvirtd start
rc-update add libvirtd
Также для виртуальной сети нам понадобятся модули и . Загрузите модули:
modprobe -a tun vhost_net
и добавьте их в автозагрузку:
/etc/modules-load.d/qemu.conf
tun
vhost_net
Configuration
Host
To create a disk image for the virtual machine, run:
Since QEMU requires a lot of options, it would be a good idea to put them into a shell script, e.g.:
FILE
#!/bin/sh
exec qemu-system-x86_64 -enable-kvm \
        -cpu host \
        -drive file=WindowsVM.img,if=virtio \
        -net nic -net user,hostname=windowsvm \
        -m 1G \
        -monitor stdio \
        -name "Windows" \
        "$@"
Change the path to the disk image WindowsVM.img in the script. Additional options can be used when calling the script. To boot the disk image, run:
Install the Windows guest. See the for optimum support. After the installation start the script without the additional options.
NoteWhen upgrading to QEMU 1.3 the must be added to keep the guest responsive. Also change to to have a network interface in your guest.
NoteWhen upgrading to QEMU 1.5.3 you have to add to keep your full screen session full screen. Without this option I got a (new) menu bar at the top of the screen, pushing the Windows bottom menu off screen.
Guest
- During installation at the partition step Windows doesn’t detect the VirtIO hard drive. Windows will require the viostor driver from the driver image listed above.
- After installation the VirtIO Ethernet adapter will appear without a driver. Windows will require the netkvm driver from the driver image listed above.
For 32-bit Windows 7 a sound driver for the Intel 82801AA AC97 exists.
- For 64-bit Windows 7 Intel HDA is available as an option (QEMU option: )
- Windows 10 guest audio emulation is tricky for ALSA users. Pass these options to QEMU:
- This assumes that you are using the default ALSA device for playback.
- we cannot use AC97 for Windows 10 because there is no driver for it.
- is an odd option, but without it I got nothing but clicks and pops during playback.
- there may be more options required for line-in and line-out () or microphone and line-out ().
USB 2.0 pass through can be configured from host to guest with variations of: -usb -device usb-ehci,id=ehci -device usb-host,bus=ehci.0,vendorid=1452
- For Windows 8.1 USB tablet is available only with USB 2.0 pass through (QEMU option:
- Another device that can be presented to the Windows guest is the random number generator. Add QEMU option: . Now install the viorng driver from the driver image.
SPICE
QEMU with SPICE support enables (among other things) the more powerful QXL display device and makes clipboard sharing possible (copy/paste between clients and the virtual machine).
To use SPICE with QEMU enable the following USE flag in package.use:
FILE Setting USE variable
app-emulation/qemu spice
Build QEMU:
Guest
If you want to try the new qlx-dod driver linked above, in order to use the driver you need to ‘update’ the basic windows display adapter driver and point it to the unzipped folder for the new driver. This can be found by: Right click the Start button -> Device Manager. Expand ‘Display adapters’ and right click on the sub entry and hit update driver.
Initialization script
FILE
#!/bin/sh
SPICE_PORT=5924
qemu-system-x86_64 -enable-kvm -daemonize \
    -cpu host \
    -drive file=WindowsVM.img,if=virtio \
    -net nic -net user,hostname=windowsvm \
    -m 1G \
    -vga qxl \
    -spice port=${SPICE_PORT},disable-ticketing \
    -usbdevice tablet \
    -device virtio-serial \
    -chardev spicevmc,id=vdagent,name=vdagent \
    -device virtserialport,chardev=vdagent,name=com.redhat.spice.0 \
    "$@"
exec spicy --title Windows 127.0.0.1 -p ${SPICE_PORT}
FILE
#!/bin/sh
SPICE_PORT=5924
qemu-system-x86_64 -enable-kvm -daemonize \
    -cpu host \
    -drive file=WindowsVM.img,if=virtio \
    -net nic -net user,hostname=windowsvm \
    -m 1G \
    -vga qxl \
    -spice port=${SPICE_PORT},disable-ticketing \
    -usbdevice tablet \
    -device virtio-serial \
    -chardev spicevmc,id=vdagent,name=vdagent \
    -device virtserialport,chardev=vdagent,name=com.redhat.spice.0 \
    "$@"
exec remote-viewer --title Windows spice://127.0.0.1:${SPICE_PORT}
Настраиваем SSH на виртуалке
Для создания канала управления виртуалкой осталось сделать совсем чуть чуть:
- Прописать пароль для -пользователя в виртуалке;
- Создать ключи на виртуалке для SSH-сервера, чтобы он стартовал без ругани;
- Прописать в конфиг SSH-сервера возможность подключаться от имени рута с использованием пароля.
Начнём с пароля для . Здесь нас снова выручает , который, на самом деле, позволяет Вам делать с виртуальным диском поистине удивительные вещи, одна из которых — прописать пароль для -пользователя:
Теперь осталось сгенерировать ключи для SSH и подправить конфиг. Для этого нам надо всего-то надо выполнить пару команд:
Вот только вопрос, а как же нам выполнить эти команды? Ведь работает только с образами дисков, никаких виртуальных машин на этом этапе не создаётся. Однако, у есть ещё пара козырей в рукаве. Он позволяет запускать программы гостевой системы без запуска собственно гостевой системы с помощью параметра :
И теперь… всё! Канал настроен! Можно было бы даже попробовать подключиться, если бы не одно «но». После выполнения команды виртуалка только-только начинает включаться. Между моментом включения виртуалки и запуском на ней ssh сервера может пройти несколько секунд. Поэтому нам потребуется организовать незатейливый механизм ожидания ssh сервера:
Также, мне пришлось добавить параметр к команде ssh для того, чтобы запрос на добавление сервера в список доверенных серверов не блокировал выполнение скрипта. Так же мне пришлось воспользоваться утилитой для того, чтобы автоматизировать ввод пароля.
Конвертация образа диска qemu-img convert
Для конвертации одного формата образа в другой используется опция convert:
qemu-img convert -c -f fmt -O out_fmt -o options fname out_fname
где:
-c — компрессия (сжатие) целевого диска. Компрессию поддерживают только и форматы.
-f fmt — формат исходного диска, в большинстве случаев хорошо определяется автоматически.
-O out_fmt — формат целевого диска
-o options — куча опций. Чтобы узнать, какие опции допустимы для данной конвертации можно ввести:
$ qemu-img convert -O qcow2 ca.img ca1.img -o ?
Supported options:
size Virtual disk size
compat Compatibility level (0.10 or 1.1)
backing_file File name of a base image
backing_fmt Image format of the base image
encryption Encrypt the image
cluster_size qcow2 cluster size
preallocation Preallocation mode (allowed values: off, metadata)
lazy_refcounts Postpone refcount updates
Запуск и инсталляция
Запускаем и создаем новую виртуальную машину из локального хранилища.

Указываем путь к установочному iso образу Windows.
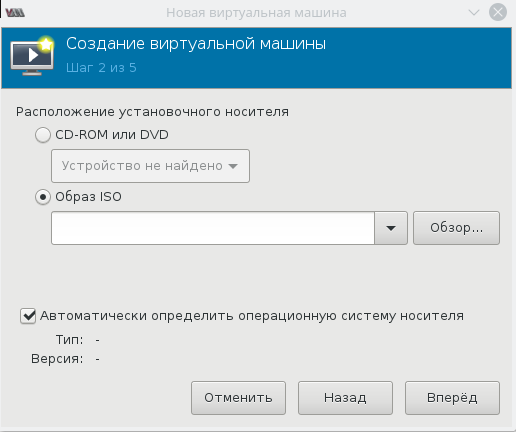
Далее, на 3-м и 4-м шаге будет выбор количества CPU, объем RAM и размер дискового пространства, после чего на 5-м шаге следует выбрать дополнительные конфигурации перед настройкой.
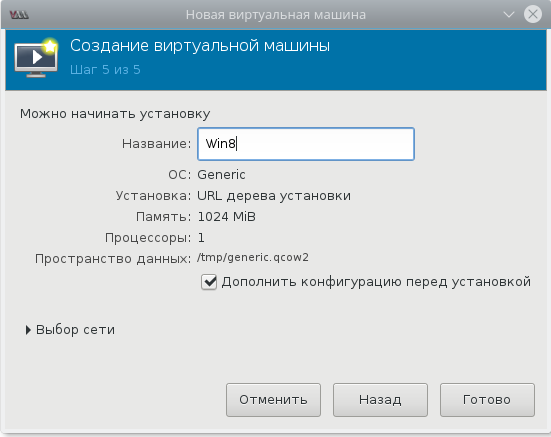
Окно дополнительных настроек нужно для того, чтобы выполнить финт ушами. Его смысл в том, чтобы добавить виртуальный флопарь с драйверами из набора . Это даст возможность изменить тип жесткого диска: удалить диск с шиной IDE и добавить его же, но с шиной VirtIO. Подробно, в доках RedHat.

Прописываем драйвер и добавляем виртуальный флоппи-диск. Затем переходим на вкладку и проделываем финт с заменой шины диска: удаляем с IDE и добавляем с VirtIO.

Чуть не забыл сказать, для чего нужен этот фокус. Специалисты утверждают, что с шиной VirtIO, производительность диска ощутимо выше.
В принципе, уже можно начинать инсталляцию, но мы забыли добавить CD-ROM с драйверами , а они нам пригодятся, когда диспетчер устройств засверкает желтыми иконками вопросительного знака.

Ну вот теперь можно начать установку.

Ну хорошо, начали мы установку. А что, если установщик Windows попросит сменить диск? Мне из-за этого пришлось пару раз прервать и начать всю карусель заново, но с вами такого уже не случится.
VM snapshots
VM snapshots are snapshots of the complete virtual machine including CPU
state, RAM, device state and the content of all the writable disks. In
order to use VM snapshots, you must have at least one non removable and
writable block device using the disk image format. Normally
this device is the first virtual hard drive.
Use the monitor command to create a new VM snapshot or
replace an existing one. A human readable name can be assigned to each
snapshot in addition to its numerical ID.
Use to restore a VM snapshot and to remove a VM
snapshot. lists the available snapshots with their
associated information:
(qemu) info snapshots
Snapshot devices hda
Snapshot list (from hda):
ID        TAG                 VM SIZE                DATE       VM CLOCK
1         start                   41M 2006-08-06 123802   000014.954
2                                 40M 2006-08-06 124329   000018.633
3         msys                    40M 2006-08-06 124404   000023.514
A VM snapshot is made of a VM state info (its size is shown in
) and a snapshot of every writable disk image. The VM
state info is stored in the first non removable and writable
block device. The disk image snapshots are stored in every disk image.
The size of a snapshot in a disk image is difficult to evaluate and is
not shown by because the associated disk sectors are
shared among all the snapshots to save disk space (otherwise each
snapshot would need a full copy of all the disk images).
When using the (unrelated) option
(),
you can always make VM snapshots, but they are deleted as soon as you
exit QEMU.
VM snapshots currently have the following known limitations:
QEMU 4.2.
QEMU 4.2 выпущен со многими улучшениями для виртуализации Linux.
В ПО есть много изменений, которые завершатся к концу 2019 году. Перечислим некоторые моменты обновления ведущего эмулятора с открытым исходным кодом:
- Поддержка расширений Intel AVX-512 BFloat16 (BF16).
- В последних обновлениях всех моделей процессоров расширения TSX (Transactional Synchronization Extensions) по умолчанию отключены. Это связано с недавней уязвимостью TSX Async Abort / Zombieload Variant Two.
- Лучшая производительность для эмуляции Tiny Code Generator (TCG) ядер ARM.
- Еще одно улучшение, производительности утилиты может появиться в недавних библиотеках Gcrypt и Nettle. Теперь QEMU использует собственный режим шифрования библиотеки XTS. В результате, наблюдается значительное повышение производительности для шифрования AES-XTS
- Драйвер блока LUKS теперь поддерживает Falloc
- Поддержка на ARM
- Поддержка модели ASpeed AST2600.
- Arm SVE (Scalable Vector Extensions) теперь поддерживается гостевыми KVM
QEMU 4.0 — запущен только в апреле 2019 года, и уже активно разрабатывается v. 5.0, чтобы сменить v. 4.2.
На момент написания статьи известно не много, но все же перечислим на каких функциях делается упор на поддержку:
- устройств VirtIO IOMMU,
- XIVE для гостей POWER KVM
- ioctl часов реального времени
Если исходить из четырехмесячного темпа релиза, то выпуск QEMU 5.0 состоится скорее всего, в апреле 2020.
Конкретный пример
Рассмотрим драйвер, предназначенный для обрушивания системы (выходит, что это не отладка, ведь драйвер уже налажен и систему обрушивает успешно). Обработчик запросов в нём копирует случайное число байт, что, конечно же, частенько приводит к kernel panic. В этом состоянии никакой отладчик в системе уже не работает.
Конечно, ядро нам немножко помогает при падении, выдавая стек вызовов. И если мы достаточно умны, можно посмотреть в код, и исправить ошибку. Но этого хватает не всегда.
Запустим запись сценария в виртуальной машине. С помощью следующей команды можно узнать, по какому адресу загрузился наш модуль.
После этого добьёмся, чтобы система упала (для этого мы использовали специально созданную программу, обращающуюся к драйверу). Теперь питание эмулятора можно отключить. Так как у нас есть полностью записанный ход выполнения эмулятора, можно отлаживать любой кусок этого сценария сколько угодно раз.
Загружаем в gdb символьную информацию о драйвере с помощью команды add-symbol-file и адреса, который выдала команда cat.
Наличие в выводе kernel panic вызова _stackchk_fail намекает нам на то, что содержимое стека было испорчено. Попробуем посмотреть, был ли перезаписан адрес возврата из функции. Для этого остановимся на последней её строке и поставим watchpoint на ту ячейку, где адрес возврата хранится.
После этого выполним команду reverse-continue. Вуаля! Мы остановились на строке, которая затирает адрес возврата и не даёт нам нормально выйти из функции:
Вот полный лог того, что происходило в отладчике:
NVMe disk images
NVM Express (NVMe) storage controllers can be accessed directly by a userspace
driver in QEMU. This bypasses the host kernel file system and block layers
while retaining QEMU block layer functionalities, such as block jobs, I/O
throttling, image formats, etc. Disk I/O performance is typically higher than
with using either thread pool or linux-aio.
The controller will be exclusively used by the QEMU process once started. To be
able to share storage between multiple VMs and other applications on the host,
please use the file based protocols.
Before starting QEMU, bind the host NVMe controller to the host vfio-pci
driver. For example:
# modprobe vfio-pci
# lspci -n -s 0000:06:0d.0
06:0d.0 0401: 1102:0002 (rev 08)
# echo 0000:06:0d.0 > /sys/bus/pci/devices/0000:06:0d.0/driver/unbind
# echo 1102 0002 > /sys/bus/pci/drivers/vfio-pci/new_id

# qemu-system-x86_64 -drive file=nvme://HOST:BUS:SLOT.FUNC/NAMESPACE
Alternative syntax using properties:
qemu-system-x86_64 -drive file.driver=nvme,file.device=HOST:BUS:SLOT.FUNC,file.namespace=NAMESPACE
HOST:BUS:SLOT.FUNC is the NVMe controller’s PCI device
address on the host.
Проверка оборудования
Проверьте, поддерживается ли на вашем хосте аппаратная виртуализация. Для процессоров Intel должна быть поддержка технологии Intel VT. Для процессоров AMD поддержка AMD SVM. Так же убедитесь, что аппаратная виртуализация включена в bios материнской платы хоста.
# egrep '(vmx|svm)' /proc/cpuinfo
flags : fpu vme de pse tsc msr pae mce cx8 apic sep mtrr pge mca cmov pat pse36 clflush dts acpi mmx fxsr sse sse2 ss ht tm pbe syscall nx rdtscp lm constant_tsc arch_perfmon pebs bts rep_good nopl xtopology nonstop_tsc aperfmperf eagerfpu pni pclmulqdq dtes64 monitor ds_cpl vmx smx est tm2 ssse3 cx16 xtpr pdcm pcid sse4_1 sse4_2 x2apic popcnt tsc_deadline_timer aes xsave avx f16c rdrand lahf_lm epb retpoline kaiser tpr_shadow vnmi flexpriority ept vpid fsgsbase smep erms xsaveopt dtherm ida arat pln pts
В данном примере используется процессор Intel, по этому в выводе присутствует vmx. Если вывода у команды не было, возможно, ваш процессор не поддерживает виртуализацию, либо она отключена в bios материнской платы.
Qemu-system-ppc installation
- Go to http://www.emaculation.com/forum/viewtopic.php?f=34&t=9028 and download our latest build from the official Qemu source.
- Create a folder for Qemu-related files and unpack the download. Put your Mac OS/OSX disk images in this folder.
- Create an empty disk image with qemu-img.exe. Open a command prompt and navigate to your Qemu folder.
qemu-img.exe create -f raw -o size=2G MacOS9.2.img
- Open your favorite text editor and create a file called qemu.bat in your qemu folder. (If one is contained in the download, edit that one).
- Paste the code below into the file:
qemu-system-ppc.exe ^
-L pc-bios ^
-M mac99,via=pmu ^
-m 512 ^
-sdl ^
-boot d ^
-drive file=MacOS9.2.iso,format=raw,media=cdrom ^
-drive file=MacOS9.2.img,format=raw,media=disk
Save qemu.bat
Short explanation of the content of the file:
qemu-system-ppc.exe starts qemu with all of the following as parameters:
- -L pc-bios defines the location of bios files to be used.
- -M mac99,via=pmu defines the mac model used(*).
- -m 512 defines the amount of memory (in Mb) for OS9/OSX.
- -sdl instructs Qemu to use SDL for the graphical display
- -boot d defines to boot from a drive entry marked as a cdrom, “-boot c” would define to boot from a drive entry marked as disk.
- -drive file=MacOS9.2.iso,format=raw,media=cdrom defines the name, location, format, and type of image (cdrom) file to be used
- -drive file=MacOS9.2.img,format=raw,media=disk defines the name, location, format, and type of image (disk) file to be used
(*)The mac model entry accepts 3 options for the via parameter:
mac99,via=pmu (with PMU, supporting usb mouse and keyboard)
mac99,via=pmu-adb (this allows some older Mac OS/Mac OS server builds to use a keyboard and mouse through the adb bus)
mac99,via=cuda (default, this allows use of the older adb (Apple Desktop Bus), now less supported cuda)
Double-click qemu.bat. This starts Qemu and boots the MacOS9.2.iso installation CD image.
Создание файла образа
Для начала стоит проверить, поддерживается ли аппаратная виртуализация вашим процессором. Для этого стоит убедиться что в параметрах камня имеется флаг vmx или svm (В зависимости от производителя Intel/AMD.)
cat /proc/cpuinfo | grep -E "vmx|svm"
Кроме того необходимо включить поддержку виртуализации в BIOS. На некоторых ноутбуках эта возможность может быть отключена производителем и потребуется перепрошивка BIOSа.
Устанавливаем QEMU:
urpmi qemu
После установки следует перезагрузить компьютер, чтобы система подключила модули ядра kvm и kvm_intel (kvm_amd).
После перезагрузки проверим, подключены ли модули ядра:
# lsmod | grep kvm
kvm_intel             137021  0
kvm                   448299  1 kvm_intel
#
Если нет желания перегружаться, можно в самим подключить эти модули:
modprobe kvm
modprobe kvm_intel #Для процессоров AMD подключаем kvm_amd
Далее, если все хорошо, то создаем файл для образа нашей системы.
qemu-img create -f qcow2 RELS1.qcow2 8G
Где:
create = создать файл
-f = укахывает на формат файла, лучше использовать формат qcow2 родной для QEMU, qcow2 формат записи образа виртуальных машины с поддержкой сжатия, снапшотов и шифрования. Кроме того qcow2 образ занимает столько места, сколько данных записано в него виртуальной машиной, вне зависимости от размера создаваемого при создании
RELS1.qcow2 = имя нашего файла образа
8G = размер файла для образа, в данном примере 8 Гигабайт.
После выполнения данной команды у вас будет такое сообщение:
$ qemu-img create -f qcow2 RELS1.qcow2 8G
Formatting 'RELS1.qcow2', fmt=qcow2 size=8589934592 encryption=off cluster_size=65536 lazy_refcounts=off
$
Advanced usage
Printing
There are multiple way to print from the guest operating system to the host:
Print directly to a networked printer you have Mac OS/OSX drivers for. This assumes you have set up tap networking so Mac OS can see the windows network and networked printer.
Print to a file that is moved to the host to print. How to print to e.g., a pdf file depends on the guest operating system.
Changing the mounted cdrom image
In Mac OS: First drag any mounted CD from the desktop into the trash
- Open the Qemu Monitor by pressing Ctrl-Alt-2
- Type “info block” to find the name of the CD drive in Qemu (most likely: ide1-cd0)
- Type “eject ide1-cd0”
- Type “change ide1-cd0 Driveletter:/path/name-of-cd-image.iso” (note the forward slashes!)
- Close the Qemu Monitor by pressing Ctrl-Alt-2 again (do not close the window by clicking the close button)
Also see the qemu documentation here: https://www.linux-kvm.org/page/Change_cdrom
Mounting a real cd
NOTE: You cannot mount Mac formatted CD’s, but other formats work
- Open the Qemu Monitor by pressing Ctrl-Alt-2
- Type “info block” to find the name of the CD drive in Qemu (most likely: ide1-cd0)
- Type “change ide1-cd0 /dev/cdrom” (note the forward slashes!)
- Close the Qemu Monitor by pressing Ctrl-Alt-2 again (do not close the window by clicking the close button)
Using a virtual usb drive to exchange files with the host
NOTE: This option is not error-free
Create an empty folder to be used to exchange files. In the example below, the folder c:\QemuVVFAT is used.
Add the following to your command line:
-device usb-storage,drive=fat32 -drive file=fat:rw:c:\QemuVVFAT,id=fat32,format=raw,if=none
An USB drive called Qemu-VVFAT will appear on your desktop. You can use it to exchange files with the host.
