Установка локального сервера apache 2.4 на компьютер с windows
Содержание:
- Verify
- Apache Directory Studio 2.0-0-M5 released posted on February 12th, 2013
- Cryptographic Software Notice
- Running Apache as a Service
- Архитектура Apache
- Cryptographic Software Notice
- Export control
- Apache Directory Studio 2.0-0-M7 released posted on May 31rd, 2013
- ШАГ 4 инсталляция Apache как службы Windows
- Дополнительная настройка
- Шаг 2: Изменение конфигурационного файла
- Name-based hosts on more than one IP address.
- Apache Directory Studio 2.0-0-M176 released posted on July 24th, 2021
- Обзор возможностей
- Шаг 5 — Настройка виртуальных хостов (рекомендуется)
Verify
It is essential that you verify the integrity of the downloaded files using the PGP signatures. Please read How to Verify Downloaded Files for more information on how and why you should verify our releases.
The PGP signatures can be verified using PGP or GPG. First download the KEYS file as well as the .asc signature files for the relevant release packages. Make sure you get these files from the main distribution directory, rather than from a mirror. Then verify the signatures using
% pgpk -a KEYS
% pgpv apache-tika-X.Y.Z-src.zip.asc
or
% pgp -ka KEYS
% pgp apache-tika-X.Y.Z-src.zip.asc
or
% gpg --import KEYS
% gpg --verify apache-tika-X.Y.Z-src.zip.asc apache-tika-X.Y.Z-src.zip
Apache Directory Studio 2.0-0-M5 released posted on February 12th, 2013
The Apache Directory Team is pleased to announce the release of Apache Directory Studio 2.0.0-M5, the fifth milestone release of the version 2.0 of its Eclipse based LDAP Browser and Directory client.
You can download Apache Directory Studio 2.0.0-M5 as a standalone RCP application for Mac OS X, Linux and Windows here: https://directory.apache.org/studio/downloads.html
You can also install it directly in Eclipse using this update site:
https://directory.apache.org/studio/update/2.x/
Here are the release notes for Apache Directory Studio 2.0.0-M5:
DIRSTUDIO-867 — References of old projects and packages name ‘org.apache.directory.shared’ still present in the code
Cryptographic Software Notice
This distribution may include software that has been designed for use with
cryptographic software. The country in which you currently reside may have
restrictions on the import, possession, use, and/or re-export to another
country, of encryption software. BEFORE using any encryption software, please
check your country’s laws, regulations and policies concerning the import,
possession, or use, and re-export of encryption software, to see if this is
permitted. See http://www.wassenaar.org/
for more information.
The U.S. Government Department of Commerce, Bureau of Industry and Security
(BIS), has classified this software as Export Commodity Control Number (ECCN)
5D002.C.1, which includes information security software using or performing
cryptographic functions with asymmetric algorithms. The form and manner of
this Apache Software Foundation distribution makes it eligible for export
under the License Exception ENC Technology Software Unrestricted (TSU)
exception (see the BIS Export Administration Regulations, Section 740.13)
for both object code and source code.
The following provides more details on the included files that may be
subject to export controls on cryptographic software:
Apache httpd 2 includes the mod_ssl module under modules/ssl/ for
configuring and listening to connections over SSL encrypted network sockets
by performing calls to a general-purpose encryption library, such as OpenSSL
or the operating system’s platform-specific SSL facilities.
In addition, some versions of apr-util provide an abstract interface for
SSL encrypted network sockets in the files under the directory
srclib/apr-util/ssl/ that makes use of a general-purpose encryption library,
such as OpenSSL or the operating system’s platform-specific SSL facilities.
Apache httpd currently does not use that apr-util interface.
Some object code distributions of Apache httpd, indicated with the word
«crypto» in the package name, may include object code for the OpenSSL
encryption library as distributed in open source form from
http://www.openssl.org/source/.
The above files are optional and may be removed if the cryptographic
functionality is not desired or needs to be excluded from redistribution.
Distribution packages of Apache httpd that include the word «nossl» in the
package name have been created without the above files and are therefore not
subject to this notice.
Running Apache as a Service
You can install Apache as a service automatically during the
installation. If you chose to install for all users, the
installation will create an Apache service for you. If you specify
to install for yourself only, you can manually register Apache as a
service after the installation. You have to be a member of the
Administrators group for the service installation to succeed.
Apache comes with a utility called the Apache Service Monitor.
With it you can see and manage the state of all installed Apache
services on any machine on your network. To be able to manage an
Apache service with the monitor, you have to first install the
service (either automatically via the installation or manually).
You can install Apache as a Windows NT service as follows from
the command prompt at the Apache subdirectory:
If you need to specify the name of the service you want to
install, use the following command. You have to do this if you
have several different service installations of Apache on your
computer. If you specify a name during the install, you have to
also specify it during any other -k operation.
If you need to have specifically named configuration files for
different services, you must use this:
If you use the first command without any special parameters except
, the service will be called
and the configuration will be assumed to be .
Removing an Apache service is easy. Just use:
The specific Apache service to be uninstalled can be specified by using:
Normal starting, restarting and shutting down of an Apache
service is usually done via the Apache Service Monitor, by using
commands like and or via normal Windows service management. Before
starting Apache as a service by any means, you should test the
service’s configuration file by using:
You can control an Apache service by its command line switches,
too. To start an installed Apache service you’ll use this:
To stop an Apache service via the command line switches, use
this:
or
You can also restart a running service and force it to reread
its configuration file by using:
By default, all Apache services are registered to run as the
system user (the account). The
account has no privileges to your network
via any Windows-secured mechanism, including the file system, named
pipes, DCOM, or secure RPC. It has, however, wide privileges locally.
Never grant any network privileges to
the account! If you need Apache to be able
to access network resources, create a separate account for Apache as
noted below.
It is recommended that users create a separate account for running
Apache service(s). If you have to access network resources via Apache,
this is required.
- Create a normal domain user account, and be sure to
memorize its password. - Grant the newly-created user a privilege of and . On Windows NT 4.0 these privileges are granted via
User Manager for Domains, but on Windows 2000 and XP you probably
want to use Group Policy for propagating these settings. You can
also manually set these via the Local Security Policy MMC snap-in. - Confirm that the created account is a member of the Users
group. - Grant the account read and execute (RX) rights to all document
and script folders ( and
for example). - Grant the account change (RWXD) rights to the
Apache directory. - Grant the account read and execute (RX) rights to the
binary executable.
It is usually a good practice to grant the user the Apache
service runs as read and execute (RX) access to the whole Apache2.2
directory, except the subdirectory, where the
user has to have at least change (RWXD) rights.
If you allow the account to log in as a user and as a service,
then you can log on with that account and test that the account has
the privileges to execute the scripts, read the web pages, and that
you can start Apache in a console window. If this works, and you
have followed the steps above, Apache should execute as a service
with no problems.
Error code 2186 is a good indication that
you need to review the «Log On As» configuration for the service,
since Apache cannot access a required network resource. Also, pay
close attention to the privileges of the user Apache is
configured to run as.
When starting Apache as a service you may encounter an error
message from the Windows Service Control Manager. For example,
if you try to start Apache by using the Services applet in the
Windows Control Panel, you may get the following message:
You will get this generic error if there is any problem with
starting the Apache service. In order to see what is really causing
the problem you should follow the instructions for Running Apache
for Windows from the Command Prompt.
Архитектура Apache
Apache состоит из ядра и модулей. Ядро выполняет основные функции: обработка конфигурационных файлов, работа с протоколом HTTP, система загрузки модулей. Оно может работать самостоятельно без модулей, но тогда функционал программы будет крайне ограничен. Ядро создала команда компании Apache Software Foundation без вмешательства сторонних разработчиков.
Как можно расширить функционал веб-сервера? Для этого выпускаются модули. Модуль — это код, который расширяет функционал ядра. Они бывают статические и динамические. Статические добавляются к ядру ещё до загрузки программы, то есть пользователь выбирает программу определенной сборки. Динамические можно добавить на этапе загрузки программы при помощи встроенного модуля mod_so.
Модули отвечают за определенные возможности программы. Это может быть поддержка различных языков программирования, повышение безопасности, аутентификация пользователя, исправление ошибок и другие дополнительные функции. Таким образом, Apache — это конструктор, который можно собрать так, как нужно пользователю. Для этой программы существует более 500 модулей. Например, Multi-Processing Module (MPM) — модуль системного уровня. С его помощью можно оптимизировать Apache в условиях конкретной операционной системы.
Cryptographic Software Notice
This distribution may include software that has been designed for use with
cryptographic software. The country in which you currently reside may have
restrictions on the import, possession, use, and/or re-export to another
country, of encryption software. BEFORE using any encryption software, please
check your country’s laws, regulations and policies concerning the import,
possession, or use, and re-export of encryption software, to see if this is
permitted. See http://www.wassenaar.org/
for more information.
The U.S. Government Department of Commerce, Bureau of Industry and Security
(BIS), has classified this software as Export Commodity Control Number (ECCN)
5D002.C.1, which includes information security software using or performing
cryptographic functions with asymmetric algorithms. The form and manner of
this Apache Software Foundation distribution makes it eligible for export
under the License Exception ENC Technology Software Unrestricted (TSU)
exception (see the BIS Export Administration Regulations, Section 740.13)
for both object code and source code.
The following provides more details on the included files that may be
subject to export controls on cryptographic software:
Apache httpd 2 includes the mod_ssl module under modules/ssl/ for
configuring and listening to connections over SSL encrypted network sockets
by performing calls to a general-purpose encryption library, such as OpenSSL
or the operating system’s platform-specific SSL facilities.
In addition, some versions of apr-util provide an abstract interface for
SSL encrypted network sockets in the files under the directory
srclib/apr-util/ssl/ that makes use of a general-purpose encryption library,
such as OpenSSL or the operating system’s platform-specific SSL facilities.
Apache httpd currently does not use that apr-util interface.
Some object code distributions of Apache httpd, indicated with the word
«crypto» in the package name, may include object code for the OpenSSL
encryption library as distributed in open source form from
http://www.openssl.org/source/.
The above files are optional and may be removed if the cryptographic
functionality is not desired or needs to be excluded from redistribution.
Distribution packages of Apache httpd that include the word «nossl» in the
package name have been created without the above files and are therefore not
subject to this notice.
Export control
Apache Tika includes cryptographic software. The country in which you currently reside may have restrictions on the import, possession, use, and/or re-export to another country, of encryption software. BEFORE using any encryption software, please check your country’s laws, regulations and policies concerning the import, possession, or use, and re-export of encryption software, to see if this is permitted. See <http://www.wassenaar.org/> for more information.
The U.S. Government Department of Commerce, Bureau of Industry and Security (BIS), has classified this software as Export Commodity Control Number (ECCN) 5D002.C.1, which includes information security software using or performing cryptographic functions with asymmetric algorithms. The form and manner of this Apache Software Foundation distribution makes it eligible for export under the License Exception ENC Technology Software Unrestricted (TSU) exception (see the BIS Export Administration Regulations, Section 740.13) for both object code and source code.
The following provides more details on the included cryptographic software:
Apache Directory Studio 2.0-0-M7 released posted on May 31rd, 2013
The Apache Directory Team is pleased to announce the release of Apache Directory Studio 2.0.0-M7, the seventh milestone release of the version 2.0 of its Eclipse based LDAP Browser and Directory client.
You can download Apache Directory Studio 2.0.0-M7 as a standalone RCP application for Mac OS X, Linux and Windows here: https://directory.apache.org/studio/downloads.html
You can also install it directly in Eclipse using this update site:
https://directory.apache.org/studio/update/2.x/
Here are a few highlights of this new version:
- A major new addition is the ability to store connection passwords in a password-protected keystore, rather than in plain text on disk.
- The LDAP Servers and ApacheDS 2.0 Configuration plugins have been updated with the latest and greatest ApacheDS (version 2.0.0-M12).
- The update site problem where Apache Directory Studio fails to install correctly has been fixed.
Here are the release notes for Apache Directory Studio 2.0.0-M7:
Bug
- DIRSTUDIO-865 — NullPointerException thrown when connecting to Domino 8.5.2FP3 LDAP
- DIRSTUDIO-888 — Improve editing of boolean values to allow lowercased values and shortcuts
- DIRSTUDIO-891 — A schema project containing a reference to a deleted connection makes the perspective completely unusable
- DIRSTUDIO-892 — Unable to import ApacheDS core schemas
- DIRSTUDIO-893 — ConcurrentModificationException thrown while deleting multiple schema elements
- DIRSTUDIO-899 — Unable to install Studio using the update site: “Missing requirement: ApacheDS Core 2.0.0.M11”
- DIRSTUDIO-902 — Unusable configuration of the HashingPasswordInterceptor with recent milestone of ApacheDS 2.0
- DIRSTUDIO-903 — Clicking “Accept” when no changes have been made on the password edit dialog changes the password
- DIRSTUDIO-904 — Directory Studio create files with french “accents”
- DIRSTUDIO-905 — IOException (Document is closed) thrown when quitting Apache Directory Studio with an LDAP Server running
- DIRSTUDIO-907 — ERR_04269 ATTRIBUTE_TYPE for OID ads-replpingersleep does not exist!
- DIRSTUDIO-916 — Can not open configuration for fresh installed ApacheDS and Studio
Improvement
- DIRSTUDIO-857 — Add support for PasswordPolicy configuration
- DIRSTUDIO-884 — Add new MessageDigest algorithm for passwords
- DIRSTUDIO-890 — Add support for SSHA2 in Password Editor
- DIRSTUDIO-895 — Add a ‘Show password’ checkbox to the CredentialsDialog used to ask the connection’s password when it’s not saved
- DIRSTUDIO-897 — Active Directory attribute type ‘lockoutTime’ should be linked with the ‘MS AD Date and Time Editor’
- DIRSTUDIO-898 — Add case-insensitive support for the attribute types aliases in the ‘Value Editors’ preferences page
New Feature
DIRSTUDIO-901 — Add the ability to store connection passwords in a password-protected keystore
ШАГ 4 инсталляция Apache как службы Windows
Приведенный выше способ запуска и остановки web сервера Apache прекрасно работает и им можно с успехом пользоваться, создав ярлык на исполняемый файл httpd.exe или написав .bat файлы с командами старта и остановки сервера. Однако более удобным вариантом будет использование Apache как системной службы Windows, что позволит запускать и останавливать Apache в автоматическом, полуавтоматическом режимах и вручную. Для этих действий можно будет использовать утилиту управления Apache службой Apache24\bin\ApacheMonitor.exe, которая входит в данный дистрибутив Apache. ApacheMonitor.exe это маленькая утилита, представлявшая собой оконную программку, висящую в системном трее и позволяющую выполнять запуск и остановку службы Apache и контролировать ее состояние. Такой подход дает некоторое удобство в работе с web сервером Apache как системной службой Windows. Поэтому, далее будут рассмотрены необходимые действия для установки Apache как системной службы Windows.
Для просмотра списка доступных команд Apache наберите в консоли:
>Z:\WebDevelopment\Apache24\bin\httpd help
или, находясь в каталоге с бинарниками Apache:
>httpd -h
и в консоли будет выведен краткий help по доступным командам Apache и их синтаксис:
>httpd -h

Usage: httpd


Options:
  -D name            : define a name for use in  directives
  -d directory       : specify an alternate initial ServerRoot
  -f file            : specify an alternate ServerConfigFile
  -C "directive"     : process directive before reading config files
  -c "directive"     : process directive after reading config files
  -n name            : set service name and use its ServerConfigFile and ServerRoot
  -k start           : tell Apache to start
  -k restart         : tell running Apache to do a graceful restart
  -k stop|shutdown   : tell running Apache to shutdown
  -k install         : install an Apache service
  -k config          : change startup Options of an Apache service
  -k uninstall       : uninstall an Apache service
  -w                 : hold open the console window on error
  -e level           : show startup errors of level (see LogLevel)
  -E file            : log startup errors to file
  -v                 : show version number
  -V                 : show compile settings
  -h                 : list available command line options (this page)
  -l                 : list compiled in modules
  -L                 : list available configuration directives
  -t -D DUMP_VHOSTS  : show parsed vhost settings
  -t -D DUMP_RUN_CFG : show parsed run settings
  -S                 : a synonym for -t -D DUMP_VHOSTS -D DUMP_RUN_CFG
  -t -D DUMP_MODULES : show all loaded modules
  -M                 : a synonym for -t -D DUMP_MODULES
  -t -D DUMP_INCLUDES: show all included configuration files
  -t                 : run syntax check for config files
  -T                 : start without DocumentRoot(s) check
  -X                 : debug mode (only one worker, do not detach)
Рекомендация: используйте с данными командами полный путь до файла httpd.exe как в примерах ниже.
Для инсталляции Apache как системной службы Windows нужно выполнить в консоли команду:
>Z:\WebDevelopment\Apache24\bin\httpd.exe -k install
Для деинсталяции Apache как системной службы Windows нужно выполнить в консоли команду:
>Z:\WebDevelopment\Apache24\bin\httpd.exe -k uninstall
После установки Apache в качестве системной службы Windows вы можете настроить работу этой службы стандартным для всех служб Windows способом в Консоли управления Microsoft — оснастке services.msc запустив ее в cmd.exe командой:
>services.msc
или воспользовавшись другими стандартными способами:
- Меню Пуск, в строке поиска наберите services.msc и нажмите клавишу Enter;
- Нажмите сочетание клавиш Win+R, наберите services.msc и нажмите клавишу Enter;
- Через оконный интерфейс по пути: Пуск->Панель управления->Администрирование->Службы
Установленная служба Apache будет иметь:
- название: Apache2.4;
- описание: Apache/2.4.23 (Win64) OpenSSL/1.0.2j;
- тип запуска: Автоматически.
Настройте необходимый вам вариант запуска службы стандартным способом.
Так же, для управления службой Apache2.4 вы можете воспользоваться описанной выше программой из дистрибутива сервера Apache24\bin\ApacheMonitor.exe. Для этого запустите указанный файл ApacheMonitor.exe и воспользуйтесь для запуска или остановки Apache кнопками в окне данной программы. В свернутом состоянии эта программа ‘висит’ в системном трее в виде иконки состояния службы Apache и может быть от туда вызвана.
Скриншот запущенной программы ApacheMonitor.exe

На этом Portable инсталляция Apache на Windows из zip архива закончена, далее можно приступать к индивидуальной настройке web сервера и организации виртуальных хостов.
Смотри также:
Еще, дополнительно, о настройке можно почитать на сайте Apache: .
Дополнительная настройка
В дополнение к перечисленным выше настройкам нужно проверить значение параметра Listen, которым задаются настройки сетевого интерфейса (ip-адрес и номер TCP-порта), на котором сервер будет принимать клиентские подключения. Если Apache используется индивидуальным Web-разработчиком, то можно рекомендовать такую конфигурацию:
Listen 127.0.0.1:8080 # параметры сетевого интерфейса
Номер TCP-порта не должен конфликтовать с другим программным обеспечением, установленным на компьютере. Так, стандартный порт HTTP 80 часто бывает занят клиентом Skype. Для совместного использования сервера в сети нужно указать правильный IP-адрес или сетевое имя компьютера, на котором устанавливается Web-сервер.
Web-сервер Apache чаще всего используется совместно с интерпретаторами таких языков серверных сценариев, как PHP и Perl. Для того, чтобы на Web-сайте могли использоваться сценарии PHP (предполагаем, что PHP установлен в папку C:\PHP5), нужно добавить в конфигурационный файл «D:\www\conf\httpd.conf» следующие строки:
- LoadModule php5_module «C:/PHP5/php5apache2_2.dll»
- AddType application/x-httpd-php .php
- PHPIniDir «C:/PHP5»
Нужно отметить, что в папке PHP5 должен существовать конфигурационный файл php.ini, созданный на основе файла php.ini-development (если сервер используется для разработки Web-сайтов) или php.ini-production (это настоящий Web-сервер). Чтобы модули PHP могли найти все необходимые им динамические библиотеки, путь к папке C:\PHP5 должен быть прописан в переменной PATH среды окружения Windows.
Серверные CGI-сценарии на языке Perl уже должны выполняться при соблюдении двух условий:
- Интерпретатор языка Perl установлен на этом компьютере.
- В первой строке файлов сценариев правильно указан путь к интерпретатору Perl, например: #!C:/PERL/bin/perl.exe -w
Для проверки можно ввести в браузере URL: http://localhost:8080/cgi-bin/printenv.pl, предварительно подправив первую строку сценария printenv.pl в соответствии с п. 2.
Остальные нюансы настройки Web-сервера Apache под Windows выходят за рамки этой статьи.
Шаг 2: Изменение конфигурационного файла
Конфигурация локального веб-сервера, установленная по умолчанию, не подходит для его нормального запуска, чтобы проверить работу и подключить остальные компоненты. Связано это с изменением пути расположения файлов и другими параметрами, влияющими на старт программы. Измените их, выполнив представленные далее шаги.
- Перейдите по пути .
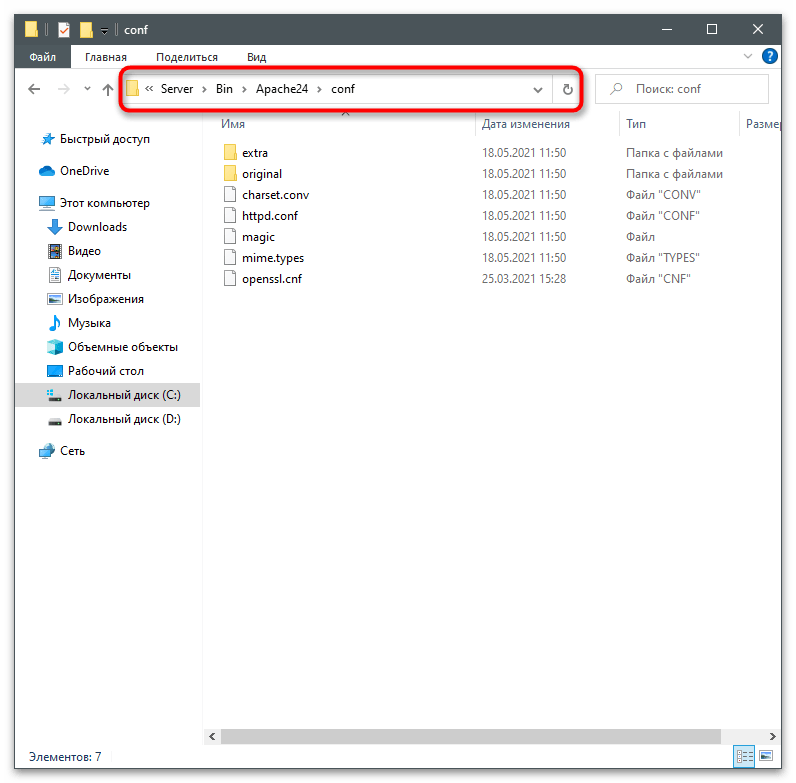
Дважды кликните по файлу «httpd.conf» для его открытия.

Если у вас есть продвинутый текстовый редактор, выберите его для просмотра файла конфигурации. В противном случае используйте стандартный «Блокнот».

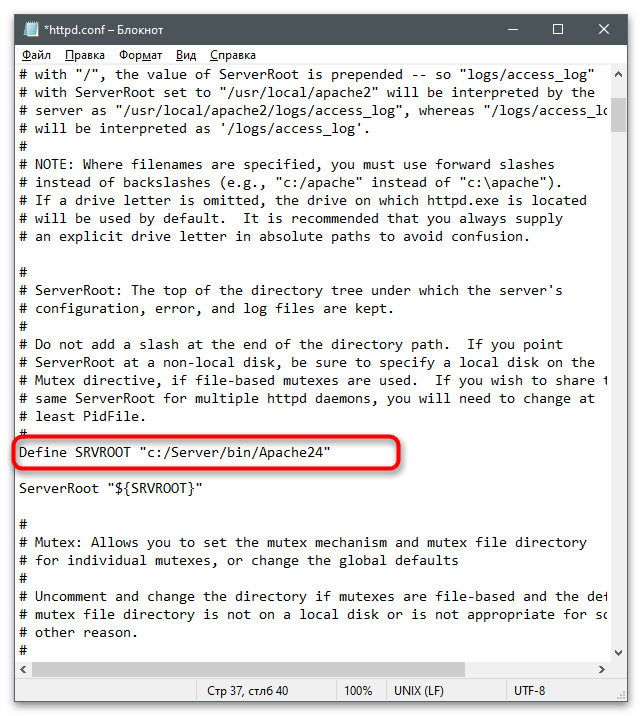
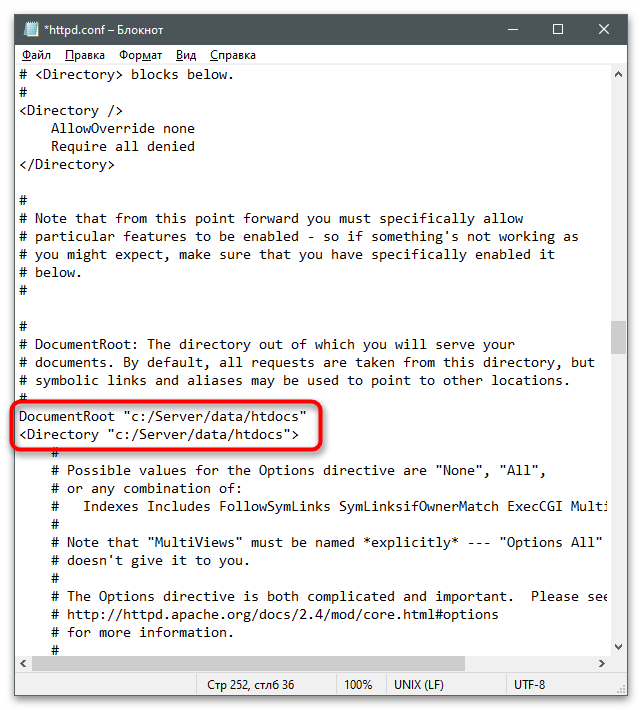
В документе найдите строку .
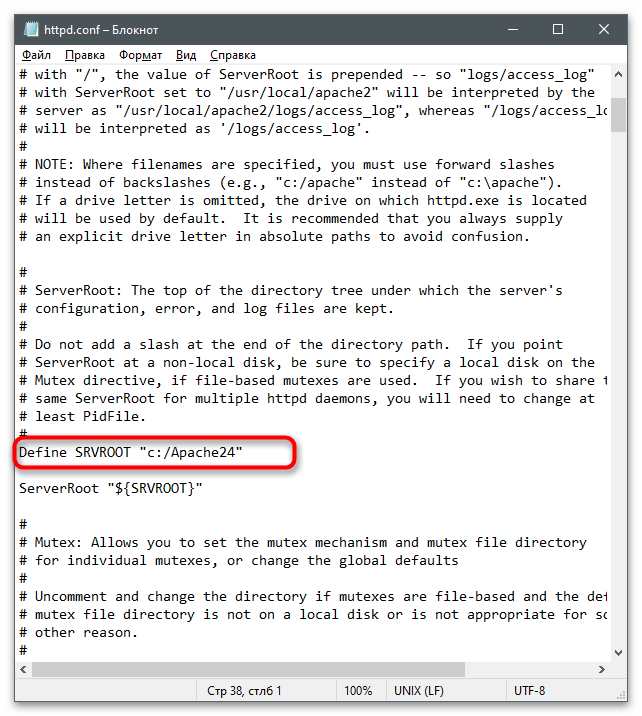
Замените ее на , чтобы указать новый путь к файлам. Учитывайте, что в строке мы указали созданный ранее путь. Если у вас он отличается, поменяйте выражение в кавычках.
Далее найдите строку , которая по умолчанию заключена в комментарий и неактивна.

Измените ее на , указав тем самым локальный адрес, который в дальнейшем и будет использоваться для проверки веб-сервера.

Отыщите строки и , которые отвечают за расположение связанных с сервером файлов.
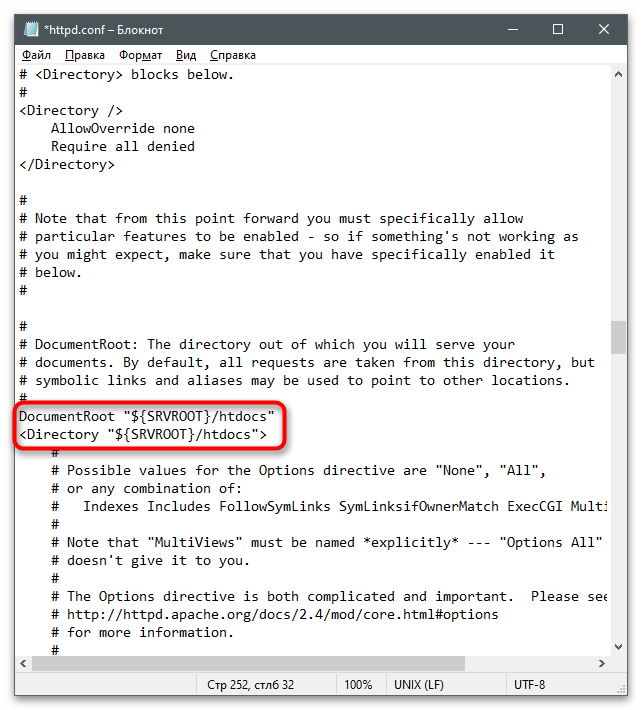
Замените их на и .
Сейчас параметр имеет только значение , поэтому его тоже нужно найти и отредактировать.
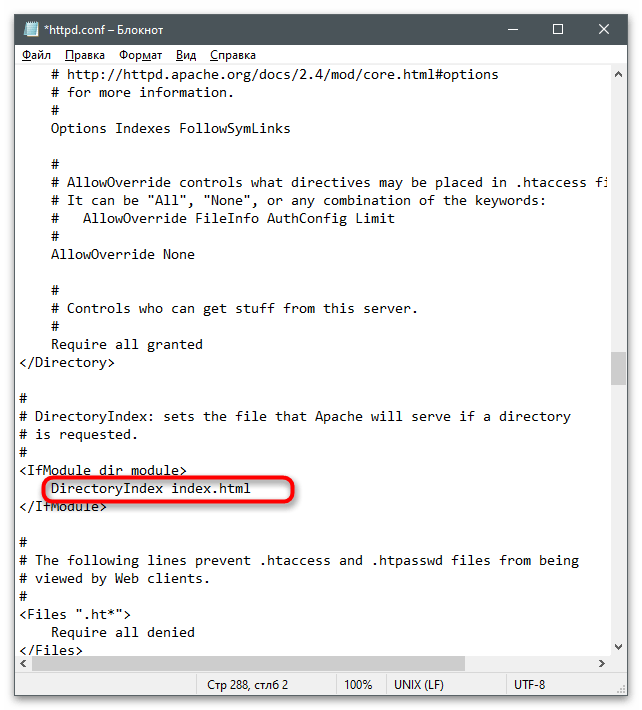
Добавьте еще несколько доступных форматов файлов, чтобы в итоге строка обрела вид .

Для строки поменяйте состояние на , удалив предыдущее выражение.
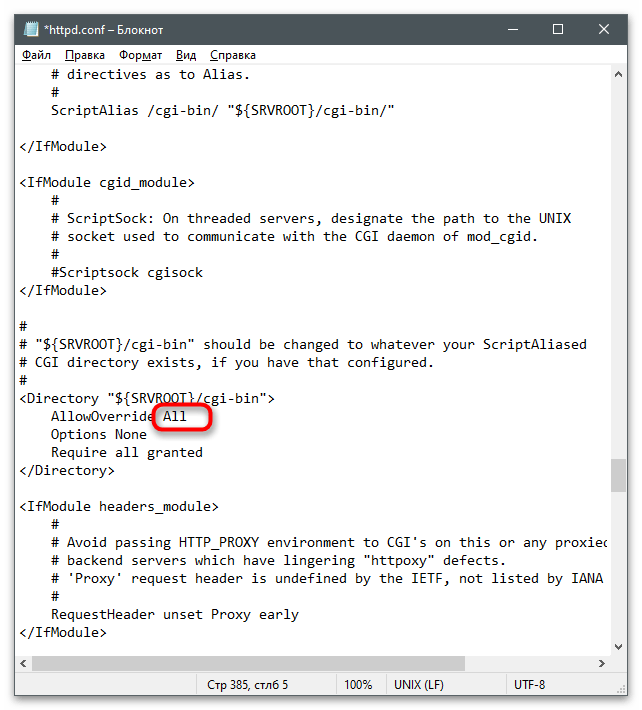
Осталось только найти и убрать значок #, активировав тем самым строку.
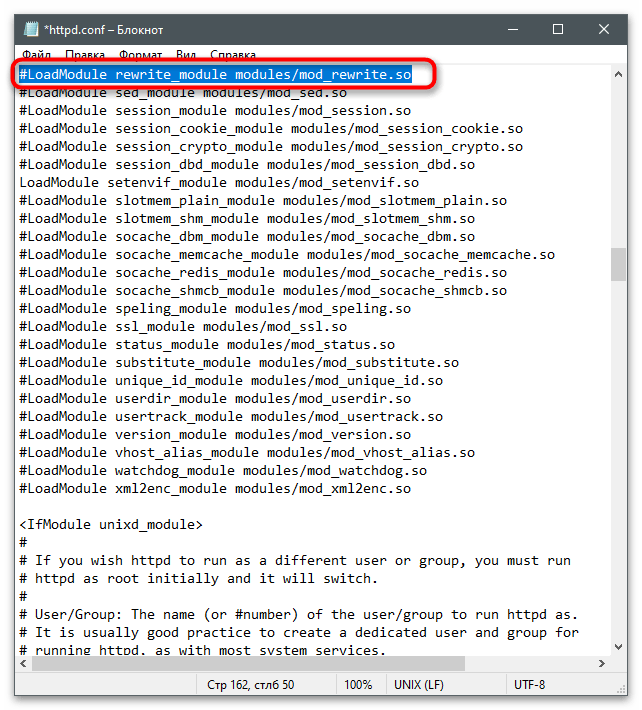
В итоге она должна отображаться так, как это показано на следующем скриншоте.
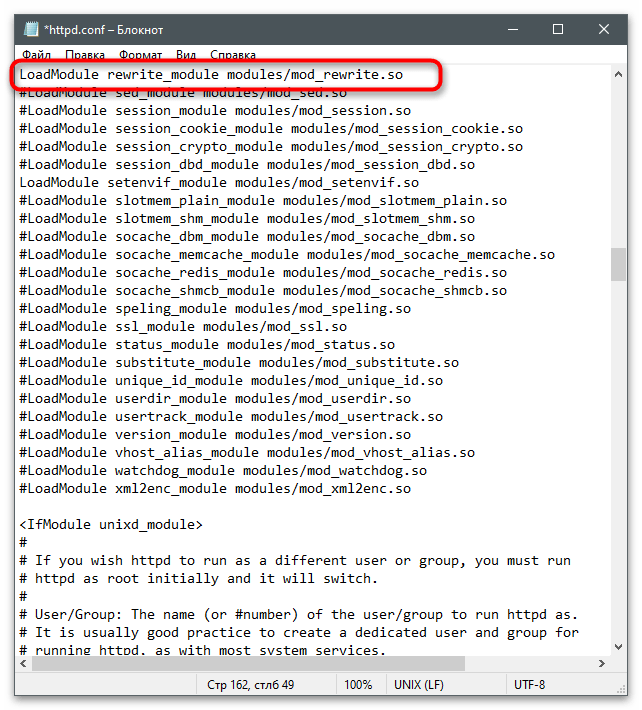
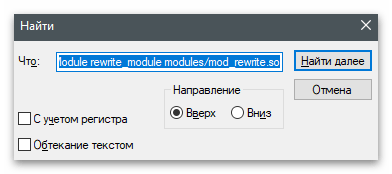
Если с поиском конкретных строк у вас возникают проблемы, используйте сочетание клавиш Ctrl + F, чтобы вызвать инструмент «Найти» и вписать там необходимое выражение.
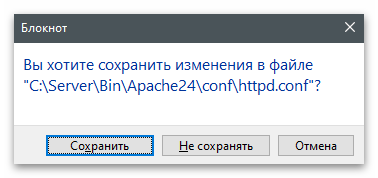
Перед выходом не забудьте сохранить изменения в конфигурационном файле.
Name-based hosts on more than one IP address.
Note
Any of the techniques discussed here can be extended to any
number of IP addresses.
The server has two IP addresses. On one (), we
will serve the «main» server, and on the
other (), we will serve two or more virtual hosts.
Listen 80

# This is the "main" server running on 172.20.30.40
ServerName server.example.com
DocumentRoot "/www/mainserver"

<VirtualHost 172.20.30.50>
    DocumentRoot "/www/example1"
    ServerName www.example.com

    # Other directives here ...
</VirtualHost>

<VirtualHost 172.20.30.50>
    DocumentRoot "/www/example2"
    ServerName www.example.org

    # Other directives here ...
</VirtualHost>
Apache Directory Studio 2.0-0-M176 released posted on July 24th, 2021
The Apache Directory Team is pleased to announce the release of Apache
Directory Studio 2.0.0-M17, the next milestone release of the version 2.0 of its Eclipse based LDAP Browser and Directory client.
You can download Apache Directory Studio 2.0.0-M17 as a standalone RCP application for macOS, Linux and Windows here: https://directory.apache.org/studio/downloads.html
You can also install it directly in Eclipse using this update site: https://directory.apache.org/studio/update/
The full release notes can be found here: https://directory.apache.org/studio/changelog.html
Обзор возможностей
Apache поддерживает множество функций, многие из которых реализованы в виде скомпилированных модулей, расширяющих базовую функциональность. Они могут варьироваться от схем аутентификации до поддержки серверных языков программирования, таких как Perl , Python , Tcl и PHP . Популярные модули аутентификации включают mod_access, mod_auth, mod_digest и mod_auth_digest, преемника mod_digest. Примеры других функций включают поддержку и Transport Layer Security ( mod_ssl ), модуль прокси ( mod_proxy ), модуль перезаписи URL (mod_rewrite), пользовательские файлы журнала (mod_log_config) и поддержку фильтрации (mod_include и mod_ext_filter).
Популярные методы сжатия в Apache включают внешний модуль расширения mod_gzip, реализованный для уменьшения размера (веса) веб-страниц, обслуживаемых через HTTP . ModSecurity — это механизм обнаружения и предотвращения вторжений с открытым исходным кодом для веб-приложений. Журналы Apache можно анализировать через веб-браузер с помощью бесплатных скриптов, таких как AWStats / W3Perl или Visitors.
Виртуальный хостинг позволяет одной установке Apache обслуживать множество разных веб-сайтов . Например, один компьютер с одним установка Apache может одновременно обслуживать , , и т.д.
Apache особенности конфигурируемые сообщения об ошибках, СУБД -На базы данных аутентификации, согласование содержания и поддерживает несколько графических пользовательских интерфейсов (GUI).
Он поддерживает аутентификацию по паролю и аутентификацию с цифровым сертификатом . Поскольку исходный код находится в свободном доступе, любой может адаптировать сервер под конкретные нужды, а также существует большая общедоступная библиотека надстроек Apache.
Более подробный список функций представлен ниже:
- Загружаемые динамические модули
- Несколько режимов обработки запросов (MPM), включая Event-based / Async , Threaded и Prefork.
- Высокая масштабируемость (легко обрабатывает более 10 000 одновременных подключений )
- Обработка статических файлов, индексных файлов, автоиндексирование и согласование содержимого
- .htaccess поддержка конфигурации для каждого каталога
-
Обратный прокси с кешированием
- Балансировка нагрузки с помощью внутриполосных проверок работоспособности
- Множественные механизмы балансировки нагрузки
- Отказоустойчивость и отказоустойчивость с автоматическим восстановлением
- Поддержка WebSocket , FastCGI , SCGI , AJP и uWSGI с кешированием
- Динамическая конфигурация
- TLS / SSL с поддержкой сшивания SNI и OCSP через OpenSSL или wolfSSL .
- Виртуальные серверы на основе имени и IP-адреса
- IPv6- совместимый
- Поддержка HTTP / 2
- Детализированная аутентификация и контроль доступа к авторизации
- сжатие и распаковка gzip
- Перезапись URL
- Перезапись заголовков и контента
- Пользовательское ведение журнала с ротацией
- Ограничение одновременных подключений
- Ограничение скорости обработки запросов
- Регулирование полосы пропускания
- Серверная сторона включает
- Геолокация на основе IP-адреса
- Отслеживание пользователей и сеансов
- WebDAV
- Встроенные сценарии Perl , PHP и Lua
- Поддержка CGI
- веб-страницы для каждого пользователя
- Анализатор общих выражений
- Просмотр статуса в реальном времени
- Поддержка FTP (отдельным модулем)
Шаг 5 — Настройка виртуальных хостов (рекомендуется)
При использовании веб-сервера Apache вы можете использовать виртуальные хосты (аналог серверных блоков в Nginx) для хранения конфигурационных настроек разных сайтов. Это позволяет иметь более одного сайта на одном сервере. В этом руководстве мы будем для примера использовать доменное имя example.com, но вам следует заменить его вашим собственным доменным именем. Для того, чтобы узнать больше о настройке доменных имён в DigitalOcean, рекомендуем ознакомиться с нашим Введением в DNS DigitalOcean.
Создайте директорию для example.com используя флаг для создания необходимых родительских директорий:
Далее настройте владельца директории с помощью переменной окружения :
Теперь права должны для корневой директории быть настроены правильным образом при условии, что вы не меняли своё значение . На всякий случай мы можем удостовериться в этом командой:
Далее создадим страницу в или любом другом текстовом редакторе:
Добавим в файл следующий HTML:
/var/www/example.com/html/index.html
Сохраните и закройте файл.
Скопируйте следующий текст настроек виртуального хоста в созданный файл:
/etc/apache2/sites-available/example.com.conf
Обратите внимание, что мы обновили на адрес нашей новой директории, и на адрес электронной почты, доступный для администратора example.com. Мы также добавили две директивы: , которая устанавливает базовое доменное имя, которое должно использоваться для хоста, а также , которая определяет другие имена, которые должны использоваться для отображения хоста так же, как и базовое доменное имя
Сохраните и закройте файл после внесения изменений.
Теперь активируем профиль сайта с помощью утилиты :
Деактивируем дефолтный сайт, определённый в :
Далее проверим наши настройки на наличие ошибок:
Вы должны увидеть следующий вывод:
Перезапустите Apache для применения внесённых изменений:
Теперь Apache должен работать с вашим доменным именем. Вы можете проверить это введя в вашем браузере, где в результате вы должны увидеть что-то в этом роде: