Cygwin
Содержание:
- MultiWindow Mode[edit | edit source]
- Using Cygwin/X
- Записки программиста
- 5.1 About the Cygwin Requirement for Installing Management Agents
- Before you get started
- GNU и Windows
- Pre-built toolchains and packages
- Building the development version of Cygwin
- Creating a local Cygwin mirror with rsync
- Как перезагрузить Cygwin
- Аналоги Cygwin
- Installing Cygwin
- Cygwin in Wine
- Как установить пакеты (программы) в Cygwin
- Accessing X of your Local Cygwin[edit | edit source]
MultiWindow Mode[edit | edit source]
In the multiwindow mode, there is an internal window manager that creates a Windows window to display the X application on your Windows desktop.
Xedit | edit source
X is a soft-link (shortcut from Windows standpoint) to /usr/X11R6/bin/XWin directory.
- Start Cygwin (The Bash shell comes up)
- Execute the command, . (Cygwin/X window comes up)
- Execute the command,
- Log in to the remote box with the command,
- Execute the command, . (xclock comes up).
Now you can run any X application on the remote box. They open up in separate windows individually with your windows title-bar, caption buttons and border. You don’t get the desktop environment in this case.
For the above method to work, should be enabled in the remote box.
startxwin.batedit | edit source
- Run startxwin.bat from folder where your Cygwin is installed. This can be done by double clicking on the batch file. It’ll bring up an xterm window. If you don’t want to go through the hassle of finding this file, you can simply run the startxwin-multiwindow.bat file which should be present on your desktop. Both the scripts are exactly similar.
- Execute the command, to provide remote box access to the X server running on your Cygwin. Alternatively you can execute the command, to disable access control completely, so that any client can connect to your X server.
- Log in to the remote box with the command,
- Execute the command, on the remote box.
- Execute the command, in the xterm window. (xclock comes up).
Now you can run any X application on the remote box. They open up in separate windows individually with your windows title-bar, caption buttons and border. You don’t get the desktop environment in this case.
If is enabled in the remote box, you can omit step 2 and step 4.
startxwin.shedit | edit source
- Start Cygwin (The Bash shell comes up)
- Execute the command, . It’ll bring up an xterm window.
- Execute the command, to provide remote box access to the X server running on your Cygwin. Alternatively you can execute the command, to disable access control completely, so that any client can connect to your X server.
- Log in to the remote box with the command,
- Execute the command, on the remote box.
- Execute the command, in the xterm window. (xclock comes up).
Now you can run any X application on the remote box. They open up in separate windows individually with your windows title-bar, caption buttons and border. You don’t get the desktop environment in this case.
If is enabled in the remote box, you can omit step 3 and step 4.
startxedit | edit source
- Start Cygwin (The Bash shell comes up)
- Execute the command, . It’ll bring up an xterm window.
- Execute the command, to provide remote box access to the X server running on your Cygwin. Alternatively you can execute the command, to disable access control completely, so that any client can connect to your X server.
- Log in to the remote box with the command,
- Execute the command, on the remote box.
- Execute the command, in the xterm window. (xclock comes up).
Now you can run any X application on the remote box. They open up in separate windows individually with your windows title-bar, caption buttons and border. You don’t get the desktop environment in this case.
If is enabled in the remote box, you can omit step 3 and step 4.
PuTTYedit | edit source
- Open PuTTY
- From the Category tree, select «Session» and enter the host details.
- From the Category tree, select «Connection > SSH > X11» and check the «Enable X11 Forwarding» checkbox.
- Click «Open» and login.
- Run an X Server on your Windows machine. There are various ways to do it.
- Open Cygwin and run .
- Run from Windows or open Cygwin and run , . An extra xterm opens which might be a pain since you don’t need it. (The previous two steps save you from that).
- Get back to your PuTTY window and execute the command, (xclock comes up).
- Check your Cygwin/X window. (You have got the desktop :-))
For this method to work should be enabled in the remote box and you should be logging into the remote box using the SSH protocol.
If you want to save yourself from the first four steps, simply add the path of the PuTTY directory to the Windows PATH variable or you can simply put PuTTY.exe in the Windows directory. Henceforth, you can simply execute the command, from anywhere and then proceed with step 5.
Using Cygwin/X
The X Window System, version 11 (often «X11», or simply «X») is the standard
graphical environment under Unix and GNU/Linux; it is also available for other
platforms, including Mac OS X and MS-Windows. X applications («clients»)
exchange data with an X server (another application). The X server receives
and interprets instructions from the clients for displaying the clients’
windows, and it collects and transmits keyboard and mouse input events to the
clients. The xorg packages available with Cygwin (collectively,
«Cygwin/X») provide a high-quality X server, a large set of standard X clients,
and a complete set of development tools that can be used to compile X clients
that run under MS-Windows.
Important: X clients cannot run unless they can connect to a running
X server. The X server must be started first. When you use Cygwin/X, its
X server (Xwin) runs on your PC, under MS-Windows. Once Xwin is running, you
can launch and interact with X clients on your PC or on any other networked
computer (which can be running MS-Windows, GNU/Linux, Mac OS X, Unix, or any
other OS that can run X client software).
Since Xwin is a complete window system, it has a «root» (background) window on
which X clients’ windows are displayed. Xwin can run in «rootless» mode, in
which its root window is invisible, allowing the MS-Windows desktop and
application windows to be visible, and allowing the X clients’ windows to be
moved, resized, closed, and reopened using the same methods as for native
MS-Windows applications. Use startxwin to run Xwin in rootless
mode.
On Cygwin 1.7, startxwin is /usr/bin/startxwin.exe,
and it must be started from a Cygwin window (not a DOS box or a
desktop shortcut). On Cygwin 1.5, startxwin
is c:\cygwin\usr\X11R6\bin\startxwin.bat, and if you create a
desktop shortcut to this batch file, you can click on it to launch
Xwin.
If you prefer, you can run the command startx in a Cygwin window to
launch Xwin; using this method, Xwin opens a root window on the desktop, and
all X client windows are contained within Xwin’s root window.
When you launch Xwin, it starts an xterm (terminal emulator) client:
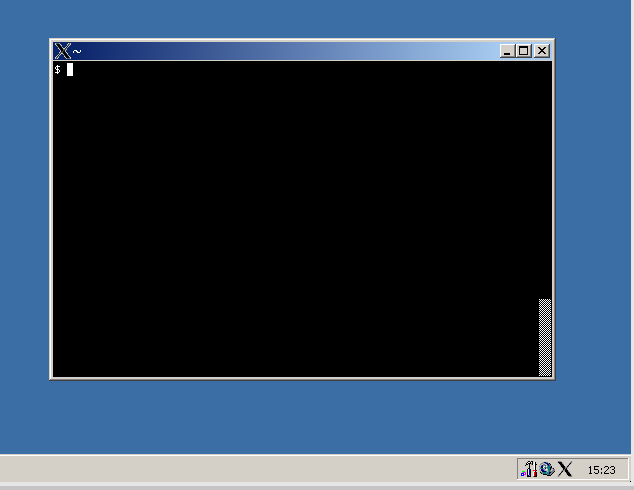
Within this window, just as in a Cygwin terminal window, you are running the
GNU bash shell. An important difference is that you can launch other
X clients from an xterm without additional preparation.
You can access xterm‘s menus by pressing and holding the Ctrl
key while clicking the left, middle, or right mouse buttons. Use these menus
to enable the scrollbar (as shown in the screen shot above) or to change the
character size, among other possibilities.
While the X server is running, its icon («X») appears in the Windows system
tray (see above). You can click on this icon to force the X server to exit,
but doing so will also force any X clients to exit; normally you should
exit from all X clients before stopping the server.
Записки программиста
Разработка кроссплатформенных приложений — дело непростое. В особенности оно непростое благодаря Windows, в котором все не как у людей. Тут тебе ни нормального терминала, ни нормальных консольных утилит, вообще ничего нет! В очередной раз столкнувшись с этой проблемой, я решил снова попробовать Cygwin. И знаете, оказывается, он действительно делает из Windows нечто, чем почти можно пользоваться!
Скачать инсталлятор Cygwin можно отсюда. На самом деле, это не столько инсталлятор, сколько пакетный менеджер, который при запуске прямо таки спрашивает, какие пакеты вы хотели бы поставить. Ребята! Пакетный менеджер! Под винду! Инсталлятор создает кэш в каталоге, из которого он будет запущен. Поэтому перед запуском лучше создать какую-нибудь специальную папочку на рабочем столе и положить инсталлятор в нее.
Какие пакеты на мой взгляд необходимо поставить:
- openssh — мастхев;
- inetutils, bind-utils, ping, nc и nc6 — мастхев;
- wget, curl — мастхев;
- python и/или python3 — считаю, что мастхев;
- vim, gvim — для правки небольших файлов лишним не будет;
- diffutils, pwgen, unzip, rzync — пусть будут на всякий случай;
- gcc и/или clang, cmake, gdb — если нужно;
- screen, tmux, mc — для любителей;
- git — под очень большим вопросом, см ниже;
Обратите внимание! Чтобы в Cygwin установить pip, поставьте галочку напротив пакета python-setuptools и/или python3-setuptools. После установки в терминале скажите:. easy_install-2.7 pip
easy_install-2.7 pip
… и/или:
easy_install-3.4 pip
…, смотря какую версию или версии Python вы поставили.
Итак, после установки Cygwin можно открыть терминал:

Ребята! Нормальный терминал, который ресайзится, позволяет копировать и вставлять текст, и вот это все! Под винду! Со всем хорошо знакомыми и привычными командами id, ls, pwd, cat, ssh, scp, и другими. С человеческим окружением — .bashrc, ~/.ssh/config, и так далее. Плюс к этому, в отличие от позорной поделки под названием PowerShell, Cygwin не тащит за собой .NET Framework. Мы даже можем открыть несколько терминалов и переключаться между ними при помощи сочетания Ctr + Tab. Это почти как табы! Понятное дело, старый-добрый Alt + Tab тоже работает.
Выше я не советовал устанавливать Git, и вот почему. Дело в том, что в Cygwin он заметно тормозит. Тут рекомендуют выполнить команды:
git config —global core.preloadindex true git config —global core.fscache true git config —global gc.auto 256
Но это, к сожалению, не решает проблему полностью. Так на большом проекте команда git status может выполняться секунд 20. В Linux на точно таком же репозитории команда отрабатывает мгновенно. Git for Windows с включенным флагом core.fscache (который можно поставить прямо в инсталляторе) работает заметно лучше, поэтому советую использовать его.
Еще вы можете обнаружить, что курсор очень трудно разглядеть, когда он находится над черным терминалом. В панели управления можно поменять, как выглядит курсор, расположенный над текстом — это решает проблему.
Также расстроило, что среди доступных пакетов не удалось обнаружить Nmap.
В остальном же Cygwin прекрасен и делает жизнь под Windows почти что сносной. Еще с его помощью можно установить Zsh, Gimp, Emacs, Mutt, Irssi, Texlive, Apache, MySQL и PostgreSQL например. Плюс чуть ли не весь KDE можно установить. Правда, на такие эксперименты я не отваживался.
А пользуетесь ли вы Cygwin и каковы ваши впечатления от него?
Метки: Кроссплатформенность, Разработка.
5.1 About the Cygwin Requirement for Installing Management Agents
The Add Host Targets Wizard is an application built into the Enterprise Manager Cloud Control console. It offers GUI-rich, interactive screens that enable you to install Oracle Management Agents (Management Agents) on unmanaged hosts and convert them to managed hosts, so that they can be monitored and managed in Enterprise Manager Cloud Control.
When you use the Add Host Targets Wizard or EM CLI to install a Management Agent on a host running on Microsoft Windows, as a prerequisite, you must install Cygwin and start the SSH Daemon on the host. To do so, follow the steps listed in .
Cygwin is essentially a utility that offers a Linux-like environment on a Microsoft Windows host. Technically, it is a DLL () that acts as a Linux API layer providing substantial Linux API functionality. Once you install Cygwin, you can configure the SSH Daemon on the host. The Add Host Targets Wizard is certified and supported with Cygwin 1.7.
Before you get started
Once you’ve checked out the sources, you will be able to avail
yourself of the «how*» files in the winsup/cygwin directory.
These are developer-written files which summarize various techniques
involved in cygwin design. You should familiarize yourself with
their content before making changes to the subsystems that they describe.
If your change is going to be a significant one in terms of the
size of your code changes, be aware that for changes to all source
files under the «winsup» directory you will have to license your code
changes under the 2-clause BSD license before we can include your
changes in the main source tree. (This is necessary for the next few
years so that Red Hat can meet its continuing obligations to Cygwin
buyout license customers while Cygwin transitions away from this
licensing model.).
To do this, just make a public statement that you provide your
patches to the Cygwin sources under the 2-clause BSD license.
For the wording of the 2-clause BSD license, see the
winsup/CONTRIBUTORS file in the Cygwin git
repository.
If you already have a Cygwin Copyright Assignment signed and
submitted, you can ignore this procedure. If you’re not sure if you
already signed the Copyright Assignment, see the list of signees in the
winsup/CONTRIBUTORS file.
Finally, before you start modifying anything for real, you should
probably join the cygwin-developers mailing list and send it mail
describing what you want to do and how you want to do it so you
don’t waste time working on something we can’t integrate. This also
allows us to keep track of what’s being worked on so efforts aren’t
duplicated.
It should go without saying but when you start coding your change,
make sure that you adhere to the brace, indentation, and whitespace
style of the surrounding code. For the most part, that means following
the
but some parts of the code which have been imported
from other sources use other styles. Just pay close attention to the
formatting of the surrounding code and don’t, e.g., add K&R style coding
to a file which uses GNU formatting.
If you want to keep track of who’s doing what to the sources, you can
subscribe to the cygwin-cvs and newlib-cvs mailing lists using the standard
subscription techniques employed for the other
mailing lists.
GNU и Windows
Для сборки программ с помощью GNU toolchain на Windows часто используют два проекта: Cygwin и MinGW + MSYS. У них схожие цели, но разные детали реализации. Давай разбираться.
Cygwin
Cygwin — самая полная реализация окружения GNU для Windows. Он предоставляет большую часть POSIX API в виде библиотеки, что позволяет собирать программы из UNIX без портирования, если только им не требуется семантика UNIX. Яркий пример — демоны, им нужен fork() и сигналы, которых нет в Windows, да и службы Windows устроены совсем иначе.
Кроме библиотеки, дистрибутив содержит набор классических команд UNIX и терминал. Реализации команд используют эту библиотеку и поддерживают некоторые возможности UNIX, такие как регистрозависимые имена файлов.
Целевой способ использования: если нет желания или возможности портировать программу на Windows или использовать только платформенно независимые API, ее можно собрать «под Cygwin», ценой зависимости от cygwin1.dll и относительной изоляции от всей остальной системы.
Многие люди ставили и продолжают ставить окружение Cygwin, чтобы иметь возможность использовать классические команды UNIX на Windows. Некоторые разработчики также включают Cygwin в инструкции для сборки своих программ под Windows, хотя сама программа не связывается с cygwin1.dll. Для этой цели может быть более правильно использовать MSYS.
MinGW и MSYS
Если цель Cygwin — сделать возможной сборку немодифицированных приложений на Windows ценой внешней зависимости, то цель MinGW + MSYS — производить приложения без внешних зависимостей.
MinGW и MSYS — это независимые пакеты, но их часто путают и смешивают друг с другом (а часто путают и с Cygwin). Можно сказать, что MinGW — это эквивалент GCC и binutils, а MSYS — расширенный эквивалент coreutils.
Начнем с MSYS. MSYS — это более «нативная» и легковесная альтернатива Cygwin. Этот пакет включает библиотеку с реализациями функций POSIX, но она предназначена для внутреннего пользования, и авторы категорически не рекомендуют связывать с ней свои приложения.
Библиотека MSYS не реализует UNIX поверх Windows, а следует соглашениям Windows — к примеру, сознательно не учитывает регистр букв в путях к файлам. Главная цель MSYS — предоставить нужные для скриптов сборки программы вроде Bourne shell, make и прочее, что обычно требуется для autotools.
MinGW содержит версии GCC и binutils (ассемблер as, компоновщик ld и так далее), которые производят исполняемые файлы для Windows в формате PE/COFF. Здесь мы и подходим к ключевому моменту: MinGW, как и все остальные части GNU toolchain, такой же платформенно независимый проект.
Кросс-компиляция в GNU toolchain уже давно обычное дело, и в GCC целевая платформа и хост независимы друг от друга. Можно запускать GCC на Linux для x86 и собирать программы для Linux на ARM, или наоборот. Совпадать не обязаны не только рабочая и целевая архитектуры процессора. Точно так же не обязаны совпадать даже ОС и формат исполняемого файла.
Pre-built toolchains and packages
| Version | Host | GCC / Mingw-w64 Version | Languages | Additional Software in Package Manager | |
|---|---|---|---|---|---|
| Arch Linux | Ada, C, C++, Fortran, Obj-C, Obj-C++ | many | |||
| Rolling | Windows | 5.4.0/5.0.2 | Ada, C, C++, Fortran, Obj-C | 5 (bzip2, libgcrypt, libgpg-error, minizip, xz, zlib) | |
| Debian 7 (Wheezy) | 4.6.3/2.0.3 | Ada, C, C++, Fortran, Obj-C, Obj-C++, OCaml | 2 (gdb, nsis) | ||
| Debian 8 (Jessie) | 4.9.1/3.2.0 | ||||
| Debian 9 (Stretch) | 6.3.0/5.0.0 | 9 (gdb, libassuan, libgcrypt, libgpg-error, libksba, libnpth, nsis, win-iconv, zlib) | |||
| Debian 10 (Buster) | 8.3.0/6.0.0 | ||||
| Fedora 19 | 4.8.1/? | Ada, C, C++, Fortran, Obj-C, Obj-C++ | 149+ | ||
| 20210423 | Windows, Linux | LLVM 12.0.0/trunk | C, C++ | make | |
| Rolling | macOS | C, C++, Fortran, Obj-C, Obj-C++ | 1 (nsis) | ||
| Rolling | Windows | 7.2.0/5.0.3 | C, C++, Fortran | 4 (gdb, libiconf, python, zlib) | |
| Rolling | Windows | Ada, C, C++, Fortran, Obj-C, Obj-C++, OCaml | many | ||
| 12.04 Precise Pangolin | 4.6.3/2.0.1 | Ada, C, C++, Fortran, Obj-C, Obj-C++, OCaml | 2 (nsis, gdb) | ||
| 14.04 Trusty Tahr | 4.8.2/3.1.0 | ||||
| 14.10 Utopic Unicorn | 4.9.1/3.1.0 | ||||
| 15.04 Vivid Vervet | 4.9.2/3.2.0 | ||||
| 15.10 Wily Werewolf | 4.9.2/4.0.2 | ||||
| 16.04 Xenial Xerus | 5.3.1/4.0.4 | 3 (nsis, gdb, zlib) | |||
| 1.5 | Windows, Linux | 4.8.3/3.3.0 | C, C++ | 91+ |
Installation:
- Community repository (toolchain)
- AUR repository (additional packages)
Cygwin
Cygwin is a Unix-like environment and command-line
interface for Microsoft Windows. Its core is the cygwin1.dll library which
provides POSIX functionality on top of the Win32 API. It can be used as a build
environment which targets Windows directly and for which output doesn’t depend
on cygwin1.dll.
Installation is done through cygwin’s package manager:
setup.exe.
As part of the numerous packages in cygwin, there are cross-compilation
toolchains which target both 32 bits and 64 bits; their names start with
“mingw64-”.
Once they are installed, they should be used according to the general
cross-compilation approach.
LLVM-MinGW
LLVM-MinGW is a toolchain built with Clang, LLD, libc++, targeting
i686, x86_64, arm and aarch64 (ARM64), with releases both for running
as a cross compiler from Linux and for running on Windows. It supports
Address Sanitizer, Undefined Behaviour Sanitizer, and generating debug
info in PDB format.
MacPorts
To install just the 32-bit or just 64-bit compiler with dependencies, use:
A shortcut to install both:
Here is the list of Mingw-w64 packages on MacPorts.
Win-Builds
Win-builds is a cross-platform project that makes building for Windows easy. It
supports building from both Windows and Linux systems and provides many
pre-built libraries which can be installed through a graphical package manager.
It aims for stability while still providing recent versions of software
packages.
Installation: http://win-builds.org.
Building the development version of Cygwin
The code corresponding to cygwin1.dll is mostly in the winsup
directory with additional code coming from newlib/libc and newlib/libm.
Any changes you make should be to the current
development sources. This makes it much easier to integrate your
changes once they’re completed and tested. Note that the current Git
tree (and the development snapshots) should compile, but they should
always be assumed to be unstable since they contain untested,
experimental code.
Build instructions are included in the FAQ under
«How do I build Cygwin on my own?».
Basically, just clone the newlib-cygwin Git repository as mentioned on the
Cygwin Git page.
Creating a local Cygwin mirror with rsync
You do not need to know anything about how the directory tree is created if
you just want a copy of an existing directory tree. Simply follow these steps:
- The first step in creating a local Cygwin mirror is to pick which
existing mirror you will download your packages from. A list of
mirrors can be found here. -
Download the current Cygwin directory tree.
If disk space is a problem, you may want to use a
public mirror and only add your own custom packages as described in the
next section. (Substitute your chosen mirror
for example.com and your DocumentRoot for /var/www/):rsync -vaz rsync://example.com/pub/cygwin/ /var/www/cygwin -
Test the mirror by pointing a browser at
http://your-server/cygwin/.
If your server is configured to show directory indexes, you should see
the various arch directories, each containing a release
directory and the compressed setup.ini files.
Run Cygwin’s setup program and type the URL of your server. -
Assuming everything works properly, you are almost done. You now have
a current Cygwin mirror, but you need to keep it updated by running the
rsync command periodically. The easiest way to do this is by
putting it in your crontab.
Как перезагрузить Cygwin
Вы можете обратить внимание, что даже после закрытия консоли, а затем её открытия, некоторые процессы, запущенные в Cygwin, продолжают работать. Вы можете проверить их с помощью команд
ps -e
Или
top
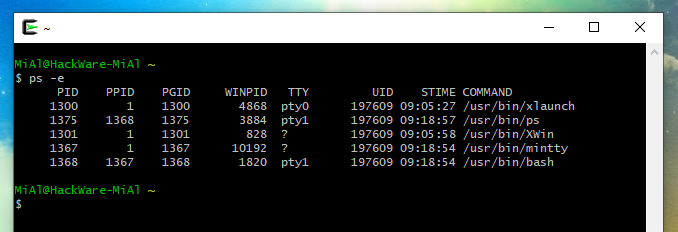
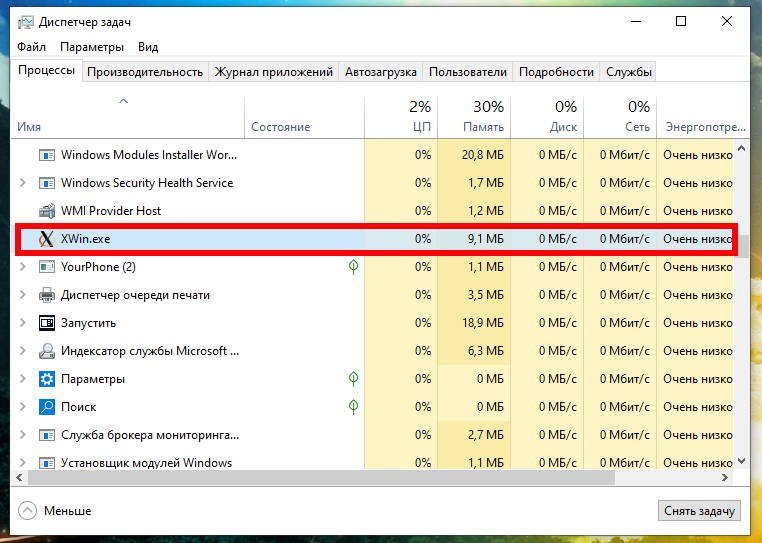
В Менеджере задач Windows вы можете увидеть процесс conhost.exe, принадлежащий Cygwin, даже после закрытия всех терминалов.

Программы, запущенные с X сервером, также не отключаются при закрытии терминалов Cygwin.
Поскольку Cygwin не является полным ядром Linux, некоторые мелкие вещи, такие как выключение машины, не будут работать так, как на Linux.
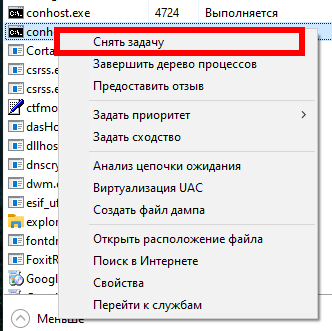
Единственные способы, которыми удаётся закрыть эти процессы — перезагрузить Windows или снять задачи вручную.
Аналоги Cygwin
- VMware Workstation
- WD SmartWare
- Glary Utilities Pro
- Realtek Ethernet Controller Driver
- Joxi
- RadioSure
2019, Win10Programs — Каталог популярных программ для Windows 10.
Эта статья будет полезна начинающим пользователям Cygwin. Начнем с того, что нам для начала нужно ответить на простой вопрос. Что же такое Cygwin? Cygwin — это UNIX-подобная среда и интерфейс командной строки для Microsoft Windows. В системе Microsoft Windows уже существует подобный интерфейс cmd. Вызвать командную строку можно сочетанием клавиш Win+R. Но зачастую большую часть работы Windows пользователям приходится делать вручную. По другую сторону Linux пользователь уже давно написал bash-скрипт и сидит пьет пиво в сторонке от автоматизированного рабочего процесса.
Так что же мешает сделать это и в ОС Windows? Правильно, абсолютно ничего не мешает. Но для этого нужны дополнительные программы и библиотеки. Программа Cygwin расширяет возможности стандартной командной строки Windows, позволяя автоматизировать некоторые процессы и разрабатывать программы для Linux и других систем.
Выбираем нужную версию, скачиваем и запускаем исполнительный файл setup-x86.exe и setup-x86_64.exe соответственно.
 Окно установки 64 битной версии программы
 Окно выбор способа установки
 Окно выбора пакетов
Окно установки 32 битной версии программы выглядит точно так же как и 64 битной. Следующим шагом будет окно выбора. Откуда устанавливать или скачивать программу. Всего есть три варианта. Первый вариант Install from Internet (downloaded files will be kept for future re-use) установка из интернета причем загруженные файлы будут храниться до следующего повторного использования. Второй вариант Download Without Installing скачать без установки. Третий вариант Install from Local Directory установка из локального каталога. Т.к. у нас нет локальной копии и нам нужно установить то выбираем первый вариант. Следующее окно будет выбор пути установки. Рекомендую выбрать системный диск, к примеру у меня путь установки Cygwin это C:cygwin64. Следующее окно это выбор пути где будут храниться временный файлы которые будут скачиваться в процессе установки. У меня это C:cygwin64package. Потом нужно выбрать как скачивать через прокси или напрямую. Следующим шагом будет выбор репозитория скачки выбираем любой попавшийся или тот что по умолчанию и жмем Далее. После нажатия кнопки далее начнется процесс скачивания основных конфигов. Следом вы сможете выбрать что устанавливать. Чтобы выбрать пакет нужно нажать Skip около названия пакета. Список пакетов которые вам пригодятся:
- gcc-core (в разделе Devel)
- gcc-g++ (в разделе Devel)
- make (в разделе Devel)
- cmake (в разделе Devel)
- automake (в разделе Devel)
- wget (в разделе Web)
- libiconv (в разделах Devel и Libs)
- openssh (в разделе Net)
- nano (в разделе Editors)
- bash (из раздела Base)
- base-cygwin (из раздела Base)
- base-files (из раздела Base)
- cygwin (из раздела Base)
- file (из раздела Base)
- gzip (из раздела Base)
- login (из раздела Base)
- mintty (из раздела Base)
- openssl (из раздела Base)
- run (из раздела Base)
- tar (из раздела Base)
- vim-minimal (из раздела Base)
- cron (из раздела Admin)
- shutdown (из раздела Admin)
- git (все пакеты из раздела Devel)
Также рекомендую полностью установить раздел Perl и Python. После этого жмем далее и произойдет установка нужных пакетов и их зависимостей. После конца установки можно будет запустить сам Cygwin и начать работу.

Мне не симпатизировал ни цвет фона, ни встроенный шрифт и цвет текста поэтому я кастомизировал его. На этих словах я закончу эту статью.
Данная статья не подлежит комментированию, поскольку её автор ещё не является полноправным участником сообщества. Вы сможете связаться с автором только после того, как он получит приглашение от кого-либо из участников сообщества. До этого момента его username будет скрыт псевдонимом.
Installing Cygwin
To install Cygwin, head to the official site of Cygwin and download the executable depending on your system preference (32-bit or 64-bit). The executable itself is small as it downloads all the required packages while installing the software.
Once you have downloaded the Cygwin installer, launch the installer as the Administrator. You will be greeted with the welcome screen,;just click on the “Next” button to continue. Here in this screen, select the radio button “Install from Internet” and click on the “Next” button. This option will download all the required packages for the installation and will store them in the local directory for future use.
Here you can select the root directory for the Cygwin installation. The default settings are fine unless you want to customize the installation directory and user access. Click on the “Next” button to continue.
In this screen, you can select the local package directory where the downloaded files are stored. If you want to change it, go ahead and change the directory location by click on the “browser” button. Otherwise, click on the “Next” button to continue.
Unless you are using some sort of HTTP proxy to access the internet, just leave the default option and click on the “Next” button to continue.
Here you can select the download site from which you wish to download the required packages. Unfortunately, Cygwin doesn’t provide any additional details like site location. So just select a random site and click on the “Next” button.
As soon as you click on the “Next” button, Cygwin will show you all the available packages in categories. At this point, you can keep them at the default settings and click the “Next” button. If you ever want to add packages to your Cygwin installation, you can do so by running the installer as needed.
Now Cygwin will download all the default packages and install them. The downloading and installing may take some time depending on your Internet speed and the selected server speed.
Once the installation is complete, you can start using Cygwin by launching it using the desktop shortcut or from the start menu.
Alternatively, you can configure Cygwin to work with the normal Windows command prompt so you don’t have to launch Cygwin specifically. To do that, open up your Start menu, type “system” and select the option “System” in the control panel section. If you are using Windows 8, you can access the same section by pressing “Win + X” and selecting “System” from the power user menu.
Click on the “Advanced System Settings” located on the left pane to open “System properties.”
Click on the “Environmental Variables” button.
Scroll down and select the variable “path” under the “system variables” and click on the “Edit” button.
Now add the below location (variable value) at the end of the line. Don’t forget to separate it using . If you have chosen a different installation directory while installing the Cygwin, then change the below location variable accordingly. Once you have added it, click on the “Ok” button to save the changes.
From this point onward, you can use Linux commands right in your regular Windows command prompt.
Hopefully that helps, and do comment below if you face any difficulties while installing and configuring Cygwin.
Vamsi Krishna
Vamsi is a tech and WordPress geek who enjoys writing how-to guides and messing with his computer and software in general. When not writing for MTE, he writes for he shares tips, tricks, and lifehacks on his own blog Stugon.
Cygwin in Wine
Before we plunge into the truly wild and wooly, installing and running the Cygwin suite within Wine is a relatively well-behaved process. Even as early as around Wine v1.0, Dan Kegel reported that much of the Cygwin suite installed and ran successfully.
Cygwin is a set of libraries and tools compiled for Windows that provides a POSIX API. It’s less a compatibility-layer like Wine and more like a miniature distribution that overlays Windows. As a result, unix apps must still be recompiled for Windows to run in Cygwin.
By using Cygwin in Wine, we can do more than uncover bugs with Cygwin itself; we can theoretically rebuild many unix binaries, scripts, etc. into tiny unit tests for Wine. Since the Cygwin sources are completely open too, it should be easier to diagnose the cause of a specific problem. Just remember the Cygwin executables must be run from a Windows/Wine console, not a unix command-line (if you want to start Cygwin’s shell, launch the cygwin.bat script from the same console).
For a less self-referential take on the «let’s run an entire suite on Wine» approach to testing, see Guest Unit Tests
Как установить пакеты (программы) в Cygwin
Рассмотрим ситуацию, как в Cygwin установить дополнительные пакеты
Рассмотрим на примере: нам нужно установить ряд зависимостей, а именно следующие пакеты (они нужны для компиляции):
- libssl-devel
- ibbz2-devel
- libgmp-devel
- zlib-devel
- libOpenCL-devel
- libcrypt-devel
Это можно сделать двумя разными способами.
Первый способ установки программ в Cygwin
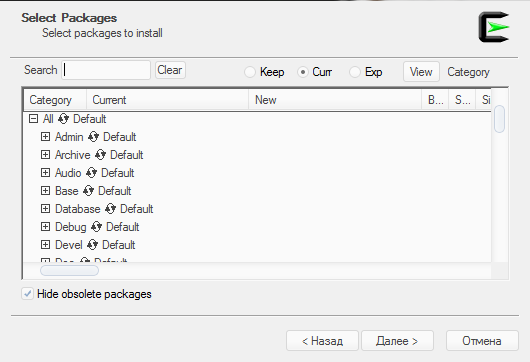
Во-первых, вы можете запустить установщик ещё раз, и на этапе выбора пакетов переключитесь в список «Full», введите имя пакета и дважды кликните на слово «Skip»:

Чтобы вместо него появился номер версии:

Сразу после этого введите имя второго пакета (первый пакет как бы пропадёт — не надо об этом беспокоится), кликните на слово «Skip».
Повторите это для всех пакетов.
Когда закончите, очистите поле поиска и переключитесь на список «Pending» чтобы увидеть список пакетов для установки:
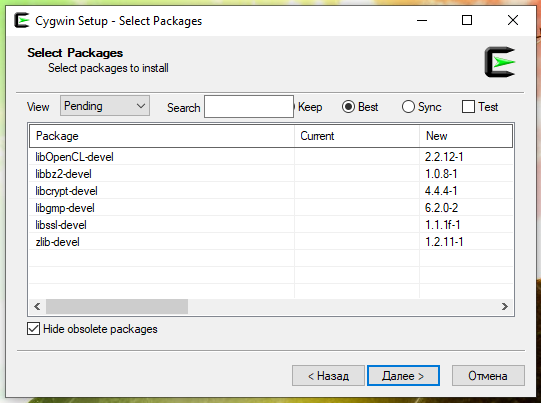
Нажмите далее и завершите установку выбранных пакетов.
Второй способ установки программ в Cygwin
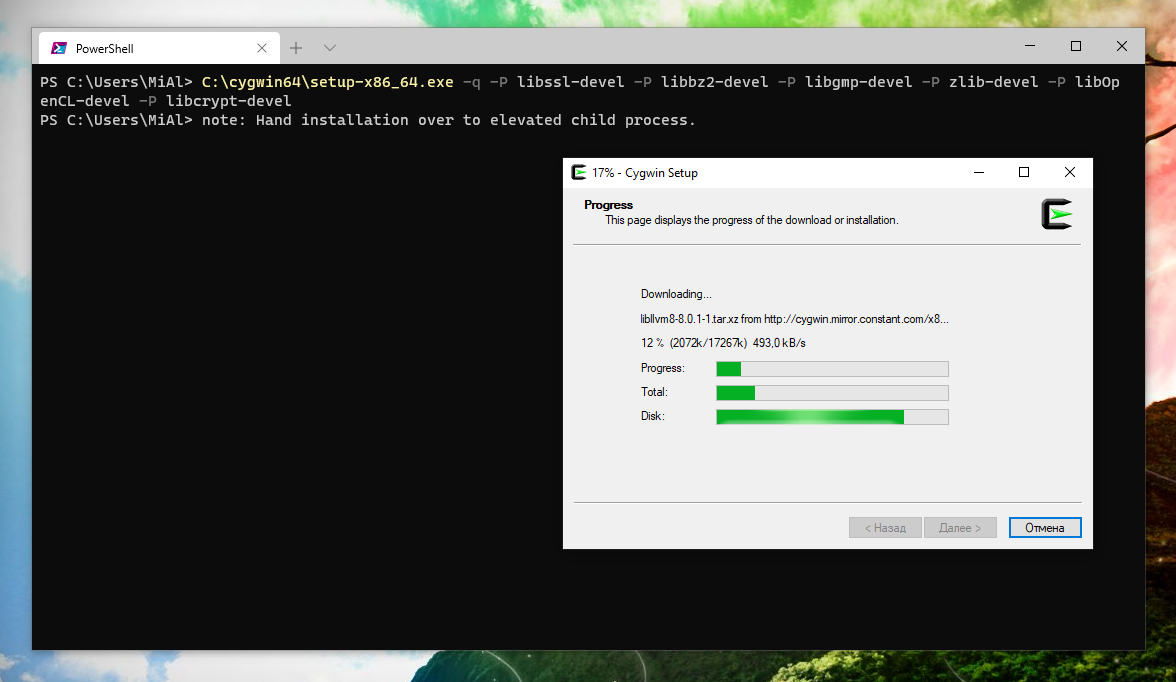
Возможно, вам больше понравится другой способ: переместите установочный файл setup-x86_64.exe в папку C:\cygwin64\ и затем откройте командную строку Windows (PowerShell) и просто выполните команду вида:
C:\cygwin64\setup-x86_64.exe -q -P ПАКЕТ1 -P ПАКЕТ2 -P ПАКЕТ3
К примеру, для моего примера по установке шести пакетов команда выглядит так:
C:\cygwin64\setup-x86_64.exe -q -P libssl-devel -P libbz2-devel -P libgmp-devel -P zlib-devel -P libOpenCL-devel -P libcrypt-devel
Сразу после запуска команды начнётся скачивание и установка требуемых пакетов CygWin.
Accessing X of your Local Cygwin[edit | edit source]
You can run the X server and the Window Manager locally and get the X Window GUI environment.
There are various ways you can do this. They are as follows:
MultiWindow Modeedit | edit source
In the multiwindow mode, there is an internal window manager that creates a Windows window to display the X application on the Windows desktop.
Xedit | edit source
X is a soft-link (shortcut from Windows standpoint) to /usr/X11R6/bin/XWin.
- Start Cygwin
- Execute the command, . (Cygwin/X window comes up)
- Execute the command,
- Execute the command, . (xclock comes up).
Now you can run any X application. They open up in separate windows individually with your windows title-bar, caption buttons and border. You don’t get the desktop environment in this case.
startxwin.batedit | edit source
- Run startxwin.bat from folder where your Cygwin is installed. This can be done by double clicking on the batch file. It will bring up an xterm window. If you don’t want to go through the hassle of finding this file, you can simply run the startxwin-multiwindow.bat file which should be present on your desktop. Both the scripts are very similar.
- Execute the command, in the xterm window. (xclock comes up).
Now you can run any X application. They open up in separate windows individually with your windows title-bar, caption buttons and border. You don’t get the desktop environment in this case.
startxwin.shedit | edit source
- Start Cygwin (The Bash shell comes up)
- Execute the command, . It’ll bring up an xterm window.
- Execute the command, in the xterm window. (xclock comes up).
Now you can run any X application. They open up in separate windows individually with your windows title-bar, caption buttons and border. You don’t get the desktop environment in this case.
startxedit | edit source
- Start Cygwin (The Bash shell comes up)
- Execute the command, . It’ll bring up an xterm window.
- Execute the command, in the xterm window. (xclock comes up).
Now you can run any X application. They open up in separate windows individually with your windows title-bar, caption buttons and border. You don’t get the desktop environment in this case.
