Как установить openssl в windows 10?
Содержание:
- Отзыв сертификата
- Installation directories
- Configuration[edit]
- Features and Technologies that Require OpenSSL
- Сборка OpenSSL, GOST-engine, cURL
- Programs for query ″download openssl for windows 10″
- Misc
- Introduction
- Подготовка конфигурационных файлов
- Configuring OpenSSL
- Target Audience
- Update PowerShell Profile Environment Variables
- Поддержка ГОСТ-сертификатов в nginx
- Use OpenSSL on a Windows machine
- Troubleshooting & Debugging
- Подпись сертификатов OpenSSL
- Embed SSL and TLS support into your projects to enhance security with the help of this lightweight cryptography library, which comprises various encryption algorithms
- Использование CRL клиентами
- Online Certificate Status Protocol
Отзыв сертификата
Утилита OpenSSL ocsp может выступать в качестве ответчика OCSP, но она предназначена только для тестирования. Для производственной среды OCSP ответчики тоже существуют, но они выходят за рамки данной статьи.
Создадим серверный сертификат для тестирования.
Запустим ответчик OCSP на локальной машине. Вместо того, чтобы хранить статус отзыва в отдельном CRL файле ответчик OCSP напрямую читает файл index.txt. Ответ подписывается криптографической парой OCSP (используя опции –rkey и –rsigner).
В другом терминале пошлем запрос к OCSP ответчику. Опция указывает сертификат для запроса.
Начало вывода показывает следующее:
- был ли получен положительный ответ (OCSP Response Status)
- идентичность ответчика (Responder Id)
- статус отзыва сертификата (Cert Status)
Отзыв сертификата.
Как и раньше, запускаем ответчик OCSP в другом терминале и шлем запрос. В этот раз вывод показывает и .
Installation directories
The default installation directories are derived from environment
variables.
For VC-WIN32, the following defaults are use:
For VC-WIN64, the following defaults are use:
Should those environment variables not exist (on a pure Win32
installation for examples), these fallbacks are used:
ALSO NOTE that those directories are usually write protected, even if
your account is in the Administrators group. To work around that,
start the command prompt by right-clicking on it and choosing «Run as
Administrator» before running ‘nmake install’. The other solution
is, of course, to choose a different set of directories by using
—prefix and —openssldir when configuring.
Configuration[edit]
OpenSSL is configured for a particular platform with protocol and behavior options using Configure and config.
You should avoid custom build systems because they often miss details, like each architecture and platform has a unique opensslconf.h and bn.h generated by Configure.
Supported Platformsedit
You can run Configure LIST to see a list of available platforms.
$ ./Configure LIST
BC-32
BS2000-OSD
BSD-generic32
BSD-generic64
BSD-ia64
BSD-sparc64
BSD-sparcv8
BSD-x86
BSD-x86-elf
BSD-x86_64
Cygwin
Cygwin-x86_64
DJGPP
...
If your platform is not listed, then use a similar platform and tune the $cflags and $ldflags by making a copy of the configure line and giving it its own name. $cflags and $ldflags correspond to fields 2 and 6 in a configure line. An example of using a similar configure line is presented in .
Configure & Configedit
You use Configure and config to tune the compile and installation process through options and switches. The difference between is Configure properly handles the host-arch-compiler triplet, and config does not. config attempts to guess the triplet, so it’s a lot like autotool’s config.guess.
You can usually use config and it will do the right thing (from Ubuntu 13.04, x64):
$ ./config
Operating system: x86_64-whatever-linux2
Configuring for linux-x86_64
Configuring for linux-x86_64
    no-ec_nistp_64_gcc_128   OPENSSL_NO_EC_NISTP_64_GCC_128 (skip dir)
    no-gmp            OPENSSL_NO_GMP (skip dir)
    no-jpake         OPENSSL_NO_JPAKE (skip dir)
    no-krb5          OPENSSL_NO_KRB5
    ...
Mac OS X can have issues (it’s often a neglected platform), and you will have to use Configure:
 ./Configure darwin64-x86_64-cc
Configuring for darwin64-x86_64-cc
    no-ec_nistp_64_gcc_128   OPENSSL_NO_EC_NISTP_64_GCC_128 (skip dir)
    no-gmp            OPENSSL_NO_GMP (skip dir)
    no-jpake         OPENSSL_NO_JPAKE (skip dir)
    no-krb5          OPENSSL_NO_KRB5
    ...
You can also configure on Darwin by exporting KERNEL_BITS:
$ export KERNEL_BITS=64
$ ./config shared no-ssl2 no-ssl3 enable-ec_nistp_64_gcc_128 --openssldir=/usr/local/ssl/macosx-x64/
Operating system: i686-apple-darwinDarwin Kernel Version 12.5.0: Sun Sep 29 13:33:47 PDT 2013; root:xnu-2050.48.12~1/RELEASE_X86_64
Configuring for darwin64-x86_64-cc
Configuring for darwin64-x86_64-cc
    no-gmp            OPENSSL_NO_GMP (skip dir)
    no-jpake         OPENSSL_NO_JPAKE (skip dir)
    no-krb5          OPENSSL_NO_KRB5
    ...
If you provide a option not known to configure or ask for help, then you get a brief help message:
$ ./Configure --help
Usage: Configure
      threads] shared]
zlib|zlib-dynamic]
 ]  os/compiler
And if you supply an unknown triplet:
$ ./Configure darwin64-x86_64-clang
Configuring for darwin64-x86_64-clang
Usage: Configure
      threads] shared]
zlib|zlib-dynamic]
 ]  os/compiler

pick os/compiler from:
BC-32 BS2000-OSD BSD-generic32 BSD-generic64 BSD-ia64 BSD-sparc64 BSD-sparcv8
BSD-x86 BSD-x86-elf BSD-x86_64 Cygwin Cygwin-pre1.3 DJGPP MPE/iX-gcc OS2-EMX
...

NOTE: If in doubt, on Unix-ish systems use './config'.
Dependenciesedit
If you are prompted to run make depend, then you must do so. For OpenSSL 1.0.2 and below, it’s required to update the standard distribution once configuration options change.
Since you've disabled or enabled at least one algorithm, you need to do
the following before building:

	make depend
OpenSSL 1.1.0 and above performs the dependency step for you, so you should not see the message. However, you should perform a make clean to ensure the list of objects files is accurate after a reconfiguration.
Features and Technologies that Require OpenSSL
RAD Studio requires OpenSSL for HTTPS support for the following features and technologies:
- Sending push notifications with the EMS Server: You need to install the OpenSSL libraries in the system where the RAD Server Engine (EMS Server) runs to send push notifications. You need to install the 32-bit or 64-bit OpenSSL depending on the EMS Server binary you are running.
- Indy
- InterBase: InterBase uses OpenSSL for encryption and OTW/SSL features.
- DataSnap Server: OpenSSL is required by DataSnap servers when encryption filters are enabled, or when the Communication Protocol is set to HTTPS in the .
Сборка OpenSSL, GOST-engine, cURL
Сборка стороннего продукта для тех, кто делает это редко, может быть нетривиальной задачей. Для сборки OpenSSL, GOST-engine и cURL пришлось разобраться с кучей опций и перепробовать несколько комбинаций версий. Если в Dockerfile вы заметите странное, то, скорее всего, это осталось от таких экспериментов.
Я зафиксировал все версии проектов для сборки, чтобы исключить ситуацию, что из-за обновления что-то перестанет работать. Например, я собирал OpenSSL 1.1.0h + GOST-engine и команда не содержала GOST-алгоритмов, хотя показывала GOST-engine в списке. Указав предыдущую версию OpenSSL 1.1.0g, все работало, как ожидалось. Это было очень странно, я повторил это еще раз, потом пытался выяснить , но в итоге решил остаться на 1.1.0g.
Собирая сам GOST-engine, я не сразу обратил внимание на наличие файла в master-ветке, потому что собирал из ветки по неизвестно откуда взятой документации. Та версия собиралась с кастомной сборкой OpenSSL командой. Но master-ветка так собираться перестала, появились ошибки об отсутствии и подобное
В итоге решение было найдено и зафиксировано
Но master-ветка так собираться перестала, появились ошибки об отсутствии и подобное. В итоге решение было найдено и зафиксировано.
Для сборки cURL с кастомной сборкой OpenSSL гораздо больше документации, тем не менее, документация успевала устаревать, и с опциями пришлось много экспериментировать.Результат работы выложен здесь.Образ запушен в Docker Hub.
Programs for query ″download openssl for windows 10″
ArcGIS for Desktop OpenSSL Update Patch
Download
This patch addresses non-exploitable instances of the OpenSSL defect commonly called Heartbleed that may still exist in ArcGIS 10.
… the OpenSSL defect … 10.1 Service Pack 1 through ArcGIS 10 … instances of OpenSSL, customers …
OpenVPN
Download
4 on 101 votes
With OpenVPN, you can: tunnel any IP subnetwork or virtual ethernet adapter over a single UDP or TCP port,
… of the OpenSSL library to … by the OpenSSL library,
choose … a GUI on Windows or Mac …
Open SSL for PopTrayU
Download
3 on 1 vote
Open SSL for PopTrayU is a plugin for PopTrayU that adds SSL support.
… notifier for Windows with improved … plugin installs openSSL dlls to …
ClicksAndWhistles
Download
3 on 88 votes
ClicksAndWhistles is a free IRC client for Windows. Internet Relay Chat (IRC) is a form of real-time Internet text …
… /underline).
— Different window modes (tabbed … . (http://www.openssl.org/).
— «Connection …
PNaCL ToraTora
Download
AES File Encrypt by PNaCl sandbox. So safely. Encrypt mode is CBC.
… .
License Information :
Openssl (4-clause BSD … License Version 1.0)
Openssl is No …
Evolane Tcl Engine
Download
Evolane Tcl Engine (eTcl) is made available under the terms of the Evolane Community License.
… : PNG license
* OpenSSL: OpenSSL license
* Tls …
stunnel
Download
Stunnel is a proxy for adding TLS encryption to existing clients and servers without any change in the programs’ code.
… uses the OpenSSL library for … of the OpenSSL FIPS Object …
wolfSSL
Download
4.4 on 75 votes
The wolfSSL embedded SSL/TLS library is a lightweight SSL library written in ANSI standard C and targeted for embedded …
… smaller than OpenSSL, and offers … wolfSSL over OpenSSL. It is …
EchoVNC VNCViewer
Download
EchoVNC comes with a VNC Viewer, and is designed to work with any flavor of VNC server that you already have installed.
… . EchoVNC uses OpenSSL components to …
Chilkat Crypt ActiveX
Download
Chilkat Encryption ActiveX is a program that provides symmetric encryption: AES, Blowfish, Twofish, RC2, ARC4, DES, 3DES, PBES1, PBES2.
… created by OpenSSL and set …
Misc
The traditional way to look at certificates is to “Run mmc”.
However you can also use PowerShell and do e.g.:
PS C:\Windows\system32> dir cert:Location : CurrentUserStoreNames : {TrustedPublisher, ClientAuthIssuer, Root, UserDS...}Location : LocalMachineStoreNames : {TestSignRoot, ClientAuthIssuer, Remote Desktop, Root...}
or e.g.:
PS C:\Windows\system32> dir Cert:\LocalMachine\myPSParentPath: Microsoft.PowerShell.Security\Certificate::LocalMachine\myThumbprint Subject---------- -------A0EE...235E7E34 CN=comp1.company.net.nz6D30...3C743CCE CN=localhost
All good!
Introduction
This guide is designed to introduce the reader to the Secure Sockets Layer (SSL) application-level protocol, and particularly the OpenSSL implementation of SSL. After a brief description of exactly what OpenSSL is, and what it is useful for, the guide will further illustrate the practical usage of OpenSSL in a client-server environment, and provide specific examples of applications which may benefit from OpenSSL. Finally, the guide will lead the user through example procedures required to use OpenSSL with the popular Apache Hyper Text Transport Protocol (HTTP) server for the purpose of serving secured web pages from your Ubuntu computer.
Подготовка конфигурационных файлов
Необходимо создать конфигурационный файл для OpenSSL. Создадим файл , скопируем в него следующее содержимое root-config.txt.
Раздел является обязательным. Здесь мы говорим OpenSSL использовать параметры из раздела :
Раздел содержит ряд значений по умолчанию:
Policy_strict будет применяться для всех подписей корневого центра сертификации, и корневой центр сертификации будет использоваться только для создания промежуточных центров сертификации.
Применим для всех подписей промежуточных центров серфтификации, так как промежуточные центры сертификации это подписывающие серверы, и клиентские сертификаты могут приходить от различных третьих лиц.
Параметры из секции применяются когда создаются сертификаты или запросы на подписывание сертификатов.
Секция определяет информацию, которая обычно требуется при запросе на подписывание сертификата. Можно указать некоторые значения по умолчанию.
Следующие несколько секций являются расширениями, которые могут применять при подписывании сертификатов. Например, при указании аргумента командной строки -extensions v3_ca будут применены расширения из секции . Эти расширения будут применяться при создании корневого сертификата.
При создании сертификата промежуточного центра сертификации будут применяться расширения из . Параметр указывает, что не может быть никаких дальнейших центров сертификации ниже промежуточного центра сертификации.
Расширение будет применяться при подписывании клиентских сертификатов, таких, которые используются для аутентификации удаленных пользователей.
Расширение будет применяться при подписывании серверных сертификатов, таких, которые используются для веб-серверов.
Расширение будет автоматически применяться при создании списков отзыва сертификатов (CRL — certificate revocation lists).
Расширение будет применяться при подписывании сертификата OCSP (Online Certificate Status Protocol, онлайн протокол статуса сертификатов).
Configuring OpenSSL
By default, OpenSSL on Windows 10 does not come with a configuration file. This is intentional because there are a lot of configuration options that you can customize. For the purposes of this guide, you are going to use a sample configuration that you can customize later to best suit your security requirements.
Open up PowerShell and run the below command. This command downloads a sample configuration file from MIT and saves it as openssl.cnf in the current working directory.
You can now open up the openssl.cnf file and you should see something that looks like below.
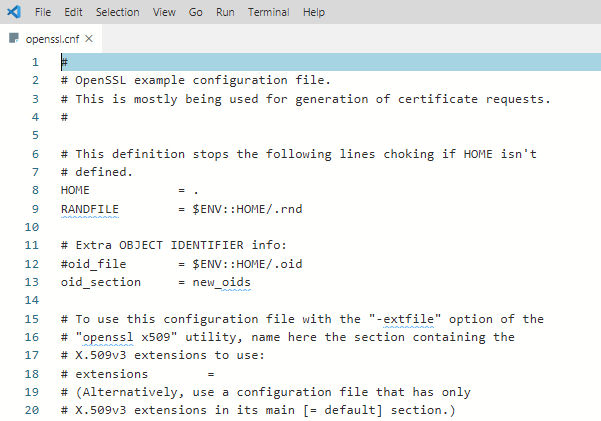 Sample OpenSSL configuration file
The downloaded configuration will work as-is for now. Do not use the defaults in a production environment!
Target Audience
To properly implement the practical steps found in this guide, the reader should be a user of Ubuntu who is comfortable with the use of command-line applications, using the Bourne Again SHell (bash) environment, and editing system configuration files with their preferred text editor application. While previous familiarity with Server Sockets Layer (SSL), or the OpenSSL implementation in particular, is not required for this guide, if desired, the reader is advised to pursue further learning from the resources listed in the Resources section of this guide in order to broaden his/her understanding of this powerful security layer.
Update PowerShell Profile Environment Variables
To make things go smoothly, you should modify your PowerShell profile on Windows 10. Setting up some environment variables allows you to easily switch between different versions of OpenSSL that you may have installed.
I suggest adding two environment variables to your PowerShell profile called and . You will update the environment variable to ensure you can run the openssl binary in any location while on the command line.
Below you’ll see a way to create a PowerShell profile if you don’t already have one. This command appends the OpenSSL binary path to your and assign the configuration file path to .
To use the environment variables, reload your profile typing or just close and reopen PowerShell.
Now you can easily invoke the openssl binary wherever you are in PowerShell as shown below.
 Verifying OpenSSL version in PowerShell
Поддержка ГОСТ-сертификатов в nginx
Возможность работать из языков программирования это уже много, но хотелось еще две возможности:
- Легко поднимать свой веб-сервер с ГОСТ-сертификатом по HTTPS (TLS).
- Легко проксировать все запросы на хост с ГОСТ-сертификатом
Легко – это означает докер-образ. Его нужно создать. Для этого нужно в Dockerfile собрать nginx с кастомным OpenSSL и GOST-engine. Открыв документацию сборки nginx, я увидел одну опцию о ssl — , которая просто булева. Но nginx популярный продукт, инструкций по сборке с openssl много, поэтому я нашел еще опцию . Как показала практика, nginx хочет, чтобы здесь были исходники openssl, а сборкой скрипты nginx займутся сами. Это не совсем то, что я хотел бы (я хотел использовать multi-stage build). Я ознакомился с help-выводом сборщика nginx, но ничего, что мне там помогло бы, я не нашел.
Пришлось дублировать инструкции выкачивания исходников OpenSSL, распаковки, сборки GOST-engine, включения GOST-engine в конфиги. Всё это начало собираться, но поддержки ГОСТ-алгоритмов в nginx все ещё не было. Это я проверял указанием в конфиге . Выполнение говорило, что не знает этого алгоритма.
Как оказалось, openssl, собранный nginx, не поддерживал динамические движки, т.е. выводил . Здесь пришлось внимательно почитать документацию сборки OpenSSL, чтобы выяснить, что проставило . Причина нашлась в openssl, которые вызывал nginx, а именно . Если это указано, то нет никаких флагов, чтобы включить поддержку загрузки движков. Пришлось править инструкцию сборки:
Всё это собралось, но nginx начал ругаться, что не может найти по пути , это довольно странно, потому что тот же собранный openssl ищет и находит движки совсем в другом месте, а именно там, где и собирался . Добавил инструкцию копирования собранных движков в , чтобы угодить nginx. Заработало.
Рядом с основным Dockerfile в репозитории я положил демонстрационный Dockerfile, который при сборке создает себе ГОСТ-сертификаты и использует их, обрабатывая соединения на https://gost.example.com. Придется поработать с DNS или docker network, чтобы из одного контейнера попробовать подключится к этому демонстрационному, но все это я описал в документации.
Демонстрационный хост использует ключи по , другие варианты это , . А вместо — .
Образ с nginx + GOST запушен в Docker Hub: https://hub.docker.com/r/rnix/nginx-gost/
Use OpenSSL on a Windows machine
By default, OpenSSL for Windows is installed in the following directory:
- if you have installed Win64 OpenSSL v1.X.X: C:\Program Files\OpenSSL-Win64\
- if you have installed Win32 OpenSSL v1.X.X: C:\Program Files (x86)\OpenSSL-Win32\
To launch OpenSSL, open a command prompt with administrator rights.
b)Generate the private key (.key) and the CSR (Certificate Signing Request)
As part of obtaining (or renewing or reissue) a certificate, you will have to generate a private key and
the associated CSR. To do this we advise you to use our online wizard
to execute the OpenSSL command with the adequate parameters.
Open a command prompt with Administrators rights (right click — Run as …). Go to the «bin» subdirectory
from the OpenSSL installation folder.
openssl req -new -newkey rsa:2048 -nodes -out www.mywebsite.com.csr -keyout www.mywebsite.com.key -subj "/C=FR/ST=Calvados/L=CAEN/O=Mon organisation/CN=www.mywebsite.com"
Save and keep safe the file containing the private key (.key, and copy / paste only the contents of the file .csr
file in the order form.
Troubleshooting & Debugging
Now that you can create & convert CSR’s, certificates, and key pairs, it’s time to learn how to troubleshoot and debug them. OpenSSL comes with commands that make it a breeze to troubleshoot problems.
OpenSSL also allows you to check certificates for file integrity and test for possible data corruption. Using an MD5 checksum, you can use the following code examples to test certificates, keys and CSR’s:
Once you have the original hash, you can then compare that original hash with a current hash to verify the certificate hasn’t been modified or corrupted.
Here’s a sample of what that code looks like when run in PowerShell:
 Sample troubleshooting command output with OpenSSL in PowerShell
Подпись сертификатов OpenSSL
Допустим, у вас есть приватный ключ и запрос на подпись, фактически, открытый ключ. Теперь вам нужно его подписать чтобы получить сертификат, который можно использовать. Тут есть несколько вариантов. Можно отправить csr файл на подпись какому-либо центру сертификации, например, LetsEncrypt. Можно подписать сертификат тем же ключом, с помощью которого он был создан, и третий вариант — создать свой центр сертификации.
Первый способ я рассматривать не буду. Здесь все просто. Либо используете утилиту сервиса, либо заполняете веб форму и получаете готовый сертификат. Второй вариант гораздо интереснее. Мы подпишем наш сертификат сами, ключом, на основе которого он был создан:

С помощью параметра -days мы указываем что сертификат будет действительным в течение 365 дней, то есть в течение года. Вы можете объединить все в одну команду и сразу создать закрытый ключ, csr и подписанный сертификат:

Или создаем самоподписанный сертификат openssl из существующего закрытого ключа без csr:
Опция -new говорит, что нужно запросить информацию о csr у пользователя. Чтобы браузер доверял ключу нужно этот же сертификат импортировать в список доверенных. А теперь рассмотрим третий способ выполнить создание сертификата OpenSSL — подписать его с помощью собственного CA, центра сертификации.
Вот вы сейчас думаете что это что-то такое сложное, да? А нет, это обычная папка, в которой лежит защищенный паролем закрытый ключ, с помощью которого мы будем подписывать все другие ключи. А открытая пара этого ключа должна быть добавлена во все браузеры, которые будут ему доверять.
Вообще, центр сертификации в крупных корпорациях находится на отдельных компьютерах, которые даже к сети не подключены. Но для примера мы разместим папку в нашей файловой системе /etc/:
Дальше нужно создать самоподписанный сертификат openssl для нашего CA:
Параметр -extensions загружает необходимые расширения для создания сертификата центра сертификации. Мы устанавливаем долгий строк действия — десять лет. Осталось подписать наш сертификат, созданный ранее:
Готово, теперь наш сертификат подписан. Но теперь, чтобы браузеры ему доверяли нужно добавить сертификат CA в список доверенных браузера.
Embed SSL and TLS support into your projects to enhance security with the help of this lightweight cryptography library, which comprises various encryption algorithms
What’s new in OpenSSL 3.0.0:
- TLS_MAX_VERSION, DTLS_MAX_VERSION and DTLS_MIN_VERSION constants are now deprecated.
- The `OPENSSL_s390xcap` environment variable can be used to set bits in the S390X capability vector to zero. This simplifies testing of different code paths on S390X architecture.
- Encrypting more than 2^64 TLS records with AES-GCM is disallowed as per FIPS 140-2 IG A.5 «Key/IV Pair Uniqueness Requirements from SP 800-38D». The communication will fail at this point.
- The EC_GROUP_clear_free() function is deprecated as there is nothing confidential in EC_GROUP data.
Read the full changelog
NOTE: Users should currently install a 1.1.1 series + a 3.0 series for maximum application compatibility
OpenSSL is a development tool designed to implement the SSL and TLS cryptographic protocols in your projects. The library is developed as open source and can be used on multiple operating systems in order to secure the data transferred over the Internet.
Secure your Internet data transfers
The TLS and SSL protocols are widely used to secure the Internet communication by using data encryption and complex authentication keys in order to ensure the confidentiality of sensitive messages.
OpenSSL aims to provide you with a reliable way to encrypt your data and generate the security keys required to safely transfer the information over the Internet. The main library is developed in C and includes a command line tool that provides access to all the available algorithms and ciphers.
Supports various encryption algorithms
The list of encryption algorithms is extensive and you can use the console to generate personal keys and certificates with Blowfish, MD5, SHA-1, DES or AES. The library also supports public-key cryptography algorithms such as RSA, DSA, and the Diffie–Hellman key exchange method.
Although the download package does not include a documentation, the online resources are extensive and provide you with details about implementing the algorithms. You can also bring your own contribution to the project as a part of the open source community.
The tools included in the package can only be used in the console which might be difficult for the users that are accustomed to graphical interfaces. Moreover, using the library requires solid knowledge about encryption algorithms and cryptography standards.
To end with
However, OpenSSL is a useful tool for generating and managing private keys, public keys or certificates for a large variety of projects.
Использование CRL клиентами
Для серверных сертификатов, обычно клиентское приложение (к примеру, веб-браузер) выполняет проверку. Это приложение должно иметь удаленный доступ к CRL.
Если сертификат был подписан с расширением, которое включает , клиентское приложение может прочитать эту информацию и получить CRL из указанного места.
Точки распространения CRL видны в спецификациях X509v3 сертификата.
Online Certificate Status Protocol
Online Certificate Status Protocol (OCSP) был создан в качестве альтернативы CRL. Как и CRL, OCSP позволяет запрашивающей стороне (к примеру, веб-браузеру) определять статус отзыва сертификата.
Когда центр сертификации подписывает сертификат, он обычно включает адрес сервера OCSP (к примеру, http://ocsp.example.com) в в сертификат. Это похоже на функцию , используемой для CRL.
Например, когда веб-браузеру предоставлен сертификат сервера, он посылает запрос на адрес сервера OCSP, указанном в сертификате. По этому адресу OCSP слушает запросы и отвечает статусом отзыва сертификата.
Рекомендуется использовать OCSP вместо CRL, где это возможно, хотя реально, как правило, OCSP нужен только для сертификатов веб-сайтов. Некоторыми веб-браузерами поддержка CRL считается устаревшей, или вообще убрана.