Minitool partition wizard 12.5
Содержание:
- Описание и возможности
- Установка Windows на этот диск невозможна: как устранить эту ошибку
- How to Partition SD Card Easily
- How to Migrate OS to SSD/HD
- Free Partition Wizard FAQ
- # Move or Resize Partition in Windows Vista via MiniTool Partition Wizard
- Download MiniTool Partition Wizard 12.5 For Free Now!
- The Popularity of Windows 7
- Why MiniTool Partition Wizard Server
- Difference between LBA and CHS
- Partition Windows 7 32/64-Bit by MiniTool Partition Wizard
- Как пользоваться
- Aomei Partition Assistant – увеличиваем место на диске C
- Guides & Tips
- # Format Partition via MiniTool Partition Wizard
- More Editions for You
- Built-in Partition Manager for Windows 7 — Disk Management
- Для каких целей предназначена программа MiniTool Partition Wizard?
- About SD Card
- Download & Install FAQ
- MiniTool Partition Wizard Is Powerful Portable Partition Magic
- How Does Partition Wizard Resize Server Partition
Описание и возможности
Прежде чем перейти к инструкции по скачиванию приложения, давайте рассмотрим его основные возможности:
- Удаление логических разделов, объединение, разделение существующих томов и изменение размера без потери данных.
- Присутствует мастер копирования раздела.
- Программа позволяет переносить установленную операционную систему на другой накопитель. При этом есть функция миграции с SSD на HDD.
- Утилита для восстановления поврежденного раздела.
- Конвертация дисков из формата NBR в GPT.
- Полное стирание накопителя.
- Функция удаления разделов.
Кроме этого, у программы присутствует ряд дополнительных возможностей, например, функция для восстановления удаленных данных, мастер диагностики дисков и другие возможности.
Установка Windows на этот диск невозможна: как устранить эту ошибку
Многие сталкивались с такой ошибкой при попытке установки операционных систем семейства Windows на x86-совместимые компьютеры.
Среди самых распространенных причин возникновения такой ошибки – установка на диск, на котором установлена GPT или же установка на ПК, в котором отсутствует UEFI BIOS. Эти явления могут возникать не только на 7й версии этой операционной системы, но и на Windows 10.
Текст ошибки сообщается, что пользователь загрузился с флеш-накопителя с установочным образом в режиме EFI, но на данном диске, куда необходимо необходимо установить систему, находится не соответствующая таблица разделов. Диски могут быть в MBR или в GPT. Елси ранее на ПК была установлена Windows 7, то это одна из причин проблемы.
Если не вдаваться в подробности, то устранить данную проблему можно преобразованием диска из GPT в поддерживаемую Windows MBR. Для этого есть несколько способов.
А вот так выглядит эта ошибка.
Использование командной строки
Очень важно помнить, что данное преобразование подразумевает полное форматирование диска. Прежде чем это делать, стоит подумать, действительно ли это необходимо и есть ли на диске какая либо важная информация
How to Partition SD Card Easily
As we can see from the table, SD cards may have a huge capacity. Therefore, some users want to perform partition management with reliable partition manager to increase the internal storage of Android phones. MiniTool Partition Wizard is such a reliable Partition Manager that works perfectly with SD card. Partition Wizard Free Edition is a powerful SD card partition tool available for Windows home users, and is much more powerful than other partition software in the same category. With free MiniTool Partition Manager, you can Create Partition, Delete Partition, Format Partition, Move/Resize Partition, Split Partition, Copy Partition, Convert File System, Hide/Unhide Partition, Explore Partition, etc. As freeware, this partition software can take place of some expensive partition management software, such as Partition Table Doctor, Acronis True Image as well as Paragon Partition Manager. Then let’s see how to partition SD card using MiniTool in Windows (compatible with Windows 10/8.1/7). Before you do: 1. Download and install Free MiniTool Partition Wizard. 2. Connect SD card via card reader to computer (maybe a previous data backup is necessary). 3. Run MiniTool Partition Wizard Free.
Step-by-step guide:
Step 1: Launch MiniTool Partition Wizard to the main interface and then your SD card is displaying there. If there is no partition on the SD card, please move to Step 3 to partition micro SD card.
Step 2: Right-click on the SD partition and choose Delete, then click Apply to make it an unallocated space for further use.
Step 3: Follow the sequence in the picture to create a new partition on the SD card. Please specify the parameters of SD partition (partition label, drive letter, file system, partition size…) on your demands.
Tip: If you are increasing the internal storage space of Android, you can create a small partition first and then continue creating a second partition.
Kind remind: Please note that Windows OS earlier than1703 can only recognize and display the first partition on a removable disk.
That’s all for how to partition SD card Windows 10/8/7. Like this post? Share with your social circle!
In addition to partitioning full SD card, mini SD card, and micro SD card, this SD card partition tool can also be applied to partition local hard drives and external hard drives. Now it is your turn to download this free SD partition tool to have a try!
See also: How to Partition a Hard Drive in Windows 7/8/XP
How to Migrate OS to SSD/HD
Step 1. Launch MiniTool Partition Wizard to get its main interface.
Step 2. Click on Migrate OS to SSD/HD in the toolbar.
Step 3. Choose a right method to migrate system disk and click Next.
Option A. To Replace the System Disk
Firstly, please select the target disk to migrate system disk to and click Next.
Then, choose a copy option. Alternatively, users can manually edit partition size by inputting exact partition size in MB, GB, or TB.
Tricks:
- Align partitions to 1MB could help improve performance for SSD and advanced format disks, so please keep it checked if users are using such devices.
- Checking Use GUID Partition Table for the target disk makes it possible to use all space of hard disk larger than 2TB, but UEFI boot should be enabled in BIOS.
- MiniTool Partition Wizard Free Edition doesn’t support migrating OS on MBR disk using GUID Partition table for the target disk.
- If users want to migrate Windows which is installed on a GPT disk, they will not see the option Use GUID Partition Table for the target disk.
Next, read a popup note and click Finish to continue.
At last, click Apply button to execute pending operations and tap Yes in pop-up prompt window to allow changes.
Option B. To Migrate Windows Only
Here, users also need to select the target disk to transfer Windows 10 to and click Next.
Then, select a copy option and click Next.
Next, read the boot note and click Finish.
At last, click Apply button in the toolbar to execute pending operations and tap Yes in the pop-up prompt window to allow changes.
SSD Best Sellers
Now you already know how to migrate OS to SSD/HD. Here are the best sellers on the SSD market. Choose one that fits your needs best.
| Product Name | Intel 660p Series (1TB) SSD | Corsair MP500 (480GB) SSD | Samsung 860 EVO (250G) SSD | Samsung 970 EVO NVMe (500GB) SSD | Adata SU800 SATA (1TB) SSD |
| Brand | Intel | Corsair | Samsung | Samsung | Adata |
| Capacity | 1TB | 480GB | 250GB | 500GB | 1TB |
| I/O Speed | Up to 1,800MB/s | Up to 3,000MB/s | Up to 550MB/s | Up to 3500MB/s | Up to 560MB/s |
| Pros | Very good NVMe performance most of the time.Extremely affordable.5-year warranty. |
Black printed circuit board.Copper strip technology.High-Performance.NVMe-Enabled. |
Good overall performance.Outstanding endurance rating.Samsung Magician software.Hardware-Based encryption.Package with DRAM cache and cloning.5-year warranty. |
Affordable (relatively) NVMe drive.Excellent sequential readsAvailable in up to 2TB capacity.Almost 50% shorter file transfer times.5-year warranty. |
Adata SSD Toolbox.Acronis Data Migration.Fair pricing. |
| Cons | Slows to 100MBps writing during very long transfers. |
High initial pricing.Low warranty terms.Lack of progress for the E7 controller. |
Expensive. |
Slows to just over 600MBps after cache is exceeded.Occasionally trails 960 Pro.Lower capacities could be cheaper. |
Micron 384Gbit 3D TLC NAND.Low throughput.High latency.Low notebook battery life. |
| Rating Star |
Free Partition Wizard FAQ
Is MiniTool Partition Wizard Free for Windows 10?
MiniTool Partition Wizard Free is definitely among the best free partition manager software for Windows 10. This free program enables users to redistribute hard drive space and check hard drive health. Feel free to download it and have a try.
Can I use MiniTool partition software Free with Windows Server OS?
The free edition of MiniTool Partition Wizard denies usage on Windows Server OS. For those who would prefer a free trial before purchase, applying the Server Trial edition is a good choice.
Is MiniTool partition manager safe?
MiniTool Partition Wizard is absolutely safe to download and install. Based on a wide variety of criteria, the mainstream antivirus software on the market all rate it 100% safe for your devices.
How to uninstall MiniTool Partition Wizard Free?
- Click Windows 10 search bar, then type “MiniTool Partition Wizard”.
- From the best match, click Uninstall.
- When you are in Programs and Features, scroll down the program list until you find MiniTool Partition Wizard.
- Right-click on it and choose Uninstall.
- Follow the on-screen wizard to finish uninstalling.
# Move or Resize Partition in Windows Vista via MiniTool Partition Wizard
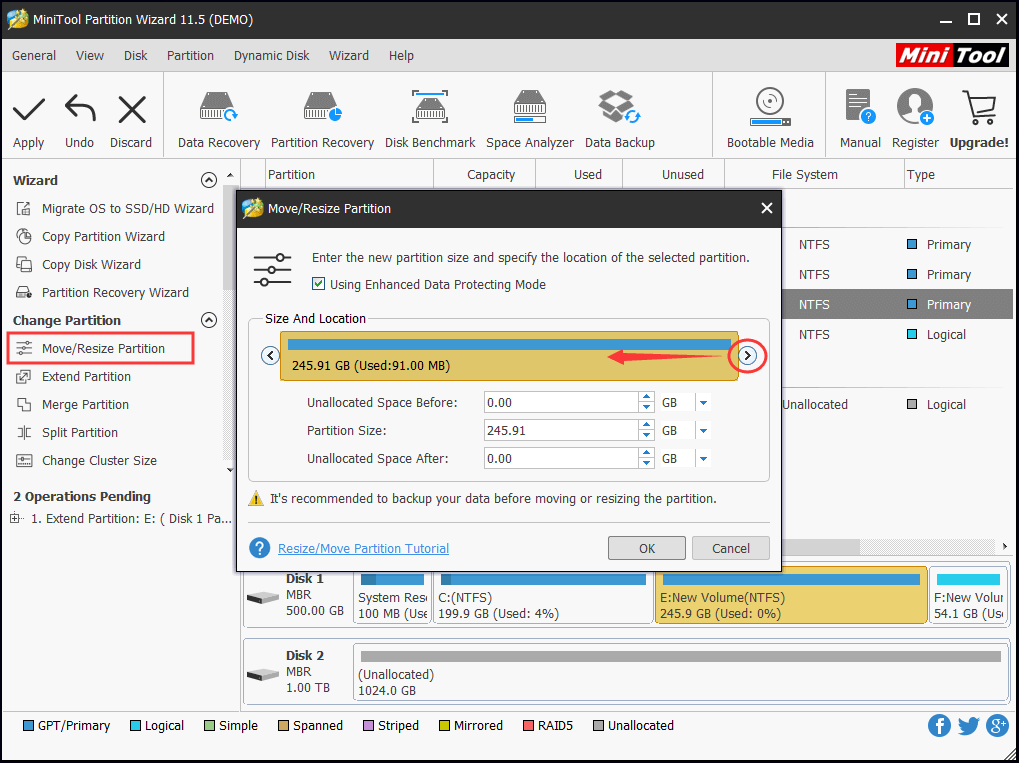
With this MiniTool Partition Wizard, you can also change the location and size of the specified partition with ease.
Sometimes, you may think the location and size of your partition in Windows Vista are not appropriate for your actual use, you can try this toolkit to make a change.
Here is the simple tutorial on moving and resizing one partition via MiniTool toolkit:
Step 1: Download the toolkit, install it and then launch it to get its main interface.
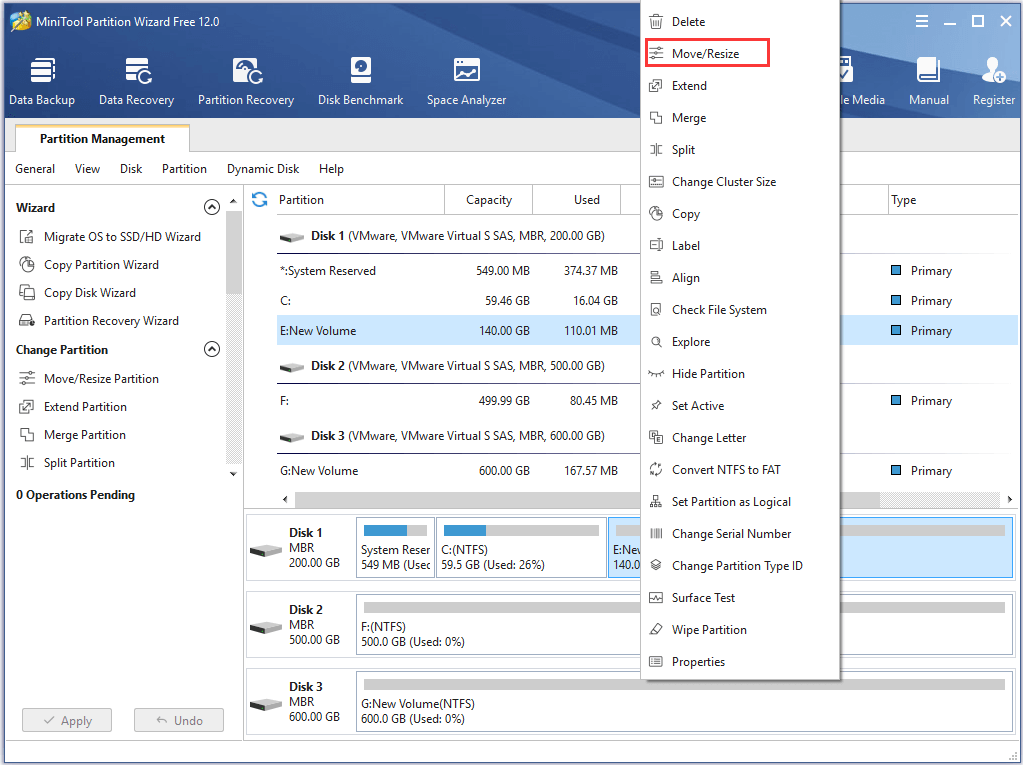
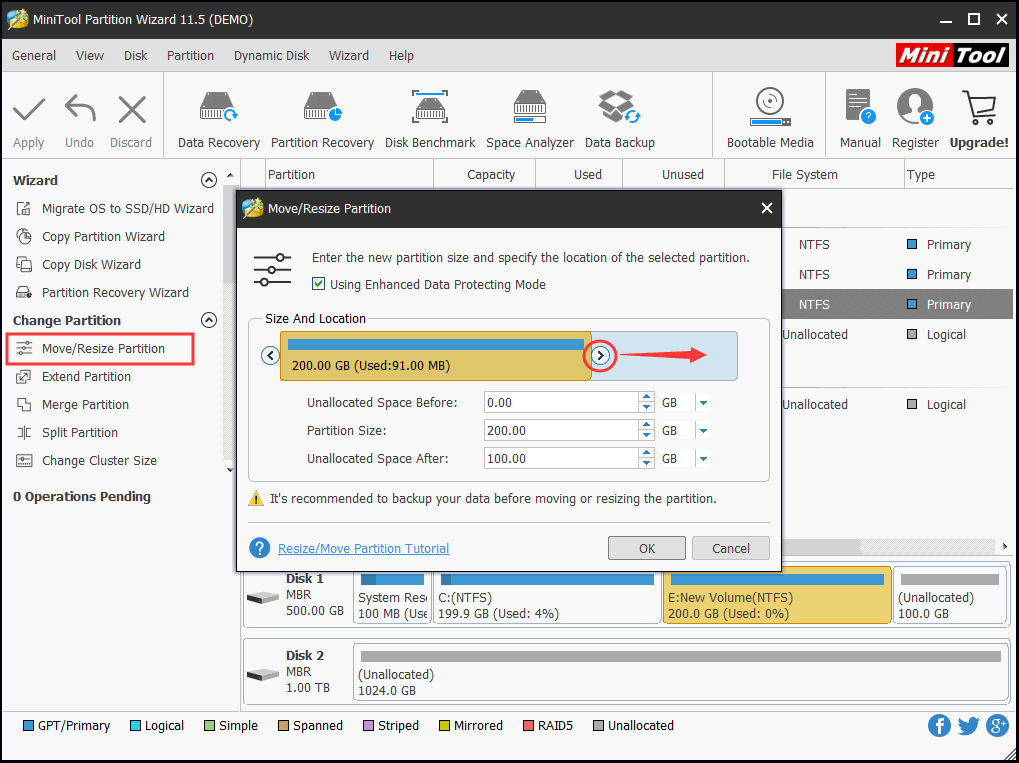
Step 2: Select one partition in the Disk Map, and select the Move/Resize Partition from the left panel.
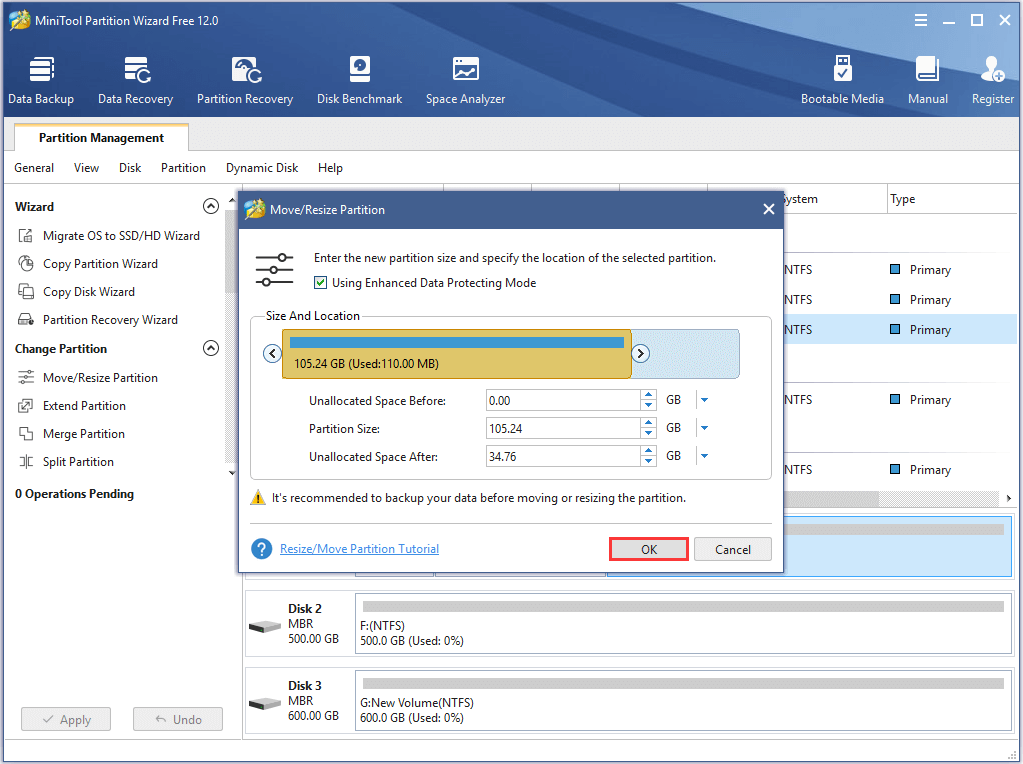
Step 3: Determine the location and the size for the selected partition according to your own preference. Finally, click the OK button.
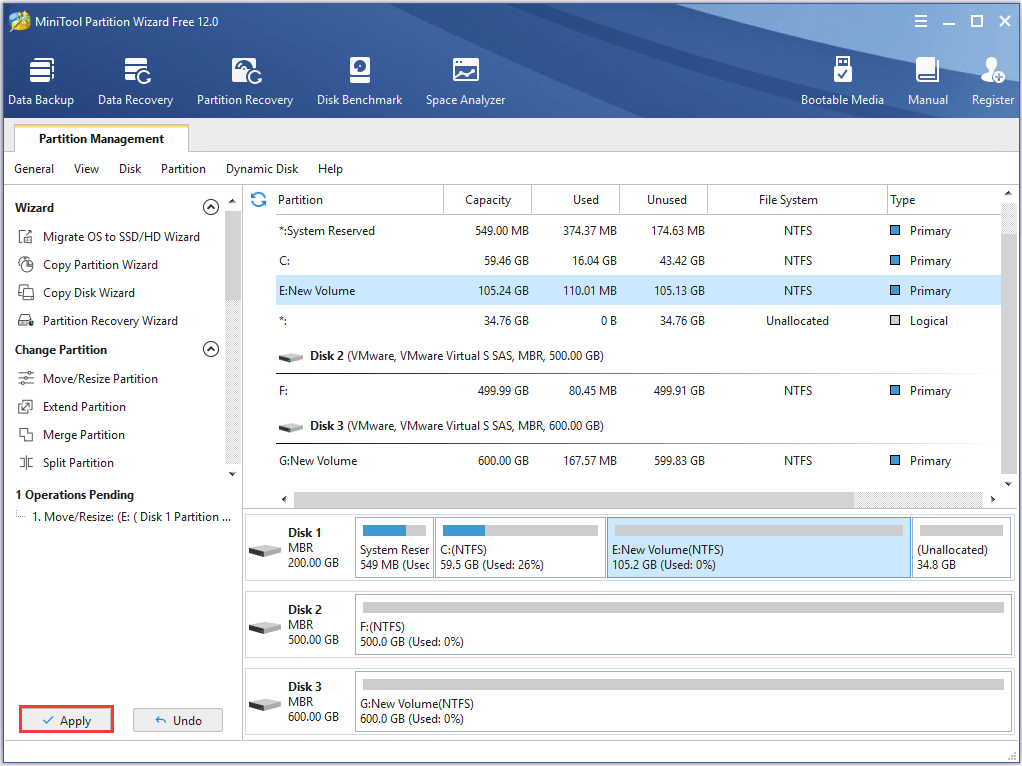
Step 4: Click the Apply button on the main interface to complete all changes.
Download MiniTool Partition Wizard 12.5 For Free Now!
Product Information
-
Product Name:
MiniTool Partition Wizard
-
Developer:
MiniTool Software Limited
-
Upgrade Date:
Jul. 1, 2021
-
Category:
Disk Management
-
Operating System:
Windows
Supported languages:
Free Edition
- For average users to manage basic disks including disk check, hard drive repartition and file system conversion.
- Support Windows XP, Windows 7, Windows 8/8.1 and Windows 10 (all editions, 32/64 bit).
Pro Edition — Trial
- For advanced users to manage basic disks and dynamic disks. Covers full features including disk check, hard drive repartition, MBR/GPT disk conversion, dynamic disk management and data recovery.
- Support Windows XP, Windows 7, Windows 8/8.1 and Windows 10 (all editions, 32/64 bit).
The Popularity of Windows 7
Are you a Windows 7 user? How do you think of it? According to netmarketshare, Windows 7 holds the first place of desktop operating system market share, with an overwhelming proportion that reaches up to 49.42% (March 2017). This demonstrates that Windows 7 is still the most popular operating system around desktop users world-wide, despite that Microsoft is aggressively pushing Windows 10 . Since so many users are choosing Windows 7, it is important to have professional partition magic for Windows 7 so that users can manage their hard drives better.
And in today’s post, what we are going to introduce is two pieces of partition manager software.
Why MiniTool Partition Wizard Server
Developed by MiniTool Software Ltd., Partition Wizard possesses powerful functions including Create Partition, Merge Partition, Resize Partition, Copy Partition, Delete Partition, Format Partition, Wipe Partition, Recover lost Partition, Convert File System, etc. To discover the full features of Partition Wizard, you can experience the FREE Demo Edition and then determine whether or not you need it.
Besides, Partition Wizard is compatible with all editions of Windows Server 2000, Windows Server 2003, Windows Server 2008, Windows Server 2012 R2, Windows XP, Windows Vista, Windows 7, Windows 8, and Windows 10, both 32 bit and 64 bit..
Furthermore, this program supports file systems like FAT16, FAT32, NTFS, Ext2*, and Ext3* (File systems marked with * indicate users can only execute limited functions like Create Partition and Delete Partition.).
Due to the deficiency of Disk Management in Server 2003, this tool is honored as the best partition software for Server 2003, for it overcomes difficulties that Disk Management can not complete, such as extending Server partition without adjacent unallocated space. We will show you the vast difference.
Difference between LBA and CHS
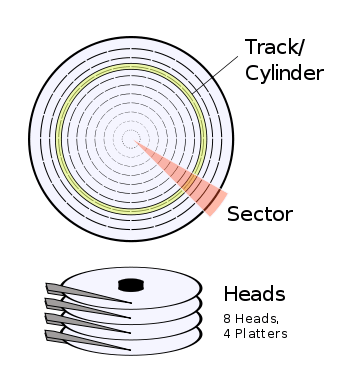
As we know, our data is saved on hard disk in sectors. When we want to find the specified data, sector addressing mode helps us to specify the locations of the data stored on computers. The following content will show something about the hard disk addressing.
CHS is an earlier form of hard disk addressing. It stands for:
- C: cylinder, the valid range is between 0 and 1023 cylinders.
- H: Head, the valid range is between 0 and 254 heads (formerly 0-15).
- S: Sector, the valid range is between 1 and 63 sectors.
Addressing Mode
From the full name of CHS, we can predicate how it specifies the location of blocks of data saved in the hard disk. For example, if hard drives are accessed through CHS, they are addressed by specifying its cylinder, head and sector address.
With LBA, each sector is assigned a unique number rather than referring to a cylinder, head, and sector to access the hard drive. Using it, the hard disk is simply addressed as a single, large device, which simply counts the existing blocks starting at 0.
In other words, LBA is a way by which a drive is accessed by linearly addressing sector addresses. Therefore, it seems that this addressing mode is simpler than that of CHS.
Note:
- LBA doesn’t allow to address more sectors than CHS style addressing does.
- In order to apply LBA, you should make sure it must be supported by both the BIOS and OS.
- The hard drive itself must support LBA as well. Luckily,all newer hard drives do in fact support LBA.
Even though CHS now no longer maintains a physical relationship with the disk’s actual characteristics, CHS is still used by many utilities.
Addressing Space
For CHS, the maximum number of cylinders supported is 1024, of heads is 16, and of sectors is 63, and the number of bytes per sector is 512. Therefore, the maximum capacity of the supported hard disk is 512 x 63 x 16 x 1024=528 MB.
Note: The capacity of hard disk is the product of the number of cylinders, heads, sectors and 512 bytes.
However, with the fast development of science and technology, the capacity of hard disks has been greatly increased. It is far beyond addressing range featuring 8 GB.
Therefore, how to address a space beyond 8 GB? The bit of CHS has expanded from 24 to 28 to get addressing space reaching 128 GB, and it seems that there’s nothing we can do about 2 TB disk capacity.
In this situation, generating a new form of hard disk addressing is a helpful solution, and the new one is LBA.
By contrast, logical block addressing (LBA) features a completely new method of addressing sectors. It can manage a hard drive space up to 8.4 GB. What’s more, the addressing space can reach up to 144,000,000 GB by using 48-bit LBA addressing mode.
Partition Windows 7 32/64-Bit by MiniTool Partition Wizard
Because there are some limitations of Disk Management in Window 7, you can take a piece of third-party software to manage the partition and disk. Thus, the professional partition manager Windows 7 – MiniTool Partition Wizard is the best choice.
MiniTool Partition Wizard is designed to optimize the partition and use with its powerful features. Thus, in order to manage partition and disk without limitations, you can download it from the following button.
Partition a New Hard Drive by MiniTool Partition Wizard
When you get a new hard drive, you may need to partition it. Thus, you can try this program and we will show you how to create a partition step by step.
Step 1: Install the software and launch it to enter its main interface.
Step 2: Select the unallocated space and choose Create from the context menu to continue.
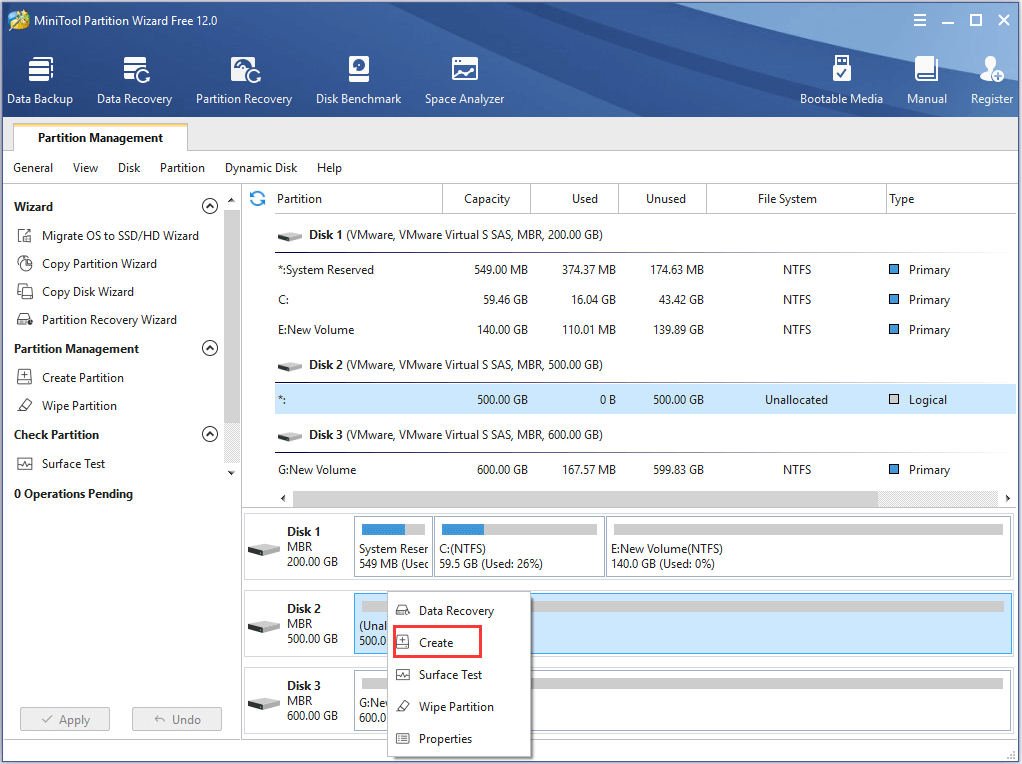
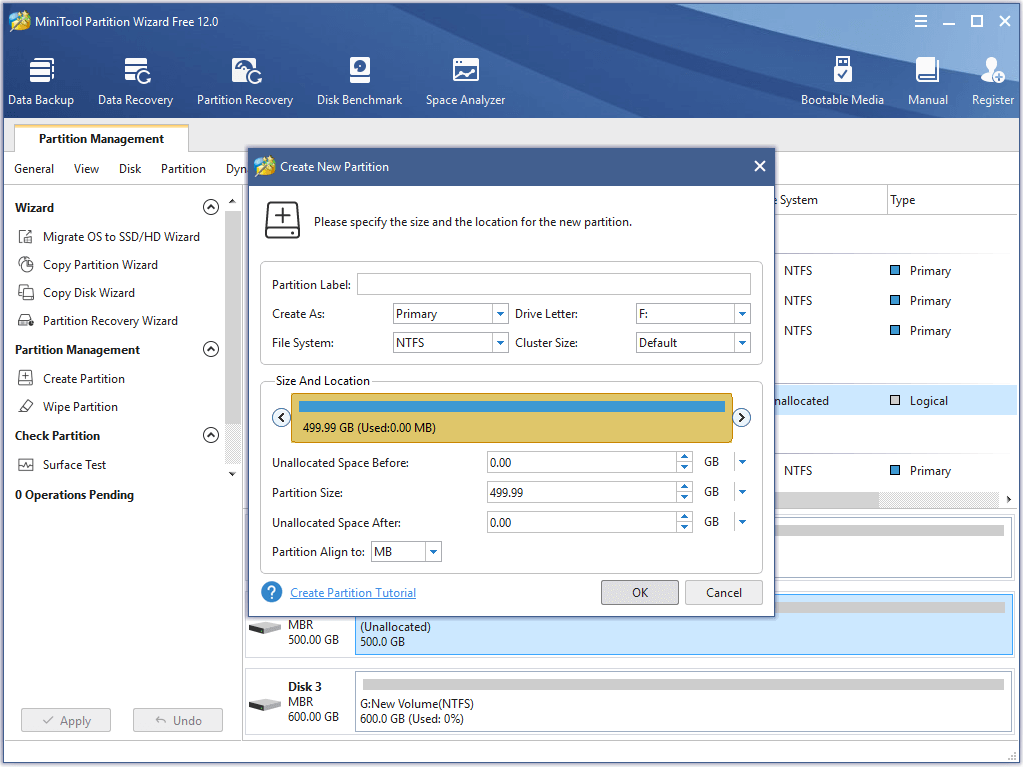
Step 3: Next, you need to set some properties of this partition and click OK to continue. You can also drag the arrow to decide the size of this partition.
Step 4: Returning to the main interface, click Apply to confirm the changes.
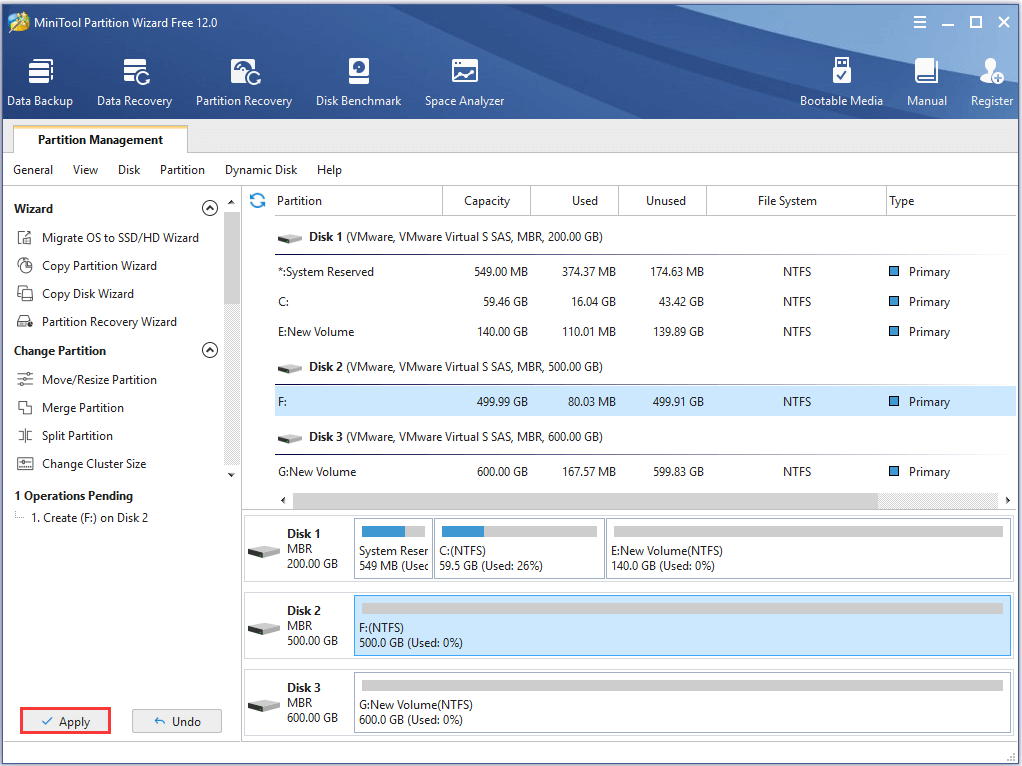
When all steps are finished, you can successfully create a partition.
Repartition a Hard Drive by Using MiniTool Partition Wizard
If you want to resize partition Windows 7 when there is/are adjacent unallocated space/spaces in the same disk, you can apply the function Move/Resize Partition.
Then we will show you how to move/resize a partition when there is adjacent unallocated space in the same disk.
Step 1: Launch the software to enter its main interface and select the partition which needs to be moved or resized. Then choose Move/Resize from the context menu.
Step 2: In the popup window, you can drag the arrow to resize the partition and move the partition. Then click OK to continue.
Step 3: Click Apply to confirm the changes.
How to Extend Partition When There Is No Adjacent Unallocated Space?
However, if there is no adjacent unallocated space or unallocated space in the same disk, how can you extend partition?
Don’t worry. The Extend Partition feature of MiniTool Partition Wizard can help you.
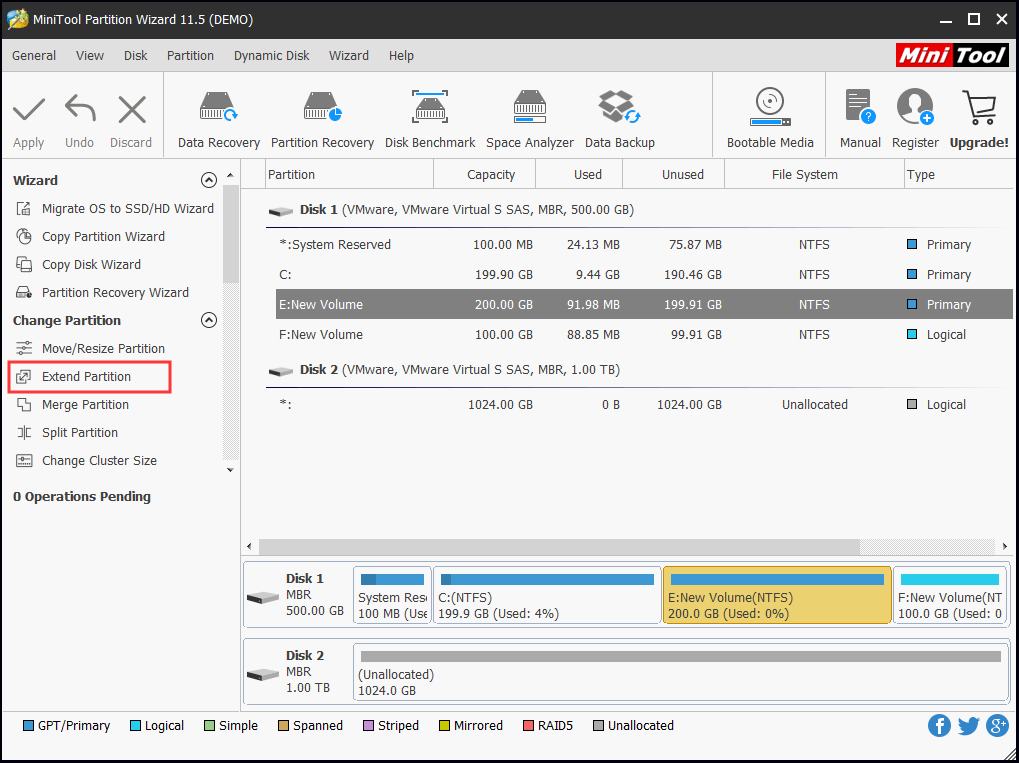
Step 1: Launch the software to enter its main interface.
Step 2: Select the partition which needs to be extended and choose Extend from the context menu.
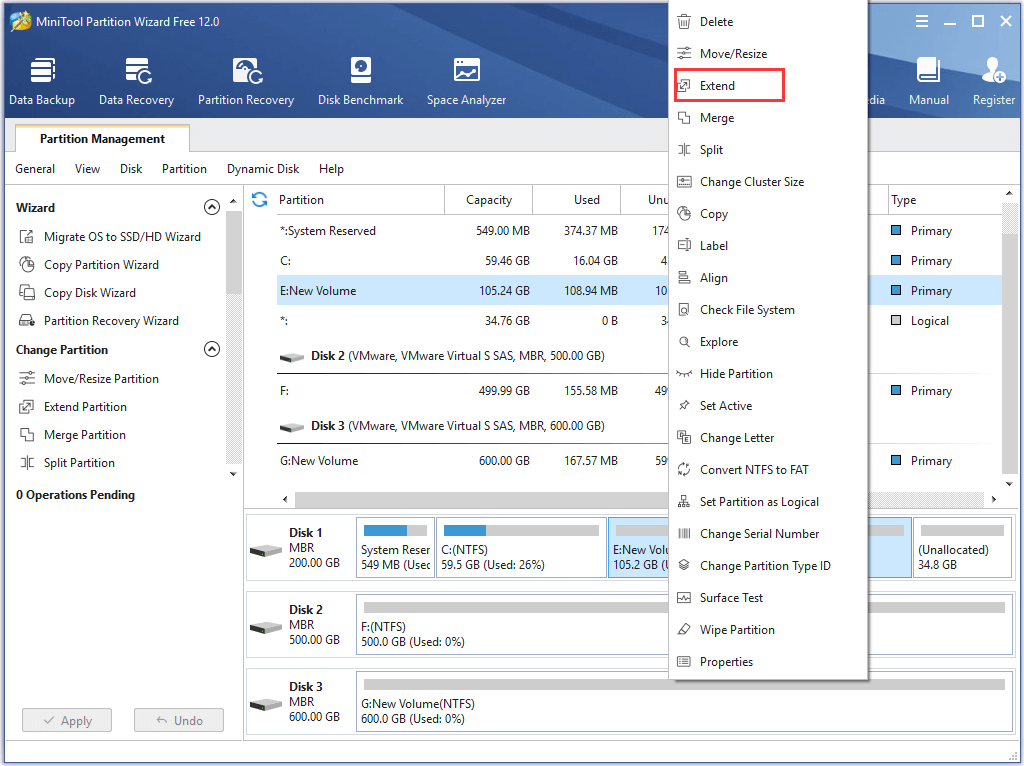
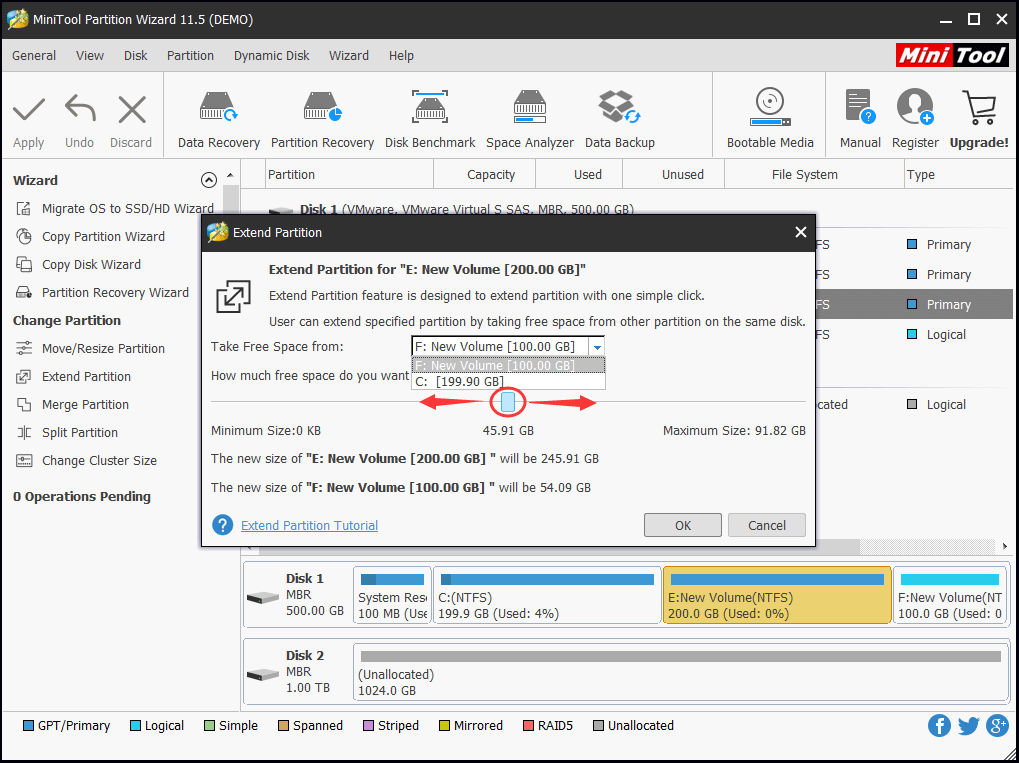
Step 3: In the popup window, open the drop-down list of Take Free Space from and choose a partition or the unallocated space to take space. You can drag the slide to decide how much space you want to take. Then click OK to continue.
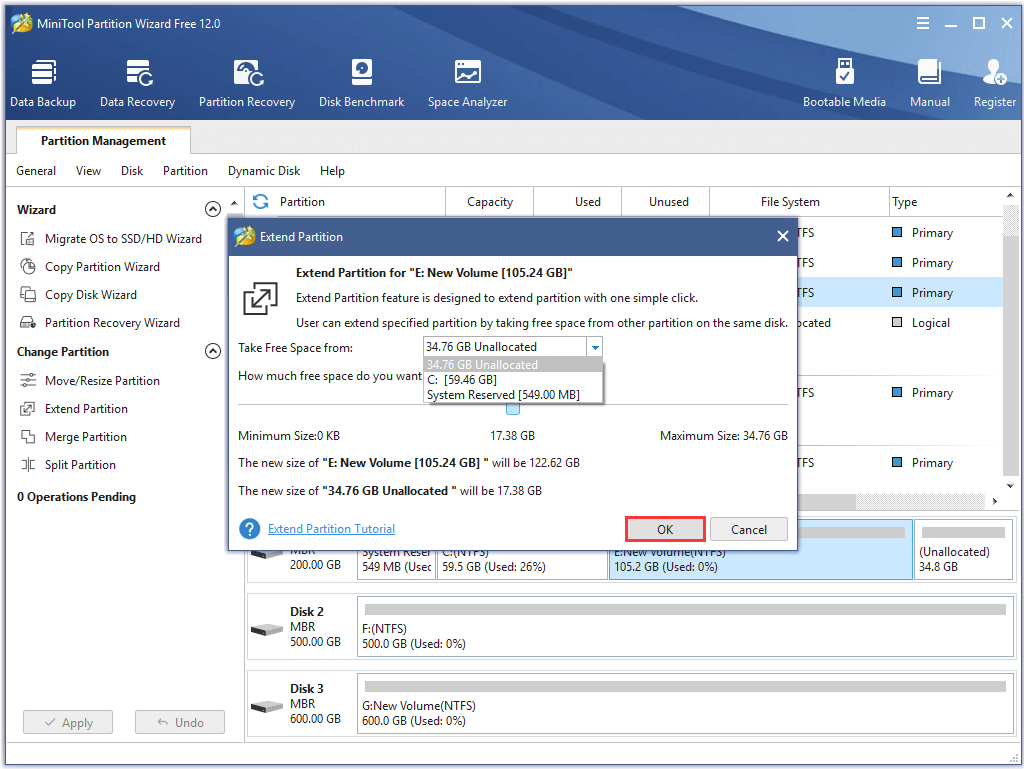
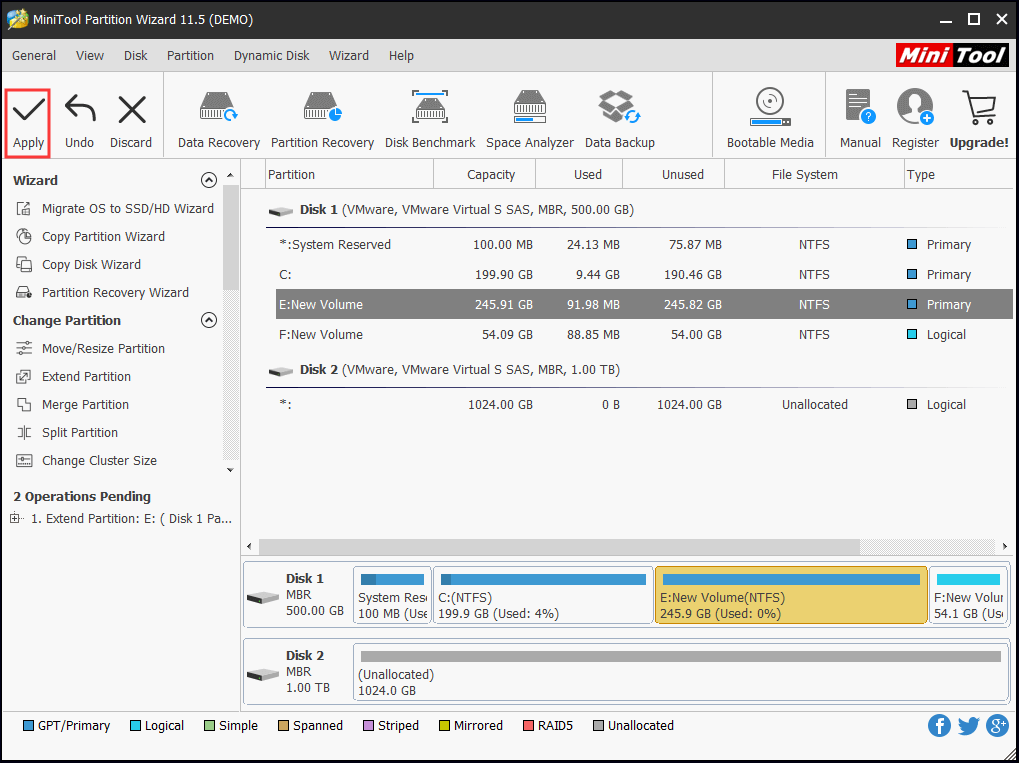
Step 4: Then click Apply to confirm the changes.
All in all, MiniTool Partition Wizard can help you to extend Windows 7 partition even though there is no adjacent unallocated space in the same disk. However, Disk Management Windows 7 tool can’t achieve that. What’s more, besides those features we have introduced in the above part, MiniTool Partition Wizard has many other powerful features, such as converting FAT to NTFS.
Как пользоваться
Теперь переходим к делу и разберемся, как бесплатно скачать программу на русском языке, как ее правильно установить, а также начать работать с MiniTool Partition Wizard.
Загрузка и установка
Начнем с установки. Программа поставляется вместе с лицензионным ключом активации, так что с платной версией проблем не возникнет. Для установки поступаем следующим образом:
- Сначала переходим немного ниже и нажимаем кнопку, при помощи которой загружаем архив со всеми нужными для инсталляции данными. Распаковав исполняемый файл, запускаем его.
- На следующем этапе устанавливаем флажок в положение, обозначенное цифрой «1», тем самым принимая лицензию приложения. Переходим к следующему шагу.
- Путь установки программы также можно изменить. В нашем случае все останется по умолчанию, и мы просто перейдем дальше, нажав на «Next».
- Дальше устанавливаем флажок напротив автоматического создания ярлыка запуска программы на рабочем столе, потом переходим дальше, снова кликнув по обозначенной кнопке.
- Остается только запустить установку, нажав на предназначенную именно для этого кнопку.
- Теперь дожидаемся завершения копирования всех нужных для работы приложения файлов по своим местам.
- Дальше закрываем окно инсталлятора, тем самым завершая нашу установку.
Теперь вы можете переходить непосредственно к использованию ПО. Мы же расскажем, как это правильно делается.
Инструкция по работе
В первую очередь необходимо запустить программу и при помощи кнопок на главной рабочей области выбрать тот или иной инструмент. Например, если мы хотим изменить размер тома, передвигаем указатель в новую позицию при помощи стрелки, которую вы видите на скриншоте. После нажатия кнопки «ОК» подтверждаем изменения и меняем размер раздела.
Aomei Partition Assistant – увеличиваем место на диске C
Увеличиваем место на диске C с помощью программы Aomei Partition Assistant, которая позволяет увеличить диски без потери данных
Обратите внимание, что при установке программы можно изменить язык
Установите и запустите программу. В главном окне отображается информация о разделах жесткого диска и список операций, которые можно применить к этим разделам.

- Для начала откройте контекстное меню. Для этого щёлкните правой кнопкой мыши по разделу D. В меню нам нужен пункт “Изменить размер раздела”, найдите его и выберите
- В появившемся окне “Перемещение и изменение размеров разделов”, укажите свободное место левее от занятого. Сделать это можно перетаскивая контрольные точки или вписав данные вручную чуть ниже
- Нажмите ОК
- Чтобы увеличить раздел диска C, вызовите контекстное меню кликнув по нему. Необходимый нам пункт – “Изменить размер раздела”
- В появившемся окне увеличьте размер раздела, расширив границы с помощью контрольной точки. Или впишите данные самостоятельно.
- Нажмите ОК
Вы вернётесь на главное окно. Для того, чтобы увеличить объём диска C, вам остается только нажать кнопку “Применить”. Изменения в размерах разделов произойдут после того, как компьютер несколько раз перезапустит систему.
Guides & Tips
-
How to Fix a Black Screen on the Lenovo Laptop?
If you boot your Lenovo laptop but it shows nothing but a black screen, the post is what you need. The post offers 7 solutions to “Lenovo black screen”.
→
-
How Long Does It Take to Format a Hard Drive? [500GB/1TB/2TB/4TB]
How long does it take to format a hard drive? A lot of people are confused about it. If you are also trying to figure it out, this article is what you need.
→
-
E drive full Windows 10 | How to Enlarge/Free Up Its Space
Do you receive E drive low disk space notification on your PC? If so, you can use the methods provided by this post to troubleshoot it immediately.
→
-
How to Install 3rd Party Apps on Samsung Smart TV
A lot of users are confused about how to install 3rd party apps on Samsung Smart TV. If you are also searching for a full guide, this post is what you need.
→
-
How to Change Boot Drive Windows 10? Here Is a Detailed Tutorial
When do you need to change boot drive? What should do before changing it? How to change boot drive Windows 10? Read this post to get the answers.
→
-
What Is Disk Usage on Windows 10? How to Check Disk Usage?
In computing, disk usage is a frequent term but lots of people ask what disk usage is. This post explains the term and introduces easy ways to check disk space.
→
# Format Partition via MiniTool Partition Wizard
MiniTool Partition Wizard is an alternative formatting tool that can help you clear partition data and then reconfigure parameters for the specified partition in Windows Vista.
To format one partition via MiniTool Partition Wizard, you can read the following recommended article:
Format Hard Drive Free with Two Top Hard Drive Format Tools
By using this free drive formatting software utility you can reformat a drive without damaging any data. Try using MiniTool Partition Wizard to format drives now.
Read More
If you mistakenly formatted one partition, you can try to recover the data from the formatted partition with MiniTool Partition Wizard.
Tip: In case of data loss, it is highly recommended to back up your important data saved in partitions.
More Editions for You
Despite this portable partition magic, MiniTool Partition Wizard offers another five editions to satisfy various user demands. Just choose the one that is most suitable for you. To know their differences, please visit Edition Comparison.
| For Home Users | ||
|
Pro(Annual Subscription)
$59 |
Pro Platinum(Annual Subscription)
$109 |
Pro Ultimate (Perpetual License)
$159 Buy Now |
| For Server Users | |
|
Server Standard(Annual Subscription)
$159 |
Server Lifetime(Perpetual License)
$259 |
| For Enterprise Users | |
|
Enterprise (Annual Subscription)
$499 Buy Now |
Technician (Perpetual License)
$699 Buy Now |
Built-in Partition Manager for Windows 7 — Disk Management
Disk Management is an extension of the Microsoft Management Console that allows users to fully manage the disk-based hardware recognized by Windows, like hard disk drives (both internal and external ones), flash drives and optical disk drives. Disk Management can be used to partition drives, format drives, extend volumes, shrink volumes, convert dynamic disk to basic, and much more. By clicking a drive or a disk, users clearly know what Disk Management can do to it.
Here is the full list of Disk Management features:
| For Basic Disk: | For Basic Volume: |
|
|
| For Dynamic Disk: | For Dynamic Volume: |
|
|
See Disk Management is really a useful tool that can satisfy most of our needs on disk partition management. However, sometimes due to some limitations, some features get inactivated. For example, while trying to expand storage space of a volume, «Extend Volume» feature greyed out. Besides, many features should be carried out on condition that all partitions are deleted or the hard drive is formatted, bringing much inconvenience to us.
Для каких целей предназначена программа MiniTool Partition Wizard?
По своей сути MiniTool Partition Wizard – это удобный, доступный и простой инструмент, позволяющий проводить различные виды действий с носителями.
Утилита появилась довольно давно и неизменно пользуется популярностью у потребителей, кому требуется программа для восстановления sd карт, форматирования или создания томов на жёстких дисках.
На сегодняшний день в мировой паутине можно скачать самые различные версии этой программы, причём существуют как бесплатные, так и платные версии.
В том случае, если пользователю нужно просто провести форматирование или восстановление SD-карты или расширить том на жёстком диске, тогда можно смело скачивать бесплатную версию.
Для тех, кто профессионально занимается ремонтом и восстановлением жёстких дисков, создатели программы предлагают платную версию утилиты, которая обладает большим функционалом и возможностями.
Программа не требовательна к производительности техники и может быть установлена даже на наиболее старые и слабые компьютеры и ноутбуки.
Важным преимуществом этого программного обеспечения также является то, что она может работать со всеми версиями Windows, включая и современную 10.
About SD Card
SD card (Secure Digital memory card) is a kind of tiny storage device developed by Matsushita, SanDisk, and Toshiba and is specially designed to use in portable devices. Today SD card has been widely applied in digital cameras, digital camcorders, handheld computers, mobile phones, media players, GPS receivers, video game consoles, and so on.
There are several types of SD cards which can be simply categorized into full SD card, mini SD card, and micro SD card. The capacities of SD card typically can range from 1GB to 2TB (and even larger with time goes by). To help users better understand it, we have made a detailed table related to different SD cards:
Don’t hesitate to share this table to your friends.
Download & Install FAQ
Failed to download the program — Network Error
Upgrade page for MiniTool Partition Wizard:
https://www.partitionwizard.com/upgrade-service/upgrade-now.php
Upgrade page for MiniTool Power Data Recovery:
https://www.powerdatarecovery.com/upgrade-service/upgrade-now.php
Free home version doesn’t seem to be downloading?
You can download MiniTool Partition Wizard Free version from
Kindly reminder: if you are using Windows Edge, after hitting the download button, please check the download task list. The download will be pending until you select Run, Save or Save To.
Or, please go back to the previous page, you may be asked to Save, Run or Cancel the download.
However, if your system is running another browser, please check if there is a download task which is located at the bottom of the browser page.
Receive the error «the signature of this program corrupt or invalid» when downloading Partition Wizard.
Every time I try to install or open the program, my antivirus software detects it as a virus, malware, or unwanted program. What’s the problem?
This is a false positive mainly reported by ESET, and it appears because we add the shell to prevent our program from being cracked. Please rest assured. Our program is 100% safe, and it is harmless to your data and system.
Can’t install Partition Wizard and receive the error message: An error occuured while trying to rename a file in the destination directory: MoveFile failed; code 5.
Please try the following methods:
- Go to C:\Program Files to delete the folder MiniTool Partition Wizard 10, and install the program again.
- Install the program to another path.
- Choose Ignore.
Received the error «the procedure entry point getlogical processor information could not be located in the dynamic lik l8ibarart KERNAL.32.dll» when installing MiniTool Partition Wizard.
The error message shows Partition Wizard doesn’t support your system. For Windows non-server operating systems, it requires 32 bit XP SP3 and 64 bit SP2 at least. For server operating systems, it requires Windows 2000 SP4 at least.
Received the error «The setup files are corrupted. Please obtain a new copy of the program» when installing MiniTool Partition Wizard.
Could you please try the following methods:
- Install the program as administrator.
- Redownload the program and install it again.
It reports additional software will be installed. Is it safe? Can I remove it?
It reports additional software will be installed. Is it safe? Can I remove it?
MiniTool Partition Wizard Is Powerful Portable Partition Magic
Explanation? Well, for some Windows users, they don’t tend to install too much software on the PC, especially the ones they only operate occasionally.
To be honest, disk and partition management also belongs to the occasionally schedule, and users only need partition tools when they have to make the change, such as extend system partition after several years’ usage, while the next time to manage disks and partitions is uncertain.
MiniTool Partition Wizard puts forward portable partition software to meets both sides. You can store it in a USB drive without having to install it on your PC, OR struggle between installing and uninstalling the program for certain reasons.
1. What Can MiniTool Portable Partition Manager Do?
Although MiniTool cuts off the installing process, the features of portable partition manager keep coincident with Partition Wizard Free Edition, because it comes right from the latter one. What you can find in Partition Wizard Free Edition also appear in the portable version. (View full features)
Below is a screenshot after we decompress MiniTool portable partition manager.
Works for Windows 10, Windows 8.1/7/Vista/XP 32-bit and 64-bit
2. How Can You Get MiniTool Portable Partition Magic?
Well, we have prepared a package in consideration of users’ convenience. With this package, you can bring it to anywhere you reach, and deal with the disk & partition issues at home and your workplace; or help your friends to get out of their trouble. Download portable partition magic!
3. How to Use MiniTool Portable Partition Manager?
Step 1. Download MiniTool portable partition manager to your portable USB drive and then decompress the package.
Step 2. When you need to carry out disk and partition management, connect the USB drive to the computer you are going to operate and then you can use MiniTool Partition Wizard without installation.
How Does Partition Wizard Resize Server Partition
When it comes to resizing partition, it includes two aspects, i.e. extend partition and shrink partition. Then how does Partition Wizard performs when dealing with Server 2003 resize Partition? Let’s talk about these two aspects one by one.
Resize Server Partition — Extend:
There are three situations when users extend a partition: adjacent with unallocated space (can be achieved by Disk Management), not adjacent with unallocated space, no unallocated space. Luckily, MiniTool Partition Wizard has put forward the corresponding solutions.
In fact, all these three situations can be perfectly solved by using «Extend Partition». Here are the specific operations:
Step 1. Right click the target partition and select «Extend Partition», then a new window pops up.
Step 2. Drop down the small box to choose which partition you are going to take free space from. Also, you can slide the button to determine how much free space you want. Click «OK» to go back to the main interface.
Step 3. Click «Apply» to execute all the changes you have made.
Resize Server Partition — Shrink:
In some cases, you may want to shrink a partition to release some free space to create a new partition. The shortcoming of Using Disk Management to shrink partition is that Disk Management only allows to shrink at most half of the original partition. What if you want to shrink more? Try MiniTool Partition Wizard Server.
Step 1. Right click the partition you want to shrink and select «Move/Resize». Then a new window pops up.
Step 2. Drag the triangle to the left side to release some partition size and click «OK» to go back to the main interface.
Step 3. Press «Apply» on the top left corner of the main interface to execute all changes.
Note:
- It is recommended to turn off all running applications when you resize a partition.
If the operations involves system partition, you need to restart your computer for data safety. - «Move/Resize» can be used to extend partition when there is unallocated space adjacent to the target partition.
- Based on the location of the unallocated space, you just need to drag the triangle to cover the free space.
