Как отключить обновления windows 10
Содержание:
- Настраиваем лимитное подключение ( #4 )
- Как удалить установленные обновления
- Зачем отключать обновления?
- How to disable automatic updates using Group Policy
- Disable Windows Update service permanently
- Windows 10 Update Disabler – disables Windows 10 Updates reliably
- Деактивация обновления Виндовс 10
- Use Group Policy to disable Windows Update
- How to disable automatic updates with Group Policy
- How to Uninstall a Windows 10 Update
- Disable updates via Registry
- Зачем отключают защиту Windows
- Отключение с помощью локальной групповой политики
- How to disable Automatic Windows Update in Windows 10?
- Планировщик заданий
- Win Updates Disabler отключит обновление Windows и защиту
- Вывод
Настраиваем лимитное подключение ( #4 )
В весеннем апдейте, за апреля 2017 года, операционная система Windows 10 получила небольшое изменение, появилась возможность задать беспроводному соединение признак лимитированного подключения, что должно уменьшить потребление интернет трафика и частично отключить обновление ОС.
Почитав интернет, многие авторы пишут, что это 100% способ отключения апдейтов. Но я вам скажу правду, способ считается не надежным, т.к. операционная система будет все равно скачивать самые критичные исправления ОС, которые нужны ей для стабильной работы.
Например! Переход на следующий крупный релиз ОС считает критичным и данный способ не сработает. Произойдет принудительное скачивание и установка обновлений, а это по объем данных в несколько гигабайт входящего трафика и огромная куча разных настроек.
Редактируем WiFi соединение
Нажимаем на клавиатуре комбинацию клавиш Win + I откроется окно «Параметры», переходим в раздел «Сеть и Интернет».Выбираем раздел «Wi-Fi».Нажимаем на имя беспроводной сети, к которой мы подключены, и активируем пункт «Задать как лимитное подключение».
Если вы подключаетесь к разным WiFi сетям, для каждой сети необходимо провести данную настройку.
Редактируем проводное соединение
А теперь я вам покажу не документированный способ, как назначить лимитированное подключением на проводном соединении.
Запускаем Редактор реестра, на клавиатуре нажимаем Win + R вводим команду regedit, нажимает «ОК».Переходим в раздел HKEY_LOCAL_MACHINE\SOFTWARE\Microsoft\Windows NT\CurrentVersion\NetworkList\DefaultMediaCost
Мы должны параметру Ethernet задать значение 2, тогда проводное подключением будет считаться лимитированным, и на него будут накладываться соответствующие правила, ограничивающие интернет трафик.Но есть небольшая проблема, просто так поменять параметр мы не может, в связи с ограничениями прав на данный раздел реестра.
При попытке внести изменения в параметр мы получим сообщение: «Ошибка при изменении параметра — Не удалось изменить «Ethernet». Ошибка при записи нового значения параметра.»Чтобы преодолеть данную ошибку, мы должны выдать себе полные права на ветку реестра, и стать её владельцем.
Нажимаем правой кнопкой мышки по разделу реестра DefaultMediaCost и в контекстном меню выбираем пункт «Разрешения…».
ДополнительноВладелецИзменитьПроверить именаОКДополнительные параметры безопасностиЗаменить владельца подконтейнеров и объектовОК
В окне «Разрешения для группы», выбираем группу «Администраторы» и предоставляем этой группе полные права, выбрав соответствующую галочку, нажимаем «ОК».Теперь у нас есть права чтобы изменить параметр «Ethernet» и указать ему Значение 2.После этих изменение проводное подключение будет считаться лимитированным и интернет трафик будет расходоваться более экономнее и частично работа Windows Update будет приостановлена.
Как удалить установленные обновления
Если после установки какого-то нового софта в работе компьютера наблюдаются сбои и неполадки, можно попробовать выполнить удаление конкретного элемента. Все установленные на ПК новшества зафиксированы в виде списка, вверху которого находится самое свежее ПО.
Способ удаления установленного софта (через «Параметры»):
через «Пуск» отправиться в «Параметры»;
отыскать «Обновление и безопасность»;
открыть «Просмотр журнала…»;
вверху перечня установленных софтов отыскать опцию «Удалить…»;
- отметить конкретную строчку в перечне новинок и «Удалить»;
- выполнить перезагрузку компьютера.
Способ удаления (через «Дополнительные параметры»):
через «Параметры» отправиться в «Обновление…»;
- потом из раздела «Восстановление» перейти в «Особые варианты загрузки»;
- активировать «Перезагрузить сейчас»;
- сразу после перезагрузки ПК появится «Выбор действия»;
- активировать «Поиск и устранение неисправностей»;
- отправиться в «Дополнительные параметры»;
- отыскать «Удалить недавно установленные…»;
- выбрать новинку софта, которую нужно удалить;
- выполнить перезагрузку компьютера.
Способ удаления (через командную строку):
активировать консоль на администраторских правах;
- предварительно нужно узнать номер КВ удаляемого софта;
- написать: wusa /uninstall /KB:UpdateID;
- выполнить «Ввод» и действовать согласно подсказкам на экране;
- в конце перезагрузить устройство.
Зачем отключать обновления?
Обновления – это незаменимый компонент Windows, так как поддерживает систему не только в рабочем положении, но и полностью актуальной. Каждое обновление направлено на: улучшение производительности системы, устранение дыр безопасности или расширенные возможности для каких-либо элементов. Вместе в обновами Windows 10 получает и компоненты для встроенных платформ, вроде DirectX.
Тем не менее, это не всегда удобно, так как обязательные действия, которые ещё и вызывают перезагрузку компьютера, нагрузку сети и системы, просто неприемлемы. В ответственные моменты закачки огромных файлов или работы с офисными приложениями, Windows 10 может просто перезагрузиться. Такие неприятные последствия влекут за собой необходимость отключить обновление драйверов Windows 10. Другой вариант, это настроить их установку и загрузку, об этом ниже.
How to disable automatic updates using Group Policy
On Windows 10 Pro, the Local Group Policy Editor allows you to disable automatic updates permanently, or you can change the Windows Update policies to decide when updates should install on the device.
Disable updates
To disable automatic updates on Windows 10 permanently, use these steps:
- Open Start.
- Search for gpedit.msc and click the top result to launch the Local Group Policy Editor.
-
Navigate to the following path:
-
Double-click the Configure Automatic Updates policy on the right side.
Source: Windows Central
-
Check the Disabled option to turn off the policy and disable automatic updates permanently.
Source: Windows Central
- Click the Apply button.
- Click the OK button.
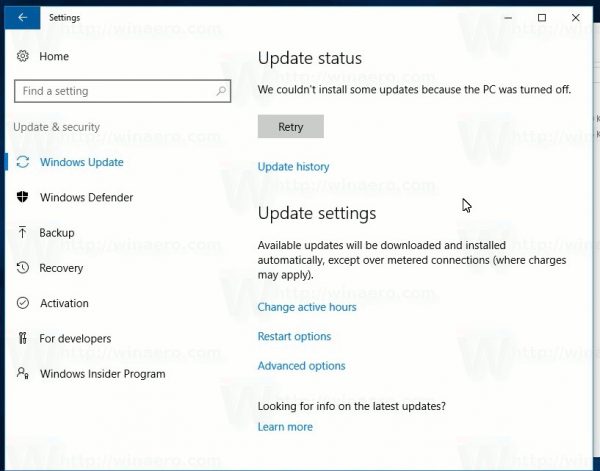
After you complete the steps, Windows 10 will stop downloading updates automatically on the device. However, the ability to check for updates manually will continue to be available in Settings > Update & Security > Windows Update. While on the page, you need to click the Check for updates button to download and install the most recent patches.
If you want to re-enable automatic updates on the device, you can use the same instructions outlined above, but on step No. 5, make sure to select the Not Configured option.
Limit updates
Alternatively, you can customize the policy to decide how you want to disable automatic updates using the Local Group Policy Editor.
To manage Windows Update automatic downloads with Group Policy, use these steps:
- Open Start.
- Search for gpedit.msc and select the top result to launch the experience.
-
Navigate to the following path:
-
Double-click the Configure Automatic Updates policy on the right side.
Source: Windows Central
-
Check the Enable option to turn on the policy.
Source: Windows Central
-
Under the «Options» section, select the best settings to prevent updates from downloading and installing automatically on Windows 10:
- 2 — Notify for download and auto install.
- 3 — Auto download and notify for install.
- 4 — Auto download and schedule the install.
- 5 — Allow local admin to choose setting.
- 7 — Auto Download, Notify to install, Notify to Restart.
Quick tip: The closest option to disable automatic updates is the 2 — Notify for download and auto install option, but you can select any other option that best fits your situation. If you choose option number 2, updates won’t download or install automatically. Instead, in the Windows Update settings page, you’ll now see an «Install now» button that you need to click manually to get the improvements.
Source: Windows Central
- Click the Apply button.
- Click the OK button.
Once you complete the steps, automatic updates will be permanently disabled on Windows 10. However, when a new patch becomes available for the system, you’ll be able to install it manually from the Windows Update settings page.
Disable Windows Update service permanently
This is the best method to completely disable Windows Update in Windows 10. In this method, we will disable the service responsible for checking, downloading, and installing updates for Windows and other programs including Windows Defender.
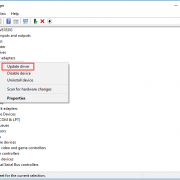
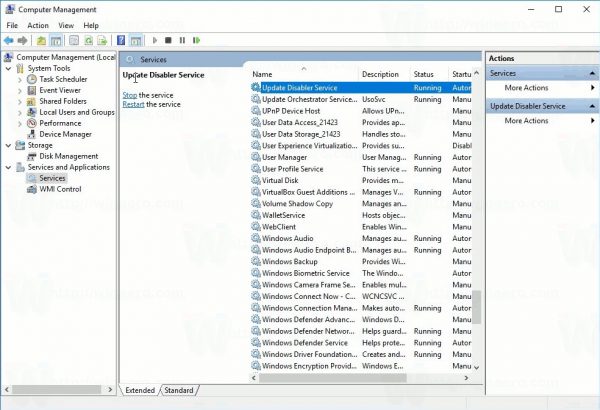
Step 1: Type Services in Start menu or taskbar search box and then press Enter key. Alternatively, you can type Services.msc in Run command box and then press Enter key to open Services.
Step 2: Here, look for the service named Windows Updates. Right-click on it and click Properties to open Windows Update Properties dialog.
Step 3: Here, change the Startup type to Disabled. Click the Apply button and then reboot your computer. That’s it!
From here on, Windows 10 will not be able to check for updates. Good luck!
Method 6 of 7
Windows 10 Update Disabler – disables Windows 10 Updates reliably
Windows 10 is well known for forced updates and the extremely inopportune times at which it downloads them, installs them and restarts your PC. Only Enterpprise editions of the Windows 10 operating system have the ability to control how updates are delivered and installed. Home editions and also the Pro edition of Windows 10 are locked down to get updates whenever Microsoft decides to push them out. A huge number of users are not happy with this behavior. So that is how Windows 10 Update Disabler was born.
Windows 10 Update Disabler is created by PainteR, the author of many other impressive themes and apps, including my favorite app, Universal Watermark Disabler. Windows 10 Update Disabler is a special tool to avoid Windows 10 Updates.
What is Windows 10 Update Disabler
Windows Update Disabler is just a service which runs in the background and terminates attempts by Windows Update to install anything. Unlike other tools, it is very transparent and does not require configuration.
According to the author, it does not rely on Windows Registry values because Windows can overwrite them any time without your knowledge or consent. Instead, it uses an undocumented system call to check the current state of Windows Update and tries to terminate it immediately. Once started, it also disables all scheduled tasks related to Windows Update, including the task which automatically restarts your PC while you are in the middle of something important.
Watch the following video to see the app in action:
You can subscribe to our YouTube channel HERE .
Here is how to use the app if you decide to give it a chance.
Before you continue : The author claims that he developed the app for himself, to protect his PC from unwanted updates. You might not agree with him and with his vision of the problem. He has not tested it extensively. I checked the tool in my virtual machine and found no issues. It does exactly what it claims to do.
How to install Windows 10 Update Disabler
- Download the Windows Update Disabler app from here:
Unpack the file UpdaterDisabler.exe to a folder you want. The EXE of this tool will run from this folder.
Open an elevated command prompt in that folder. Tip: See the article How to open an elevated command prompt in Windows 10.
Деактивация обновления Виндовс 10
ОС Windows 10, по умолчанию, без вмешательства пользователя проверяет в автоматическом режиме наличие обновлений, их самостоятельно скачивает и устанавливает. В отличие от предыдущих версий этой операционной системы, Виндовс 10 отличается тем, что юзеру отключить обновлении стало немного сложнее, но все-таки сделать это возможно как с помощью сторонних программ, так и посредством встроенных инструментов самой ОС.
Далее рассмотрим пошагово, как можно отменить автоматическое обновление в Windows 10, но сначала рассмотрим то, как его приостановить, а точнее, отложить на некоторое время.
Use Group Policy to disable Windows Update
In this method, we are going to use the Local Group Policy Editor. Since Group Policy Editor is not present in Windows 10 Home edition, this method is not applicable to Windows 10 Home.
Step 1: Open Local Group Policy Editor. To do so, type Edit Group Policy in Start or taskbar search box and then press Enter key. Alternatively, open Run command box, type Gpedit.msc, and then press Enter key to open the same.
Step 2: Navigate to the following policy:
Computer Configuration > Administrative Templates > Windows Components > Windows Update.
Step 3: On the right-side, double-click on the policy labeled Configure Automatic Updates to open its properties.
Step 4: Select the Enabled option. Under Configure automatic updating, select the second option labeled Notify for download and notify for install. Don’t touch the rest of the settings.
Click the Apply button. As mentioned before, this method will not turn off Windows Update, but you will be notified when updates are available to download. You can ignore the alert to avoid downloading and installing updates.
When this policy is enabled, you’ll see Some settings are managed by your organization message under Advanced options of Windows Update.
Method 4 of 7
How to disable automatic updates with Group Policy
The Local Group Policy Editor available on Windows 10 Pro includes policies to permanently disable automatic updates or change the Windows Update settings to decide when patches should be installed on the computer.
Disable updates
To disable automatic updates on Windows 10 permanently, use these steps:
- Open Start.
- Search for gpedit.msc and click the top result to launch the Local Group Policy Editor.
-
Navigate to the following path:
-
Double-click the Configure Automatic Updates policy on the right side.
Source: Windows Central
-
Check the Disabled option to turn off automatic updates permanently on Windows 10.
Source: Windows Central
- Click the Apply button.
- Click the OK button.
After you complete the steps, the system will stop downloading updates automatically. However, the ability to check for updates manually will continue to be available on Settings > Update & Security > Windows Update, and clicking the Check for updates button to download the most recent patches.
If you want to enable automatic updates on the device again, you can use the exact instructions outlined above, but on step No. 5, make sure to select the Not Configured option.
Limit updates
Alternatively, the Local Group Policy Editor lets you device how to disable automatic updates.
To manage Windows Update automatic downloads with Group Policy, use these steps:
- Open Start.
- Search for gpedit.msc and select the top result to launch the experience.
-
Navigate to the following path:
-
Double-click the Configure Automatic Updates policy on the right side.
Source: Windows Central
- Check the Enable option to turn on the policy.
-
Under the «Options» section, select the option to prevent updates from downloading and installing automatically on Windows 10:
- 2 — Notify for download and auto install.
- 3 — Auto download and notify for install.
- 4 — Auto download and schedule the install.
- 5 — Allow local admin to choose setting.
- 7 — Auto Download, Notify to install, Notify to Restart.
Quick tip: The best option to disable automatic updates is the 2 — Notify for download and auto install option, but you can make a different selection. If you choose option number 2, updates won’t download automatically. Instead, in the Windows Update settings page, you will now see an «Install now» button to manually trigger an update.
Source: Windows Central
- Click the Apply button.
- Click the OK button.
Once you complete the steps, automatic updates will be permanently disabled on Windows 10. However, when new updates become available, you will be able to install them manually from the Windows Update settings page.
How to Uninstall a Windows 10 Update
Perhaps you’re here because you’ve realized that and Update is already installed and you aren’t happy with the outcome. Unlike other operating systems, Windows does give you the option to uninstall an update as you see fit.
Following the same steps as above, access your PC’s Settings, then click on Update & Security. Once there, follow these steps:
- Click Delivery Optimization in the right menu list and then click View Update History.
2. Now, click Uninstall Updates.
From here you can choose to uninstall the updates as you need to. If you’re doing this because the newest update is causing issues with other software on your computer it’s worth researching before going straight into an uninstall frenzy.
Check your driver and other updates to see if the culprit lies somewhere other than Windows OS.
Disable updates via Registry
If you are on Windows 10 Home, you can disable the automatic update by making modifications to the Registry. Here is how to do that.
Step 1: Open the Registry Editor by typing Regedit.exe in the Start/taskbar search field and then hitting the Enter key.
Step 2: Navigate to the following key:
Computer\HKEY_LOCAL_MACHINE\SOFTWARE\Policies\Microsoft\Windows
Step 3: Right-click on the Windows key, click New and then click Key. Name it as WindowsUpdate.

Step 4: Now that you have created WindowsUpdate key, right-click on it, click New, and then name it as AU.

Step 5: Now, right-click on the AU key, click New and then click DWORD (32-bit) Value. Name it as NoAutoUpdate.

Step 6: Double-click on NoAutoUpdate and then change its value data from 0 to 1 to disable automatic updates.


Note that this disables automatic updates only. You can manually check for updates by clicking the Check for updates button in Settings > Update & Security > Windows Update page.
Method 5 of 7
Зачем отключают защиту Windows
Этому тоже есть простые объяснения. Некоторые маньяки-энтузиасты отключают всю защиту для максимального ускорения работы компьютера, ведь различное постоянное сканирование системы на предмет вирусов или перепроверка каждого действия пользователя (программ) действительно заметно замедляет систему.
Каюсь, я тоже экспериментировал с этим и как-то пользовался компьютером без какой-либо защиты несколько месяцев (даже без антивируса), но моя попа оказалась не железной (на диске много важных данных) — всё-таки включил её обратно. К тому же я не заметил визуального сумасшедшего ускорения работы.
Я считаю, что есть много других способов разгона операционной системы — оптимизация автозагрузки , качественная периодическая очистка её, сжатие реестра , дефрагментация диска , удаление дубликатов … наконец, простая замена медленного жёсткого диска на SSD-диск .
Но чаще всего встроенную системную защиту отключают при переходе к сторонним мощным комплексам безопасности, чтоб не возникало конфликтов и не дублировались функции. Например, логично выключить встроенный брандмауэр при использовании мощного и удобного Comodo Firewall .
Отключение с помощью локальной групповой политики
Если вы используете Windows 10, то можете запустить редактор локальной групповой политики для изменения системных настроек. Это позволит запретить системе автоматически загружать и устанавливать обновления.
Вот что нужно сделать для этого. Используйте комбинацию клавиш Windows+R, чтобы запустить команду «Выполнить». В появившемся окне введите «gpedit.msc» (без кавычек) и нажмите «ОК», чтобы открыть редактор локальных групповых политик.
Теперь перейдите по следующему адресу: Конфигурация компьютера → Административные шаблоны → Компоненты Windows → Центр обновления Windows.
С правой стороны окна найдите пункт «Настойка автоматического обновления». Кликните по нему дважды и установите флажок напротив пункта «Отключено». Нажмите кнопку «ОК».
После выполнения этих действий автоматические обновления больше не будут загружаться. Их нужно будет устанавливать вручную, перейдя в «Центр обновления Windows».
Если отключение через групповую политику не сработало, то вы можете схитрить и наоборот, разрешить обновления, но уже по вашим правилам. Для этого выберите пункт «Включено» и настройте обновления в разделе «Параметры» на ваше усмотрение.
В нем вы найдете несколько параметров для настройки, в том числе:
- 2 – Уведомлять о загрузке и установке.
- 3 – Автоматическая загрузка и уведомление об установке.
- 4 – Автоматическая загрузка и планирование установки.
- 5 – Разрешить локальному администратору выбирать настройки.
Вы должны выбрать опцию, которая наилучшим образом соответствует вашим предпочтениям. Опция №2 является наиболее подходящим вариантом для постоянного отключения автоматических обновлений. В любой момент вы можете отменить эти изменения. Не забудьте перезагрузить компьютер, чтобы активировать изменения.
How to disable Automatic Windows Update in Windows 10?
Some background information before you proceed!
There is no option to stop or turn off Windows Updates using the Control Panel or Settings app in Windows 10, as it used to be with earlier versions of Windows. But there is a workaround to disable or turn off Windows Update in Windows 10, that we’ll talk about in this post.
First, let us take a look at why people may want to turn off Windows updates.
With Windows 8.1 and earlier versions, we had Windows Update giving us options to:
- Install updates automatically (Recommended)
- Download Updates but choose when to install them
- Check for updates but let me choose whether to download and install them
- Never check for updates (Not Recommended)
These options provided a way to defer updates until we had enough time to download and install them or to have them downloaded automatically and then install them at a time we wish. These options are not present in Windows 10 Update & Security Settings.
Now in Settings app > Update and Security > Windows Update > Advanced Options, you will see the following settings:
Microsoft has explained that it will provide updates in two distinct methods for its two distinct types of clients.
The Home users now have the option to pause Windows Updates. Earlier they did not have this option. Windows 10 will also let you defer restart, but that is not enough because a download in the background might slow down your browsing in some cases.
The other ring of users are Enterprise users who will have the option to delay updates so that they can hold it to the time when they are free. Microsoft said it would push updates to such users less frequently so that they are faced with minimum downtime. These are the corporates and real-time users such as hospitals and ATMs etc.
Coming back to Home users and Professional users, there is not even the option to delay the updates. They will be downloaded as soon as they are available. The availability of Windows Updates for normal users means that the updates have already been tested by Windows Insiders. If you are a Windows Insider, running Windows 10 Home or Pro, you will be in priority to receive updates. After a few days of you testing the updates and if it doesn’t pose any problems, it will be released to the normal ring of users.
Thus, you are stuck. Windows 10 will keep on downloading updates as soon as they are available and will occupy your computer resources, when you may not want it too. Some of us will want to keep the automatic downloads to be stopped so that we can install the updates manually when free – when we are not working on something urgent. That is to say; some users would want the liberty and option to download and install updates when they want and not when Microsoft provides it.
Since there is no option to turn off Windows updates from Control Panel or PC Settings, here is a workaround.
Read: Windows 10 Update enables itself even after turning it Off.
Планировщик заданий
Если вы задаетесь вопросом: «почему некоторые действия происходят в системе регулярно, хотя я ничего не делаю?», то, вероятнее всего, виновник — планировщик заданий. Многие системные процессы, а также сторонние утилиты запускаются в автоматическом режиме при определенных условиях (они ещё называются триггеры).
Например, из-за этого часто запускаются некоторые программы на старте системы, хотя в автозагрузке всё чисто. Планировщик — более глубокий инструмент. Его следует проверять регулярно. Итак, для отключения системных обновлений выполните следующие действия:
- Нажмите комбинацию клавиш Win R и введите команду taskschd.msc.
- Проследуйте по адресу: Библиотека планировщика заданийMicrosoftWindowsUpdateOrchestrator.
- Отключите все задания, связанные с апдейтами. В разных версиях Windows они называются по-разному. Чаще всего это что-то типа Update Assistant или Update Assistant CalendarRun.
Win Updates Disabler отключит обновление Windows и защиту
Сегодня расскажу как полностью отключить автоматическое обновление Windows или её защиту всего парой кликов мышки, не внедряясь в реестр системы или бродя в многочисленных окнах панели управления.
В этом нам поможет бесплатная программа Win Updates Disabler .
Зачем это может понадобиться? Тоже объясню.
Хочу заметить, что я не рекомендую отключать все защитные возможности операционной системы, а лишь покажу, как это можно легко и быстро сделать.
Что нового
Новое в версии 3.5.115 :
- Совместимость с Windows 10 May 2020 Update (версия 2004).
- Добавлен новый процесс для блокировки: UPFC.EXE, связанный с WaaSMedic.
- Переработка приложения.
Новое в версии 3.0.100 :
- Новая функция «Двойная защита: блокировка прfв доступа + Блокировка службой StopUpdates10»
- Отключение дополнительных служб (выбранных пользователем).
- Отключен сервис USOSVC.
- Премиум версия.
- Приостановка или возобновление обновления с помощью командной строки.
Подробное описание
Блокировка обновлений — не самая лучшая идея, потому что в этом случае вы блокируете установку критических важных обновлений и патчей безопасности.
Тем не менее, иногда все же возникает необходимость заблокировать установку обновлений в качестве временной меры. Система накопительных обновлений Microsoft не позволяет блокировать отдельные обновления, которые могут создавать проблемы и конфликты в системе.
Единственная доступная пользователям и администраторам возможность — блокировка всех обновлений до тех пор, пока будут решены все известные проблемы.
Основные возможности StopUpdates10
Функции
- Блокировка обновлений Windows.
- Блокировка принудительных обновлений.
- Блокировка раздражающих уведомлений об обновлении.
- Мгновенная отмена изменений. Нажмите кнопку Restore, чтобы откатить все изменения.
Преимущества
- StopUpdates10 не удаляет файлы, не изменяет права доступа отдельных файлов и не выполняет других повреждающих систему действий.
- StopUpdates10 имеет маленький размер и чрезвычайно прост в использовании.
- StopUpdates10 распространяется абсолютно бесплатно.
Принцип работы
- StopUpdates10 создает специальные ключи реестра для блокировки обновлений.
- StopUpdates10 блокирует выполнение некоторых процессов, используемых для обновления.
Как удалить StopUpdates10
- Используйте стандартный метод удаления программ в Windows.
- Также можете запустить с правами администратора файл по следующему пути: “C:Program Files (x86)StopUpdates10unins000.exe”.
StopUpdates10 автоматически восстановит работоспособность системы обновления Windows во время удаления.
Автоматизация
Вы можете использовать StopUpdates10 в своих bat-файлах или сценариях. Убедитесь, что вы используете утилиту с учетной записью администратора.
- Отключить обновления Windows: StopUpdates10.exe /disable
- Включить обновления Windows: StopUpdates10.exe /restore
Вывод
Итак, с вопросом стоит ли отключать обновления Windows 10 будем считать, что разобрались. Стоит, если вас полностью устраивает используемая версия ОС, если вы хотите оградить себя от грубых вмешательств в конфигурацию Windows со стороны разработчика, а также если вы желаете получить больше контроля над процедурой обновления. Разумным решением в таком случае будет блокировка обновлений сразу после чистой установки Windows 10.
Можно ли полностью и навсегда отключить обновления Windows 10 в принципе? Только при условии полного отказа от установки любых исправлений и компонентов от Microsoft, которые могут отключить используемую вами блокировку. Использование сторонних утилит является наиболее удобным способов избавить себя от принудительных апдейтов, но применять нужно их последние версии, скачивая только с официальных сайтов разработчиков или ресурсов, которым вы доверяете.