Vivaldi для windows
Содержание:
- Connecting another device
- Search in Private Window
- Как скачать и установить программу
- Search Engine Nicknames
- Search in the Search Field
- Getting started
- Managing Extensions
- Syncing
- Расширения в Vivaldi
- Managing Notes
- Adding a New Search Engine
- Extensions in Vivaldi
- Search Suggestions
- Управление расширениями
- Delete synced data
Connecting another device
To connect another device to Sync:
- Open Sync Settings;
- Log in;
- Enter the encryption password;
- Start syncing.
With bigger profiles, the first sync between newly connected devices can take some time to finish.
Most data, like Bookmarks and Notes, will be put to their respective locations, but to access the tabs that you have open in another Vivaldi instance (Remote session), look for the Remote Sessions button on the Tab Bar, next to Recently Closed Tabs.
![]()
When you log in or enable synchronisation of some data type, your local data is merged and re-associated with what exists on the server. This is done in a way that ensures you won’t lose any data. Some things like Bookmarks can be moved to match the location the server believes they are in.
When you make changes to synced data on one client, Sync will check the servers for updates, download any new data and upload the changes you just made. It will also try to notify all desktop clients about the update, so they could download it.
Search in Private Window
To make your private browsing more private, you can set a different default search engine for the Private Window.
Option 1
- Go to Settings > Search > Private Window Search Engine;
- Select your preferred Search Engine from the dropdown menu.
Option 2
- Go to Settings > Search > Search Engines;
- Select the Search Engine you want to set as default;
- Tick the box for Set as Private Search.
Some search engines allow users to use the POST method for search. The combination of POST and no-redirects, ensures that websites won’t know the search terms you use to find their site, nor will your search terms be stored in your local history. If you have enabled Use POST method, but search doesn’t come up with any results, this means that the search engine of your choice doesn’t support the POST method. If you still want to use this search engine, you should disable Use POST method.
Как скачать и установить программу
Загрузить на компьютер дистрибутив с программой. Не требуется ни регистрации, ни оплаты, браузер абсолютно бесплатный. Файл с именем Vivaldi. exe и размером 51 МБ попадает в папку Загрузки. Кликаем на файле дважды, открывается программа установки браузера. Ожидаем её завершения. Если на первых шагах инсталляции и будут использоваться окна с английским языком интерфейса, сама программа будет работать на языке ОС.
Уже установленный браузер можно настраивать, в первую очередь выбрать тему. Остальные настройки можно отрегулировать после, когда пользователь поближе познакомится с программой.
Во время процесса установки иконки можно расположить в любой части браузера, если не устроит их точечный вид на сером фоне. При желании можно прицепить к правой стороне окна браузера вертикальный столбец с вкладками, возможны любые варианты.
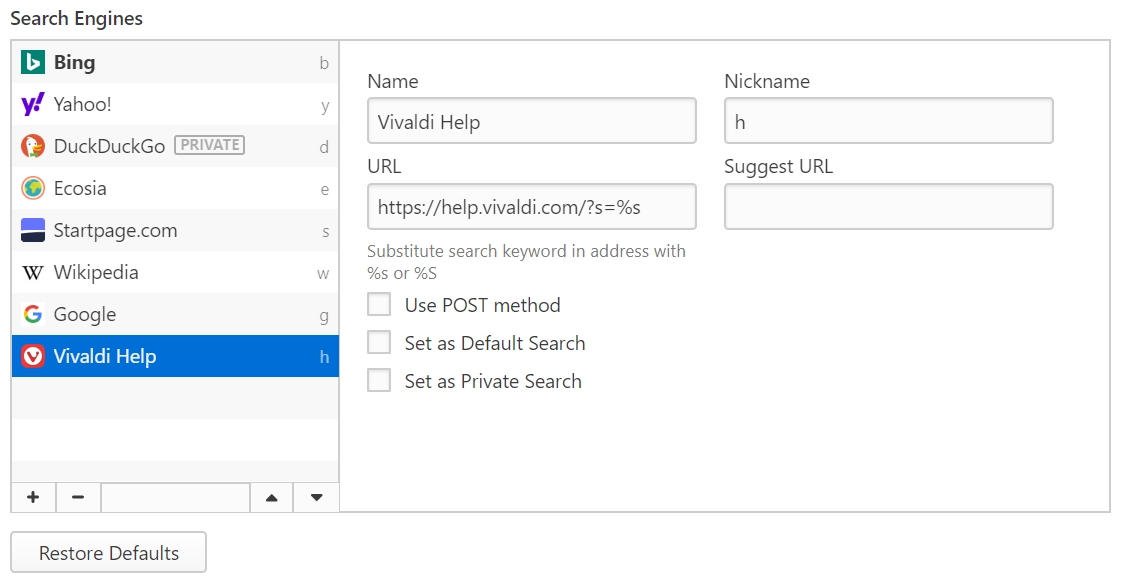
Search Engine Nicknames
Using Search Engine Nicknames, you can quickly switch between one Search Engine to another just by typing the nickname at the front of your search term.
- Get to know the default Search Engine Nicknames in Settings > Search > Search Engines.
- Start the search with the Search Engine Nickname, followed by Space. For instance, the search term “d Vivaldi browser” will search for “Vivaldi browser” via DuckDuckGo.
You can change the default Search Engine nickname to anything you like by:
- Clicking on the search engine you would like to assign a new nickname to;
- Entering the new nickname in the Nickname field;
Search in the Search Field
Another option is to search the web using the Search Field on the Address Bar.
- Go to Settings > Search and choose between:
- Showing the full search field on the Address Bar,
- Showing only a search button,
- Disabling the search field altogether;
- Type the search term in the Search Field on the Address Bar.
To switch between Search Engines, click on the Change Search Engine button on the left side of the Search Field and pick a different Search Engine from the dropdown menu.
When you search with different search engines from your default one in the Search Field, your last used Search Engine will revert back to the default one when you close the browser. To keep your last used search engine, go to Settings > Search and enable Keep Last Selected Search Engine.
To search for the same search term again, click on the Show Search History button on the right side of the Search Field to see a list of your latest searches.
To display the active Search Engine’s favicon instead of the magnifying glass, enable it in Settings > Search > Show Search Engine Icon.
The size of the search field on the Address Bar can be changed by placing the mouse cursor between the Address and Search fields and dragging the mouse in preferred direction.
Getting started
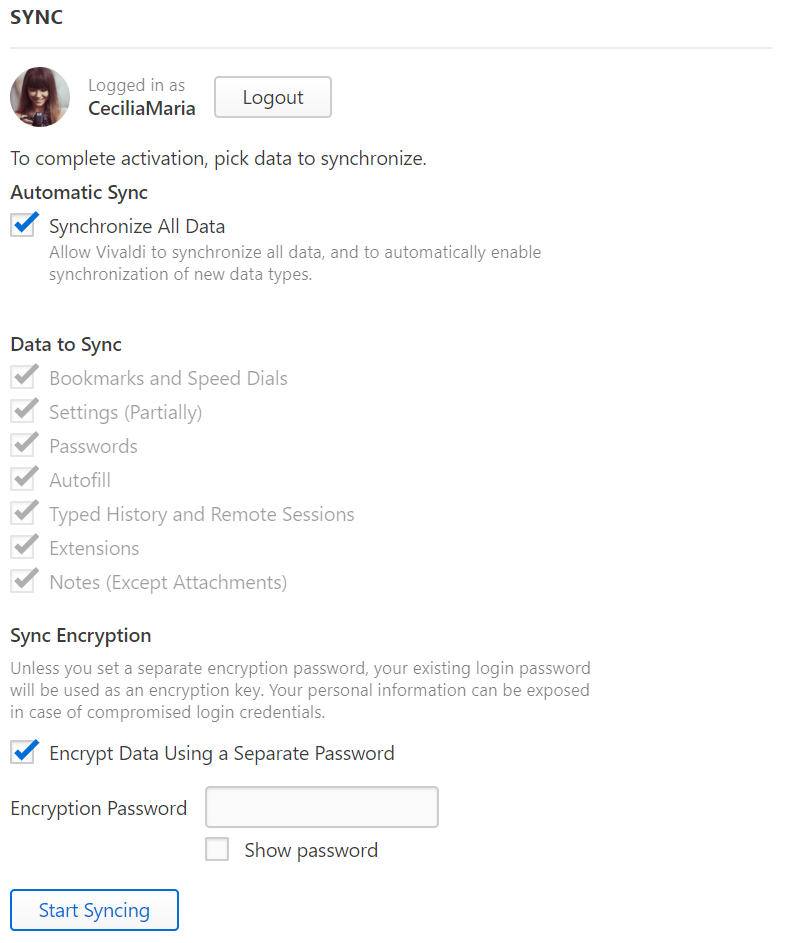
To use Sync, you need to have a Vivaldi account.If you don’t have an account yet, sign up here.
Accessing Sync Settings
Click the Sync settings button on the left side of the Status Bar next to the Panel toggle or open Settings > Sync.
![]()
First, log in to your Vivaldi account with your account’s username and login password.Your login password is sent to our servers over a secure connection and a hash of it is stored in our database.
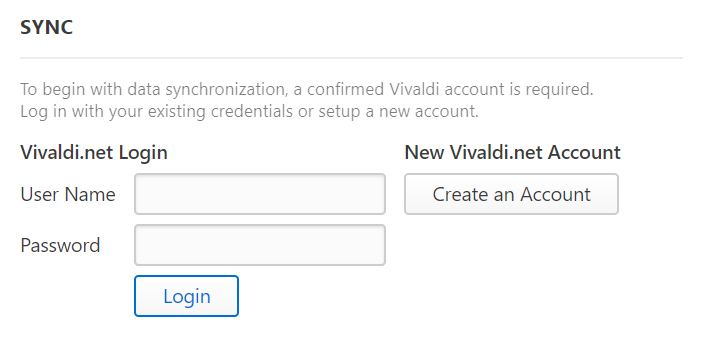
You also need to pick an encryption password that is used for encrypting your data. Your encryption password is used locally on your computer for encrypting the data you’re about to send to our servers and to decrypt the received data. Your encryption password is never sent to us or any other third party, which ensures that we cannot decrypt your data. This also means that even if someone should get access to your account’s username and login password, it’s impossible for them to find out the encryption password, unless you yourself have shared it with them.
Managing Extensions
The Extensions page gives an overview of the extensions currently installed, the ability to disable or delete extensions, and adjust extension-specific settings.
Accessing the Extensions page
To open the Extensions page go to the Vivaldi Menu > Tools > Extensions.
The Extensions page can also be accessed by:
- using a Keyboard Shortcuts Ctrl+Shift+E / ⌃ ⌘ E;
- typing “Extensions” in Quick Commands;
- right clicking on an extension button in the Address Bar and selecting Manage Extensions;
- entering vivaldi://extensions in the Address Bar;
- creating a Mouse Gesture for the action.
Access Extensions using Quick Commands
To open the extension’s popup or options:
- Open Quick Commands (F2 / ⌘ E);
- Type in the extension’s name;
- Use arrow keys to select the extension;
- Press Enter to open the extension’s popup or Ctrl + Enter / ⌘ Enter to open the extension’s options page (if the extension has one).
Access Extensions using Quick Commands
To open the extension’s popup or options:
- Open Quick Commands (F2 / ⌘ E)
- Type in the extension’s name;
- Use arrow keys to select the extension;
- Press Enter to open the extension’s popup or Ctrl + Enter / ⌘ Enter to open the extension’s options page (if the extension has one).
Changing Extension settings
Some Extensions have settings you can change. To check these options:
- Right-click on the Extension on the Address Bar and select Options from the context menu;
- Alternatively, click on Details > Extension Options on the Extensions page.
Updating extensions
Extensions usually update automatically. To manually update extensions:
- Go to the Extensions page;
- Enable Developer mode from a toggle in the top right corner of the page;
- Click Update on the new menu that appears.
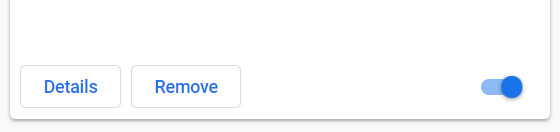
Disabling Extensions
To disable an Extension:
- Open the Extensions page;
- Click on the toggle button in the lower right corner of the extension card.
Disabling extensions is a good way to test whether an issue you’re encountering in the browser is caused by an Extension or not.
Removing Extensions
To remove an extension:
- Right-click on the Extension on the Address Bar and select Remove Extension from the context menu;
- Alternatively, click Remove on the Extension page.
Confirm your decision by clicking Remove again in the confirmation dialog.
Syncing
To start Sync:
- Select the data you want to synchronise;
- Click Start Syncing.
Currently, Vivaldi supports synchronisation of the following items:
- Bookmarks and Speed Dials;
- Some Settings (more will be added in the future);
- Stored webpage Passwords;
- Stored autofill information;
- Typed History and remote sessions (only typed URLs for history at the moment);
- Extensions;
- Notes (partially, without attachments).
The data to be synced is encrypted end-to-end
The data you send us is encrypted on your computer using a password that is never sent to us. In addition, the servers on which your encrypted data is stored are well protected from intrusion both physically and from the network.
When syncing, the encrypted data is sent to a central server, from which it can be requested from all other Vivaldi instances only by the same user. When one Vivaldi instance sends new data to the Sync server, a notification is immediately sent to all other Vivaldi instances to let them know that they can download this new information. This means you should see changes reflected within a minute.
Vivaldi stores Sync data on its own servers in Iceland. If you want to know more about how we handle your synced data please visit Sync’s Privacy Page.
Расширения в Vivaldi
Несмотря на то, что Vivaldi включает большой набор встроенных функций, многие пользователи любят проводить тонкую настройку своей работы в сети с помощью расширений.
Браузер Vivaldi создан на базе кода Chromium, поэтому расширения, доступные в Chrome Web Store, моугт быть установлены в Vivaldi. В некоторых случаях, когда расширения были написаны для браузера Chrome, они могут вести себя немного иначе при установке в Vivaldi, но в большинстве своём ваши любимые расширения будут отлично работать и в Vivaldi.
Если расширение не работает так, как ожидалось, пожалуйста, обсудите эту проблему на нашем Форуме. Возможно, проблема имеет решение или другие пользователи могут предложить альтернативный вариант. Также может помочь и сообщение о проблеме авторам расширения.
Managing Notes
Creating a new Note
To write a new note, click on the New Note button on top of the Panel. Everything you type will be saved automatically.
Copy to Note
Add a note by selecting text on a webpage and selecting Copy to note from contextual menu or use the Keyboard Shortcut Ctrl + Shift C / ⌥ ⌘ C.
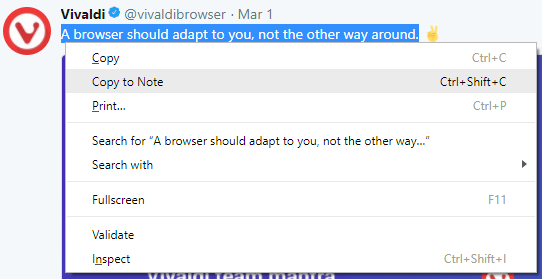
The note will be added with the marked text as body, the webpage link, creation date and a screenshot of the page with the highlighted text.
New Note with Capture Page
In addition to text, you can take screenshots and save them as Notes. To save a screenshot as a note:
- Click on Capture Page on the Status Bar;
- Select whether you want to capture the full page or just a part of it;
- For Format select Create Note With…;
- Click Capture.
The note will be added with the capture as an attachment, the webpage link and creation date. You can add a title and note about the screenshot.
New note with drag and drop
- Highlight the text you want to make into a note;
- Drag the highlighted text (you can also drag links and images) to the Notes Panel button;
- Release the mouse button to create a new note.
When the Notes Panel is already open, drag the note content to the notes list to create a new note.
If you want to add to an existing note, open the note, then drag and drop the additional content to the note editor section.
Editing Notes
At the bottom of the Notes Panel you may:
- Edit the note.
- Add an image either from a webpage or from a file on your computer.
- Add a webpage link to the note.
Organising Notes
Notes can be sorted:
- Manually,
- by Title,
- by Address,
- by Content,
- by Date Created.
Notes can also be divided into folders. To create a new folder, click on the New Folder button on top of the Panel and give it a title.
Notes can be moved between folders by dragging the note to the new destination folder.
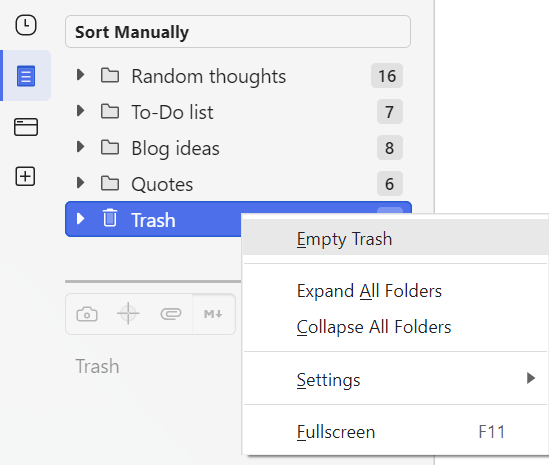
Deleting Notes
To delete a note or a notes folder, either select the note/folder and click on the Delete button on top of the Panel or right click the note/folder and select Delete from the context menu.
Drag the note out of the Trash and place it anywhere above.

Emptying Notes Trash
Right-click the Trash and select Empty trash.
Importing Notes
To import notes:
- Make sure all notes you want to import are in one folder;
- Open Quick Commands (F2 / ⌘ E);
- Type “Import notes“;
- Select the folder you want to import and click Select Folder.
All applicable text files in the folder will be imported as notes to Vivaldi.
Exporting Notes
To export notes:
- Open Quick Commands (F2 / ⌘ E);
- Type “Export notes“;
- Select a folder you want to export the notes to and click Select Folder.
All notes will be saved as separate text files.
Adding a New Search Engine
Vivaldi lets you add your preferred search engines in a few simple steps.
Method 1
- Go to the page you want to add.
- Right click on the search field of the page and select Add as Search Engine.
- If you wish, add a nickname and make the new Search Engine your Default Search.
- Click Add.
Method 2
- Do a search on the website you want to add as a Search Engine.
- Copy the URL of the search results page.
- Go to Vivaldi Browser Settings > Search > Search Engines.
- Click on the Add Search Engine button to add a new Search Engine.
- Paste the link to the URL field and substitute the used search term with %s
- Enter the Name and a Nickname for the Search Engine.
Extensions in Vivaldi
Although Vivaldi aims to provide as much built-in functionality as possible, many users further fine tune the browsing experience using extensions.
Because Vivaldi is built using the Chromium web browser project, extensions available in the Chrome Web Store can also be installed in Vivaldi. In some instances, extensions built for the Chrome browser will behave differently when installed in Vivaldi, but for the most part your favourite Chrome extensions will work just fine in Vivaldi.
In case an extension does not work as expected, please discuss the extension on our Forum, to see if the issue can be solved or if our Community members can suggest alternatives. Contacting the extension developers can help as well.
Search Suggestions
Among other options in Settings > Search > Allow Search Suggestions, you can decide whether to enable search suggestions in the Address and Search fields. When enabled, you’ll get search suggestions as soon as you start typing in a search query. It’s a convenient feature, but has privacy implications. You can read more on our Team Blog.
Even if you have enabled search engine suggestions, in Settings > Search > Allow Search Suggestions, you can limit it to allowing search suggestions only if you type a Search Engine nickname, which is a clear indication that this is intended to be a search, not a URL.
Alternatively, you can manually disable search suggestions for particular Search Engines, by going to Settings > Search > Search Engines > selecting the Search Engine > emptying the Suggest URL field. Or you can use another Search Engine’s Suggest URL. For example, get suggestions from a more privacy conscious DuckDuckGo, even if you search with Google.
Управление расширениями
На странице расширений вы можете просмотреть уже установленные расширения, отключить или удалить их, а также произвести индивидуальные настройки.
Доступ к странице расширений
Для перехода на страницу расширений откройте меню Vivaldi > Инструменты > Расширения.
Также к странице расширений можно перейти следующими способами:
- используя Комбинации клавиш Ctrl+Shift+E / ⌃ ⌘ E;
- введя «Расширения» в Быстрых командах;
- по клику правой кнопкой мыши на иконке расширения в Адресной панели и выбрав Управление расширениями;
- введя адрес vivaldi://extensions в Адресной панели;
- создав Жест мышью для данного действия.
Доступ к расширениям используя Быстрые команды
Чтобы открыть окно расширения или его настройки:
- Откройте Быстрые команды (F2 / ⌘ E);
- Введите имя расширения;
- Используйте стрелки, чтобы выбрать расширение в списке;
- Нажмите Enter, чтобы открыть окно расширения или Ctrl + Enter / ⌘ Enter, чтобы открыть окно настроек расширения (если у расширения таковое имеется).
Доступ к расширениям используя Быстрые команды
Чтобы открыть окно расширения или его настройки:
- Откройте Быстрые команды (F2 / ⌘ E)
- Введите имя расширения;
- Используйте стрелки, чтобы выбрать расширение в списке;
- Нажмите Enter, чтобы открыть окно расширения или Ctrl + Enter / ⌘ Enter, чтобы открыть окно настроек расширения (если у расширения таковое имеется).
Изменение настроек расширения
Некоторые расширения позволяют менять свои настройки. Чтобы проверить эти опции:
- Кликните правой кнопкой мыши на иконке расширения в Адресной панели и выберите Настройки в контекстном меню;
- Используя другой способ, нажмите Подробнее > Настройки расширения на странице расширений.
Обновление расширений
Обычно расширения обновляются автоматически. Чтобы обновить расширение вручную:
- Откройте страницу расширений;
- Включите режим разработчика в верхнем правом углу страницы;
- Нажмите кнопку Обновить в появившемся меню.
Отключение расширений
Чтобы отключить расширение:
- Откройте страницу расширений;
- Кликните на переключатель в правом нижнем углу карточки расширения.
Отключение расширений позволяет проверить, не создаёт ли оно помехи в работе браузера, если вы обнаружили некоторые проблемы.
Удаление расширений
Чтобы удалить расширение:
- Кликните правой кнопкой мыши на иконке расширения в Адресной панели и выберите Удалить расширение в контекстном меню;
- Используя другой способ, нажмите кнопку Удалить на странице расширений.
Подтвердите свой выбор нажав Удалить в открывшемся диалоговом окне.
Delete synced data
To delete synced data from the servers:
- Open Sync Settings;
- Make sure you’re logged in;
- Click on Reset Remote Data.
You will need to make sure that you have all your data client side before doing this to avoid losing data. Note that the data will be re-uploaded if you choose to run sync again in the future.
If, in addition to clearing the data and logging out of Sync, you’re also thinking of deleting your Vivaldi account, please note that when the account is deleted, you will also lose access to all other Vivaldi Community services such as webmail, forum, and blogs and all the data will be deleted. If you still wish to proceed, follow the instructions on our help page about deleting Vivaldi accounts.