Скачивание sql server management studio (ssms)
Содержание:
- Creating and Dropping Tables
- Using mysql_install_db
- Подключение к базе данных
- Modifying Tables
- Class Reference
- Создание и удаление таблиц
- Executing queries and creating statements
- Modifying Tables
- Аналоги dbForge Studio for MySQL
- Installing System Tables
- Connecting to MySQL or MariaDB instances
- Initializing the Forge Class
- Class Reference
- Manipulating Tables
Creating and Dropping Tables
There are several things you may wish to do when creating tables. Add
fields, add keys to the table, alter columns. CodeIgniter provides a
mechanism for this.
Fields are created via an associative array. Within the array you must
include a ‘type’ key that relates to the datatype of the field. For
example, INT, VARCHAR, TEXT, etc. Many datatypes (for example VARCHAR)
also require a ‘constraint’ key.
$fields = array(
        'users' => array(
                'type' => 'VARCHAR',
                'constraint' => '100',
        ),
);
// will translate to "users VARCHAR(100)" when the field is added.
Additionally, the following key/values can be used:
- unsigned/true : to generate “UNSIGNED” in the field definition.
- default/value : to generate a default value in the field definition.
- null/true : to generate “NULL” in the field definition. Without this,
the field will default to “NOT NULL”. - auto_increment/true : generates an auto_increment flag on the
field. Note that the field type must be a type that supports this,
such as integer. - unique/true : to generate a unique key for the field definition.
$fields = array(
        'blog_id' => array(
                'type' => 'INT',
                'constraint' => 5,
                'unsigned' => TRUE,
                'auto_increment' => TRUE
        ),
        'blog_title' => array(
                'type' => 'VARCHAR',
                'constraint' => '100',
                'unique' => TRUE,
        ),
        'blog_author' => array(
                'type' =>'VARCHAR',
                'constraint' => '100',
                'default' => 'King of Town',
        ),
        'blog_description' => array(
                'type' => 'TEXT',
                'null' => TRUE,
        ),
);
After the fields have been defined, they can be added using
followed by a call to the
method.
$this->dbforge->add_field()
The add fields method will accept the above array.
Passing strings as fields
If you know exactly how you want a field to be created, you can pass the
string into the field definitions with add_field()
$this->dbforge->add_field("label varchar(100) NOT NULL DEFAULT 'default label'");
Note
Passing raw strings as fields cannot be followed by calls on those fields.
Note
Multiple calls to add_field() are cumulative.
Creating an id field
There is a special exception for creating id fields. A field with type
id will automatically be assigned as an INT(9) auto_incrementing
Primary Key.
$this->dbforge->add_field('id');
// gives id INT(9) NOT NULL AUTO_INCREMENT
Generally speaking, you’ll want your table to have Keys. This is
accomplished with $this->dbforge->add_key(‘field’). An optional second
parameter set to TRUE will make it a primary key. Note that add_key()
must be followed by a call to create_table().
Multiple column non-primary keys must be sent as an array. Sample output
below is for MySQL.
$this->dbforge->add_key('blog_id', TRUE);
// gives PRIMARY KEY `blog_id` (`blog_id`)

$this->dbforge->add_key('blog_id', TRUE);
$this->dbforge->add_key('site_id', TRUE);
// gives PRIMARY KEY `blog_id_site_id` (`blog_id`, `site_id`)

$this->dbforge->add_key('blog_name');
// gives KEY `blog_name` (`blog_name`)

$this->dbforge->add_key(array('blog_name', 'blog_label'));
// gives KEY `blog_name_blog_label` (`blog_name`, `blog_label`)
After fields and keys have been declared, you can create a new table
with
$this->dbforge->create_table('table_name');
// gives CREATE TABLE table_name
An optional second parameter set to TRUE adds an “IF NOT EXISTS” clause
into the definition
$this->dbforge->create_table('table_name', TRUE);
// gives CREATE TABLE IF NOT EXISTS table_name
You could also pass optional table attributes, such as MySQL’s :
$attributes = array('ENGINE' => 'InnoDB');
$this->dbforge->create_table('table_name', FALSE, $attributes);
// produces: CREATE TABLE `table_name` (...) ENGINE = InnoDB DEFAULT CHARACTER SET utf8 COLLATE utf8_general_ci
Note
Unless you specify the and/or attributes,
will always add them with your configured char_set
and dbcollat values, as long as they are not empty (MySQL only).
Execute a DROP TABLE statement and optionally add an IF EXISTS clause.
// Produces: DROP TABLE table_name
$this->dbforge->drop_table('table_name');

// Produces: DROP TABLE IF EXISTS table_name
$this->dbforge->drop_table('table_name',TRUE);
Using mysql_install_db
To invoke , use the following syntax:
$ mysql_install_db options
Because the MariaDB server, , needs to access the data directory
when it runs later, you should either run from the same
account that will be used for running or run it as root and use the
option to indicate the user name that will run
as. It might be necessary to specify other options such as
or if
does not use the correct locations for the installation
directory or data directory. For example:
$ scripts/mysql_install_db --user=mysql \
   --basedir=/opt/mysql/mysql \
   --datadir=/opt/mysql/mysql/data
Options
supports the following options:
| Option | Description |
|---|---|
| If set to , it creates a account that authenticates with the authentication plugin and that has no initial password set, which can be insecure. If set to , it creates a account that authenticates with the authentication plugin. Set to by default from MariaDB 10.4 (see Authentication from MariaDB 10.4), or by default in earlier versions. Available since MariaDB 10.1. | |
| Used with . It specifies the name of the second account to create with privileges in addition to , as well as of the system account allowed to access it. Defaults to the value of . | |
| The path to the MariaDB installation directory. | |
| If using with out-of-directory builds, you will need to set this to the location of the build directory where built files reside. | |
| For internal use. Used when building the MariaDB system tables on a different host than the target. | |
| , | The path to the MariaDB data directory. |
| Read this file after the global files are read. Must be given as the first option. | |
| Only read default options from the given file name Must be given as the first option. | |
| In addition to the given groups, read also groups with this suffix. From MariaDB 10.1.31, MariaDB 10.2.13 and MariaDB 10.3.5. | |
| Causes to run even if DNS does not work. In that case, grant table entries that normally use host names will use IP addresses. | |
| Don’t read default options from any option file. Must be given as the first option. | |
| Print the program argument list and exit. Must be given as the first option. | |
| For internal use. This option is used by RPM files during the MariaDB installation process. | |
| Do not create the anonymous user. | |
| Uses IP addresses rather than host names when creating grant table entries. This option can be useful if your DNS does not work. | |
| Don’t install the test database. | |
| For internal use. The path to the MariaDB source directory. This option uses the compiled binaries and support files within the source tree, useful for if you don’t want to install MariaDB yet and just want to create the system tables. The directory under which looks for support files such as the error message file and the file for populating the help tables. | |
| The login user name to use for running . Files and directories created by will be owned by this user. You must be to use this option. By default, runs using your current login name and files and directories that it creates will be owned by you. | |
| Verbose mode. Print more information about what the program does. | |
| For internal use. This option is used for creating Windows distributions. |
Option Files
In addition to reading options from the command-line, can also read options from option files. If an unknown option is provided to in an option file, then it is ignored.
The following options relate to how MariaDB command-line tools handles option files. They must be given as the first argument on the command-line:
| Option | Description |
|---|---|
| Print the program argument list and exit. | |
| Don’t read default options from any option file. | |
| Only read default options from the given file #. | |
| Read this file after the global files are read. | |
| In addition to the default option groups, also read option groups with this suffix. |
Option Groups
reads options from the following from option files:
| Group | Description |
|---|---|
| Options read by , which includes both MariaDB Server and MySQL Server. |
also reads options from the following server from option files:
| Group | Description |
|---|---|
| Options read by , which includes both MariaDB Server and MySQL Server. | |
| Options read by MariaDB Server. | |
| Options read by a specific version of , which includes both MariaDB Server and MySQL Server. For example, . | |
| Options read by MariaDB Server. | |
| Options read by a specific version of MariaDB Server. | |
| Options read by all MariaDB client programs and the MariaDB Server. This is useful for options like socket and port, which is common between the server and the clients. | |
| Options read by a galera-capable MariaDB Server. Available on systems compiled with Galera support. |
Подключение к базе данных
Тут очень важно, чтобы была возможность подключиться через SSH. Если её нет, то должны быть другие, очень веские причины для использования такого MySQL менеджера
Конечно, вы можете открыть доступ к MySQL серверу снаружи, но при этом придётся обеспечивать его безопасность (например, создавать списки IP адресов, с которых можно к нему подключаться), а это дополнительная работа.
В dbForge подключение через SSH реализовано, нужные настройки находятся на вкладке «Безопасность».
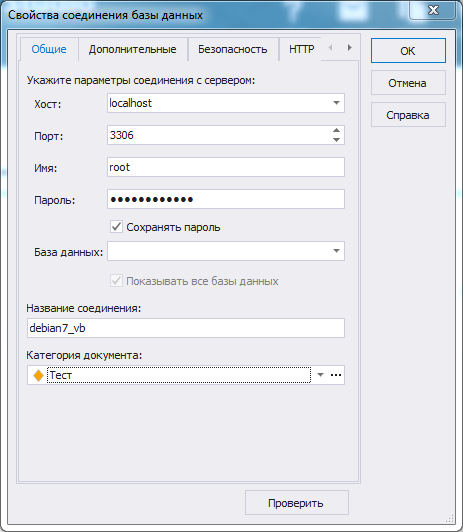
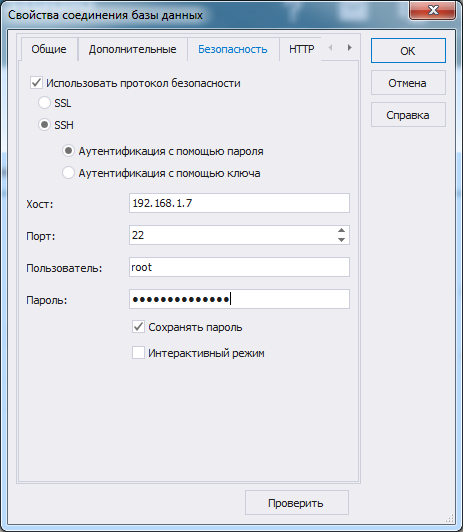
Примечание. Скриншоты для этой статьи я сделал с локального сервера, установленного в VirtualBox, поэтому использована аутентификация с помощью пароля. Для рабочих серверов лучше использовать ключи и запретить вход под root’ом.
Modifying Tables
$forge->addColumn()
The method is used to modify an existing table. It
accepts the same field array as above, and can be used for an unlimited
number of additional fields.
$fields =
        'preferences' => 'type' => 'TEXT'
];
$forge->addColumn('table_name', $fields);
// Executes: ALTER TABLE table_name ADD preferences TEXT
If you are using MySQL or CUBIRD, then you can take advantage of their
AFTER and FIRST clauses to position the new column.
Examples:
// Will place the new column after the `another_field` column:
$fields =
        'preferences' => 'type' => 'TEXT', 'after' => 'another_field'
];

// Will place the new column at the start of the table definition:
$fields =
        'preferences' => 'type' => 'TEXT', 'first' => true
];
$forge->dropColumn()
Used to remove a column from a table.
$forge->dropColumn('table_name', 'column_to_drop'); // to drop one single column
Used to remove multiple columns from a table.
$forge->dropColumn('table_name', 'column_1,column_2'); // by proving comma separated column names
$forge->dropColumn('table_name', 'column_1', 'column_2']); // by proving array of column names
Class Reference
- class
-
- ($table, $field = array(), $_after = NULL)
-
Parameters: - $table (string) – Table name to add the column to
- $field (array) – Column definition(s)
- $_after (string) – Column for AFTER clause (deprecated)
Returns: TRUE on success, FALSE on failure
Return type: bool
Adds a column to a table. Usage: See .
- ($field)
-
Parameters: Returns: CI_DB_forge instance (method chaining)
Return type: CI_DB_forge
Adds a field to the set that will be used to create a table. Usage: See .
- ($key, $primary = FALSE)
-
Parameters: - $key (array) – Name of a key field
- $primary (bool) – Set to TRUE if it should be a primary key or a regular one
Returns: CI_DB_forge instance (method chaining)
Return type: CI_DB_forge
Adds a key to the set that will be used to create a table. Usage: See .
- ($db_name)
-
Parameters: Returns: TRUE on success, FALSE on failure
Return type: bool
Creates a new database. Usage: See .
- ($table, $if_not_exists = FALSE, array $attributes = array())
-
Parameters: - $table (string) – Name of the table to create
- $if_not_exists (string) – Set to TRUE to add an ‘IF NOT EXISTS’ clause
- $attributes (string) – An associative array of table attributes
Returns: TRUE on success, FALSE on failure
Return type: bool
Creates a new table. Usage: See .
- ($table, $column_name)
-
Parameters: - $table (string) – Table name
- $column_name (array) – The column name to drop
Returns: TRUE on success, FALSE on failure
Return type: bool
Drops a column from a table. Usage: See .
- ($db_name)
-
Parameters: Returns: TRUE on success, FALSE on failure
Return type: bool
Drops a database. Usage: See .
- ($table_name, $if_exists = FALSE)
-
Parameters: - $table (string) – Name of the table to drop
- $if_exists (string) – Set to TRUE to add an ‘IF EXISTS’ clause
Returns: TRUE on success, FALSE on failure
Return type: bool
Drops a table. Usage: See .
- ($table, $field)
-
Parameters: - $table (string) – Table name
- $field (array) – Column definition(s)
Returns: TRUE on success, FALSE on failure
Return type: bool
Modifies a table column. Usage: See .
- ($table_name, $new_table_name)
-
Parameters: - $table (string) – Current of the table
- $new_table_name (string) – New name of the table
Returns: TRUE on success, FALSE on failure
Return type: bool
Renames a table. Usage: See .
Создание и удаление таблиц
Есть несколько вещей, которые вы можете делать при создании таблиц: добавление полей, добавление ключей в таблицу, изменять столбцы. CodeIgniter предоставляет механизм для этого.
Поля создаются через ассоциативный массив. В массив необходимо включить ‘type’ ключ, который относится к типу данных поля. Например, INT, VARCHAR, TEXT и т.д. Многие типы данных (например, тип VARCHAR) также требуют ‘constraint’ ключ.
$fields = array(
        'users' => array(
                'type' => 'VARCHAR',
                'constraint' => '100',
        ),
);
// будет создано "users VARCHAR(100)" при добавлении поля.
Кроме того, следующие ключи/значения могут быть использованы:
unsigned/true : для создания “UNSIGNED” в пределах поля.
default/value : для создания значения по умолчанию в пределах поля.
null/true : для создания “NULL” в пределах поля. Без этого поля по умолчанию “NOT NULL”.
auto_increment/true : создает auto_increment флаг для поля
Обратите внимание, что тип поля должен поддерживать такой тип как integer.
unique/true : создание уникального ключа в пределах поля.
$fields = array(
        'blog_id' => array(
                'type' => 'INT',
                'constraint' => 5,
                'unsigned' => TRUE,
                'auto_increment' => TRUE
        ),
        'blog_title' => array(
                'type' => 'VARCHAR',
                'constraint' => '100',
                'unique' => TRUE,
        ),
        'blog_author' => array(
                'type' =>'VARCHAR',
                'constraint' => '100',
                'default' => 'King of Town',
        ),
        'blog_description' => array(
                'type' => 'TEXT',
                'null' => TRUE,
        ),
);
После того, как поля были определены, они могут быть добавлены с помощью $this->dbforge->add_field($fields); вызова create_table() метода.
$this->dbforge->add_field()
Метод добавления полей «add» принимает вышеуказанный массив.
Passing strings as fields
Если вы точно знаете, какое поле должно быть создано, вы можете передать строку с определением поля в add_field()
$this->dbforge->add_field("label varchar(100) NOT NULL DEFAULT 'default label'");
Примечание
Передача строк как полей не могут следовать вызовам add_key() этих полей.
Примечание
Множественные вызовы add_field() являются накопительными.
Создание поля ID
Есть специальное исключение для создания поля ID. Такое поле будет автоматически назначаться в качестве INT(9) auto_incrementing Primary Key.
$this->dbforge->add_field('id');
// дает INT(9) NOT NULL AUTO_INCREMENT
Вообще говоря, вы пожелаете, чтобы ваши таблицы имели ключи. Это достигается с $this->dbforge->add_key(‘field’). Необязательный второй параметр установленный в TRUE создаст primary ключ
Обратите внимание, что add_key() должен быть вызван после вызова create_table()
Несколько столбцов с ключом non-primary, должны быть отправлены как массив. Ниже пример вывода для MySQL.
$this->dbforge->add_key('blog_id', TRUE);
// дает PRIMARY KEY `blog_id` (`blog_id`)

$this->dbforge->add_key('blog_id', TRUE);
$this->dbforge->add_key('site_id', TRUE);
// дает PRIMARY KEY `blog_id_site_id` (`blog_id`, `site_id`)

$this->dbforge->add_key('blog_name');
// дает KEY `blog_name` (`blog_name`)

$this->dbforge->add_key(array('blog_name', 'blog_label'));
// дает KEY `blog_name_blog_label` (`blog_name`, `blog_label`)
После объявления полей и ключей вы можете создавать новые таблицы с
$this->dbforge->create_table('table_name');
// дает CREATE TABLE table_name
Необязательный второй параметр установленный в TRUE добавляет “IF NOT EXISTS” условие в определении
$this->dbforge->create_table('table_name', TRUE);
// дает CREATE TABLE IF NOT EXISTS table_name
Вы также можете передать дополнительные атрибуты таблицы, такие как ENGINE для MySQL:
$attributes = array('ENGINE' => 'InnoDB');
$this->dbforge->create_table('table_name', FALSE, $attributes);
// производит: CREATE TABLE `table_name` (...) ENGINE = InnoDB DEFAULT CHARACTER SET utf8 COLLATE utf8_general_ci
Примечание
Если Вы не укажите CHARACTER SET и/или COLLATE свойства,
create_table() будет добавлять их в свои настроенный char_set и dbcollat занчения пока они не пустые (MySQL только).
Выполнение DROP TABLE заявления и дополнительно добавить IF EXISTS заявление.
// производит: DROP TABLE table_name
$this->dbforge->drop_table('table_name');

// производит: DROP TABLE IF EXISTS table_name
$this->dbforge->drop_table('table_name',TRUE);
Executing queries and creating statements
How that we’ve seen how to add servers, let’s move on to the next step, and see what we can do from here. Connection explorer provides a user interface to view and manage the objects in each instance of MySQL and MariaDB servers directly from Visual Studio Code.
For example, we can delete the sakila database by right-clicking on it and choosing the Show DROP script option. This will open a new query editor and place the syntax of the DROP DATABASE statement:
To complete the operation, click the Execute button (also available from the right-click context menu) in the top left corner of the query editor. We just deleted all tables in the sakila database and database itself permanently. But don’t worry – this is just a sample database, and we can recreate it anytime. Let’s see how we can do that.
Back in ApexSQL server explorer, right-click our instance and choose New query:
In the newly opened query editor, I’ll just paste the SQL script for creating the sample database and hit the Execute button to recreate the database:
Note: The Sakila sample database is available from this page.
If the connection is remote, give it a few seconds. There’s always a slight delay when dealing with remote locations. It also depends on the complexity of the script that you’re running, the number of batches, etc.
I’ll run another long script to populate the tables with sample data:
You can always verify your connection and status of a query in the lower status bar:
Once the script is executed successfully, head over to connection explorer, right-click Databases and select Refresh to get latest changes, and you’ll see that the objects are recreated:
Now that we have some actual data in the sample database, let’s see how the results of queries can be viewed in Visual Studio Code directly in a spreadsheet-like grid.
Fetching data from a table, of course, requires a SELECT statement to be executed. So, open a new query, paste the code from below, and execute it:
|
1 |
SELECT* FROMactor WHEREUPPER(last_name)LIKE’%LI%’ ORDERBYlast_name, first_name; |
Query results are displayed right below the SQL editor:
Aside from executing queries, the VS Code extension also enables users to generate DDL and DML scripts using the integrated SQL editor.
To generate DDL and DML scripts, right-click a supported object from connection explorer and choose an appropriate option. Clicking either of those options will automatically open a new query editor and generate script, ready for execution:
Modifying Tables
$this->dbforge->add_column()
The add_column() method is used to modify an existing table. It
accepts the same field array as above, and can be used for an unlimited
number of additional fields.
$fields = array(
        'preferences' => array('type' => 'TEXT')
);
$this->dbforge->add_column('table_name', $fields);
// Executes: ALTER TABLE table_name ADD preferences TEXT
If you are using MySQL or CUBIRD, then you can take advantage of their
AFTER and FIRST clauses to position the new column.
Examples:
// Will place the new column after the `another_field` column:
$fields = array(
        'preferences' => array('type' => 'TEXT', 'after' => 'another_field')
);

// Will place the new column at the start of the table definition:
$fields = array(
        'preferences' => array('type' => 'TEXT', 'first' => TRUE)
);
$this->dbforge->drop_column()
Used to remove a column from a table.
$this->dbforge->drop_column('table_name', 'column_to_drop');
Аналоги dbForge Studio for MySQL
dbForge Studio for MySQL — это универсальный инструмент с графическим интерфейсом для разработки, управления и администрирования баз данных MySQL и MariaDB.
Среда IDE позволяет создавать и выполнять запросы, разрабатывать и отлаживать сохраненные сеансы, автоматизировать управление объектами базы данных, анализировать данные таблиц через интуитивно понятный интерфейс.
Клиент MySQL предоставляет инструменты для сравнения и синхронизации данных и схем, инструменты создания отчетов о базе данных, опции резервного копирования с расписанием и многое другое.
Преимущества:
-Широкие параметры совместимости (MySQL, сервер MariaDB, Percona, Galera Cluster, Amazon RDS, Amazon Aurora, Google Cloud, облако Alibaba, TokuDB, Sphinx, Tencent Cloud).
— Интеллектуальное кодирование SQL (завершение кода, форматирование, приглашение MySQL и фрагменты кода обеспечивают удобство и эффективность написания кода SQL).
-Schema — сравнение данных и синхронизация.
-Data Generator — поддерживает все типы данных MySQL, включает в себя большое количество значимых генераторов с регулируемыми настройками и позволяет генерировать данные через интерфейс командной строки.
— Визуальный конструктор запросов — создание визуальных запросов с помощью редактора диаграмм и выражений. Запросы любой сложности могут быть созданы за несколько секунд.
— Инструмент с графическим интерфейсом автоматически добавляет объединения между таблицами и позволяет работать с операторами INSERT, UPDATE, DELETE.
-Database Designer — инструмент для создания, анализа, обратного проектирования, печати и настройки ваших баз данных MySQL.
-Импорт / Экспорт данных — заполните базы данных MySQL внешними данными, используя наши инструменты экспорта и импорта.
— Резервное копирование базы данных.
— Администрирование базы данных.
— MySQL Debugger — предлагает пошаговое удаленное выполнение кода, контрольной точки, времени, стека вызовов, механизма оценки переменных для автоматизации отладки хранимых подпрограмм и процедур MySQL.
-Table Designer — дизайн таблиц.
-Query Profiler — программа запросов.
— Рефакторинг базы данных.
-DB Documenter — позволяет генерировать документацию базы данных в форматах HTML, PDF и Markdown.
-Доклад и анализ проектов.
-Копирование базы данных.
Функции и возможности
- Подсветка синтаксиса
- Завершение кода
- Расписание для резервного копирования
- MariaDB
- Intellisense
- Импорт из MySql
- Экспорт в MySQL
Installing System Tables
Installing System Tables From a Source Tree
If you have just compiled MariaDB from source, and if you want to use from your source tree, then that can be done without having to actually install MariaDB. This is very useful if you want to test your changes to MariaDB without disturbing any existing installations of MariaDB.
To do so, you would have to provide the option. For example:
./scripts/mysql_install_db --srcdir=. --datadir=path-to-temporary-data-dir
Installing System Tables From a Binary Tarball
If you install a binary tarball package in a non standard path, like your home directory, and if you already have a MariaDB / MySQL package installed, then you may get conflicts
with the default . This often results in permissions
errors.
One possible solution is to use the option, so that it does not read any option files. For example:
./scripts/mysql_install_db --no-defaults --basedir=. --datadir=data
Another possible solution is to use the option, so that you can specify your own option file. For example:
./scripts/mysql_install_db --defaults-file=~/.my.cnf
Connecting to MySQL or MariaDB instances
The extension can be installed either from Marketplace, integrated extension manager inside Visual Studio Code, or using the VSIX installation file available as a download on this page. I’m gonna go with the integrated extension manager, but feel free to use any of the other two methods.
Bring up the Extensions view by clicking on the Extensions icon in the Activity Bar on the left side of code editor or go to View | Extensions from the main menu:
Start typing the name of the VS Code extension, and it should pop-up in the search results. At the moment of writing this article, the official product version is 2020.3.19. To install the extension, click the Install button shown below:
Once the installation is complete, you’ll see one additional icon in the Activity Bar. Clicking on the icon will bring up ApexSQL server explorer which is used for connecting to MySQL or MariaDB instances using TCP/IP or a local socket or pipe:
I’ve already added a few instances, as can be seen above, but let’s add another one by clicking on the plus (+) sign on the top right of connection explorer. This action will open the Connect to server tab in which I’ll enter needed information to connect to MySQL Server using TCP/IP over an SSH connection:
Once everything is set up, just click Connect, and if connection parameters are correct, you’ll see a message in the bottom right corner of Visual Studio Code saying “Connection successful”. The Connect to server tab closes, and the focus goes to ApexSQL server explorer in which you’ll find the newly added instance of MySQL Server:
Initializing the Forge Class
Important
In order to initialize the Forge class, your database
driver must already be running, since the forge class relies on it.
Load the Forge Class as follows:
$this->load->dbforge()
You can also pass another database object to the DB Forge loader, in case
the database you want to manage isn’t the default one:
$this->myforge = $this->load->dbforge($this->other_db, TRUE);
In the above example, we’re passing a custom database object as the first
parameter and then tell it to return the dbforge object, instead of
assigning it directly to .
Note
Both of the parameters can be used individually, just pass an empty
value as the first one if you wish to skip it.
Once initialized you will access the methods using the
object:
Class Reference
- class
-
- ($table, $field = array(), $_after = NULL)
-
Parameters: - $table (string) – Table name to add the column to
- $field (array) – Column definition(s)
- $_after (string) – Column for AFTER clause (deprecated)
Returns: TRUE on success, FALSE on failure
Return type: bool
Adds a column to a table. Usage: See .
- ($field)
-
Parameters: Returns: CI_DB_forge instance (method chaining)
Return type: CI_DB_forge
Adds a field to the set that will be used to create a table. Usage: See .
- ($key, $primary = FALSE)
-
Parameters: - $key (array) – Name of a key field
- $primary (bool) – Set to TRUE if it should be a primary key or a regular one
Returns: CI_DB_forge instance (method chaining)
Return type: CI_DB_forge
Adds a key to the set that will be used to create a table. Usage: See .
- ($db_name)
-
Parameters: Returns: TRUE on success, FALSE on failure
Return type: bool
Creates a new database. Usage: See .
- ($table, $if_not_exists = FALSE, array $attributes = array())
-
Parameters: - $table (string) – Name of the table to create
- $if_not_exists (string) – Set to TRUE to add an ‘IF NOT EXISTS’ clause
- $attributes (string) – An associative array of table attributes
Returns: TRUE on success, FALSE on failure
Return type: bool
Creates a new table. Usage: See .
- ($table, $column_name)
-
Parameters: - $table (string) – Table name
- $column_name (array) – The column name to drop
Returns: TRUE on success, FALSE on failure
Return type: bool
Drops a column from a table. Usage: See .
- ($db_name)
-
Parameters: Returns: TRUE on success, FALSE on failure
Return type: bool
Drops a database. Usage: See .
- ($table_name, $if_exists = FALSE)
-
Parameters: - $table (string) – Name of the table to drop
- $if_exists (string) – Set to TRUE to add an ‘IF EXISTS’ clause
Returns: TRUE on success, FALSE on failure
Return type: bool
Drops a table. Usage: See .
- ($table, $field)
-
Parameters: - $table (string) – Table name
- $field (array) – Column definition(s)
Returns: TRUE on success, FALSE on failure
Return type: bool
Modifies a table column. Usage: See .
- ($table_name, $new_table_name)
-
Parameters: - $table (string) – Current of the table
- $new_table_name (string) – New name of the table
Returns: TRUE on success, FALSE on failure
Return type: bool
Renames a table. Usage: See .
Manipulating Tables
| Parameter | Type | Description |
|---|---|---|
| $table | The name of the table to drop | |
| Returns | The result of the query |
Execute a statement with an clause:
| Parameter | Type | Description |
|---|---|---|
| $table_name | The name of the table being renamed | |
| $new_table_name | The new table name | |
| Returns | The result of the query |
Executes a rename:
| Parameter | Type | Description |
|---|---|---|
| $table | The table to add the column to | |
| $field | The column defintition (see for details) | |
| $after_field | The field that should come before this new field, leave empty to be the last field | |
| Returns | The result of the query |
The method is used to modify an existing table. It accepts the same field array as above, and can be used for an unlimited number of additional fields:
You can also take advantage of MySQL’s and clauses to position the new column:
| Parameter | Type | Description |
|---|---|---|
| $table | The table to drop the column from | |
| $column_name | The name of the column to drop | |
| Returns | The result of the query |
Used to remove a column from a table:
| Parameter | Type | Description |
|---|---|---|
| $table | The table to add the column to | |
| $field | The column defintition (see for details) | |
| Returns | The result of the query |
The usage of this method is identical to , except it alters an existing column rather than adding a new one. In order to change the name you can add a key into the field defining array:
