Nexus mod manager 0.80.2 на русском языке
Содержание:
- Исправлена ошибка, из-за которой загрузка с Nexus Mod Manager не работала
- Activating a file
- Change Game Mode
- Приступаем к работе
- Running the installer
- The User Interface
- Как скачать Nexus Mod Manager
- Nexus Mod Manager — Автоматическая установка и управление модами v0.72.2
- The Search Box
- Before beginning installation
- Nexus Mod Manager
- Обновить:
- Aims
- Plugins, tools and load order
- How To Manually Install Fallout 4 Mods
- Overview
Исправлена ошибка, из-за которой загрузка с Nexus Mod Manager не работала
Преимущество Nexus Mod Manager заключается в скорости, с которой он становится легко доступной и самостоятельно создаваемой библиотекой ваших модульных игр. Он просто предлагает категории модов, которые поддерживают порядок в вашей коллекции и обеспечивают легкую нахождение модной системы независимо от того, сколько у вас установлено.
Тем не менее, некоторые пользователи оказываются в ситуации, когда они переходят на страницу «Nexusmods» и пытаются загрузить файлы модов, нажав на кнопку «Скачать с менеджером», и она загружается немного, но Nexus Mod Manager просто не хочет скачать файл, по которому щелкнули.
Использование редактора реестра
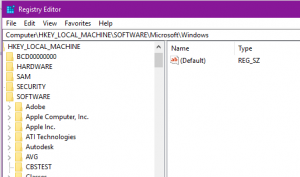
Временным решением проблемы является ручная установка менеджера ссылок:
- Откройте regedit с правами администратора.
- Добавьте новый ключ с именем nxm в HKEY_CLASSES_ROOT.
- Там измените значение строки (по умолчанию) на Nexus Mod Download (или как вы хотите это называть).
- Добавьте еще одно строковое значение, называемое URL-протоколом. Оставьте значение пустым.
- Добавьте ключ к nxm с именем DefaultIcon. Установите значение (по умолчанию) «C: Path to NexusClient.exe, 1».
- Добавьте еще один ключ к nxm с именем Shell.
- Добавьте ключ к оболочке с именем open.
- Добавьте ключ, чтобы открыть вызываемую команду.
- Установите (по умолчанию) значение команды «C: Path to NexusClient.exe» «% 1».
Как только это сделано, загрузка модов работает.
Повторно свяжите ваши файлы NXM с помощью Nexus Mod Manager.
- Откройте программу Nexus Mod Manager с правами администратора (щелкните правой кнопкой «Запуск от имени администратора»).
- Нажмите «Настройки» в верхней части Nexus Mod Manager.
- На вкладке Общие установите флажок «Ссылка на URL-адреса NXM».
- Если «Связать с URL-адресами NXM» уже включено, отключите его и проверьте еще раз.
- Нажмите ОК.
Activating a file
The mod tab within NMM with some out-dated mods
Once a file download has been completed NMM will automatically add the file to the «Mods» tab. The Mods tab contains all the mods and files that you have downloaded or added to your game manually.
The Mods tab contains a few details about all the files you are currently using:
- The checkbox tells you whether the mod is activate or inactive.
- An active mod is installed and has been added to your game
- An inactive mod has not been installed in to your game, but is available to be installed
- Name — The name of the file. You can edit this like you would a file on your computer by slowly clicking the name twice
- Version — The version of the mod you have downloaded
- Latest Version — The most up-to-date version of the mod you have downloaded according to the Nexus sites
- Author — The author of the mod
When you download a file it will be added to the Mods tab, but it will not be active (which means it won’t show up in the game until you activate it). NMM does not automatically activate mods as there is a chance your downloads will conflict with currently installed files, and we think it’s best if you manage this process manually so you do not inadvertently break your game.
To activate and install a mod simply select the mod within the Mods tab and click the «Activate» button. To deactivate and uninstall a mod simply click the «Deactivate» button. You can also double-click the mod in the list to activate or deactivate mods. Deactivating mods simply removes the files the mod used from the game folders and removes the content from your game. However it does not delete the archived file, so you can deactivate and activate mods you have within the Mods tab without having to redownload the files.
Change Game Mode
As mentioned earlier — in the section dealing with the installation of NMM — you can change the Game Mode at anytime, as far as you run at least two NMM supported games..
In the header of the User Interface, on the right is a circular arrow.
If you click that symbol or the small arrow a menu will open and offer few options to change your Game Mode.
You have three options:
- Switch to another game (listed in that menu).
- Change Default Game (at your will)
- Rescan Installed Games
Switch to another game
Highlight and ….
… and click the game you want to change.
NMM will restart ….
… with the game you selected.
That is all on changing a game.
Change Default Game
Whenever you start NMM, the Game Selection screen will be displayed for selecting the game you want to start with NMM.
You can adjust NMM that way, that your current favourite game is highlighted as a default every time you start NMM. You can do this in the NMM User Interface, Change Game Mode..
Click Change Default Game… and NMM will return to the Game Selection screen.
Click the game you want to have highlighted as a default every time you start NMM. NMM will restart with the game you selected. The game you selected will now be highlighted as default in the game selection screen every time you start NMM, unless you change your default game again (as described above).
That is all on Change Default Game.
Rescan Installed Games
As mentioned in the section of Installing NMM, you can run a scan for new installed NMM supported games at any time.
Click Rescan Installed Games… to start the scan (as you did after you installed NMM for the first time).
It is the same procedure as in the first scan: As each game is found, a green checkmark will appear. Clicking this will confirm the directory location of the game. Clicking the red «x» will stop the search for any given game.
After the scan is done your new game will be added to your Game Selection screen.
That is all on Rescan Installed Games and all on Change Game Mode in the whole.
Приступаем к работе
После первого запуска приложение произведет сканирование файловой системы на присутствие на компьютере поддерживаемых приложений, перечисленных в окошке программы.
Если какую-либо игру искать не стоит, есть смысл кликнуть по иконке в виде крестика у ее названия, избавив ПК таким образом он ненужной рутины и ускорив процесс сканирования.
Рассмотрим, как устанавливать моды через Nexus Mod на примере Fallout 3. По окончанию поиска кликаем «ОК», затем выбираем обнаруженную игру и снова жмем «ОК».
После запуска утилиты появится возможность бесплатно управлять модами. Для их добавления кликаем по пиктограмме «+» и выбираем тип подключения: из файла на ПК или загрузка с сайта разработчика утилиты.


После выбираем версию модификации и кликаем «Download with manager».

Дожидаемся появления статуса «Complete».


По достижении строки прогресса 100% и появления статуса «Complete» установка завершится. Запускаем игру на своей 64 bit-ной или старой 32 bit-ной системе и наслаждаемся нововведениями.
Утилита Nexus Mod Manager предназначена для удобства хранения, установки и включения/выключения модов в TES V.
Running the installer
Next step is to run the setup program and choose a directory where you would like NMM installed. This runs like any normal program setup. Choose your directory (or leave it default) and hit Next.
Release Notes
Suggestion:
If you install NMM for the first time or in case you update NMM this screen may be seen,
if a fundamental or major update is done, telling you what vitally is going to change (update). It is advised to read it, especially when updating, as it could have some bad or unexpected ramifications down the line.
Change log
The next screen is a «change log» and will inform you about new features and bug fixes.
Clicking «Continue» will complete the installation/update.
Scanning for games
The first time you install NMM, it will search your computer for instances of the games it manages. As each game is found, a green checkmark will appear. Clicking this will confirm the directory location of the game. Clicking the red «x» will stop the search for any given game. You can repeat this procedure of search for games at anytime in the NMM user interface especially after you’ve installed another game. This process will be described in one of the following sections dealing with the NMM interface. When the search is complete and ran properly, NMM can be opened by clicking the “OK” button. After the starting/loading screen — screenshot — NMM will show the games it found on your system in a new menu.
Selecting a game to manage
Highlight/select the game you want to manage. You can change your selection at any time when you restart NMM in this menu and also at any time in the NMM user interface as described in the following section.
Run NMM
Once NMM is installed, you will get the option to run it. Do as you wish here, but if you’re reading this, running it is most likely what you want to do.
If you get this without error:
You’re done, and ready to start using NMM.
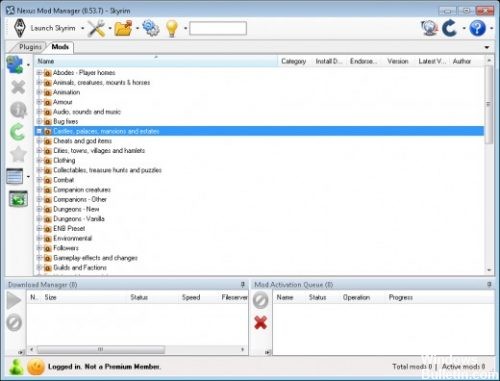
The User Interface
This is NMM. Everything we have done so far was in support of getting to this point. The very top line in the image is the title line. On the left, see the version of NMM being ran and the game being managed, On the right are the standard Windows interface icons.
Directly below the title line, the Menu Bar contains a lot of functionality for managing Nexus Mod Manager.
Как скачать Nexus Mod Manager
- Для того, чтобы начать пользоваться программой Nexus Mod Manager необходимо будет скачать её с сайта https://www.nexusmods.com/about/vortex/.
- Перейдите на данный сайт, кликните вверху на надпись «not logged in», в открывшемся окошке выберите «create an account» (создать аккаунт).
- На открывшейся странице кликните на кнопку «Register» справа (nexus mod manager регистрация), промотайте открывшуюся страницу вниз и нажмите на кнопку «Create Account».
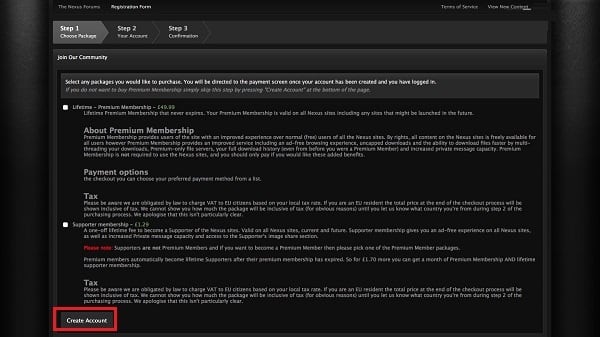
Нажмите на «Create Account» для создания аккаунта
- В окне регистрации введите своё имя или ник (Username), е-мейл, пароль к своему аккаунту (Password), ещё раз тот же пароль (Confirm Password), укажите свой пол (Gender).
- Затем вам будет необходимо ответить по-английски на вопрос программы, которая хочет удостовериться, что вы не бот.
- Если вы не знаете английский язык на должном уровне, тогда рекомендую воспользоваться программами-переводчиками, который помогут дать англоязычный вариант правильного ответ на указанный вопрос.
- Затем введите капчу в соответствующем рядке, поставьте галочку напротив «I’ve read and agree to the Terms of Use», и нажмите на кнопку «Create Account».
- На ваш е-мейл будет выслано письмо с подтверждением регистрации, и, после нажатия на соответствующую ссылку в нём, вы получите возможность войти на сайт под выбранным ранее логином и паролем.

Теперь скачайте Nexus Mod Manager, выбрав соответствующую версию для своей операционной системы, и установите данную программу на ПК.
Nexus Mod Manager — Автоматическая установка и управление модами v0.72.2
Эта программа предназначена для автоматической установки модов для большого количества игр, удобного их хранения, отключения ненужных и т.д. Программа на английском языке, но всё понятно.
Важно. При запуске NMM менеджера, если у вас выскакивает окошко с ошибками, то смотрите первые строки в окошке, вам будут указаны неверно установленные названия модов esp
в лаунчере, расставьте все как вам пишут и запустите NMM снова, если снова будет окошко с ошибками, то продолжайте расставлять моды, которые пишут в окошке)
Обновлено 0.72.2: — исправлена ошибка, связанная со сбоем при добавлении модов с локального диска.
Обновлено 0.72.1: — загруженные файлы теперь отображаются немного в другом списке
Обновлено 0.71.1: — исправлены ошибки, которые приводили к вылетам — улучена работа с архивами
Обновлено 0.70.11 — исправлена ошибка импорта порядка загрузки, который не обрабатывал файлы .esl — оптимизирован код для ускоренной загрузки плагинов — исправлено включение официальных неуправляемых плагинов, отображаемых как отключенные
Обновлено 0.70.9: — исправлена ошибка сброса фильтра категорий — исправлена установка .PDB-файлов — удален не используемый инструмент в игре Enderal — исправлена ошибка пробелов в архивах — улучшено отображение логов
Обновление: 0.70.5 — Исправлены известные ошибки — Добавлена поддержка последнего обновления Windows 10
Обновление:0.54.10 (для Windows 7,8,Vista), 0.52.3 (для Windows XP) — Для Windows 7,8,Vista 1. Исправление: Исправлена проблема с порядком загрузки модов вызванная пустыми файлами Plugins.txt (сломанные плагины будут игнорироваться) 2. Исправление: Исправлена процедура порядка загрузки/плагинов с резервным копированием, будучи не в состоянии получить путь к AppData на некоторых системах 3. Исправление: Исправлена проблема вызванная неверными файлами в userlist.yaml — Для Windows XP версия не обновлялась
Возможности программы:
- выбирайте и устанавливайте скачанные моды
- ручная сортировка установленных модов
- корректное удаление установленных модов(не надо искать в папках игры файлы для удаления,программа сама всё подчистит)
- поддержка Archive Invalidation
- запуск игры.
The Search Box
Search for installed mods:
In the UI Interface there is a search bar left to the tips icon (light bulb).
If you look for a certain installed mod, simply punch in the mod’s name or another character related to the mod’s name. NMM will immediately offer what was found or matched. That is quite a bit easier than scrolling through a boat load of mods.
That works in the category view as well.
How to switch alphabetical or category views is described in the section Mods View, Tool 6 (Categories) and Tool 7 (NMM views).
Simply punch in the mod’s name to get displayed what NMM found.
That feature comes in handy if you want to uninstall a mod.
This feature is comfortable as well, if you look for a mod you uninstalled — not deleted completely — for the purpose to reinstall it. Such mods are still listed in the Mods tab and marked as uninstalled (red circle before the mod’s name).
How to reinstall such mods with two clicks will be described in the section 6.2.6.2 Uninstalling Mods.
Before beginning installation
- Every system is different. While the NMM team try to account for everything, something may arise or be different on your end that isn’t covered in this guide.
- NMM requires Microsoft .Net Framework 4.5 to run. Most systems should already be running this by default, if you’re unsure, Download it Here.
- The term «Directory» refers to a folder. NMM refers to Nexus Mod Manager.
- Make sure you have enough space. This cannot be stressed enough. A «Virtual Install» directory will be created to unpack any mods downloaded, this directory can get quite large. This directory can be chosen and changed, and will be covered in setting up NMM for the first time and navigating the settings menu.
Nexus Mod Manager
Gophers Video explaining how to use The Nexus Mod Manager
Manually installing mods can be tricky and there is always some risk of damaging your game installation. The Nexus Mod Manager makes this process safer and easier by providing users with an easy way to download, install, enable, disable, and remove Fallout 4 mods, all from a centralized interface.
NMM is now a community project, and its development /support has been moved to GitHub:
— Releases (Downloads)
— Issues
*If you have an issue, please take the time to look through existing reports before you post a new one
*Do NOT put your entire issue summary in the title
*Please Fill Out the 'Bug Report' or 'Feature Request' forms as they are denoted
Обновить:
Теперь мы рекомендуем использовать этот инструмент для вашей ошибки. Кроме того, этот инструмент исправляет распространенные компьютерные ошибки, защищает вас от потери файлов, вредоносных программ, сбоев оборудования и оптимизирует ваш компьютер для максимальной производительности. Вы можете быстро исправить проблемы с вашим ПК и предотвратить появление других программ с этим программным обеспечением:
- Шаг 1: Скачать PC Repair & Optimizer Tool (Windows 10, 8, 7, XP, Vista — Microsoft Gold Certified).
- Шаг 2: Нажмите «Начать сканирование”, Чтобы найти проблемы реестра Windows, которые могут вызывать проблемы с ПК.
- Шаг 3: Нажмите «Починить все», Чтобы исправить все проблемы.

Ваши NXM-файлы снова связаны с Nexus Mod Manager! Чтобы быть уверенным, зайдите на сайт Nexus и попробуйте скачать мод с зеленой кнопкой «Download with Manager». Он должен открыть программу Nexus Mod Manager.
Проверка настроек NXM в Firefox
Как следует из названия, этот метод проверяет настройки браузера Firefox для режима Nexus Internet Download Manager, Вполне возможно, что nxm будет работать с неверным приложением или приложение не выбрано в ваших настройках. Если вы измените настройки nxm, эта проблема будет исправлена, потому что вы не можете получить загрузки с веб-сайта в менеджере. Шаги для проверки и исправления этой опции:
- Запустите «Firefox» и перейдите в «Настройки».
- Слева выберите вкладку «Приложения».
- Затем выберите «Nexus Mod Manager» для nxm из списка.
- Если NMM отсутствует в раскрывающемся списке, выберите «Использовать другое».
- Нажмите Обзор и выберите NexusClient.exe из установленной папки.
- Теперь иди и попробуй скачать через NMM.
Заключение
NMM был разработан и протестирован только с легальными и паровыми копиями в случае Skyrim и Fallout New Vegas.

CCNA, веб-разработчик, ПК для устранения неполадок
Я компьютерный энтузиаст и практикующий ИТ-специалист. У меня за плечами многолетний опыт работы в области компьютерного программирования, устранения неисправностей и ремонта оборудования. Я специализируюсь на веб-разработке и дизайне баз данных. У меня также есть сертификат CCNA для проектирования сетей и устранения неполадок.
Aims
The aims of Nexus Mod Manager are as follows:
Ease of Use
We need the NMM to give our users a very intuitive and easy to use piece of software. The user must be able to install, run and use the NMM with little to no support from the staff of Nexus Mods. This can be achieved by inviting users to a focus group and asking for their advice on the flow of the software — how do they use the software? What are they using the most? What are their frustrations? etc.
Compatibility
NMM draws its value from the games it supports. The largest games on the site are Bethesda games so these will be supported on / prior to release. Other games that are either determined to become large or very easy to integrate will need to first be approved by Robin due to the developer time which would be needed.
Stability
NMM needs to be able to work on a number of different platforms, from XP through to the latest Windows iteration, it needs to do this while remaining robust. In case of an error NMM needs to provide the user with enough information that a reason and fix can be found quickly once submitted to our developers.
Power
NMM will give the user a huge amount of control over the setup of their game and mods. They will be able to control which mods are active, what order they load in, the options that are selected within the scripted installers and create profiles that can quickly and easily be modified / switched and uploaded to the NexusMods.com site.
Ad-Free
While the Nexus will show ads to non-premium / supporter members, the NMM will remain free of ad’s. This will enable a clean and clear interface and ensure that nothing interrupts the user while they are creating their mod profile.
Plugins, tools and load order
*Plugins*so to speak are mods with an .esm or .esp file format.
After switching to the Plugins tab NMM will display in the field on the left your game.esm, DLCs, official updates and the plugins you installed.
Important note:
Your plugins as displayed from top downwards represent the «load order» so to speak.
Plugins can be activated or deactivated without reinstalling or uninstalling them. Deactivating a plugin within a midgame is generally not recommended. Plugins that have a checkmark before the plugin’s name are active. Those that are not checkmarked are not active. Launching the game with the game named launch button on the top left hand side will load all the checkmarked plugins and start the game’s launcher.
Further on some tools that are displayed in the column on the leftmost.
These are
- The up and down arrows to move a highlighted plugin up or down.
- The load order of plugins is quite essential for a stable or working game.
- The load order determines the order the plugins are loaded when you start the game with NMM. This is important so far, as some plugins require other plugins being active and loaded before. Apart from that, plugins that are loaded last or after others will always have domination over those that are loaded before. Authors often give information on that in their mod description on what position to put a plugin. It is highly recommended to follow their corresponding instructions.
- The buttons to checkmark or uncheck all the listed plugins.
- A tool to export your current load order to save it on your system or to import a load order to restore it from our system.
How To Manually Install Fallout 4 Mods
Gophers Video explaining how manually install Fallout 4 mods
Finding Your Data Folder
This is where you will install Fallout 4 modification files.
The default location for your data folder is within your steam games installation directory:
- C: \ Program Files \ Steam \ steamapps \ Common \ Fallout 4 \ Data
An alternative method for finding your installation directory:
- In Steam, right-click the game title > Properties > Local Files > Browse Local Files > Then open the “data” folder.
You have now found your data folder. Remember this location.
Installing Loose files
«Loose files» refers to a mod who’s content files are separate, individually contained within an archive that must be extracted to your data folder.
To install, extract the contents of the mod archive to your data folder.
- If the archive already contains a ‘data’ folder, extract it directly to your installation directory instead.
That’s it! You should now be able to load the game and see the installed mod in action.
Installing Plugins
Plugins are mods that are packaged as self-contained ESP files (.esp). These plugins must be extracted to your data folder and unlike loose files, must be enabled via the plugins.txt file.
To install a plugin, simply extract the archive to your data folder.
- If the archive already contains a ‘data’ folder, extract it directly to your installation directory instead.
After installation, plugins must be enabled before they will be active in-game.
Enabling Plugins
Plugins, unlike loose files, must be enabled in Fallout 4 by adding them to your plugins.txt file before they are active in-game.
Locate your plugins.txt file in your Fallout 4 AppData folder
- This folder is hidden by default. To ensure that you are able to see hidden files in windows file explorer, access Tools > Folder Options > View > then select “Show Hidden Files”
- The Fallout 4 AppData folder can be found in “C:/Users//AppData/Local”
- Alternatively, in windows explorer, you can type “%LocalAppData%/Fallout4” into the browser bar and be taken directly to this folder.
Run the Fallout 4 Launcher (do not run the game) then quit the launcher. This will populate your plugins.txt file with the newly added ESP file.
Open the plugins.txt file located in Fallout 4’s AppData folder with a text editor such as Notepad++
Ensure the new ESP file is listed.
If you enabled modding correctly as described in the «How to Enable Fallout 4 mod support» section at the top of this page, the mod (ESP file) you are installing will be now listed in this file, after the Fallout 4 launcher is run. If not, you may try manually add the mod to this list as a whole filename with extension (ie. yourmod.esp).
After confirming the ESP file is listed in your plugins.txt file, you are done! You should now be able to see the mod you installed active in-game.
Overview
The Nexus Mod Manager (NMM) is a computer program that performs multiple, related tasks to support the acquiring, archiving, activating and managing of Computer Game Modification files (mods).
The NMM helps a user activate and manage their mods by providing an interface that performs all the tasks related to Mod management in a concise, intuitive interface. This is the face of NMM that most users see, day in and day out.
The NMM helps the user acquire mods by acting as a download manager for the Nexus Forums and File Pages(the Nexus).
The NMM helps a user archive mods by initializing and managing the user’s storage sub-system on their computer with very little input by the user.
The NMM also provides an interface to certain external tools that are related to mod management such as load order optimization tools, merge patch management tools, script enhancement tools and others.
