Stencyl 4.0.2 на русском языке
Содержание:
- 1. Введение
- Review
- Global Custom Blocks
- 5. Поиск помощи
- General Questions
- The Nitty Gritty
- Возможности
- The Nitty Gritty
- Working with the Tileset
- Функции
- Troubleshooting
- How to Upgrade to 3.0
- Возможности
- Changes to iOS Publishing
- Плюсы и минусы
- Changes to Desktop Publishing
- How to Upgrade your Games
- How to Make Custom Blocks
- 2. Установка
- Using Custom Blocks
- Collision Shapes
- Достоинства и недостатки
- Как пользоваться
- Major Features
- General Questions
1. Введение
Stencyl это игровой движок для всех: от начинающих разработчиков до продвинутых. С версии Stencyl 3.0 в проектах используется язык программирования Haxe. Это правильно. Если вы хотите, можете писать код в Stencyl, но это не обязательно
Обратите внимание, что Stencyl может создавать только 2D игры. Если вы хотите создавать 3D игры, то я советую вам взглянуть на платформу подобную Unity
С самого начала выпущенный в 2011 году, как StencylWorks, Stencyl позволяет абсолютным новичкам создавать 2D игры для компьютеров и мобильных устройств. Платформу, разработал Джонатан Чунг, для физики и столкновений используется движок Box2D и зависит от комплекта средств разработки программного обеспечения OpenFL. Эти компоненты, вместе с языком программирования Haxe, сила Stencyl, это создание игр которые возможно написать один раз и запускать где угодно.
Stencyl поддерживает широкий диапазон платформ:
- iOS
- Android
- Flash
- Windows
- OS X
- Linux
Строительные блоки типичной Stencyl игры сгруппированны в четыре категории:
- Актёры: актер может быть игроком, врагом, деревом, или чем-то другим. Актер обычно принимает форму изображения или серию изображений, создавая анимацию. Например, если бы мы должны были сделать игру похожую на Super Mario Bros, игра будет включать актера Марио, Баузера, и актеров для грибов.
- Сцены: В игре может быть много сцен. Игра, как правило, имеет главное меню или начальную сцену, сцены для уровней игры, и сцену конца игры.
- Поведения: поведения готовы к использованию, многократно используемые способности, которые можно назначать актерам и сценам в игре. Вы также можете создавать свои собственные модели поведения, чтобы сделать вашу игру уникальной и сложной.
- События: события — это настраиваемые блоки команд, которые можно создать и назначить актеру. Вы можете создавать события для актеров с помощью редактора событий Stencyl’s, который мы увидим далее в этом руководстве.
В этом руководстве я буду использовать Windows версию Stencyl. Версии Mac и Linux должны быть в основном те же с несколькими незначительными отличиями.
Review
Stencyl is a program that allows the creation of video games for multiple platforms, without the need of writing code.
The creation of video games is something that attracts many people, because creating a video game we can can tell an interactive story, create a challenge for the player, or simply make the user pass a good time. One of the basic requirements to create a video game, is to know how to code.
Stencyl is presented as a tool that allows the game development without the need of programming skills. To achive that, it makes use of graphics blocks representing the basic control structures (loops, conditions, events, etc). Thanks to that, we will be able to program the behavior of the game using only the mouse. Even so, we must know a few programming fundamentals to be able to understand how to operate the control blocks. While it is true that we will be able to start using the program without knowing anything about programming, having prior knowledge will help us greatly to understand the use of this program.
The program is divided into several sections belonging to the different elements that we will be able to create within the game. For example:
- Actor Types: Here we can create the characters of the game, the main character, as the enemies. Within this section we will be able to import or create the sprites that will make up the characters.Also we will control the behavior of the characters when they are jumping, running, squatting, etc.We will be able to add events that happens when a key is pressed, or they happen from time to time, etc.We can also define the collision detection between the different characters, and also we can define the physics that affect the character we are creating.
- Background: Here we can define how it will be the background of the video game, and how the scroll will move, in vertical or horizontal. This is an essential step to creating a typical platform video game with horizontal scroll, or create a shoot ’em-up with vertical scroll.
- Scenes: Here we add and edit levels of the game. For example, if we’re creating a 2D platforms game, we will be able to define where the platforms will be located, in which place there are obstacles, and where will be a hole in the ground. The creation/editing of maps is very simple, since we will use an interface very similar to a graphical editor.
- Sound: Here we can add the sounds that will be part of the game. We will be able to use MP3 and OGG files. The audio files that we import may be used as sound effects: when the character jumps, or falls on an enemy, or shoot, etc. We can also import a song and use it as background music.
- Tiles: In this screen we will be able to create the “images blocks” that we will use to create objects that appear in each of the levels of the game.
- Logic: In this section we can define the behavior of the characters (jumping, running, squatting, etc.), and the behavior of the scenes. In this part is where we program, and to do this we will be able to make use of the “graphics blocks”, that allow us to program without coding, or if we know programming, we can select the “Code Mode” option, where we can type the instructions that we want to give to the characters and scenarios of the game.
In the “StencylForge” option, located in the top menu of the program, we can download a large amount of items that have already been created, in such a way that we will be able to download images of characters, background images, sounds, behaviors, etc. This way we can create a game by reusing already existing elements, which is a great advantage when we are just beginning to using the program.
Learn how to manage Stencyl is somewhat complex, since there are many sections that we must master in order to start the creation of our own video games. It is for this reason that we should not to confuse the comfort of the creation and programming games using only using the mouse, with the ease to understand and master this software.
One of the outstanding features of the program is that it is free, and we will be able to use all its features without any limitation. The free version allows us to export our game to Flash format, which can be used on almost any browser. If we want to export our video game to desktop platforms (Windows, Linux and Mac), we will have to buy a license. If, in addition, if we want to export the game to mobile platforms iOS (iPhone, iPad) and Android, we must acquire other license.
The program is available for download, and run in i>Windows, Mac and Linux platforms.
Global Custom Blocks
Global Custom Blocks are custom blocks that can be used in any behavior. You may have noticed this as an option when first creating the custom block.
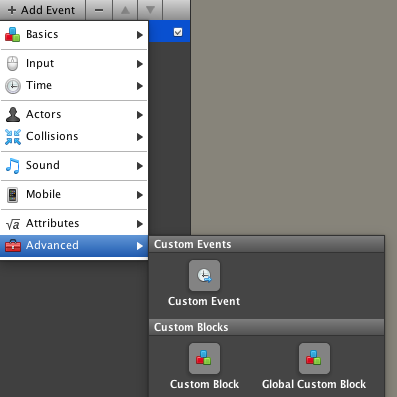
What is the catch? You can’t refer to any of a behavior’s attributes from within the custom block’s implementation.
Why do you think this is the case?
A global custom block isn’t tied to any behavior at all. Because it lacks a «home,» it’s unable to refer to a behavior’s attributes. On the flip side, the advantage to a global custom block is that it can be used from anywhere in the game. This can be convenient for game-wide functionality such modifying a game’s score, which is frequently stored inside of a game attribute.


Print ArticleEdit ArticleHow to Edit an Article
Disclaimer: Use comments to provide feedback and point out issues with the article (typo, wrong info, etc.). If you’re seeking help for your game,
please ask a question on the forums. Thanks!
5. Поиск помощи
Если вы застряли создавая игру в Stencyl, то одним из лучших способов решения проблемы, задать ваш вопрос на официальных форумах Stencyl. Вы также можете посетить Stencylpedia, официальная вики-страница Stencyl и найти ответ на свой вопрос.
Если вы хотите стать более опытным Stencyl пользователем, ознакомьтесь с некоторыми книгами и курсами по Stencyl или посетите рынок расширений для загрузки расширений, которые сделают вашу игру лучше и проще для создания.
Также легко монетизировать ваше приложение вместе с Stencyl. Вот несколько способов заработать деньги с вашем Stencyl приложением:
General Questions
Is Stencyl free or does it cost money?
Creating Flash games is free. If you want to create mobile games or standalone games, or if you want to remove the splash screen, those will cost money.
Are there different versions of Stencyl? (Flash, iOS, etc.)?
There’s just one version of Stencyl. When you purchase a license, the toolset automatically unlocks that functionality. To be clear, you are always able to test your games on all platforms — you just can’t publish or export until you purchase a license.
Are there any rules about where I can publish my game?
You’re free to publish your game anywhere you’d like, including other portals or a personal website. Games are not locked to a single site.
The Nitty Gritty
Do I need to know how to code?
Absolutely not. You can use code (Haxe, Java, Objective-C), but the vast majority of our users prefer to use our visual tools to build their game’s behaviors.
Are there any game graphics or sounds available with Stencyl?
Yes. Through StencylForge, our «marketplace for game resources», you can browse an extensive collection of royalty-free game graphics and sounds for your games.
What image format do I use with Stencyl?
Any raster format will do — PNG, JPG, and GIF. We even support animated GIF’s. We don’t support vector art to a satisfactory degree. It will import, but it will be converted to raster form.
What kind of audio files can I use?
MP3s for Flash and OGGs for everything else.. It’s best if these are at a 44.1kHz sampling rate with a 16-bit resolution. You can use Audacity or a similar program to change the sampling rate, if need be.
Возможности
А теперь давайте подробнее рассмотрим возможности программы для создания игр.
- В главном меню приложения весь первоначальный функционал поделен на основные группы:
- Games.
- Kits.
- Sample Games.
- Extensions.
- Все игры, над которыми мы работали и не закончили работу, отображаются в виде иконок на главной рабочей области.
- Мы можем создавать приложения для самых разных платформ, например: Flash, HTML5, Android, Windows или Cppia. Это означает, что игры будут запускаться не только на операционных системах смартфона и компьютера, но и онлайн прямо в браузере.
- Поддерживается работа с игровыми контролерами.
- Присутствует обширная справка, которая тут называется Stencylpedia.
- Для того чтобы все настройки и проекты сохранялись в облаке, мы можем авторизоваться при помощи своих логина и пароля.
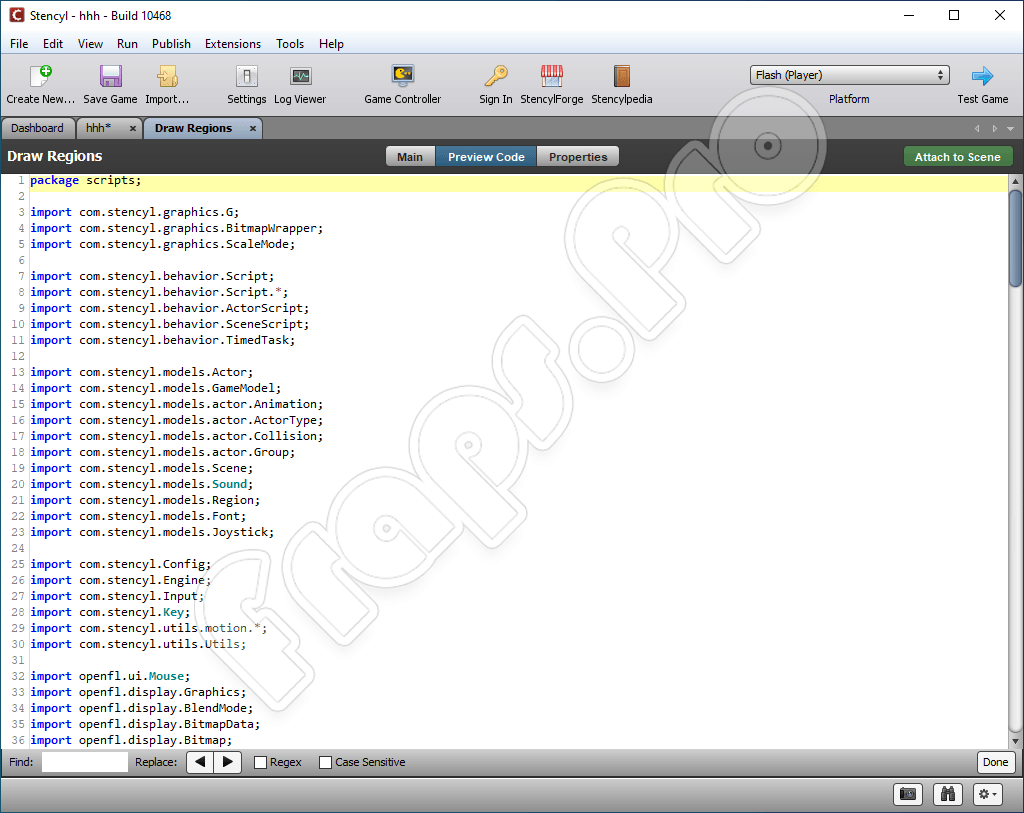
В приложении есть огромное количество других возможностей, но перечислить их все в рамках такой небольшой статьи явно не получится.
The Nitty Gritty
Do I need to know how to code?
Absolutely not. You can use code (Haxe, Java, Objective-C), but the vast majority of our users prefer to use our visual tools to build their game’s behaviors.
Are there any game graphics or sounds available with Stencyl?
Yes. Through StencylForge, our «marketplace for game resources», you can browse an extensive collection of royalty-free game graphics and sounds for your games.
What image format do I use with Stencyl?
Any raster format will do — PNG, JPG, and GIF. We even support animated GIF’s. We don’t support vector art to a satisfactory degree. It will import, but it will be converted to raster form.
What kind of audio files can I use?
MP3s for Flash and OGGs for everything else.. It’s best if these are at a 44.1kHz sampling rate with a 16-bit resolution. You can use Audacity or a similar program to change the sampling rate, if need be.
Working with the Tileset
You can alter a tileset’s row and column count by clicking directly on the row and column headers.
Adding More Tiles
You may add additional tiles to a tileset after the initial import.
For best results, we recommend importing using an image that is the same width as the existing tileset, so additions don’t get «offset» and break the layout.
Rearranging Tiles
You can drag and drop tiles to rearrange them. Here’s how.
1) With the Select Tiles mode active, select the tile(s) you wish to move. In this example, we’ve selected some tiles in row 1.
2) Now, switch to the Move Tiles mode.
3) Drag and drop your selection to the desired location. This will perform a swap between the tiles you have selected and the tiles in the desired location.
Working with Multiple Tiles at a Time
You can select multiple tiles at a time by clicking and dragging a box over those tiles. What’s the use of this?
You can edit multiple collision bounds at the same time, a major time saver. As described above, you can also move/rearrange multiple tiles at a time.

Modifying the Tile Sheet Directly
You can…
- Edit the tileset’s backing image directly in an external editor.
- Reimport the image, provided that it’s the same size as the existing one.
- Replace the images for selected tiles.
This allows you to make visual tweaks to the tileset without having to reimport everything or manually edit the image from the game’s directory.
Tile Metadata
You can tag tiles with textual data that can be accessed during game. For example, a lava tile could convey that it’s deadly to the touch, or a healing tile in an RPG could heal the character passing over it.

To access this data from a behavior, you can use one of two methods.
-
Use the data for tile block under Scene > World > Tile API.
- Use the data for collided tile block under Collision > Collision Points.
Функции
Игры, созданные в Stencyl, можно экспортировать в Интернет через Adobe Flash Player и на персональные компьютеры как исполняемые игры, а также на различные мобильные устройства, такие как приложения iOS и Android . Управление физикой и столкновениями осуществляется с помощью Box2D , который можно выборочно или полностью отключить, чтобы снизить любое потенциальное влияние на производительность для игр, которые не требуют полной симуляции физики. Начиная с версии 3.0, проекты в Stencyl используют язык программирования Haxe и игровой фреймворк OpenFL, чтобы обеспечить гибкий стиль создания игр: писать один раз и запускать где угодно .
IDE
Stencyl — это инструмент для разработки и IDE . Приложение включает в себя несколько модулей, используемых для выполнения необходимых задач по созданию игр с помощью программного обеспечения.
- Редактор поведения используется для создания и редактирования кода и игровой логики в виде модульных элементов, известных как поведения и события.
- Редактор наборов листов используется для импорта и редактирования наборов фрагментов , включая их формы столкновения, внешний вид и анимацию.
- Редактор актеров используется для создания и редактирования игровых объектов (актеров) и их настроек, включая поведение, физику и анимацию.
- Конструктор сцен используется для создания и редактирования уровней и состояний игры (сцен) с помощью актеров, наборов фрагментов и поведения.
Дополнительные инструменты позволяют пользователю импортировать изображения для использования в качестве переднего плана и фона в сценах, импортировать и редактировать шрифты, импортировать звуки и музыкальные файлы ( поддерживаются MP3 и OGG , в зависимости от цели экспорта) и изменять настройки игры, такие как элементы управления плеером и разрешение игры. Библиотека общих поведений включена в Stencyl, чтобы уменьшить необходимость воссоздавать общие игровые поведения, а несколько игровых «комплектов» обеспечивают функциональную отправную точку для общих жанров 2D-игр.
VPL
При создании нового поведения предоставляется возможность создать его либо в режиме кода, либо в режиме разработки. Использование режима кода для поведения позволяет пользователю программировать логику в традиционной текстовой форме и, при необходимости, открывать код во внешнем редакторе. В качестве альтернативы, режим проектирования — это графический интерфейс, который позволяет пользователям создавать модульную игровую логику для актеров и сцен, используя язык визуального программирования . Концепция режима проектирования как формы разработки для конечных пользователей возникла в среде изучения компьютерного языка MIT Scratch и использовалась с разрешения Stencyl.
Поскольку это визуальный язык программирования, пользователям режима дизайна не требуется изучать или печатать конкретный язык программирования, а также им не нужно заниматься синтаксисом . Скорее, доступные действия перетаскиваются из палитры «блоков кода». Эти блоки будут защелкиваться вместе и вкладываться друг в друга, позволяя создавать расширенную логику из базовых компонентов. Чтобы избежать синтаксических ошибок во время компиляции, не все блоки будут соединяться вместе. Например, пробел, требующий логического значения, не примет блок, представляющий числовое значение. Формы типов блоков различаются, чтобы помочь представить это пользователю как ограничение, определяющее поведение . Числовой блок можно использовать вместе с блоком сравнения, например «(Число) равно (Число)», чтобы оценить как утверждение Истина / Ложь для необходимого логического значения.
Облачное хранилище
StencylForge — это интегрированный онлайн-сервис для хранения и совместного использования игр и игровых ресурсов Stencyl. Его можно использовать для резервного копирования проектов и доступа к проектам с других компьютеров при входе в Stencyl. Загружаемый пользователем контент по умолчанию является личным, но его также можно сделать общедоступным, чтобы поделиться им с другими пользователями. В дополнение к загружаемому пользователем контенту также доступен и широко представлен на StencylForge официально санкционированный контент, такой как примеры игр, игровые наборы, модели поведения, изображения или звуковые ресурсы.
Другой
Stencyl также поддерживает созданные пользователем расширения для добавления функций в программное обеспечение. Например, расширение может добавлять новые блоки для использования в режиме разработки, такие как сторонний API . Другой пример — обширный инструмент для создания сценариев диалогов, позволяющий легко добавлять диалоги и настраивать его параметры для игры.
Troubleshooting
-
Keep the tile size for all tilesets and scenes the same. For example, if your tilesets have a tile size of 32 x 32, make sure that the scenes also have a tile size of 32 x 32.
-
When defining custom polygon shapes for Tiles, you can only use convex polygons. If you need to make a concave polygon, use multiple tiles to achieve this.
- In very rare situations, a scene may crash in game if the terrain is complex enough to exceed our engine’s internal limit — there’s no exact number, but it’s on the order of hundreds, possibly thousands of sides. This happens because we combine all of the shapes into larger ones to improve performance. This can be worked around by altering the terrain to break up the large, offending shape into 2 smaller land masses.
How to Upgrade to 3.0
To upgrade to Stencyl 3.0 and beyond, you must download it in full from our site. For best results, do the following.
- Back up your existing games. The simplest way is to ZIP up your games folder.
- Uninstall Stencyl.
- Download Stencyl 3.0.
- Install Stencyl 3.0.
After upgrading to Stencyl 3.0, upgrading involves redownloading the app in full each time. This may not be as convenient as our prior patch-based solution, but it makes it significantly easier for us to deliver automated, regular, timely updates and in the long run, is a win-win for all. Thanks for your understanding!
Note: It is OK to have both 2.0 and 3.0 installed. It is not OK to have them open simultaneously. It is also not OK to open a game in 3.0 and then reopen it in 2.0.
Возможности
С помощью этого инструмента можно выполнять множество операций и реализовывать довольно сложные проекты:
- Создание двухмерных анимированных Флеш-приложений, которые очень легко реализовать;
- Наличие интерфейса Code Mode, который обладает функцией автозавершения кода;
- Возможность подключения внешних редакторов, импорта и экспорта;
- Наличие каталога персонажей с готовыми моделями поведения;
- Перенос объектов на сцену при помощи Drug-and-Drop;
- Создания множества уровней и игровых персонажей с широкими графическими возможностями (но в пределах двух измерений);
- Возможность конвертировать готовую игру в формат SWF.

Кроме этого, стоит отметить, что благодаря широким графическим возможностям и поддержке импорта есть возможность реализовывать очень креативные и тематические проекты как для развлечений, так и для создания отличных обучающих и развивающих игр для детей и подростков.
Особенное отличие – это модульный интерфейс и возможность работать полностью без кода – алгоритмы представляются в виде небольших элементов, скрепленных между собой наподобие пазла. Их легко менять местами и наблюдать за результатом в окне предпросмотра. Настройка параметров каждой команды интуитивно понятна и выполняется непосредственно на самом элементе. У этого инструмента очень мощный потенциал для новичков, которые еще не решаются на написание кода, но уже готовы к составлению алгоритмов.
Changes to iOS Publishing
Better Workflow
Testing on a Mac has been simplified. Apps run directly on a device without going through Xcode, and there is no longer a MAC address requirement to run on a device.
Universal Apps & Scaling
Deploying an app that looks and runs great on all iOS and Android devices is simpler.

Stencyl’s engine will select an appropriate “scale” for the game to run at depending on the device, and you have control how the frame is shown via a rescaling mode, after that scale is picked.
Handling Touch Input
Stencyl 3.0 simplifies touch detection. In the past, you had to detect touch using a separate set of touch blocks. In 3.0, you just use the mouse blocks instead.
Atlases
Atlases were somewhat of a pain to work with in past releases. That is now a thing of the past in 3.0, where the size restrictions are gone as well as the hardcoded limit on how many you could make.
Drawing Text
In past releases, we discouraged using the “draw text” block to draw text on mobile apps due to performance reasons. This is no longer the case in 3.0.
However, if you prefer the old way, labels remain available through a pre-installed extension that you can enable.
Events for Purchases, Ads & Game Center
We’ve added Events for In-App Purchases, Ads, and Game Center. Particularly for purchases, these are essential pieces of the puzzle that are finally in place.
iOS Purchases GuideiAds GuideGame Center Guide
Плюсы и минусы
Вполне естественно, что у подобной программы имеются как сильные, так и слабые стороны. Сначала рассмотрим отрицательные:
- Stencyl на русском в оригинальном виде сложно – нужно скачивать русификаторы. Сама программа имеет английский язык интерфейса;
- Полностью двумерная;
- Встречаются небольшие недоработки при реализации очень специфических и редко используемых функций.
Как видим, отрицательных пунктов совсем немного. Что же касается положительных сторон, то их у данной программы намного больше:
- Очень простой в освоении и интуитивно понятный интерфейс среды разработки;
- Для зарегистрированных пользователей предоставляется онлайн хранилище;
- Внушительный каталог готовых моделей с прописанным поведением и возможностью редактирования;
- Поддержка готовых проектов всеми популярными операционными системами, Флеш-плеером и HTML;
- Можно найти множество обучающих видео по данной теме для любого уровня владения инструментарием.
Changes to Desktop Publishing
Native, Hardware-Accelerated Apps
Stencyl 2.0 introduced desktop publishing through the use of Adobe’s technologies. Stencyl 3.0 changes that around by going the native route.
Apps are truly native (cross-compiled to C++) and use hardware-accelerated graphics. They run significantly faster than their web and mobile counterparts.
OGG Sounds are Required
One notable change is that if you intend to export a desktop or mobile app, you must provide an OGG copy of every sound in your game due to some peculiarities in the underlying technology.
Disclaimer: Use comments to provide feedback and point out issues with the article (typo, wrong info, etc.). If you’re seeking help for your game,
please ask a question on the forums. Thanks!
How to Upgrade your Games
Note: All sample games that we shipped with 2.0 are incompatible with 3.0. Grab the new ones from here.
1) Recommended — Back up your game first.
2) Open your game in Stencyl 3.0.3) Save your game.
Beyond that, you may run into some issues when attempting to run the game for the first time in 3.0. The following is a checklist of things to consider when bringing your 2.x based game to 3.0.
FAQ: My game never runs and shows «Compiling» forever.See this article on how to deal with this. Your game is not compiling forever.
Clean your project.
Select Run > Clean Project from the main menu before running your game in 3.0 for the first time. This will remove legacy output that can sometimes trip up Stencyl.
Does your project include ActionScript code?
If your project includes code, you’ll have to port it from AS3 to Haxe. Likewise, if you used any Flixel-specific classes (references to FlxG for example), you’ll need to figure out what to do on your own. If you don’t know how to code, you’ll either have to seek help on the forums or drop the behavior in question.
Building for mobile or desktop? Import OGG copies of your sound.
Due to the technology change, Stencyl now requires OGG format sounds for all non-Flash games. The Sound Editor now includes a second import field that accepts OGG.
Update your Pre-Shipped Behaviors.
If you used any Pre-Shipped Behaviors, we recommend updating all of them. Since Pre-Shipped Behaviors are *copied* to a project upon use, you have to manually remove them from the game and reattach them to the desired Actors and Scenes.
Block Changes
Some blocks have changed or have been removed. For example, Single-Touch blocks are now deprecated in favor of using our regular mouse blocks. Stencyl converts these blocks to the new form, but it helps to double-check that that’s the case if something seems off.
Common Gotcha — Handling Collisions
When working with the “Collision Group for colliding shape” block, be sure to compare groups directly, rather than comparing the textual name of the Group, which can lead to bugs and crashes.

(This is the right way)

(This is the wrong way, don’t do this!)
Summary
This isn’t the extent of what you may have to do, but it is a list of the most common pitfalls in the process.
If you get stuck at any time in the upgrade process, please post on the forums and provide logs.
One last tip — if your game is giving you lots of trouble, you may want to consider removing all behaviors from it and, using a second computer with Stencyl + the game open, rebuilding that portion in 3.0. You may spend less time doing that than trying to struggle the other way.
Other Changes to Watch For
- StencylForge, for compatibility reasons, does not list some resources in Stencyl 3.0 that were built for 2.0.
- The Flixel console no longer exists in-game. It’s moved to the Log Viewer, a window you can activate from the main menu (View > Log Viewer).
Note: Our coverage of the upgrade process ends here. Everything below covers the changes between 1.x/2.x and Stencyl 3.0.
How to Make Custom Blocks
Let’s make a custom block that returns the distance between 2 actors.
Step 1: Getting Started
Pick out the «Event» for Custom Blocks.
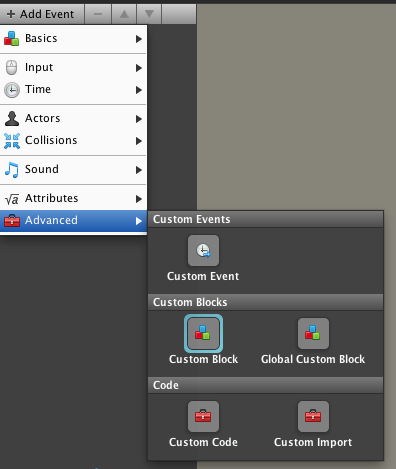
The custom block will appear in the working area. Click on the Create Custom Block button…

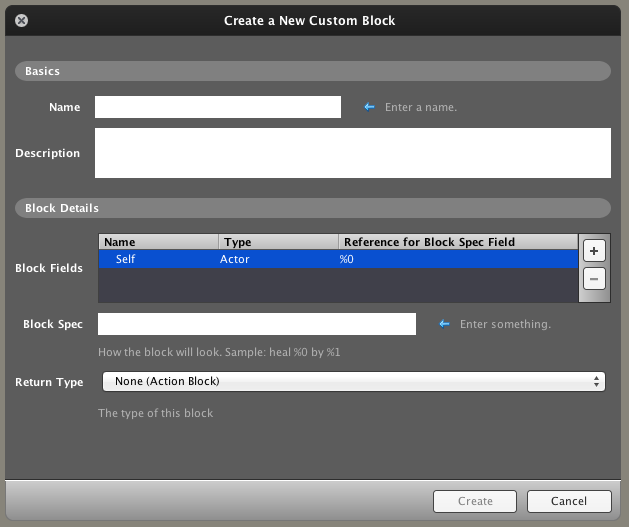
You’ll now see a dialog like this.
Step 3: Give it Fields (Parameters)
Parameters are the values that a block takes in. In this example, the values are the two actors we’re trying to calculate the distance between.
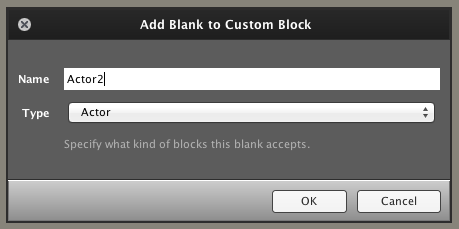
First, click the + button…

Then, pick what type of parameter you want (in this case, both will be Actors) and what the name is. This is the name that will appear in the block itself, so make it descriptive.
Step 4: Define the Block’s Appearance
The spec field describes how the block will appear to the user.

The % fields correspond to the parameters you defined in Step 3, and to tell what you type in, refer back to the Reference for Block Spec Field column above. In this case, %1 corresponds to Actor1 and %2 corresponds to Actor2.
Final Step: Choose a «Return Type»
At the bottom, you can also select a Return Type, which is what will be reported back to the behavior whenever this block is used.
In this example, we want the block to calculate the distance between actors and give us back a positive number, so I’ve selected Number as the return type. As a result, the custom block can now be used anywhere a Number attribute would go in the behavior!

2. Установка
Теперь, когда мы знаем, что такое Stencyl, давайте загрузим Stencyl и установим его. Посетите официальную страницу загрузки Stencyl и загрузите версию для вашей операционной системы. Следуйте инструкциям по установке, выберите указанную папку установки и подождите несколько минут. После завершения установки, запустите Stencyl, чтобы начать работу.
С работой Stencyl не стесняйтесь проверить имеющиеся примеры игр и посмотрите на компоненты, которые мы обсуждали ранее, актеры, сцены, поведение и события. Можно также загрузить несколько других примеров игр и комплектов в центре разработчиков Stencyl или посетить раздел Аркады для вдохновения.
Using Custom Blocks
Now that we’ve created a custom block, let’s use it. Where can you find it?
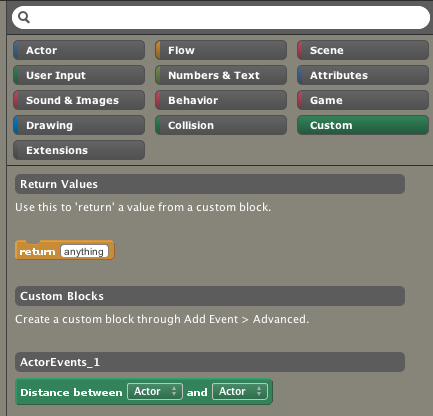
Custom Blocks reside inside the «Custom» category of the Palette
Custom blocks are organized by behavior. Those created inside an Actor/Scene versus a standalone behavior will be under a header that looks like ActorEvents_1 or SceneEvents_1.
Implementing a Custom Block
Now that we’ve defined the wrapper for a custom block, it’s time to implement it.
The short summary is this:
-
Drag in the parameter blocks to use them in your custom block’s implementation.
- If your custom block returns a value, use the return block to do so.
Using a Custom Block
Custom blocks with «None» as a return value will work like action blocks.
Otherwise, custom blocks that return a value will act like blocks of that type. For example, our distance block acts like a number block because we set the return type to number.

Collision Shapes
Now that you’ve uploaded your tileset, you will want to set the collision shapes for your tiles. You can either…
- Choose an existing collision shape (or none at all)
- Create a custom collision shape.
Picking a shape is simple — just click on any entry within the Collision Bounds pane. This even works when multiple tiles are selected (click and drag to select multiple tiles in the left pane).

If you prefer to make a custom shape, click the + button. You’ll get a choice between creating a box (rectangle) or a convex polygon.


To learn more about tile collision shapes and how to define custom shapes, view our Setting Tile Collision Shapes article.
Достоинства и недостатки
Теперь давайте рассмотрим список положительных и отрицательных особенностей данного редактора для создания игр.
Плюсы:
- Для вас профессиональная версия программы будет полностью бесплатной.
- Приложение имеет очень симпатичный пользовательский интерфейс, выполненный в темных тонах.
- Все инструменты для удобства тут разделены по категориям.
- Игры, которые создаются в программе, можно запускать на самых различных мобильных и компьютерных платформах.
Минусы:
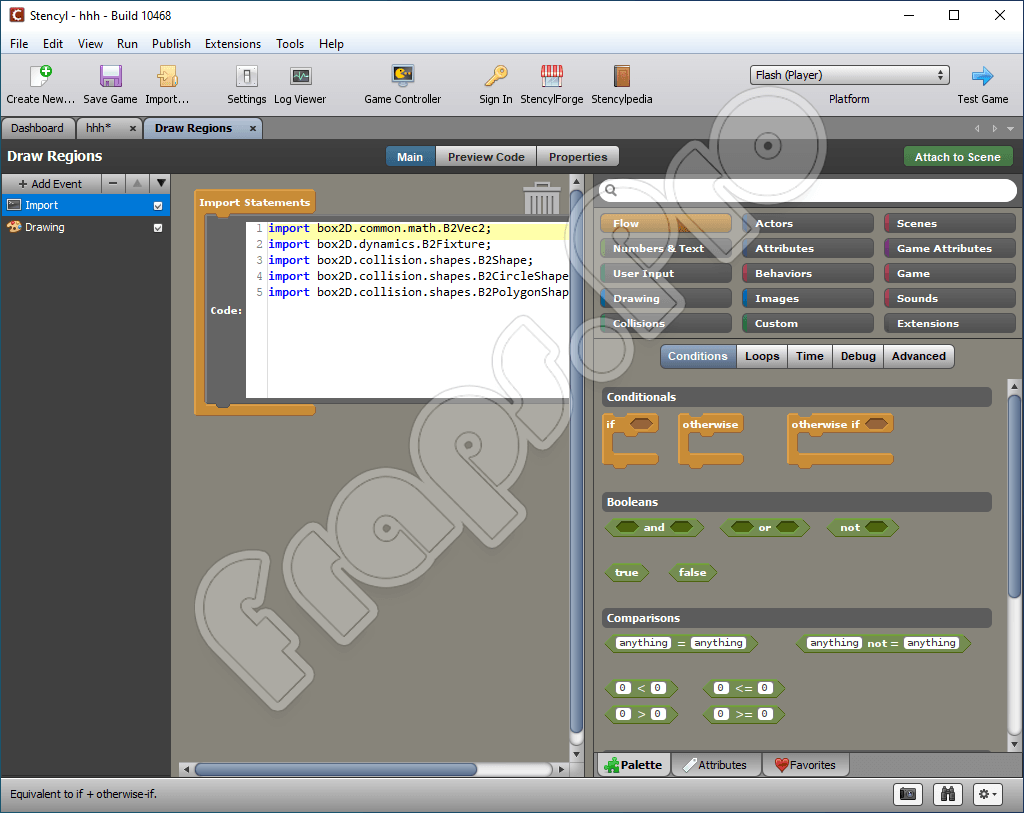
К сожалению, в приложении нет русского языка.
Но это и не удивительно, если бы кто-то попытался перевести настолько сложный инструмент, из этого ничего хорошего бы явно не вышло.
Как пользоваться
А теперь, когда теоретическая часть статьи позади, мы рассмотрим, как бесплатно скачать программу, как ее установить и как с помощью Stencyl спроектировать простейшую игру.
Загрузка и установка
Сначала нам нужно будет скачать последнюю версию программы, которую мы сегодня рассматриваем. Делается это так:
- В первую очередь, переходим немного ниже и жмем кнопку, которая запустить торрент-раздачу. Именно с ее помощью мы и загрузим наш редактор.
- Запускаем исполняемый файл и устанавливаем приложение, руководствуясь подсказками пошагового мастера.
- Закрываем окно инсталлятора и на этом считаем установку программы законченной.
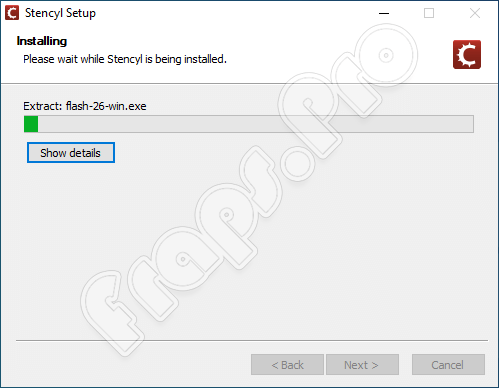
Теперь можно переходить к использованию нашего редактора.
Инструкция по работе
Для того чтобы создать простейшую игру при помощи Stencyl вам необходимо поступить так:
- При помощи главного меню импортируем все материалы, которые могут понадобиться в проекте.
- Создаем игровой мир, нашего персонажа, различные текстуры, поведение, характер и так далее.
- Когда процесс создания игры будет завершен, экспортируем результат, сохранив его для той или иной платформы.
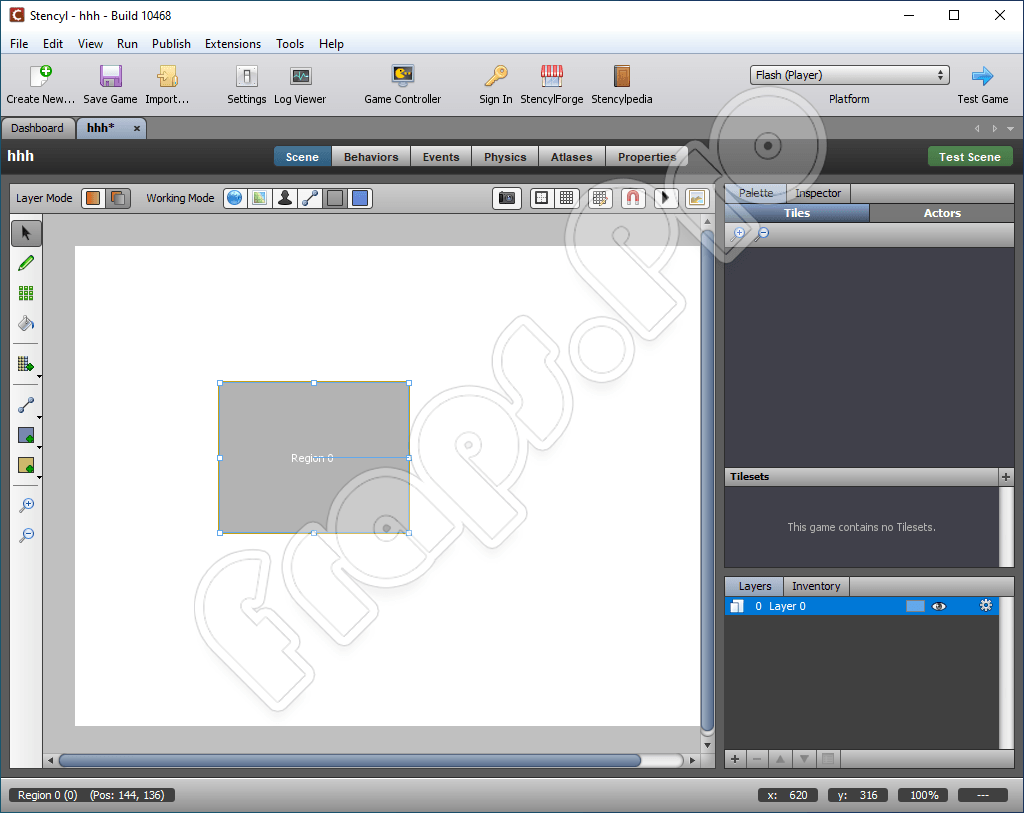
Более подробно понять процесс использования этой программы вы можете, просмотрев видео, которое мы прикрепили ниже.
Major Features
New Platforms: Android, Native Desktop
Stencyl has officially gone cross-platform and now supports 5 commercially important platforms including iOS, Android, Mac, Windows and Flash.
Publishing for Android Publishing to the Mac App StorePublishing a Desktop app
Haxe — Unified Programming Language
Stencyl had adopted Haxe as its official programming language. Haxe is similar in syntax to ActionScript and JavaScript. It converts to Flash, C++ and JavaScript, enabling native apps for all major targets.
If you’re a programmer and are interested in coding in Haxe, read the transition guide for details.
Simple Physics
In order to support a broader array of games that don’t require physics, Stencyl 3.0 introduces a “simple physics” mode that provides enhanced performance and box-only collisions as an alternative to Box2D physics.
Extensions
Stencyl 3.0 supports user-built extensions to the engine. These extensions can augment the engine’s functionality, import external libraries and hook in native functionality for mobile devices.
Browse the Extensions CollectionMake your own extension
General Questions
Is Stencyl free or does it cost money?
Creating Flash games is free. If you want to create mobile games or standalone games, or if you want to remove the splash screen, those will cost money.
Are there different versions of Stencyl? (Flash, iOS, etc.)?
There’s just one version of Stencyl. When you purchase a license, the toolset automatically unlocks that functionality. To be clear, you are always able to test your games on all platforms — you just can’t publish or export until you purchase a license.
Are there any rules about where I can publish my game?
You’re free to publish your game anywhere you’d like, including other portals or a personal website. Games are not locked to a single site.
