How to install maven on windows
Содержание:
- User visible Changes
- Known Issues
- Apache Maven Install Plugin
- Dependencies
- Reporters and Contributors of this release
- Как создать свой локальный репозиторий
- Зачем собирать код без IDE
- Step 2 — Set JAVA Environment
- Step 1 — Verify Java Installation on your Machine
- Multi Module Setup
- Как сделать свою java библиотеку
- Apache Maven Deploy Plugin
- Apache Maven Resources Plugin
- Step 5 — Set Maven Environment Variables
- Feature Summary
- Usage
- Single Project Setup
- Итого
User visible Changes
mvn --no-transfer-progress ....
or in short:
mvn -ntp ... ....
There had been an issues like MNG-6505 and MNG-6059 related to the construction of URL’s etc. within project, distributionManagement and scm part in the pom for multi module builds like this:
<project child.project.url.inherit.append.path="false">
  <url>...</url>

  <scm child.scm.connection.inherit.append.path="false"
       child.scm.developerConnection.inherit.append.path="false"
       child.scm.url.inherit.append.path="false">
    <connection>...</connection>
    <developerConnection>...</developerConnection>
    <url>...</url>
  </scm>

  <distributionManagement>
    <site child.site.url.inherit.append.path="false">
      <url>...</url>
    </site>
  </distributionManagement>
</project>
Known Issues
- New attributes for URLs inheritance (see ) are not yet accepted during POM structure control on upload to the Central Repository: see MVNCENTRAL-4841 to track progress
- If you are using Maven reporting, it might happen that you will get an exception which looks like this:
 Scanning for projects...
 Internal error: java.lang.NullPointerException ->
org.apache.maven.InternalErrorException: Internal error: java.lang.NullPointerException
    at org.apache.maven.DefaultMaven.execute (DefaultMaven.java:120)
...
Caused by: java.lang.NullPointerException
    at org.apache.maven.model.plugin.DefaultReportingConverter.convert (DefaultReportingConverter.java:243)
...
This is caused by using a which does not contain a element.
Temporarily this issue can circumvented by adding an empty element inside the .
Apache Maven Install Plugin
The Install Plugin is used during the install phase to add artifact(s) to the local repository. The Install Plugin uses the information in the POM (groupId, artifactId, version) to determine the proper location for the artifact within the local repository.
The local repository is the local cache where all artifacts needed for the build are stored. By default, it is located within the user’s home directory (~/.m2/repository) but the location can be configured in ~/.m2/settings.xml using the <localRepository> element.
Goals Overview
The Install Plugin has 3 goals:
- install:install is used to automatically install the project’s main artifact (the JAR, WAR or EAR), its POM and any attached artifacts (sources, javadoc, etc) produced by a particular project.
- install:install-file is mostly used to install an externally created artifact into the local repository, along with its POM. In that case the project information can be taken from an optionally specified pomFile, but can also be given using command line parameters.
- install:help displays help information on maven-install-plugin.
Important Note for Version 3.0.0+
The install:install goal does not support creating checksums anymore via -DcreateChecksum=true cause this option has been removed. Details can be found in MINSTALL-143.
Usage
General instructions on how to use the Install Plugin can be found on the usage page. Some more specific use cases are described in the examples given below.
If you feel like the plugin is missing a feature or has a defect, you can fill a feature request or bug report in our issue tracker. When creating a new issue, please provide a comprehensive description of your concern. Especially for fixing bugs it is crucial that the developers can reproduce your problem. For this reason, entire debug logs, POMs or most preferably little demo projects attached to the issue are very much appreciated. Of course, patches are welcome, too. Contributors can check out the project from our source repository and will find supplementary information in the guide to helping with Maven.
Examples
To provide you with better understanding on some usages of the Maven Install Plugin, you can take a look into the following examples:
- Installing a Custom POM
- Generating a Generic POM
- Creating Checksums
- Updating Release Info
- Installing an Artifact to a Specific Local Repository Path
- Installing Secondary Artifacts
Dependencies
In a multi module build you have often the case that you define dependencies between module(s). The usual way of defining dependencies and their appropriate versions has been to use and this has not been changed.
So the correct way to do such things can be seen in the following example:
<project>
  <modelVersion>4.0.0</modelVersion>
  <parent>
    <groupId>org.apache</groupId>
    <artifactId>apache</artifactId>
    <version>18</version>
  </parent>
  <groupId>org.apache.maven.ci</groupId>
  <artifactId>ci-parent</artifactId>
  <name>First CI Friendly</name>
  <version>${revision}</version>
  ...
  <properties>
    <revision>1.0.0-SNAPSHOT</revision>
  </properties>
  <modules>
    <module>child1</module>
    ..
  </modules>
</project>
The child will look like this:
<project>
  <modelVersion>4.0.0</modelVersion>
  <parent>
    <groupId>org.apache.maven.ci</groupId>
    <artifactId>ci-parent</artifactId>
    <version>${revision}</version>
  </parent>
  <groupId>org.apache.maven.ci</groupId>
  <artifactId>ci-child</artifactId>
   ...
  <dependencies>
    <dependency>
      <groupId>org.apache.maven.ci</groupId>
      <artifactId>child2</artifactId>
      <version>${project.version}</version>
    </dependency>
  </dependencies>
</project>
Reporters and Contributors of this release
We really value the contributions of these non committers, so this section is focused on those individuals. Descriptions of the issues fixed can be found at the .
Issue Reporters of this release:
- MNG-5705 Ondra Žižka
- MNG-5965 Matthias Schmalz
- MNG-6059 Andreas Sewe
- MNG-6159 Christian Aistleitner
- MNG-6213 Jin Kwon
- MNG-6256 Christoph Etzel
- MNG-6261 Dawid Weiss
- MNG-6262 Gene Smith
- MNG-6346 Patrik Jetzer
- MNG-6374 Rohan Padhye
- MNG-6495 Elliotte Rusty Harold
- MNG-6506 Andreas Veithen
- MNG-6526 Olaf Otto
- MNG-6529 Michael Istria
- MNG-6530 Michael Istria
- MNG-6533 Michael Istria
- MNG-6543 Romain Manni-Bucau
- MNG-6558 Guy Brand
- MNG-6577 Rohan Padhye
- MNG-6591 Olaf Otto
- MNG-6605 Gunnar Wagenknecht
- MNG-6618 Viacheslav Yakunin
Code Contributors of this release:
- MNG-6374 Gabriel Belingueres (indirectly via plexus-utils PR)
- MNG-6529 Michael Istria
- MNG-6530 Michael Istria
- MNG-6558 Guy Brand
- MNG-6261 Fabiano C. de Oliveira
- MNG-6533 Michael Istria
Many thanks to all reporters and contributors for their time and support.
Как создать свой локальный репозиторий
Для этого, как сказано выше, у maven есть штатное средство.
Допустим у нас есть библиотека, которая находится в jar файле под названием hello-world-library-1.0-SNAPSHOT.jar. О библиотеке нам известно, что в ней есть один класс HelloWorld, который включает один статический метод say, печатающий в консоли, как несложно догадаться, Hello World.
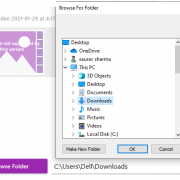
Мы хотим в директории проекта создать директорию lib, в которой будет находиться наш дополнительный репозиторий, и поместить туда библиотеку. Для этого достаточно в директории проекта выполнить следующую команду.
Если вы используете операционную систему Windows, нужно заменить \ на ^, то есть написать
Или можно просто убрать \ и написать команду в одну строчку.
Обратите внимание, как и для любого другого артефакта, для библиотеки нам нужно придумать groupId, artifactId и version. Мы потом укажем их в pom.xml, когда будем подключать зависимость
Внутри директории, которую создаст команда, находится полноценный репозиторий, для использования которого достаточно указать maven, где он находится. Все сведения о том, какие библиотеки можно там найти, содержатся непосредственно в структуре директорий свежесозданного репозитория. Для последующего использования репозитория, например, на других машинах, команду deploy-file выполнять не надо.
Дать проекту знать, что репозиторий существует, и показать, где он находится, можно уже описанным способом, правда, с поправкой на то, что репозиторий локальный.
Обратите внимание на пятую строку
Тут сказано, что искать репозиторий надо в директории проекта, на которую указывает встроенная переменная maven project.basedir.
Класс, использующий библиотеку, будет предельно прост, но для порядка приведём его код.
Осталось добавить в pom.xml зависимость и можно собирать проект.
Проверим:
Работает!
Директорию lib надо закомитить и библиотека будет доступна проекту вообще всегда.
Однако следует помнить об одном правиле.
Нужно обязательно обновлять номер версии библиотеки в локальном репозитории при каждом изменении jar файла
Maven воспринимает репозитории как внешние, поэтому, если не изменить номер версии, то maven будет использовать не версию библиотеки из директории lib, а ту, что он закешировал на локальной машине. В данном конкретном случае это не должно сыграть роли из-за суффикса SNAPSHOT, но об этом нужно знать.
Есть ещё один распространённый сценарий. У вас есть своя библиотека, которую вы сами собираете с помощью maven и потом подключаете к другому maven проекту.
Зачем собирать код без IDE
Первый вопрос, который возникает у начинающего разработчика — как в реальной жизни может пригодиться умение собирать код без среды разработки. Она ведь установлена и настроена у всех — это первое, что делает программист, когда приходит на проект.
Ответ простой — для того, чтобы нормально организовать рабочий процесс — код нужно регулярно собирать, проверять что он вообще компилируется, а потом, для того чтобы убедиться в работоспособности кода, прогонять тесты.
Можно, конечно, выделить специального человека, который будет раз в 15 минут запускать IDE и проводить описанные выше процедуры, но это безумие, такие вещи следует делать автоматически.
Уметь собирать код без среды разработки — суровая необходимость. Настолько суровая, что для решения этой задачи существует особый класс программного обеспечения, называемого системами сборки.
Step 2 — Set JAVA Environment
Set the JAVA_HOME environment variable to point to the base directory location where Java is installed on your machine. For example −
| OS | Output |
|---|---|
| Windows | Set the environment variable JAVA_HOME to C:\Program Files\Java\jdk1.7.0_60 |
| Linux | export JAVA_HOME=/usr/local/java-current |
| Mac | export JAVA_HOME=/Library/Java/Home |
Append Java compiler location to System Path.
| OS | Output |
|---|---|
| Windows | Append the string “;C:\Program Files\Java\jdk1.7.0.60\bin” to the end of the system variable, Path. |
| Linux | export PATH=$PATH:$JAVA_HOME/bin/ |
| Mac | not required |
Verify Java Installation using java -version command as explained above.
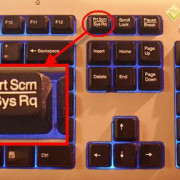
Step 1 — Verify Java Installation on your Machine
Open console and execute the following java command.
| OS | Task | Command |
|---|---|---|
| Windows | Open Command Console | c:\> java -version |
| Linux | Open Command Terminal | $ java -version |
| Mac | Open Terminal | machine:~ joseph$ java -version |
Let’s verify the output for all the operating systems −
| OS | Output |
|---|---|
| Windows |
java version «1.7.0_60» Java(TM) SE Runtime Environment (build 1.7.0_60-b19) Java HotSpot(TM) 64-Bit Server VM (build 24.60-b09, mixed mode) |
| Linux |
java version «1.7.0_60» Java(TM) SE Runtime Environment (build 1.7.0_60-b19) Java HotSpot(TM) 64-Bit Server VM (build 24.60-b09, mixed mode) |
| Mac |
java version «1.7.0_60» Java(TM) SE Runtime Environment (build 1.7.0_60-b19) Java HotSpot(TM) 64-Bit Server VM (build 24.60-b09, mixed mode) |
Multi Module Setup
So now let us take a look into a situation where we have a multi module build. We have a parent pom and one or more children. The parent pom will look like this:
<project>
  <modelVersion>4.0.0</modelVersion>
  <parent>
    <groupId>org.apache</groupId>
    <artifactId>apache</artifactId>
    <version>18</version>
  </parent>
  <groupId>org.apache.maven.ci</groupId>
  <artifactId>ci-parent</artifactId>
  <name>First CI Friendly</name>
  <version>${revision}</version>
  ...
  <properties>
    <revision>1.0.0-SNAPSHOT</revision>
  </properties>
  <modules>
    <module>child1</module>
    ..
  </modules>
</project>
The child will look like this:
<project>
  <modelVersion>4.0.0</modelVersion>
  <parent>
    <groupId>org.apache.maven.ci</groupId>
    <artifactId>ci-parent</artifactId>
    <version>${revision}</version>
  </parent>
  <groupId>org.apache.maven.ci</groupId>
  <artifactId>ci-child</artifactId>
   ...
</project>
Как сделать свою java библиотеку
Для того, чтобы сделать библиотеку, достаточно написать класс с модификатором public. И потом можно будет использовать этот класс в коде, к которому подключена библиотека.
Вот такой, например, класс.
Теперь нужно сделать maven проект, который будет собирать библиотеку, содержащую этот класс.
Как мы помним, с точки зрения maven, библиотека — это просто артефакт, поэтому помник будет выглядеть тривиально.
Итак, у нас есть класс со статическим методом, у нас есть описание артефакта для maven. Осталось только собрать этот код, чтобы получилась библиотека, то есть jar файл.
Просто напишем в консоли:
После этого в директории target появится файл с названием \<artifactId>-\<version>.jar, в нашем конткретном случае — hello-world-library-1.0-SNAPSHOT.jar, который и есть ваша библиотека.
Apache Maven Deploy Plugin
The deploy plugin is primarily used during the deploy phase, to add your artifact(s) to a remote repository for sharing with other developers and projects. This is usually done in an integration or release environment. It can also be used to deploy a particular artifact (e.g. a third party jar like Sun’s non redistributable reference implementations).
As a repository contains more than the artifacts (POMs, the metadata, MD5 and SHA1 hash files…), deploying means not only copying the artifacts, but making sure all this information is correctly updated. It’s the reponsibility of the deploy plugin.
To work, the deployment will require:
- information about the repository: its location, the transport method used to access it (FTP, SCP, SFTP…) and the optional user specific required account information
- information about the artifact(s): the group, artifact, version, packaging, classifier…
- a deployer: a method to actually perform the deployment. This can be implemented as a wagon transport (making it cross-platform), or use a system specific method.
The information will be taken from the implied (or specified) pom and from the command line. The settings.xml file may also be parsed to retrieve user credentials.
Goals Overview
The deploy plugin has 2 goals:
- deploy:deploy is used to automatically install the artifact, its pom and the attached artifacts produced by a particular project. Most if not all of the information related to the deployment is stored in the project’s pom.
- deploy:deploy-file is used to install a single artifact along with its pom. In that case the artifact information can be taken from an optionally specified pomFile, but can be completed/overriden using the command line.
Major Version Upgrade to version 3.0.0
Please note that the following parameter has been completely removed from the plugin configuration:
uniqueVersion
As of Maven 3, snapshot artifacts will always be deployed using a timestamped version.
Usage
General instructions on how to use the Deploy Plugin can be found on the usage page. Some more specific use cases are described in the examples given below.
If you feel like the plugin is missing a feature or has a defect, you can fill a feature request or bug report in our issue tracker. When creating a new issue, please provide a comprehensive description of your concern. Especially for fixing bugs it is crucial that the developers can reproduce your problem. For this reason, entire debug logs, POMs or most preferably little demo projects attached to the issue are very much appreciated. Of course, patches are welcome, too. Contributors can check out the project from our source repository and will find supplementary information in the guide to helping with Maven.
Examples
To provide you with better understanding on some usages of the deploy plugin, you can take a look into the following examples:
Project Deployment:
- Deployment with FTP
- Deployment with external SSH
File Deployment:
- Disable the generation of pom
- Deploy an artifact with a customed pom
- Deploy an artifact with classifier
- Disable timestamps suffix in an artifact
- Deploy an artifact in legacy layout
Apache Maven Resources Plugin
The Resources Plugin handles the copying of project resources to the output directory. There are two different kinds of resources: main resources and test resources. The difference is that the main resources are the resources associated to the main source code while the test resources are associated to the test source code.
Thus, this allows the separation of resources for the main source code and its unit tests.
Starting with version 2.3 this plugin uses the Maven Filtering shared component for filtering resources.
Goals Overview
The Resources Plugin copies files specified by Resource elements, to an output directory. The three variations below only differ in how the resource and output directory elements are specified or defaulted. The Resources Plugin has three goals:
-
resources:resources copies the resources for the main source code to the main output directory.
This goal usually executes automatically, because it is bound by default to the process-resources life-cycle phase. It always uses the project.build.resources element to specify the resources, and by default uses the project.build.outputDirectory to specify the copy destination.
-
resources:testResources copies the resources for the test source code to the test output directory.
This goal usually executes automatically, because it is bound by default to the process-test-resources life-cycle phase. It always uses the project.build.testResources element to specify the resources, and by default uses the project.build.testOutputDirectory to specify the copy destination.
-
resources:copy-resources copies resources to an output directory.
This goal requires that you configure the resources to be copied, and specify the outputDirectory.
Usage
General instructions on how to use the Resources Plugin can be found on the usage page. Some more specific use cases are described in the examples given below.
If you feel like the plugin is missing a feature or has a defect, you can fill a feature request or bug report in our issue tracker. When creating a new issue, please provide a comprehensive description of your concern. Especially for fixing bugs it is crucial that the developers can reproduce your problem. For this reason, entire debug logs, POMs or most preferably little demo projects attached to the issue are very much appreciated. Of course, patches are welcome, too. Contributors can check out the project from our source repository and will find supplementary information in the guide to helping with Maven.
Examples
The following examples show how to use the Resources Plugin in more advanced use cases:
- Specifying a character encoding scheme
- Specifying resource directories
- Filtering
- Including and excluding files and directories
- Escape filtering
- Copy resources
- Binaries filtering
- Custom resources filters
Step 5 — Set Maven Environment Variables
Add M2_HOME, M2, MAVEN_OPTS to environment variables.
| OS | Output |
|---|---|
| Windows |
Set the environment variables using system properties. M2_HOME=C:\Program Files\Apache Software Foundation\apache-maven-3.3.1 M2=%M2_HOME%\bin MAVEN_OPTS=-Xms256m -Xmx512m |
| Linux |
Open command terminal and set environment variables. export M2_HOME=/usr/local/apache-maven/apache-maven-3.3.1 export M2=$M2_HOME/bin export MAVEN_OPTS=-Xms256m -Xmx512m |
| Mac |
Open command terminal and set environment variables. export M2_HOME=/usr/local/apache-maven/apache-maven-3.3.1 export M2=$M2_HOME/bin export MAVEN_OPTS=-Xms256m -Xmx512m |
Feature Summary
The following are the key features of Maven in a nutshell:
- Simple project setup that follows best practices — get a new project or module started in seconds
- Consistent usage across all projects — means no ramp up time for new developers coming onto a project
- Superior dependency management including automatic updating, dependency closures (also known as transitive dependencies)
- Able to easily work with multiple projects at the same time
- A large and growing repository of libraries and metadata to use out of the box, and arrangements in place with the largest Open Source projects for real-time availability of their latest releases
- Extensible, with the ability to easily write plugins in Java or scripting languages
- Instant access to new features with little or no extra configuration
- Ant tasks for dependency management and deployment outside of Maven
- Model based builds: Maven is able to build any number of projects into predefined output types such as a JAR, WAR, or distribution based on metadata about the project, without the need to do any scripting in most cases.
- Coherent site of project information: Using the same metadata as for the build process, Maven is able to generate a web site or PDF including any documentation you care to add, and adds to that standard reports about the state of development of the project. Examples of this information can be seen at the bottom of the left-hand navigation of this site under the «Project Information» and «Project Reports» submenus.
- Release management and distribution publication: Without much additional configuration, Maven will integrate with your source control system (such as Subversion or Git) and manage the release of a project based on a certain tag. It can also publish this to a distribution location for use by other projects. Maven is able to publish individual outputs such as a JAR, an archive including other dependencies and documentation, or as a source distribution.
- Dependency management: Maven encourages the use of a central repository of JARs and other dependencies. Maven comes with a mechanism that your project’s clients can use to download any JARs required for building your project from a central JAR repository much like Perl’s CPAN. This allows users of Maven to reuse JARs across projects and encourages communication between projects to ensure that backward compatibility issues are dealt with.
Usage
Prepare your project to use the maven-release-plugin
To be able to make a solid start with the maven-release-plugin, there are 2 things you should include in our pom:
- the scm-section with a developerConnection
- the maven-release-plugin with a locked version
The developerConnection contains the URL of the Source Control Management system pointing to the folder containing this pom.xml This URL is prefixed with scm: so the plugin can pick the right implementation for committing and tagging. The Maven SCM-page contains an overview all the supported SCMs, per SCM you can see how the URL should look like.
<project>
  ...
  <scm>
    <developerConnection>scm:svn:https://svn.mycompany.com/repos/myapplication/trunk/mycomponent/</developerConnection>
  </scm>

  <build>
    <plugins>
      <plugin>
        <groupId>org.apache.maven.plugins</groupId>
        <artifactId>maven-release-plugin</artifactId>
        <version>3.0.0-M4</version>
      </plugin>
    </plugins>
    ...
  </build>
  ...
</project>
The following are some common scenarios in preparing a release.
Use a different username in the SCM server than the one in the operating system
Most of the SCMs are simply executed as an external command as the current user on your system. If this username is not the same as the SCM username, you may need to set the following option:
mvn -Dusername=your_scm_username release:prepare
Set where to tag the files in Subversion
This example shows how to set the repository location for all tags to be created in Subversion. Note that this is not needed if you use the standard SVN layout, where the root project is in trunk, and there is a sibling tags directory.
<project>
  ...
  <build>
    <plugins>
      <plugin>
        <groupId>org.apache.maven.plugins</groupId>
        <artifactId>maven-release-plugin</artifactId>
        <version>3.0.0-M4</version>
        <configuration>
          <tagBase>https://svn.mycompany.com/repos/myapplication/releases</tagBase>
        </configuration>
      </plugin>
    </plugins>
    ...
  </build>
  ...
</project>
Do a Dry Run
Since the Release Plugin performs a number of operations that change the project, it may be wise to do a dry run before a big release or on a new project. To do this, commit all of your files as if you were about to run a full release and run:
mvn release:prepare -DdryRun=true
This will ask all the same questions, run the same tests, and output a copy of how the POMs will look after transformation. You can check the output and review the POMs, then run:
mvn release:clean
This will remove all of the files created above, and the project will be ready to execute the proper release.
Run in Batch Mode
Sometimes it is desirable to do the commit/tag process on a regular interval (e.g. to produce nightly or integration builds through a build server). To use the default inputs for the versions and tag information and not prompt for any values, use Maven’s --batch-mode setting:
mvn --batch-mode release:prepare
Use a staging repository
Sometimes it is desirable to deploy a pre-release to be approved before made publicly available. One option is to create release candidates versions using the release:perform goal, but the final deployed artifact will NOT be the exact one that has been approved as RCx.
A common solution is to use a staging repository, where a test-version is deployed with it’s documentation for review. If all is fine, it is then copied to the public repository. Using this strategy, the artifact that has been tested IS the one that is deployed.
The release:stage goal uses this strategy. It replaces the release:perform goal and does the same tasks, but requires a stagingRepository parameter. It will automatically re-configure the deploy and site-deploy goals to use the staging strategy.
After the release is complete, the release.properties and other release files will NOT be removed, so that you can still execute a release:rollback if some error has been detected and a new candidate must be created after some fixes. You just need to use a distinct tag in SCM, or rename the one that has been created if the SCM provider supports renaming tags.
Single Project Setup
This can look like this:
<project>
  <modelVersion>4.0.0</modelVersion>
  <parent>
    <groupId>org.apache</groupId>
    <artifactId>apache</artifactId>
    <version>18</version>
  </parent>
  <groupId>org.apache.maven.ci</groupId>
  <artifactId>ci-parent</artifactId>
  <name>First CI Friendly</name>
  <version>${revision}</version>
  ...
</project>
This is of course a simple situation where we use only for brevity to show the general course.
Based on the above pom you can build your project using:
mvn clean package
But wait there is a problem? Which version will the artifacts have? So you need to define the version for your artifacts. The first possibility is to use the command line like this:
mvn -Drevision=1.0.0-SNAPSHOT clean package
This will become cumbersome over the time. So the other solution for this is to simply use a property inside the pom file which looks like this:
<project>
  <modelVersion>4.0.0</modelVersion>
  <parent>
    <groupId>org.apache</groupId>
    <artifactId>apache</artifactId>
    <version>18</version>
  </parent>
  <groupId>org.apache.maven.ci</groupId>
  <artifactId>ci-parent</artifactId>
  <name>First CI Friendly</name>
  <version>${revision}</version>
  ...
  <properties>
    <revision>1.0.0-SNAPSHOT</revision>
  </properties>
</project>
So now you can simply call Maven as usual like .
You can of course change the version via the command line like this:
mvn -Drevision=2.0.0-SNAPSHOT clean package
Of course you can use the file for this.
A note about the used properties. You can only use those named , and/or and not other named properties like this:
<project>
  <modelVersion>4.0.0</modelVersion>
  <parent>
    <groupId>org.apache</groupId>
    <artifactId>apache</artifactId>
    <version>18</version>
  </parent>
  <groupId>org.apache.maven.ci</groupId>
  <artifactId>ci-parent</artifactId>
  <name>First CI Friendly</name>
  <version>${revision}</version>
  ...
  <properties>
    <revision>1.0.0-${buildNumber}-SNAPSHOT</revision>
  </properties>
</project>
The above example will not work as expected. If you like to have more flexibility you can use a combination of the different properties like this:
<project>
  <modelVersion>4.0.0</modelVersion>
  <parent>
    <groupId>org.apache</groupId>
    <artifactId>apache</artifactId>
    <version>18</version>
  </parent>
  <groupId>org.apache.maven.ci</groupId>
  <artifactId>ci-parent</artifactId>
  <name>First CI Friendly</name>
  <version>${revision}${sha1}${changelist}</version>
  ...
  <properties>
    <revision>1.3.1</revision>
    <changelist>-SNAPSHOT</changelist>
    <sha1/>
  </properties>
</project>
If you like to make a version this can simply being achieved by using this:
mvn -Drevision=2.0.0 clean package
Another usage example can be to make a release which can be done via (version 1.3.1):
mvn -Dchangelist= clean package
Or if you like to make a release with another version:
mvn -Drevision=2.7.8 -Dchangelist= clean package
Итого
- Maven ищет библиотеки в удалённом репозитории по умолчанию.
- Чтобы подключить библиотеку, которой нет в репозитории по умолчанию, можно указать дополнительные удалённые репозитории, тогда maven будет искать библиотеки ещё и в них.
- Если библиотеки нет ни в одном удалённом репозитории, то можно с помощью штатного механизма maven создать локальный репозиторий и добавить его в pom.xml.
- При обновлении репозитория, который находится в исходниках проекта, нужно всегда менять версию библиотеки, иначе могут быть непонятные проблемы.
- Если у вас есть maven проект, то из него можно сделать библиотеку командой mvn package.
- Командой mvn install можно поместить библиотеку в локальный репозиторий по умолчанию.
- Чтобы использовать библиотеку в другом проекте, достаточно указать её в качестве зависимости в pom.xml.
Тут я совершенно согласен. Когда речь идёт о крупных проектах и корпоративной разработке, быть по-другому просто не может. Но, с моей точки зрения, есть случаи, когда удобнее сделать иначе. Я имею в виду маленькие проекты, созданные в процессе обучения, потому что именно с такими вещами обычно имеют дело новички, и случаи, когда доступа к инфраструктуре нет, а добавить библиотеку в сборку нужно в течение 10 минут. Нужно было с самого начала уточнить, что речь в статье именно о таких кейсах.
Да, хранить библиотеки в системе контроля версий — хак. Но, как и все хаки, это такая штука, которой в некоторых случаях можно пользоваться и о возможности осуществления которой неплохо бы знать.