Windows 7 usb/dvd download tool 8.0.7600.16385 русская версия
Содержание:
- Как пользоваться
- Introduction
- Windows Performance Toolkit components
- Скачать Windows USB Installation Tool
- Пожертвования
- Free Windows installation program
- Как создать виртуальную машину Windows 10
- What’s New
- Процедура создания загрузочного носителя с Windows 7
- fsutil
- Что такое VMware Workstation Tools
- Скачать
- Windows Deployment Services
- (1) Сравнение скорости работы Rufus и других приложений
- diskpart
Как пользоваться
Переходя к делу, давайте рассмотрим, как скачать программу, установить ее, а также создать загрузочную флешку с Windows 7.
Загрузка и установка
Изначально давайте загрузим и установим приложение для ПК или ноутбука:
- Перейдите в самый конец странички и нажмите кнопку, которая находится сразу после таблицы. Распакуйте полученный архив и запустите исполняемый файл, который найдете в нем.
- На первом этапе инсталляции нам потребуется лишь кликнуть по кнопке, которая обозначена на скриншоте.
- Перейдя дальше, запускаем процесс установки, нажав на «Install».
- Через пару мгновений установка будет завершена и пользователю останется закрыть инсталлятор. Для этого нажимаем на единственную активную кнопку.
Теперь, когда установка завершена, мы можем рассматривать процесс использования Windows 7 USB/DVD Download Tool.
Инструкция по работе
Для того чтобы сделать загрузочную флешку с Windows 7 через Windows 7 USB/DVD Download Tool нужно поступить следующим образом:
- Сначала запускаем утилиту от имени администратора. Для этого производим правый клик мышью по появившемуся на рабочем столе ярлыку и из контекстного меню выбираем нужный пункт.
- Когда приложение запустится, кликаем по кнопке выбора образа с Windows 7. Соответственно, подразумевается, что последний уже скачан из интернета. В результате откроется окно проводника, в котором мы указываем файл и подтверждаем выбор.
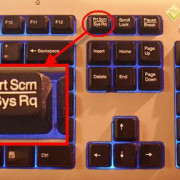
- Устанавливаем накопитель в USB-порт компьютера либо вставляем оптический диск в привод. Переходим к следующему этапу, нажав на кнопку, обозначенную красной стрелкой.
- Выбираем устройство, на которое будет вестись запись. Как уже было сказано, программа позволяет работать с DVD-дисками или USB-накопителями. Мы будем использовать последний, поэтому кликаем по соответствующей кнопке.
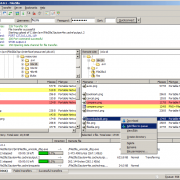
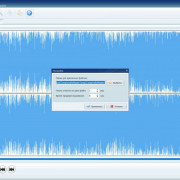
- В выпадающем списке выбираем накопитель, на который будет вестись запись. Затем запускаем процесс, кликнув по отмеченной на скриншоте кнопке.
- Программа предупредит нас о том, что с накопителя, который выбран в качестве целевого, будут удалены все данные. Подтверждаем свое намерение.
- В результате начнется процесс записи Windows 7 на флешку. Пользователю остается лишь дождаться, пока он будет завершен.
Уже через несколько минут вы получите загрузочный накопитель, при помощи которого можно произвести установку операционной системы от Microsoft.
Introduction
The Windows NT and Windows 2000 Resource Kits come with a number of
command-line tools that help you administer your Windows NT/2K systems.
Over time, I’ve grown a collection of similar tools, including some not
included in the Resource Kits. What sets these tools apart is that they
all allow you to manage remote systems as well as the local one. The
first tool in the suite was PsList, a tool that lets you view detailed
information about processes, and the suite is continually growing. The
«Ps» prefix in PsList relates to the fact that the standard UNIX process
listing command-line tool is named «ps», so I’ve adopted this prefix for
all the tools in order to tie them together into a suite of tools named
PsTools.
Note
Some anti-virus scanners report that one or more of the tools are infected with a «remote admin» virus. None of the PsTools contain viruses, but they have been used by viruses, which is why they trigger virus notifications.
The tools included in the PsTools suite, which are downloadable as a
package, are:
-
PsExec —
execute processes remotely -
PsFile —
shows files opened remotely -
PsGetSid —
display the SID of a computer or a user -
PsInfo —
list information about a system -
PsPing —
measure network performance -
PsKill —
kill processes by name or process ID -
PsList —
list detailed information about processes -
PsLoggedOn —
see who’s logged on locally and via resource sharing (full source is
included) -
PsLogList —
dump event log records -
PsPasswd —
changes account passwords -
PsService —
view and control services -
PsShutdown —
shuts down and optionally reboots a computer -
PsSuspend —
suspends processes -
PsUptime — shows you how long a system has been running since its
last reboot (PsUptime’s functionality has been incorporated into
PsInfo
The PsTools download package includes an HTML help file with complete
usage information for all the tools.
Download PsTools Suite (3.5 MB)
Runs on:
- Client: Windows Vista and higher
- Server: Windows Server 2008 and higher
- Nano Server: 2016 and higher
Installation
None of the tools requires any special installation. You don’t even need to install any client software on the remote computers at which you target them. Run them by typing their name and any command-line options you want. To show complete usage information, specify the «-? » command-line option.
If you have questions or problems, please visit the Sysinternals PsTools Forum.
Related Links
Introduction to the PsTools: Wes Miller gives a high-level overview of the Sysinternals PsTools in the March column of his TechNet Magazine column.
Windows Performance Toolkit components
The Windows Performance Toolkit consists of two independent tools: Windows Performance Recorder (WPR) and Windows Performance Analyzer (WPA). In addition, support is maintained for the previous command-line tool, Xperf. However, Xperfview is no longer supported. All recordings must be opened and analyzed by using WPA.
The following are the system requirements for running Windows Performance Toolkit:
-
Windows Performance Recorder (WPR): Windows 8 or later.
-
Windows Performance Analyzer (WPA): Windows 8 or later with the Microsoft .NET Framework 4.5 or later.
Windows Performance Recorder
WPR is a powerful recording tool that creates Event Tracing for Windows (ETW) recordings. You can run WPR from the user interface (UI) or from the command line. WPR provides built-in profiles that you can use to select the events that are to be recorded. Alternatively, you can author custom profiles in XML. WPR can also be invoked and controlled by using the WPRControl application programming interface (API). For more information about the WPRControl API, see WPRControl API Reference.
For basic procedures and a detailed walkthrough, see the WPR Quick Start. For complete documentation of the WPR UI, see WPR Features. For reference of command-line options, see WPR Command-Line Options. For step-by-step procedures, see WPR How-to Topics. For discussion of key scenarios, see WPR Scenarios. For complete reference material, including a recording profile XML reference and a legacy Xperf reference, see WPR Reference.
Windows Performance Analyzer
WPA is a powerful analysis tool that combines a very flexible UI with extensive graphing capabilities and data tables that can be pivoted and that have full text search capabilities. WPA provides an Issues window to explore the root cause of any identified.
For basic procedures and a detailed walkthrough, see the WPA Quick Start Guide. For complete documentation of the WPR UI, see WPA Features. For step-by-step procedures, see WPA How-to topics. For extended discussion of key scenarios, see WPA Scenarios.
Скачать Windows USB Installation Tool

GIGABYTE Windows USB Installation Tool — это полезная утилита от соответствующего производителя комплектующих для ПК, которая позволяет в несколько шагов создать загрузочную «флешку» с операционной системой Windows. Также программа выполняет несколько других полезных операций, о которых мы упомянем в дальнейшем. А вот что нужно отметить в первую очередь — это тот факт, что GIGABYTE Windows USB Installation Tool доступна совершенно бесплатно и при этом не требует установки на компьютер (работает в портативном режиме).
Ключевые особенности
- помогает создать загрузочный накопитель с Windows 7;
- дает возможность выбрать основные параметры записи;
- имеет простой интерфейс, состоящий из единственного окна;
- распространяется на бесплатной основе;
- доступна совершенно бесплатно.
Пожертвования
Поскольку постоянно задаются вопросы о пожертвованиях, поясняю, что на странице нет кнопки пожертвовать.
Причина отсутствия возможности пожертвовать заключается в том, что, по моему мнению, пожертвования не помогают в разработке программного обеспечения, а только вызывают чувство вины у пользователей, которые не пожертвовали.
Если вы все же настаиваете, то всегда можете сделать пожертвование в Free Software Foundation, так как именно благодаря FSF является возможным создание Rufus.
В любом случае, я хочу вам сказать спасибо за вашу постоянную поддержку и энтузиазм, связанные с этой небольшой программой: для меня это очень важно!
Пожалуйста, продолжайте пользоваться Rufus безвозмездно, без каких-либо пожертвований – вы ничего не должны!
Free Windows installation program
Windows 7 USB DVD Download Tool is a free utility program that creates bootable USB flash drives or DVD for Windows 7 32- and 64-bit operating systems. When people install Windows systems from the Microsoft Store, they can either download a collection of compressed installation files or an uncompressed ISO file; the freeware is developed by Microsoft to install the ISO file onto a PC machine.
Does Windows 7 USB DVD Download Tool work Windows 10?
The application functions with Windows 7, , and systems along with Windows Vista and XP SP2 models. If the Windows XP users intend to operate the app, then there are applications to install before: Microsoft .NET Framework 2.0 and Microsoft Image Mastering API v2. Along with the Windows USB DVD Download Tool, people will need to have purchased and downloaded the Windows ISO file.
The system requires 50 MB of storage space on the hard disk as well as a DVD-R drive or removable USB device with a minimum of 4 GB available. Essentially, users need the ISO file, the download tool, and either the blank DVD drive or the 4GB or higher USB.
How do I convert Windows ISO to USB?
The lightweight platform has an easy to use interface; fundamentally, the program is created for people who are not adept in technical skills for them to perform the process. If the Microsoft community does need assistance, then within the user interface there is an ‘Online help’ option. Essentially, the tools Windows offers in the app are presented in four steps.
Each step is displayed on a small and simple interface. Lining the top of the tool is the distinction of which step the user is on within the procedure. Upon the download, Windows greets people with a screen that reads ‘Step 1 of 4: Choose ISO file’. Below the instruction is a space to either insert or searches for the source file with the browser.
Once the article is retrieved, ensure that the encased space presents the correct information. If the data is accurate, then press the green ‘Next’ button in the bottom right corner to continue. The setup continues into ‘Step 2 of 4’ on the following page: ‘Choose media type’.
The directions inform the community that they can either burn the ISO file to a DVD or copy the uncompressed file to a USB Pendrive. If people are using the USB backup, then they need to utilize a USB that has 4GB or more to ensure that the file size is compensated for.
To be allowed to continue, select either ‘USB device’ or ‘DVD’ in the lower right corner. Confirm that the DVD or USB is placed into the computer. Note that there is a ‘Start over’ button presented in the lower-left section to restart the boot order. Step 3 includes a dropdown menu to verify the inserted media.
If the USB or DVD information is not visible, then there is a refresh key that can be chosen beside the menu. Ensure that any content that is within the external devices is safely copied to another location. If there is data on the equipment, then a message will appear to notify the user that there is not enough disk space to continue.
How do I create a bootable flash drive?
Either choose the erase route or cancel the operation. Once the disc or drive has been identified, click ‘Begin copying’. The final step is creating the bootable drive. A loading bar will be placed in the center of the page that details the progress of the root folder being combined with the DVD or USB port equipment.
When the integration is complete the window will display the text: ‘Bootable USB device created successfully’. To the right of the loading bar ‘100%’ will be present and below the bar, the status will read ‘Backup complete’.
Additional installer program
Rufus creates bootable discs and drives in a variety of formats. As the developer, Microsoft created the Windows USB DVD Tool for their single existing operating system: Windows 7, 8, 10, etc. Rufus is an impressive option that is recommended for anyone that wishes to create bootable equipment for free on other systems: Linux, UEFI, etc.
Follow the steps to install
The Windows USB DVD Download Tool provides succinct steps that are individually presented to install their system with a DVD or USB drive. There are four steps total.
This tool is compatible with the Windows 7 OS and above. Visit their official site to view any new versions and updates as well as the latest company news, terms, etc.
Как создать виртуальную машину Windows 10
-
1.
Запустите Workstation Player и нажмите Create a New Virtual Machine:
-
2.
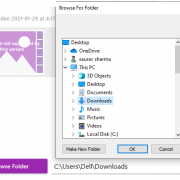
Нажмите Browse и в локальной папке компьютера выберите ISO-образ Windows 10. После этого кликните Next.
-
3.
Кликните на строку Version of Windows to install. В выпадающем списке выберите Windows 10 Pro for Workstation и нажмите Next:
-
4.
Во всплывающем окне нажмите Yes:
-
5.
Затем кликните Next:
-
6.
Выберите максимальное количество дисковой памяти, которое сможет использовать BM, и нажмите Next:
-
7.
Чтобы завершить настройку, нажмите Finish. Создание машины займёт 5-10 минут.
Готово, установка завершена.
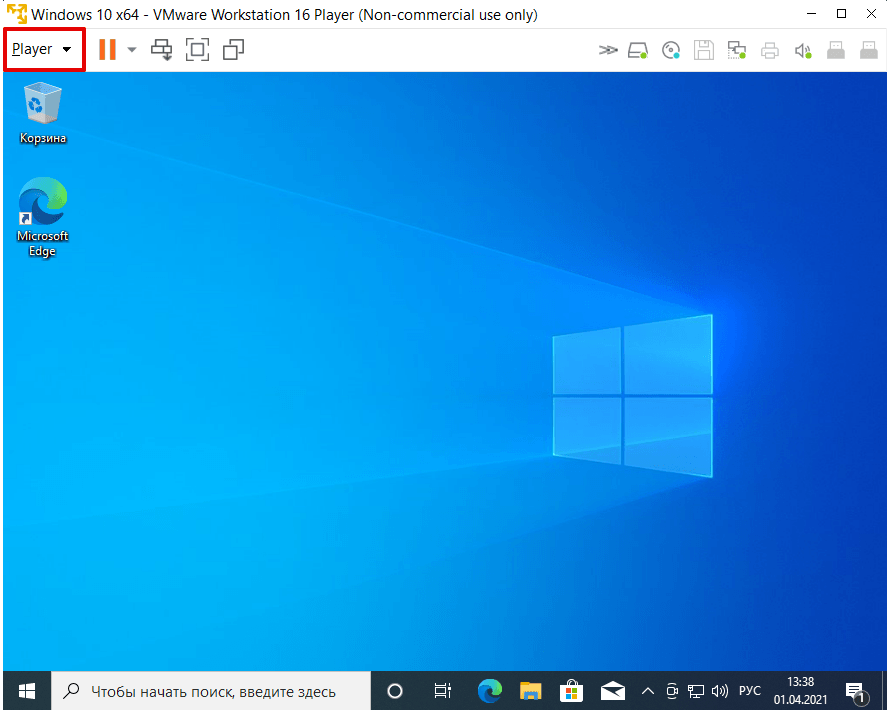
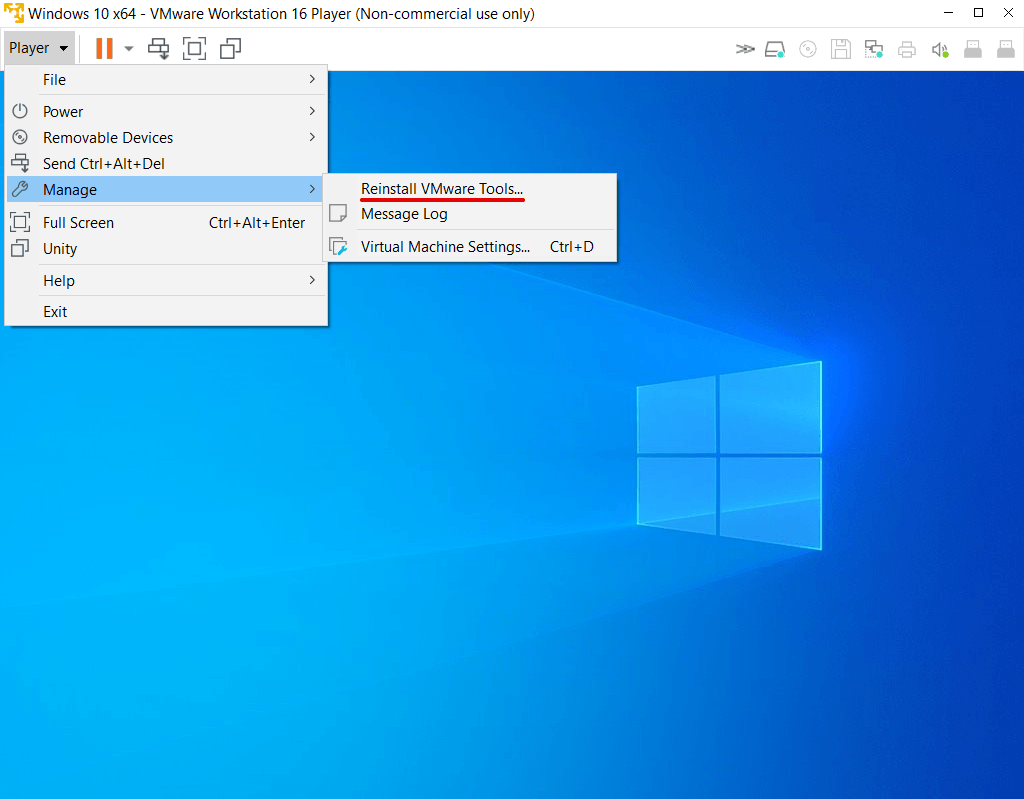
Часто пакет Тулс устанавливается автоматически при создании VM. Чтобы проверить, активирован ли Тулс, в панели управления ВМ нажмите Player:
В списке наведите курсор на раздел Manage. Если в первом пункте выпадающего списка вы увидите «Reinstall», значит пакет тулс уже установлен. Если в пункте будет указано «Installation», значит пакет нужно установить вручную .
Если кнопка Tools в настройках неактивна
-
1.
В панели управления нажмите Player и наведите курсор на раздел Removable Devices:
-
2.
Наведите курсор на пункт Floppy и кликните Settings..:
-
3.
Кликните по строке Floppy и нажмите Remove:
-
4.
Подтвердите удаление. Для этого кликните Ок во всплывающем окне, а затем Ок внизу страницы:
Готово, вы активировали кнопку.
What’s New
What’s New (August 18, 2021)
-
Candid talk from the man behind your favorite Windows tools
Mark talks with Larry Seltzer about the history and future of Sysinternals. -
Autoruns v14.0
Autoruns, a utility for monitoring startup items, is the latest Sysinternals tool to receive a UI overhaul including a dark theme.
What’s New (July 27, 2021)
ProcDump v10.1
This update to ProcDump, a command-line utility for generating memory dumps from running processes, adds a new option (-dc) for specifying a dumpfile comment and supports «triage» dumps (-mt).
What’s New (June 22, 2021)
RDCMan v2.8
RDCMan, a utility for managing multiple remote desktop connections, is now part of the Sysinternals family of tools! This release fixes CVE-2020-0765, an XML parsing vulnerability.
What’s New (May 25, 2021)
-
Process Monitor v3.80
Process Monitor is the latest tool to integrate with the new Sysinternals theme engine, giving it dark mode support. -
Sysmon v13.20
This update to Sysmon, an advanced system security monitor, adds «» and «» filter conditions and fixes a regression for rule include/exclude logic. -
TCPView v4.10
This update to TCPView, a TCP/UDP endpoint query tool, adds the ability to filter connections by state. -
Process Explorer v16.40
This update to Process Explorer, an advanced process, DLL and handle viewing utility, adds process filtering support to the main display and reports process CET (shadow stack) support.
What’s New (April 21, 2021)
-
Process Monitor v3.70
This update to Process Monitor allows constraining the number of events based on a requested number minutes and/or size of the events data, so that older events are dropped if necessary. It also fixes a bug where the Drop Filtered Events option wasn’t always respected and contains other minor bug fixes and improvements. -
Sysmon v13.10
This update to Sysmon adds a FileDeleteDetected rule that logs when files are deleted but doesn’t archive, deletes clipboard archive if event is excluded and fixes an ImageLoad event bug. -
Theme Engine
This update to the theme engine uses a custom title bar in dark mode, similar to MS Office black theme. WinObj and TCPView have been updated. Expect more tools using the theme engine in the near future!
What’s New (March 23, 2021)
TCPView v4.0
This major update to TCPView adds flexible filtering, support for searching, and now shows the Windows service that owns an endpoint. It is also the second Sysinternals tool to feature the new theme engine with dark mode.
What’s New (February 22, 2021)
-
WinObj v3.0
This major update to WinObj adds dynamic updates, quick search, full search, properties for more object types, as well as performance improvements. It’s also the first Sysinternals tool to feature a dark theme. -
Coreinfo v3.52
This update to CoreInfo adds reporting for CET (shadow stack) support.
Процедура создания загрузочного носителя с Windows 7
К сожалению, возникновение ошибок в ПК на Windows явление частое. Поэтому каждый раз вызывать мастера для устранения неполадок неудобно и самое главное накладно.
Проще самостоятельно один раз овладеть навыком переустановки ОС.
Для этого в первую очередь требуется загрузочный внешний носитель с дистрибутивом системы. Специалисты «Майкрософт» значительно облегчили пользователям своей «Седьмой» ОС процедуру создания загрузочного диска или флешки, сделав для этого специальную утилиту.
Вопросу, как пользоваться этой программой «Windows 7 usb/dvd download tool» и посвящена нижеописанная пошаговая инструкция с иллюстрациями к исполняемым действиям.
Данное приложение доступно на официальном ресурсе «Майкрософт» совершенно бесплатно: «store.microsoft.com». Она позволяет создать загрузочную флешку либо ДВД-диск из образа с Windows 7 с расширением «.iso».
Потом можно купить ключ активации официально, либо воспользоваться одним из множества существующих активаторов.
Чтобы записать собственную загрузочную флешку или диск с Windows 7, достаточно установить фирменную утилиту от Майкрософт и запустить ее. Далее необходимо выполнить следующие шаги:
- В первом диалоговом окне надо клацнуть виртуальную кнопку «Обзор» или «Browse» (необходимо отметить, что программа также имеет и русский интерфейс, но даже использование английского меню не затруднит процедуру записи носителя и для начинающего пользователя, поскольку имеет интуитивно понятное исполнение);
- Далее отобразится окошко, в котором потребуется указать месторасположение в памяти компьютера файла-образа с Windows 7;
- Клацнуть «Открыть»;
- Затем в меню утилиты кликнуть «Далее» или «Next»;
- Теперь необходимо вставить в USB-разъем компьютера флешку, у которой емкость не меньше размера файла дистрибутива с ОС, который планируется записать (обычно достаточно флеш-памяти не менее 4 Gb, но для 100%-ой уверенности рекомендуется применять флешку на 8 Gb). Если пользователь решил использовать ДВД-диск, то вставить его в оптический привод (объем памяти диска должен быть не меньше 4,7 Gb);
- Далее в меню утилиты клацнуть по соответствующей кнопке: «USB Device» либо «DVD», в зависимости от того, какой тип носителя выбрал пользователь в предыдущем пункте под номером 5.
Примечание: Если на флешке были сохранены какие-либо пользовательские файлы, то после выполнения следующего этапа инструкции все сотрется.
Поэтому заблаговременно требуется позаботиться о копировании важной информации на другой носитель или в один из логических разделов компьютера. Это же касается и в случае использования DVD-RW
Даже если объем съемного носителя превышает количество отводимого места для дистрибутива операционной системы, то все равно при форматировании вся информация будет уничтожена.
- Затем в программе клацнуть кнопку с круговыми стрелочками под названием «Обновить» или в английском интерфейсе «Refresh». Убедиться, что вставленный в ПК носитель распознан приложением и кликнуть «Старт» (в английском варианте на кнопке будет надписано: «Start over»);
- Дождаться завершения процесса. Обычно на него уходит не более четверти часа;
- Готово. Загрузочный носитель готов к использованию.
fsutil
The fsutil utility can be used to perform all sorts of NTFS and FAT operations, including file manipulation. Of these, the following are useful for OS developers:
| Subcommand | Parameter | Description |
|---|---|---|
| 8dot3name | query | This can be used in order to find out whether a volume (which may very well be a loopback device) is configured to use the 8.3 file naming scheme. Example:
fsutil 8dot3name query C: If no volume is specified, information on all volumes is displayed. |
| set | This option can set one or all volumes to (not) use the 8.3 file name scheme. Before this can be used on a per volume basis, the registry key HKLM\System\CurrentControlSet\Control\FileSystem\NtfsDisable8dot3NameCreationNtfsDisable8dot3NameCreationNtfsDisable8dot3NameCreation must be set to the value 2, if this is not already true. This can be done by using the following command:
fsutil 8dot3name set 2 Next, we are free to play around with individual volumes: fsutil 8dot3name set C: 0 The last parameter can take the value 0 (enable) or 1 (disable). This is somewhat odd; the reason behind it is probably that Microsoft, in order to avoid confusion, decided to preserve these values, which are also used in a similar command. |
|
| file | createnew | Creates an empty file (all zeroes) of some size specified, in bytes. Example:
fsutil createnew foobar 42 |
| setshortname | Sets the 8.3 name for a file (while preserving its long name). Example:
fsutil setshortname foobarbaz fooba~1 |
|
| setvaliddata | Sets the VDL for a file. Example:
fsutil setvaliddata foobar 4096 |
|
| setzerodata | Sets one or more bytes in a file to zero. Example:
fsutil setzerodata foobar offset=42 length=42 foobar |
Что такое VMware Workstation Tools
Чтобы одновременно запускать на одной физической машине (сервере или компьютере) несколько операционных систем, были придуманы специальные программы. Одной из таких программ является VMware Workstation Player. С её помощью можно создавать на компьютере с одной ОС, ещё один компьютер с совершенно другой ОС — виртуальную машину (ВМ или VM). VMware Workstation можно установить на macOS, Windows, а также на Linux и его дистрибутивы.
Однако, чтобы виртуальная машина работала наравне с физической, желательно установить дополнительные программы и утилиты. Например, VMware Workstation Tools.
VMware Tools — это специальный пакет программ, с помощью которого можно оптимизировать взаимодействие виртуальной машины и физической, ресурсы которой использует для работы виртуальная. Он позволяет улучшить управляемость и производительность операционной системы ВМ.
Tools усиливает интеграцию с гипервизором — элементом, который отвечает за распределение ресурсов основного компьютера между несколькими гостевыми операционными системами и изоляцию их друг от друга.
VMTools позволяет:
Тулс можно запускать на 32-разрядных и 64-разрядных операционных системах. Инструмент интеграции подойдёт для работы как на Windows, так и Linux и других дистрибутивах.
Пакет устанавливается одним из двух способов: сразу при создании гостевой ОС (через функцию Open-VM-Tools) или после её создания. Чтобы использовать первый способ, в старых версиях достаточно выбрать автоматическую интеграцию (OVT) при установке машины. В новых версиях пакет чаще всего устанавливается по умолчанию.
Во втором случае установка происходит вручную. Нужно смонтировать ISO-файл, который будет содержать двоичные файлы (установочные файлы, скрипты и другое) в виртуальный CD-ROM гостевой машины.
Ниже мы покажем, как установить Windows 10 на Workstation, а также разберём установку Tools вручную.
Скачать
Последнее обновление 2021.08.03:
- Rufus 3.15 (1.1 МБ)
- Rufus 3.15 Переносная версия (1.1 МБ)
- Другие версии (GitHub)
- Другие версии (FossHub)
Поддерживаемые языки:
| Bahasa Indonesia | , | Bahasa Malaysia | , | Български | , | Čeština | , | Dansk | , | Deutsch | , | Ελληνικά | , |
| English | , | Español | , | Français | , | Hrvatski | , | Italiano | , | Latviešu | , | Lietuvių | , | Magyar | , | Nederlands | , | Norsk | , |
| Polski | , | Português | , | Português do Brasil | , | Русский | , | Română | , | Slovensky | , | Slovenščina | , | Srpski | , |
| Suomi | , | Svenska | , | Tiếng Việt | , | Türkçe | , | Українська | , | 简体中文 | , | 正體中文 | , | 日本語 | , | 한국어 | , | ไทย | , |
| עברית | , | العربية | , | پارسی | . |
Системные требования:
Windows 7 или более поздней версии, неважно, 32 или 64 бит. После загрузки приложение готово к использованию
Я хочу выразить мою благодарность переводчикам, которые перевели Rufus, а также эту веб-страницу на различные языки. Если вы обнаружите, что можете пользоваться Rufus на вашем родном языке, вы должны благодарить их!
Windows Deployment Services
Windows Deployment Services (WDS) has been updated and improved in several ways starting with Windows 8. Remember that the two main functions you will use are the PXE boot support and multicast. Most of the changes are related to management and increased performance. In Windows Server 2012 R2, WDS also can be used for the Network Unlock feature in BitLocker.
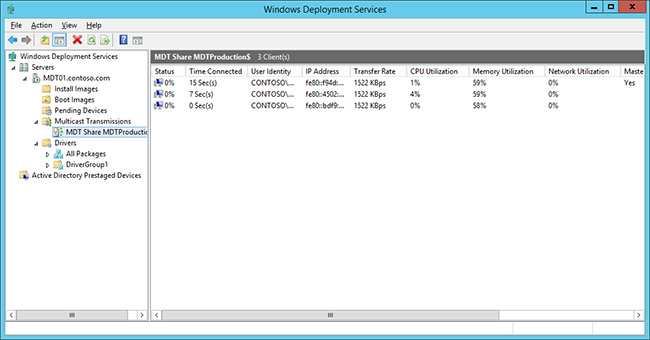
Windows Deployment Services using multicast to deploy three machines.
In Windows Server 2012 R2, Windows Deployment Services can be configured for stand-alone mode or for Active Directory integration. In most scenarios, the Active Directory integration mode is the best option. WDS also has the capability to manage drivers; however, driver management through MDT and Configuration Manager is more suitable for deployment due to the flexibility offered by both solutions, so you will use them instead. In WDS, it is possible to pre-stage devices in Active Directory, but here, too, Configuration Manager has that capability built in, and MDT has the ability to use a SQL Server database for pre-staging. In most scenarios, those solutions are better than the built-in pre-staging function as they allow greater control and management.
Trivial File Transfer Protocol (TFTP) configuration
In some cases, you need to modify TFTP Maximum Block Size settings for performance tuning reasons, especially when PXE traffic travels through routers and such. In the previous version of WDS, it was possible to change that, but the method of do so—editing the registry—was not user friendly. In Windows Server 2012, this has become much easier to do as it can be configured as a setting.
Also, there are a few new features related to TFTP performance:
- Scalable buffer management. Allows buffering an entire file instead of a fixed-size buffer for each client, enabling different sessions to read from the same shared buffer.
- Scalable port management. Provides the capability to service clients with shared UDP port allocation, increasing scalability.
- Variable-size transmission window (Variable Windows Extension). Improves TFTP performance by allowing the client and server to determine the largest workable window size.
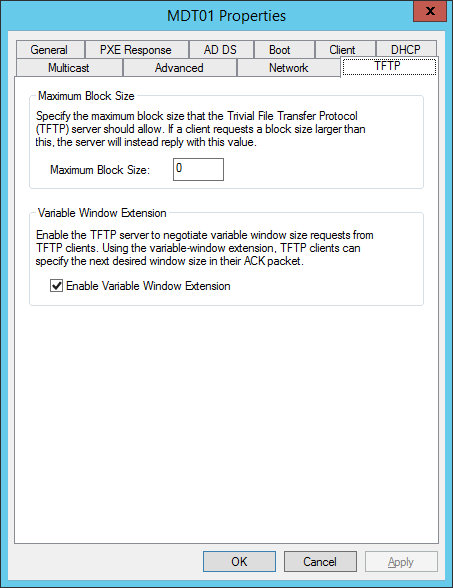
TFTP changes are now easy to perform.
(1) Сравнение скорости работы Rufus и других приложений
Сравнения были проведены на компьютере с ОС Windows 7 x64 с процессором Core 2 duo, 4 ГБ RAM, с контроллером USB 3.0 и флешкой 16 ГБ USB 3.0 ADATA S102.
| • | Windows 7 x64 | en_windows_7_ultimate_with_sp1_x64_dvd_618240.iso |
| Windows 7 USB/DVD Download Tool v1.0.30 | 00:08:10 |
| Universal USB Installer v1.8.7.5 | 00:07:10 |
| UNetbootin v1.1.1.1 | 00:06:20 |
| RMPrepUSB v2.1.638 | 00:04:10 |
| WiNToBootic v1.2 | 00:03:35 |
| Rufus v1.1.1 | 00:03:25 |
| • | Ubuntu 11.10 x86 | ubuntu-11.10-desktop-i386.iso |
| UNetbootin v1.1.1.1 | 00:01:45 |
| RMPrepUSB v2.1.638 | 00:01:35 |
| Universal USB Installer v1.8.7.5 | 00:01:20 |
| Rufus v1.1.1 | 00:01:15 |
| • | Slackware 13.37 x86 | slackware-13.37-install-dvd.iso |
| UNetbootin v1.1.1.1 | 01:00:00+ |
| Universal USB Installer v1.8.7.5 | 00:24:35 |
| RMPrepUSB v2.1.638 | 00:22:45 |
| Rufus v1.1.1 | 00:20:15 |
diskpart
- Extended article: Windows Loopback Alternative
The diskpart utility is useful for managing partitions and virtual hard drives, which can be used as loopback devices. If you want other types of loopback devices, you might want to consider VFD for floppy drives, and DAEMON Tools for optical media.
The file format used by this tool is called VHD (Virtual Hard Disk) and can be used with several emulators/VMs, including VirtualBox, Microsoft Virtual PC, Xen, and VMware.
This isn’t your usualy command-line utiliy: you run it from the command prompt, after which you query commands.
In order to create a VHD image that is 10 MiB in size, you can use the following command:
create vdisk file="C:\foo.vhd" maximum=10 type=expandable
There are a few things worth noting:
- The utility expects you to specify full paths.
- When the maximum argument is omitted, the default size is set to 24 GiB. When it is present, a valid hard disk size is needed.
- If not type is specified, the default is set to fixed. Expandable images grow in size as needed, while fixed ones do not.
- The source=»bar.vhd» argument can be used in order to intialize the contents of the new image with bar.vhd.
Most operations require one to shift focus to the virtual disk beforehand. Creating a VHD automatically shifts focus to it but when working with multiple images, the select command is useful:
select vdisk file="C:\foo.vhd"
Although expandable images grow in size, they do not also automatically reduce in size. To manually reduce the size of the selected virtual disk:
compact vdisk
Here’s an example of how to change the maximum size of the selected VHD to 20 MiB:
expand vdisk maximum=20
The following attaches the selected VHD (similarly to plugging a HDD in):
attach vdisk
The readonly argument can be used; its purpose is obvious.
After attaching a virtual disk, you need to create a partition for it and then mount it (i.e., assign it a letter):
create partition primary
assign letter=E
Finally, the following unmounts and then detaches the selected VHD:
remove letter=E
detach vdisk