Start10®
Содержание:
- Buy StartIsBack Personal Edition
- Trial, licensing and activation
- 4: Disable or uninstall third-party antivirus programs
- StartIsBack Business Edition license
- Современное меню «Пуск» на Windows 10
- Stardock.com Navigation
- 2: Create a new user account
- Fences 2.12
- Fences 3.05
- Fences 3.04
- Настройка меню «Пуск» на Windows 10
- Fences 3.13
- 8: Reinstall Cortana
- 3: Reinstall video card and sound card drivers
- Features
- Fences 2.1
Buy StartIsBack Personal Edition
You can easily buy StartIsBack license with PayPal or direct card payment (with Gumroad). All payments are processed securely.
for you
direct card payment
for you & you
direct card payment
family pack
direct card payment
Paypal payments from China may be delayed for several days.
StartIsBack Personal License can be used only for personal purposes. You must agree to be bound by terms of license agreement.
If you’re a visual styles (skins) creator and intend to make visual styles for Windows 8 with Start Menu skinned, or you want to promote StartIsBack with review, you can get StartIsBack license key for free. .
Trial, licensing and activation
How trial version works?
There are no limitations in trial version. After installing it runs for 30 days.
If you don’t activate it with license number you bought within 30 days, it will still work, but in limited mode:
Start Menu will be blank and sad; every boot you’ll be nagged about evaluation period over.
Trial period runs for each user which have installed StartIsBack on one PC separately.
What is activation and why is it needed?
Activation is a process of validating your license online.
It ties your computer to your license via online service.
It is required in order to make sure license use is not abused.
One license key allows you to activate a limited number of computers.
How my computer is identified?
Your computer is uniquely identified by motherboard unique number and hard disk physical serial number OS is installed to.
What if I change hardware configuration of my PC or replace it?
If you change both hard disk and motherboard, you will need to activate your license again as modified PC will count as new.
You can activate your license on new PC after 30 days since you used license on the old PC, so you may need to wait while trial period is over.
Does StartIsBack «phone home»?
No. StartIsBack does not collect information about your PC hardware or software.
It does not use Internet connection for license validation purposes except the moment you activate it.
Online activation service does not collect your IP address or any other information which could identify you or your computer.
Computer unique identifiers are transferred in hash form, which does not allow anyone else to view it.
Note: automatic new version checking functionality requires Internet connection.
How many times can I reinstall / reactivate StartIsBack?
There is no limitation on how many times you can activate an installation on the same PC.
Does my license expire?
4: Disable or uninstall third-party antivirus programs
If you’ve installed antivirus or anti-malware programs such as Norton, Kaspersky, AVG, Avast Behavior Shield or Malwarebytes, you shouldtemporarilyturn them off or disable them to see if they’re causing your Start menu not working problem. If your computer’s Start menu returns to normal when they’re off, you should contact the vendor of the software to see if they can provide some help.
Note that Microsoft has its own default anti-malware,Windows Defender. It’s automatically enabled even if you also have other antivirus applications installed. Even if you disable your other antivirus programs, Windows Defender is always there for you during that certain time range. So, no need to worry too much about temporarily turning antivirus off.
StartIsBack Business Edition license
If you want to use StartIsBack at business environment, you should buy Business License.
StartIsBack is perfectly suited for corporate use: 100% compatible with all Windows 7 start menu group policies and settings + has additional group policies which will help you restrict features
as well as customize appearance.
Mini-FAQ
Does Business license requires downloading special version?
No. Currently, Business license key is applicable to standard StartIsBack version you .
Can I split, resell my license key?
No. You can’t resell, split, sublicense, lease or rent your license key. You may want to resell Personal Edition instead.
How do I proceed with offline activation?
Offline activation is possible with StartIsBack+ version 1.7.5 and later and only available to license keys for 1000PC or more. To use it, either:
- Prepare OS image with StartIsBack+ installed and activated online; such image won’t be tied to hardware, or
- Save activation response when using ‘Activate by web browser’ request and use it on another PC, or
- Contact support
Современное меню «Пуск» на Windows 10
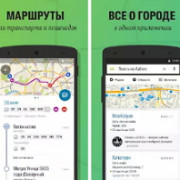
Новый «Пуск» в Windows 10 сильно отличается от системного меню, который был в Windows 7, XP и Vista. Его можно назвать средней производной между классическим «Пуском» и начальным экраном Windows 8. Что в новом современном меню изменилось по сравнению со старым, к которому привыкло большинство пользователей этой операционной системы?
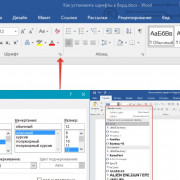
Окно «Пуска» в Windows 7 имеет компактный небольшой размер и содержит иконки всех необходимых разделов
Новое меню разделено на две части. С левой стороны находятся списки всех установленных программ, а справа — живые плитки. Это своеобразные иконки различных сервиосв и программ на компьютер. Их можно менять местами, удалять, переименовывать, а также добавлять новые и изменять их размер. Плитки дают быстрый доступ к часто используемым сервисам, разделам и программам.
В новом меню «Пуск» Windows 10 появились так называемые живые плитки, которые были доступны на начальном экране Windows 8
Изменилось также положение кнопки отключения ПК: теперь она находится в левой части экрана прямо над кнопкой Windows. Сохранился также раздел часто используемых утилит в левой части меню, а также доступ к параметрам компьютера. Однако добавились пункты и для других разделов, которых раньше не было, например, «Диспетчер задач» и «Сетевые подключения».
Software
Object Desktop
Your complete Windows customization suite.
Start11
Restore the Classic Start Menu in Windows 10/11.
Fences
Automatically organize your desktop shortcuts icons and running tasks.
DeskScapes
Personalize your desktop background with animated pictures and video.
Multiplicity
Connect multiple PCs with one keyboard and mouse.
Groupy
Organize multiple applications into grouped tabs on your Windows desktop.
CursorFX
Customize your Windows cursor and create your own.
Curtains
Easily create and add additional style modes to Windows 10.
SoundPackager
Customize your auditory experience by applying sound packages to your PC.
View All Software Products
Discover our productivity and customization tools.
Volume Licensing
Increase productivity, design intelligent controls and reinforce branding with our enterprise products.
Games
Galactic Civilizations
How will you rule your galaxy?
Sins of a Solar Empire
Real-time strategy. Unrivaled scale.
Star Control
The space action/adventure classic returns.
The Political Machine 2020
Win the hearts and minds of America’s voters.
Ashes of the Singularity
Massive-scale warfare in an epic RTS.
Offworld Trading Company
Save humanity. Turn a profit. Preferably both.
All Games
Check out our complete catalog of award-winning games.
Community
Stay up-to-date with game news and dev journals.
Metaverse
See how you rank against other players in your favorite games.
Wikis
Immerse yourself in game lore, tutorials, and more.
Community
Software
Games
Discord
Wikis
WinCustomize
News
Ashes of the Singularity: Escalation — Core Worlds DLC Adds New Maps Based on Real-World Locations Ashes of the Singularity: Escalation v3.1 Optimizes Game with Faster Load Times and Major Balance UpdatesStardock updates its fantasy civilization game, Fallen Enchantress: Legendary Heroes, with new quests, champions, performance updates and bug fixesStart11 Releases New Beta, Allows Users to Center the Taskbar Buttons on Windows 10Groupy Releases Opt-in Beta
All News >
Blog
FDA Approves First Ever «Game-Based» Treatment for Children with ADHDHosting an Online Game NightToxicity in Online GamingSneak-peek at NEW WindowBlinds skinsStressed Out? Play Your Comfort Game
All Blogs >
2: Create a new user account
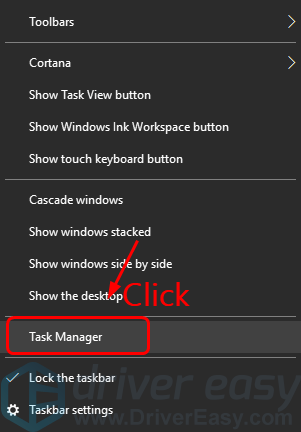
1) Right-click the task bar on your desktop at the bottom and click Task Manager.
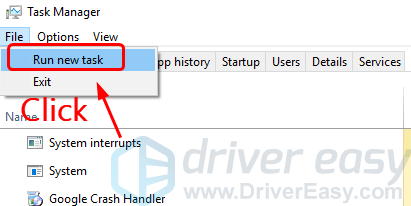
2) On the top of the Task Manager window, select File option and then choose Run new task.
3) Then type powershell and tick the box for Create this task with administrative privileges. Click OK.

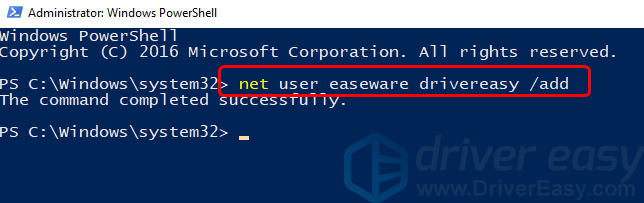
4) In PowerShell window, copy and paste in the following command and press the Enter key on your keyboard:
net user newusername newpassword /add
We are using the username “easeware” and password “drivereasy” as an example in the screenshot, you can set them as per your own preference.
5) Restart your computer and log into the new user account.
6) Your Start menu should work now.You can change the new local account to a Microsoft account and transfer your files and settings.
Fences 2.12
- Added allowing users to choose between rounded and 90 degree angle corner edges in the Fences config (defaulted by OS)
- Added prompt for email at trial activation
- Re-enabled touch features. This includes using two fingers to switch between desktop pages (enabled by default) and the ability to «flick» icons into fences (disabled by default). Both are options in the settings, on the «Desktop Pages» and «Layout and snapping» tabs respectively.
- Fixed Fences not showing on desktop/exist offscreen, out of res bounds
- Fixed Fence shifting icons into hidden third column
- Fixed show my desktop issue reactivated with information
- Fixed issue with Folder portals and visibility
- Fixed issue with name based rules and right click
- Fixed issue with bottomed aligned secondary monitors causes off-set Portal Fences
- Fixed a crash issue that has been haunting support where a target folder location had been changed
- Fixed issue with config UI blanking out
- Fixed issue with Fences not showing on desktop when they existed offscreen, out of the screen resolution
- Fixed issue with new files defaulting to the second monitor
- Fixed issue with the show desktop button in Windows when an active modal window was displaying in Fences
- Fixed issue with being unable to drag desktop pages when the taskbar was on the left or right
- Fixed issue with excluding icons from quickhide (like .website)
- Fixed issue when folder portal opacity was set to 0%
- Fixed where rules weren’t sticking if assigned through right-click/…
- Removed Fences as a Control Panel item (kept causing problems)
Fences 3.05
- FEATURE: Added simplified Chinese Localization
- UPDATE: Heuristic improvements (icons go where they should go and shouldn’t fall out of fences)
- UPDATE: Improved start process (users were having to right-click on desktop to show Fences)
- UPDATE: Fixed Folder Portal spacing for Windows 10 Insider Redstone-3 Fast Track, spacing logic tweak for RS2
- UPDATE: Improved bug reporting
- FIX: Fixed issue where drag/drop into a roll-up fence failed
- FIX: Fixed issue where hidden icons would save excessively during mousedown events
- FIX: Fences could crash while performing activities such as switching monitors, resizing desktop area, initial startup
Fences 3.04
- Variety of fixes for Windwos 10 Creator’s Update
- Fixed issue where details-view Folder Portals would not remember column order, size
- Fixed issue where icon-view Folder Portals would not remember icon size in Windows 10 Creator’s Edition
- Fixed issue where icon label would not clipped by Fence area in multi-DPI scenarios in Windows 10 Creator’s Edition
- Improved upgrade method for replacing files
- Fixed issue where Fence size could repeatedly grow larger in Windows 10 Creator’s Edition
- Fixed issue where it’s possible to move icons off-screen in multimon scenarios.
- Fixed bug with wallpaper shuffling
- Fixed bug with background blur when wallpapers are set independently per-monitor (Win10+)
- Fixed issue with icon spacing with DPI’s greater than 100% in Windows 10 Creator’s Edition
- Fixed issue where icons would jump around on moves, deletes, additions on Windows 10 Creator’s Edition
- Fixed issue with desktop icon spacing on systems with multiple monitors with multiple DPIs on Windows 10 Creator’s Edition
- Improved most High-DPI visuals up to 350%
- High-DPI compatibility improvements
- Per-monitor DPI compatibility for Fence visuals. Titlebars scale on per monitor basis as fence is moved between monitors.
- Improved startup time
- Fixed issue with drawing, where icons would appear partially black while clicking desktop
Настройка меню «Пуск» на Windows 10
Каким образом можно поменять внешний вид «Пуска», чтобы он напоминал стандартное окно из Windows 7? Вы можете изменить цвет и размер окна, а также убрать плитки с помощью самих настроек меню.
Изменение размера и цвета
Любой даже начинающий пользователь сможет легко изменить размер большого «Пуска» в Windows 10. Меню уменьшается так же, как и окно «Проводника Windows».
- Подведите курсор мышки к правому краю меню, чтобы появилась двойная стрелка, направленная в правую и левую сторону.
- Перетяните стрелку влево, чтобы уменьшилась ширина «Пуска».
- Повторите те же действия с верхним краем меню. В результате у вас будет меню, которое по размеру буде практически соответствовать системному меню Windows 7 или XP.
В разделе «Персонализация» поменяйте цвет окна, если вас не устраивает чёрный. Как это сделать?
- На «Рабочем столе» найдите пустое место, на котором нет иконок. Щёлкните по нему правой кнопкой мыши.
- В появившемся небольшом списке опций выбираем самый последний пункт «Персонализация».
- Во втором разделе «Цвета» выберите нужный вам оттенок в палитре.
- Теперь прокручиваем страницу до пункта «Отображать цвет элементов на следующих поверхностях». Ставим значение «В меню «Пуск», на панели задач и в центре уведомлений». Вы сразу увидите, что панель задач поменяла цвет. Закрываем окно настроек.
Действия с плитками
С живыми плитками в правой части экрана можно проводить разные манипуляции: добавлять, менять местами, переименовывать, создавать и т. д. Однако большинство пользователей интересуются, как избавиться от плиток, если они не нужны. Рассмотрим, как их вовсе удалить из «Пуска», если они вам мешают:
- Кликните левой кнопкой мыши по Windows в левом нижнем углу, чтобы вызвать системное меню.
- Теперь щёлкните по любой плитке правой кнопкой мыши. В небольшом списке опций нужно выбрать «Открепить от начального экрана» — она сразу же исчезнет из меню.
- Повторите это действие для каждой плитки.
- Когда не останется ни одной, уменьшите размер меню, как это было описано в разделе «Изменение размера и цвета» в этой статье. В результате вы получите меню, которое напоминает «Пуск» из Windows 7.
Если не хотите совсем убирать плитки, измените их размер. Кликните по плитке правой кнопкой мыши и в списке выберите «Изменить размер», а затем щёлкните по «Мелкий». Повторять эту процедуру нужно будет для каждой плитки в отдельности.
Выберите пункт «Мелкий», чтобы уменьшить размер плитки
Настройка левого блока
Запустите окно «Персонализации», как это было описано в разделе «Изменение размера и цвета» в этой статье. Перейдите на вкладку «Пуск». Здесь и будем проводить все дополнительные манипуляции. Отключите следующие пункты:
- Показывать больше плиток. Чтобы в меню осталась только его левая часть без плиток.
- Показывать список приложений в меню «Пуск». Большой список программ исчезнет из меню. Вместо этого списка, мы поставим другие блоки. Как это сделать, опишем ниже в этом разделе статьи.
- Показывать недавно добавленные приложения. Утилиты, которые вы недавно установили, не будут появляться в меню «Пуск».
- Показывать наиболее часто используемые приложения. Вы не будете видеть список с программами, которыми пользуетесь чаще всего.
- Иногда показывать рекомендации в меню «Пуск». Windows не будет отображать рекомендации в плитках.
Отключите все ненужные параметры, которые определяют внешний вид левой части меню «Пуск»
Чтобы заполнить очищенное пространство левой части, нажмите ссылку «Выберите, какие папки будут отображаться в меню «Пуск». В представленном разделе выберите блоки, которые будут отображаться в виде списка в левой зоне меню.
Включите те разделы, которые вы хотите видеть в левой зоне «Пуска»
Если вы хотите убрать только некоторые программы из списка, не удаляя его полностью, воспользуйтесь следующей инструкцией:
- Откройте «Пуск». Кликните по разделу в списке правой кнопкой мыши.
- В меню «Дополнительно» выберите «Не показывать в этом списке».
- Повторите эти действия для каждой программы, которую вы хотите убрать из списка.
Сортировка плиток по группам
Вы можете распределить все необходимые вам плитки по определённым группам, чтобы в меню «Пуск» не было беспорядка. Используйте уже имеющиеся или создавайте свои.
Отсортируйте нужные вам плитки по группам с помощью их перетаскивания
Чтобы создать новую группу кликните по иконке с двумя параллельными полосками и введите в поле название группы. Перетащите в эту группу все необходимые плитки.
Создайте новую группу и поместите туда важные для вас плитки
Fences 3.13
Fences 3.13 is a culmination of prior versions.
3.13
Fixed issue where rollup Folder Portals were not rendering icons properly
3.12
- Fixes for WPE compatibility
- Fixes Windows Explorer crashes from crazy long (URL) shortcuts paths
- Fixes issues where Steam users could be prompted for a Stardock key under certain conditions
3.10 (was yanked because of Windows Explorer crashes and issues with WPE)
- Improved startup times
- Disabled icon move animation (currently disabled with new installs only)
- Resolved issue with folder portal ‘flicker’
- Resolved incorrect sorting (name, date, etc) of icons outside of Fences on the desktophttps://forums.stardock.com/493308/get;3753480
- Fixed an issue with roll-up Fences where icon artifacts were left behindhttps://forums.stardock.com/503237/icons-persistence
- Much work was done to get icons to correctly go to proper monitors on multi-monitor systems
- Fixed issues with single width Fences (Fences with one icon horizontally)
- Addressed issues with MS Office icons not remaining in Fences after edit and temp file creation. Example:https://forums.stardock.com/503237/icons-persistence
- Fixed an issue where restored snapshots were not also restoring color settings
- Fixed issue where selecting icons on desktop could select hidden icons in a roll-up Fencehttps://forums.stardock.com/503136
- New feature: Target based Rules:For example, works for ‘steam’ links, or any .lnk, .url, or .website file. (Resolves the target, and applies the match to the target).https://forums.wincustomize.com/504083/updatestatus-on-url-protocol-rulefilter
8: Reinstall Cortana
The reason why your Start menu and Cortana is not working could be that they are installed wrong, somehow. You can reinstall them to get the Start menu feature back. Here is how:
1) Right-click the task bar on your desktop at the bottom and click Task Manager.
2) On the top of the Task Manager window, select File option and then choose Run new task.
3) Then type powershell and tick the box for Create this task with administrative privileges. Click OK.
4) Copy and paste the following command in and press the Enter key on your keyboard.
Get-AppXPackage -Name Microsoft.Windows.Cortana | Foreach {Add-AppxPackage -DisableDevelopmentMode -Register "$($_.InstallLocation)\AppXManifest.xml"}
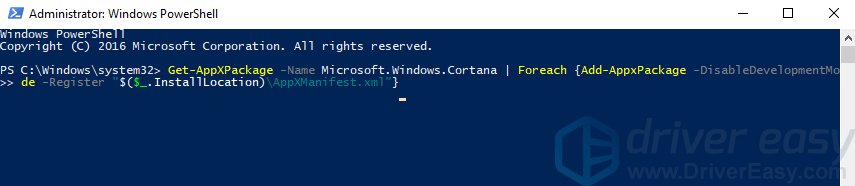
If this command is not working in your case, try the following command instead:
Get-AppXPackage -AllUsers | Foreach {Add-AppxPackage -DisableDevelopmentMode -Register "$($_.InstallLocation)\AppXManifest.xml"}
4) There, your Cortana is reinstalled, and your Start menu should also be back now.
3: Reinstall video card and sound card drivers
Many Windows users say that their video card driver and sound card driver are the culprit, especially after the latest Windows update, and quite a number of them got their Start menu back after they reinstall or update their video and sound card drivers to the recent correct version. Here is what you can do to get your Start menu working like a charm again:
1) Download Display Driver Updater and use it to uninstall your current display card driver.
2) On your keyboard, press the Windows logo key and X at the same time, click Device Manager.
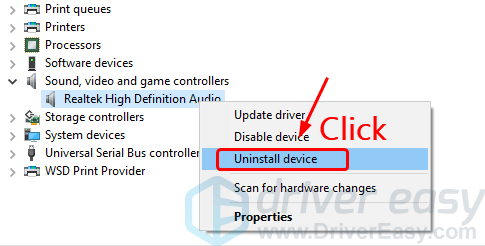
3) Double-click Sound, video and game controller. Right-click your audio card driver and click Uninstall device.
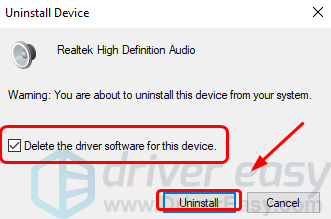
When prompted with the following notification, tick the box for Delete the driver software for this device and click Uninstall.
5) Restart your computer after the uninstall of both of your video card driver and your sound card driver.
6) Going forward, you need to update your video and sound card driver.
Manual drivers update – You can update your drivers manually bu going to the manufacturer’s website and searching for the most recent correct drivers. Note that if you are a laptop users, you should go to the laptop manufacturer for the correct video driver, since drivers from chipset manufacturer or video card manufacturer might not include the customized features you need for you laptop.
Automatic drivers update – If you don’t have the time, patience or computer skills to update your drivers manually, you can, instead, do it automatically with . Driver Easy will automatically recognize your system and find the correct drivers for your exact video card and audio card, and your variant of Windows 10, and it will download and install them correctly:
6.1)and install Driver Easy.
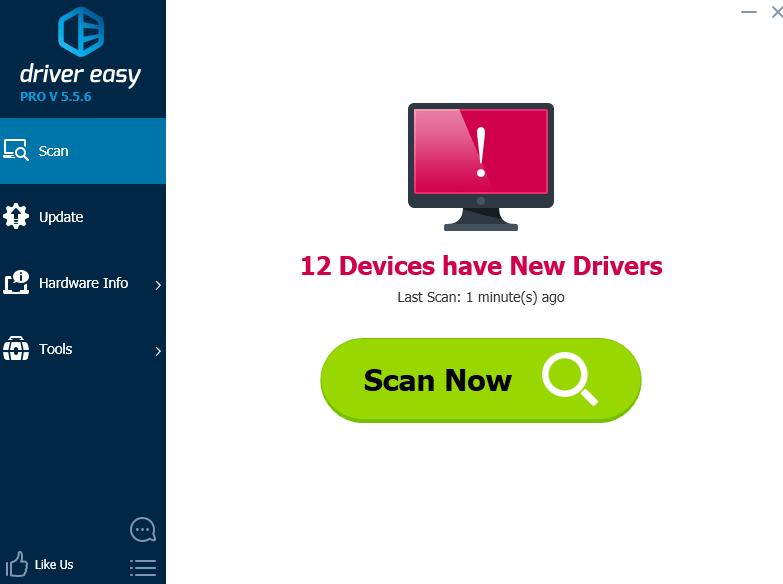
6.2) Run Driver Easy and clickScan Nowbutton. Driver Easy will then scan your computer and detect any problem drivers.
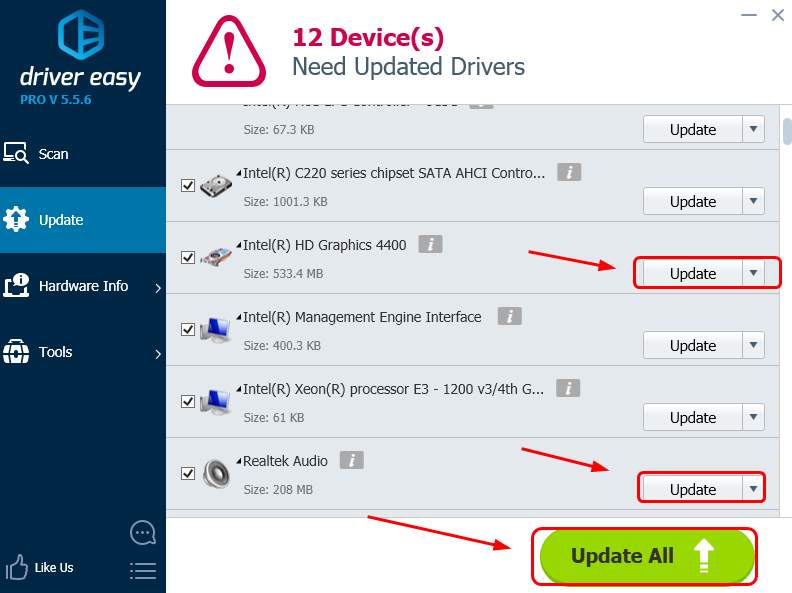
6.3) Click the Update button next to the flagged video and audio card to automatically download and install the correct versions of them (you can do this with the FREE version).
Or click Update All to automatically download and install the correct version of all the drivers that are missing or out of date on your system (this requires the Pro version – you’ll be prompted to upgrade when you click Update All).
7) Check if your Start menu is back.
Features
How do I configure Start Menu?
Either right-click Start button and click «Properties» or right-click opened Start Menu itself and choose «Properties» context menu item.
Can I use StartIsBack without start menu, just for skinning / jump list / awesomeness?
Yes. Just pick leftmost (Windows 10) style. Then select taskbar and start button styles separately.
Can StartIsBack break my system?
No. If you experience issues with old StartIsBack on too recent Windows 10 update, just hold Escape key when logging in to disable StartIsBack.
How do I uninstall StartIsBack?
As expected: go to Control Panel — Programs and Features, find StartIsBack and click Uninstall.
Fences 2.1
- New: Persistent fences (and their icons) across pages
- New: Network drive connection detection. Fences will attempt to recreate mapped folder locations on a reboot.
- New: Page indicator. Skinnable via editing graphics in Images folder.
- New: Added ability to reset appearance of All Fences
- Fixed: Recycle bin jumps out of Fence
- Fixed: Right click actions make files jump into the same fence
- Fixed: Unable to move portal fence if title is off
- Fixed: “Sort by” appears twice for folder fences with labels hidden
- Fixed: icons would fall out of fence when ran if partially hidden
- Fixed: You can no longer page onto blank screens (unless dragging an icon or a fence).
- Fixed: When dragging a fence to a new page, you no longer endlessly scroll to new pages if you stay on the edge.
- New option visible in FolderView pane when Aero is disabled: «Display incompatibility warning when Aero is disabled».
- Can also toggle via registry — «HKEY_CURRENT_USER\Software\Stardock\Fences\Tips\NeverWarnAboutAero» = 0x00000001 (DWORD 32bit)