Qt designer download
Содержание:
- Введение в Qt
- qt designer download
- Qt QML
- Первая программа
- Create Your First Applications
- Writing the code
- Краткосрочные ключи
- Установка Qt Creator в Linux
- 3 Использование формы, созданной в Qt Designer
- Automatic Connections
- Открываем Qt designer
- 7 ответов
- Prerequisites
- Layout Types
- Setting A Top Level Layout
- Connecting Objects
Введение в Qt
Qt является кроссплатформенным (не зависящим от платформы/ОС) фреймворком для разработки приложений на языке С++. С помощью Qt были разработаны такие известные приложения, как: KDE, Opera, Google Earth и Skype. Впервые Qt был опубликован в мае 1995 года.
Qt5 подразумевает двойное лицензирование, а это означает, что Qt может быть использован в некоммерческих целях для создания приложений с открытым исходным кодом, а также как лицензия для коммерческих клиентов. За счет использования собственного фреймворка и мощного инструментария Qt позволяет быстро и удобно создавать собственные кроссплатформенные приложения. Кроме того, команды разработчиков получают возможность работать на разных платформах, используя при этом общие инструменты для разработки и отладки. Весь инструментарий Qt с открытым исходным кодом вы можете найти на сайте qt.io.
Изначально Qt был разработан норвежской компанией по разработке программного обеспечения Trolltech. В 2008 году компанию приобрела Nokia. Спустя четыре года в августе 2012 программные технологии Qt выкупила финская компания-разработчик Digia. Сейчас Qt развивается компанией QT Company, которая является дочерней компанией Digia, и как проект Qt под открытым исходным кодом с участием отдельных разработчиков и фирм.
qt designer download
- 軟體兄弟
- qt安装教程
- 文章資訊
Download Qt, the software that allows you to reach all your target platforms — desktop and embedded systems — and try out our UI and UX design tools. ,Qt Creator is a fully loaded cross-platform IDE that enables embedded software development, has a spectrum of mobile development tools, & more! ,Qt Designer normally ships as a part of Qt Creator. This is Qt’s official editor and lets you do a lot more than just graphically design user interfaces. It is … ,Qt Designer is the Qt tool for designing and building graphical user interfaces (GUIs) with Qt Widgets. You can compose and customize your windows or … ,2020年6月26日 — https://build-system.fman.io/qt-designer-download. 若是Linux 系統, 可由如下指令安裝及啟動Qt Designer sudo apt-get install python3-pyqt5 … ,Learn how you can use the Qt framework under both open source and commercial licenses. Download Qt for open source development and get started today! ,Download Qt Creator and Qt source packages offline. Whether you’re i
注意! 請解除 AdBlock 的阻擋廣告,才可以瀏覽完整網頁資訊…
| 相關軟體 Qt Creator (64-bit) 資訊 |
|---|
|
Qt Creator 64 位是面向應用程序開發人員的完整集成開發環境(IDE)!無論您是創建移動應用程序,桌面應用程序還是連接的嵌入式設備,Qt Creator 都是跨平台的 IDE,使應用程序和 UI 開髮變得輕而易舉。由於上市時間至關重要,因此 IDE 包含可加快開發時間的生產力工具。完整的跨平台集成開發環境,可輕鬆創建連接設備,用戶界面和應用程序.超越代碼設計和創新我們相信,提供滿足並超出… Qt Creator (64-bit) 軟體介紹 qt designer download 相關參考資料 Download Qt | Real Time Embedded Systems — Qt Download Qt, the software that allows you to reach all your target platforms — desktop and embedded systems — and try out our UI and UX design tools. https://www.qt.io Qt Creator — A Cross-platform IDE for Application Development Qt Creator is a fully loaded cross-platform IDE that enables embedded software development, has a spectrum of mobile development tools, & more! https://www.qt.io Qt Designer Download for Windows and Mac — fman Build … Qt Designer normally ships as a part of Qt Creator. This is Qt’s official editor and lets you do a lot more than just graphically design user interfaces. It is … https://build-system.fman.io Qt Designer Manual — Qt Documentation Qt Designer is the Qt tool for designing and building graphical user interfaces (GUIs) with Qt Widgets. You can compose and customize your windows or … https://doc.qt.io Qt Designer的用途 — MahalJsp 2020年6月26日 — https://build-system.fman.io/qt-designer-download. 若是Linux 系統, 可由如下指令安裝及啟動Qt Designer sudo apt-get install python3-pyqt5 … Qt for Open Source Development Learn how you can use the Qt framework under both open source and commercial licenses. Download Qt for open source development and get started today! https://www.qt.io Source Package Offline Installer | Qt Download Qt Creator and Qt source packages offline. Whether you’re installing for the first time or using the Qt Maintenance Tool, Qt has you covered. https://www.qt.io 在Mac OS 中安裝Qt Designer 方法筆記 — Clay … 2020年10月28日 — Qt Designer 是一個專用於Python PyQt5 圖形化介面框架的輔助程式,可以讓我們直接拉出自己想要的程式介面,非常方便。不過在Mac OS 上安裝較為困難, … |
Qt QML
With Qt QML we focused on preparing for Qt 6, which has lead to a useful set of new features in Qt 5.15.
QML now has the concept of ‘required’ properties for components. These are properties that have to be set by a user of the component. Components can now be specified inline in a QML file. We’ve also added a new, declarative way of registering types.
We have improved the qmllint tool to give you far better warnings about possible problems in your QML code base. We’ve also added a new qmlformat tool that can help you format your QML files according to our QML coding style guidelines.
Finally, we’ve also worked on making sure that QML used in Qt for MCUs and Qt 5.15 are compatible.
Первая программа
Перед вами исходный код файла main.cpp, задача которого вывести информацию о версии библиотеки Qt5:
#include <QCoreApplication>
#include <iostream>
int main(int argc, char *argv[])
{
QCoreApplication a(argc, argv);
std::cout << «Qt version: » << qVersion() << std::endl;
return a.exec();
}
|
1 |
#include <QCoreApplication> intmain(intargc,char*argv) { QCoreApplicationa(argc,argv); std::cout<<«Qt version: «<<qVersion()<<std::endl; returna.exec(); } |
Функция qVersion() возвращает строку, которая содержит информацию о версии библиотеки Qt. Теперь можно запустить нашу программу и посмотреть на результат её выполнения: для этого нажмите на большой зеленый треугольник в левом нижнем углу или воспользуйтесь сочетанием клавиш :

Результат выполнения программы:

Create Your First Applications
Learn the basics of Qt and Qt Quick development by following the two tutorials below that illustrate how to create simple applications and build and run them on target platforms:
- Getting Started Programming with Qt Widgets
- Getting Started Programming with Qt Quick
Qt Widgets provides a library of UI elements which allow you to create classic desktop-style user interfaces. Qt Quick is a library providing types and functionalities for building modern, fluid, animated UIs.
For a more thorough walkthrough of the different aspects of developing applications with Qt 5, see the QML Book. It focuses on Qt Quick, but also provides the information needed to use QML together with C++.
Writing the code
Now that we have the file with the necessary design part of the application we can create our main application code and logic.
Create a file in the same folder as your file.
Using the design
For the application we’ll need the following python modules imported:
We also need the design code we created in the previous steps so add this too:
Since the design file will be completely overwritten each time we change something in the design and recreate it we will not be writing any code in it, instead we’ll create a new class e.g. that we’ll combine with the design code so that we can use all of its features, like this:
In that class we’ll interact with the GUI elements, add connections and everything else we need. But first we’ll need to initialize that class on our code startup, we’ll handle the class instance creation and other stuff in our function:
And to execute that main function we’ll use well known:
In the end our whole file looks like this (with short explanations of the code):
Running that will bring up our app running completely from python code!
But clicking button isn’t doing anything, so we need to implement those features ourselves.
Implementing functions
(All of the following code is written inside the class)
Let’s start with the «Pick a folder» button.
To connect a button event, such as clicked, to a function we use the following code:
And add it to the method of our class so that it’s set up when the application starts.
Explanation of that line of code:
— btnBrowse is the name of the object we defined in Qt Designer. is self exaplanatory and means that it belongs to current class.
— the event we want to connect. Various elements have various events, for example list widgets have etc.
— used to specify with what we want to connect it with. In our example:
— simply a function name that we’ll write inside our class:
For getting the directory browser dialog we can use the built in method like this:
If the user picks a directory the variable will be equal to absolute path of the selected directory, otherwise it’s . To avoid running our code any further if the user cancels the folder browse dialog we’ll use statement.
To list the directory contents we’ll need to add to our imports:
and to get current file list we can use .
For adding items to the listWidget we use method on it, and to clear all existing items simply use
In the end our function looks something like this:
Now you can run your app by typing and you should get the layout you desgined and picking the folder will populate list with folder items.
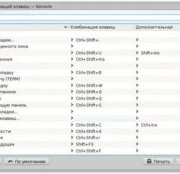
Краткосрочные ключи
В дополнение к стандартной панели инструментов и пунктам контекстного меню,существует также набор клавиатурных сокращений для применения раскладок на виджетах.
| Layout | Shortcut | Description |
|---|---|---|
| Horizontal | Ctrl+1 | Размещает выделенные объекты в горизонтальном положении. |
| Vertical | Ctrl+2 | Размещает выделенные объекты в вертикальном положении. |
| Grid | Ctrl+5 | Размещает выделенные объекты в сетке. |
| Form | Ctrl+6 | Размещает выделенные объекты в макете формы. |
| горизонтальный делитель | Ctrl+3 | Создает горизонтальный разделитель и помещает в него выделенные объекты. |
| Вертикальный разветвитель | Ctrl+4 | Создает вертикальный разделитель и помещает в него выделенные объекты. |
| Регулировать размер | Ctrl+J | Регулирует размер макета, чтобы каждый дочерний объект имел достаточно места для отображения его содержимого. См. () для получения дополнительной информации. |
Примечание. Ctrl + 0 используется для разрыва макета.
Компания Qt Company Ltd.Лицензия GNU Free Documentation License,версия 1.3.https://doc.qt.io/qt-6.1/designer-layouts.html
Установка Qt Creator в Linux

На этих уроках используется операционная система Linux (Debian 9.x 64-bit), поэтому мы скачиваем , но вы также можете использовать соответствующие файлы Qt для Windows или macOS:

После окончания загрузки переходим в папку с необходимым нам файлом, нажимаем на него правой кнопкой мыши и выбираем . На вкладке видим , , , а также наименование родительской папки:

Переходим на вкладку и ставим галочку возле пункта :

Закрываем и запускаем программу.
Шаг №2: На следующем этапе установщик сообщает, что нам предоставлена версия с открытым исходным кодом Qt 5.13.0. Дальнейшая установка Qt предполагает регистрацию в Qt и создание Qt Account, который предоставляет доступ ко всем возможностям Qt. Кроме того, данное действие необходимо для проверки лицензии (коммерческая/некоммерческая). Если у вас уже есть учетная запись в Qt Account, то используйте кнопку .
Если учетной записи в Qt Account у вас еще нет, то её можно создать сейчас: для этого перейдите по соответствующей ссылке в установщике, и вы будете перенаправлены на сайт qt.io в соответствующий раздел, или просто используйте кнопку — вы сможете это сделать на следующем шаге:

Шаг №3: Здесь необходимо ввести логин и пароль от Qt Account или создать Qt Account, если его у вас еще нет. Кнопка переводит нас на следующий этап:

Добро пожаловать в настройки Qt 5.13.0! Для перехода к следующему шагу нажимаем :

Шаг №4: Выбираем каталог для установки Qt 5.13.0
Обратите внимание, адрес каталога указывается латинскими буквами (без кириллицы) и без пробелов! После того, как выбрали каталог, нажимаем :

Шаг №5: Выбираем компоненты, которые хотим установить. Если на данном этапе у вас нет уверенности в выборе конкретных компонентов, то добавление и удаление можно будет сделать позже, после установки программы:

Шаг №6: Принимаем лицензионное соглашение:

И нажимаем на кнопку :

Для завершения установки нажимаем . После завершения установки Qt Creator запустится самостоятельно (для этого необходимо поставить галочку возле пункта ):

Вот примерно следующее вы должны увидеть при запуске Qt Creator:

Поздравляем! Qt Creator установлен.
3 Использование формы, созданной в Qt Designer
Я дал своей форме имя MainUI, виджету — имя m_counter, а кнопка — m_start и m_stop, соответственно. При этом, рядом с файлом проекта появился файл ui_mainui.h, в пространстве имен Ui которого расположен класс MainUI. Есть 2 варианта использовать этот класс:
- наследование. При этом, должно использоваться множественное наследование (например, от классов QWidget и Ui::MainUI). Наследование от Ui::MainUI должно быть закрытым для решения проблемы ромбовидного наследования;
- агрегация. Класс агрегат хранит указатель на форму, созданную в Qt Designer. Мне этот вариант кажется более естественным, хотя, обращаться к элементам формы приходится через указатель (в отличии от варианта с наследованием).
Файл заголовка формы, используемой в программе приведен на листинг 3, реализация — на листинг 4.
#ifndef MAINUI_H
# define MAINUI_H
#include <QDialog>

namespace Ui {
  class MainUI;
}

class MainDialog :public QDialog {
  Q_OBJECT
public:
  explicit MainDialog(QWidget *parent = 0);
  ~MainDialog();
public slots:
private:
  Ui::MainUI *m_ui;
};

#endif // MAINUI_H
#include "mainui.h"
#include "ui_mainui.h"

MainDialog::MainDialog(QWidget *parent)
  : QDialog(parent), m_ui(new Ui::MainUI) {
  m_ui->setupUi(this);

  m_ui->m_counter->set(6, 200);

  connect(m_ui->m_start, SIGNAL(clicked()), m_ui->m_counter, SLOT(on_start()));
  connect(m_ui->m_stop, SIGNAL(clicked()), m_ui->m_counter, SLOT(on_stop()));
}

MainDialog::~MainDialog() {
  delete m_ui;
}
В 6 строке реализации форма, созданная дизайнером устанавливается для текущего диалога (this) при помощи метода setupUI.
Таким образом, практически одной мышью можно создать пользовательский интерфейс и использовать при этом нестандартные виджеты. Однако, при описании класса Counter отмечены особенности создания виджетов, используемых в Qt Designer (такой виджет не может содержать дочерних элементов, а его конструктор принимает единственный аргумент — указатель на родительский диалог).
Исходй код проекта статьи: Виджет счетчика (исходный код)
Automatic Connections
The signals and slots connections defined for compile time or run time forms can either be set up manually or automatically, using QMetaObject’s ability to make connections between signals and suitably-named slots.
Generally, in a QDialog, if we want to process the information entered by the user before accepting it, we need to connect the clicked() signal from the OK button to a custom slot in our dialog. We will first show an example of the dialog in which the slot is connected by hand then compare it with a dialog that uses automatic connection.
A Dialog Without Auto-Connect
We define the dialog in the same way as before, but now include a slot in addition to the constructor:
class ImageDialog : public QDialog, private Ui::ImageDialog
{
    Q_OBJECT

public:
    ImageDialog(QWidget *parent = );

private slots:
    void checkValues();
};
The slot will be used to validate the values provided by the user.
In the dialog’s constructor we set up the widgets as before, and connect the Cancel button’s signal to the dialog’s reject() slot. We also disable the property in both buttons to ensure that the dialog does not interfere with the way that the line edit handles return key events:
ImageDialog::ImageDialog(QWidget *parent)
    : QDialog(parent)
{
    setupUi(this);
    okButton->setAutoDefault(false);
    cancelButton->setAutoDefault(false);
    ...
    connect(okButton, SIGNAL(clicked()), this, SLOT(checkValues()));
}
We connect the OK button’s signal to the dialog’s checkValues() slot which we implement as follows:
void ImageDialog::checkValues()
{
    if (nameLineEdit->text().isEmpty())
        (void) QMessageBox::information(this, tr("No Image Name"),
            tr("Please supply a name for the image."), QMessageBox::Cancel);
    else
        accept();
}
This custom slot does the minimum necessary to ensure that the data entered by the user is valid — it only accepts the input if a name was given for the image.
Widgets and Dialogs with Auto-Connect
Although it is easy to implement a custom slot in the dialog and connect it in the constructor, we could instead use QMetaObject’s auto-connection facilities to connect the OK button’s clicked() signal to a slot in our subclass. automatically generates code in the dialog’s function to do this, so we only need to declare and implement a slot with a name that follows a standard convention:
void on_<object name>_<signal name>(<signal parameters>);
Using this convention, we can define and implement a slot that responds to mouse clicks on the OK button:
class ImageDialog : public QDialog, private Ui::ImageDialog
{
    Q_OBJECT

public:
    ImageDialog(QWidget *parent = );

private slots:
    void on_okButton_clicked();
};
Another example of automatic signal and slot connection would be the Text Finder with its slot.
We use QMetaObject’s system to enable signal and slot connections:
QMetaObject::connectSlotsByName(this);
This enables us to implement the slot, as shown below:
void TextFinder::on_findButton_clicked()
{
    QString searchString = ui_lineEdit->text();
    QTextDocument *document = ui_textEdit->document();

    bool found = false;


    document->undo();

    if (searchString.isEmpty()) {
        QMessageBox::information(this, tr("Empty Search Field"),
                                 tr("The search field is empty. "
                                    "Please enter a word and click Find."));
    } else {
        QTextCursor highlightCursor(document);
        QTextCursor cursor(document);

        cursor.beginEditBlock();
    ...
        cursor.endEditBlock();

        if (found == false) {
            QMessageBox::information(this, tr("Word Not Found"),
                                     tr("Sorry, the word cannot be found."));
        }
    }
}
Automatic connection of signals and slots provides both a standard naming convention and an explicit interface for widget designers to work to. By providing source code that implements a given interface, user interface designers can check that their designs actually work without having to write code themselves.
Открываем Qt designer
Чтобы открыть Qt designer открываем командную строку, вводим в ней designer.exe и жмем Enter. Перед нами откроется следующее окно:

Здесь нужно выбрать один из пяти предложенных шаблонов:
Dialog with Buttons Bottom (Диалоговое окно с кнопками внизу) – форма с кнопками ОК и Cancel расположенными внизу.
Dialog with Buttons Right (Диалоговое окно с кнопками справа) – такая же как и предыдущая форма, но кнопки расположены вверху справа.
Dialog without Buttons (Диалоговое окно без кнопок) – пустая форма диалогового окна.
Main Window (Главное окно) – окно с пустым меню и панелью для инструментов.
Widget (Виджет) – пустое окно.
7 ответов
Лучший ответ
Последние колеса PyQt5 (которые могут быть установлены через pip) содержат только то, что необходимо для запуска приложений, и не включают инструменты dev. Это относится к PyQt версии 5.7 и выше. Для PyQt версий 5.6 и более ранних существуют бинарные пакеты для Windows, которые также включают в себя инструменты разработки, и они все еще доступны по адресу sourceforge. Однако сопровождающий PyQt не планирует выпускать какие-либо дополнительные выпуски таких бинарных пакетов — теперь будут доступны только колеса времени выполнения, и официальных инструментов для инструментов разработчика не будет.
В свете этого кто-то создал неофициальное колесо pyqt5-tools (только для Windows) , Это, похоже, находится на ранней стадии, и поэтому может не поспевать за последними выпусками PyQt5. Это означает, что не всегда возможно установить его через pip. Если это так, то в качестве обходного пути файлы колес можно рассматривать как файлы zip, а содержимое извлекать в подходящее место. Это должно позволить вам запустить файл , который находится в папке .
Наконец, обратите внимание, что вы также увидите некоторые файлы zip и tar.gz в sourceforge для PyQt5. Однако они содержат только исходный код , поэтому они не будут вам полезны, если вы не собираетесь самостоятельно скомпилировать PyQt5
И просто для ясности: компиляция из исходного кода все равно не даст вам всех инструментов Qt dev . Если вы пойдете по этому пути, вам также понадобится установить весь комплект разработки Qt отдельно (который будет , а затем предоставит вам инструменты разработки).
14
ekhumoro
3 Окт 2017 в 19:30
Попробуйте использовать:
Теперь вы найдете дизайнера в .
1
eyllanesc
6 Июл 2019 в 02:22
Конструктор Qt не установлен вместе с установкой .
Вы можете загрузить полную версию с sourceforge (возможно, это будет не последний выпуск pyqt, и возможно, глючить при наличии другой установки, например вашей, или установить ее с другим (неофициальным) пакетом — pyqt5-tools (), затем запустите конструктор из следующего подпути вашего каталога python —
18
Uriel
7 Фев 2017 в 13:29
Я тоже боролся с этим. Подход громоздок, поэтому я создал автономный установщик для Qt Designer . Это всего 40 МБ. Может быть, вы найдете это полезным!
12
Michael Herrmann
28 Окт 2018 в 14:45
Вы также можете установить Qt Designer следующим образом:
Установите последнюю версию Qt (я использую 5.8) с основного сайта Qt
Убедитесь, что вы включили компонент «Qt 5.8 MinGW» Qt Designer будет установлен в
Обратите внимание, что исполняемый файл называется «designer.exe»
2
eyllanesc
6 Июл 2019 в 02:23
Затем перезапустите cmd, просто наберите «designer» и нажмите ввод.
2
eyllanesc
6 Июл 2019 в 02:22
работает в Python 3.7.4
не будет работать в Python 3.8.0
dima_showstopper
27 Ноя 2019 в 21:14
Prerequisites
You need PyQt and Qt Designer installed, and of course python.
I’ll be using PyQt4 with python 2.7.10 but there are no major differences between PyQt and PySide or python 3 versions of those, so if you already have PyQt5 or PySide installed there is no need to downgrade/switch.
If you don’t have anything installed you can get PyQt for Windows here:
It comes with Qt Designer bundled.
For OS X you can download the PyQt via homebrew:
And QtCreator (which contains Qt Designer) here: http://download.qt.io/archive/qt/4.8/4.8.6/
If you’re looking for a more straightforward installation of the qt Qt Designer alone then check out this privately maintained builds page https://build-system.fman.io/qt-designer-download
On Linux the packages required are probably in your distro repositories, if you’re on Ubuntu/Debian you can run:
After you’re done installing requirements on your operating system open terminal/command prompt and make sure you can run command it should show:
If you get «command not found» or something along those lines try googling on how to solve it for your operating system and pyqt version.
If you’re on windows you most likely don’t have (replace with your python version) in your .
To see how to solve that look at this SO thread
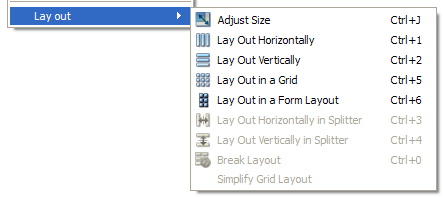
Layout Types
Horizontal and Vertical (Box) Layouts
The simplest way to arrange objects on a form is to place them in a horizontal or vertical layout. Horizontal layouts ensure that the widgets within are aligned horizontally; vertical layouts ensure that they are aligned vertically.
Horizontal and vertical layouts can be combined and nested to any depth. However, if you need more control over the placement of objects, consider using the grid layout.
The Grid Layout
Complex form layouts can be created by placing objects in a grid layout. This kind of layout gives the form designer much more freedom to arrange widgets on the form, but can result in a much less flexible layout. However, for some kinds of form layout, a grid arrangement is much more suitable than a nested arrangement of horizontal and vertical layouts.
The Form Layout
The QFormLayout class manages widgets in a two-column form; the left column holds labels and the right column holds field widgets such as line edits, spin boxes, etc. The QFormLayout class adheres to various platform look and feel guidelines and supports wrapping for long rows.
The UI file above results in the previews shown below.
| Windows XP | macOS | Cleanlooks |
|---|---|---|
Splitter Layouts
Another common way to manage the layout of objects on a form is to place them in a splitter. These splitters arrange the objects horizontally or vertically in the same way as normal layouts, but also allow the user to adjust the amount of space allocated to each object.
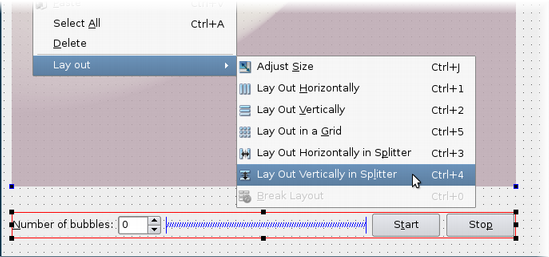
Although QSplitter is a container widget, Qt Designer treats splitter objects as layouts that are applied to existing widgets. To place a group of widgets into a splitter, select them then apply the splitter layout by using the appropriate toolbar button, keyboard shortcut, or Lay out context menu entry.
Setting A Top Level Layout
The form’s top level layout can be set by clearing the selection (click the left mouse button on the form itself) and applying a layout. A top level layout is necessary to ensure that your widgets will resize correctly when its window is resized. To check if you have set a top level layout, preview your widget and attempt to resize the window by dragging the size grip.
|
Applying a Layout
To apply a layout, you can select your choice of layout from the toolbar shown on the left, or from the context menu shown below. |
Similary, top level layouts are set on container widgets (QGroupBox) or on pages of page-based container widgets (QTabWidget, QToolBox and QStackedWidget), respectively. The container widget needs to be selected for this to succeed.
Top level layouts are not visible as separate objects in the Object Inspector. Their properties appear below the widget properties of the main form, container widget, or page of a container widget in the Property Editor.
Connecting Objects
To begin connecting objects, enter the signals and slots editing mode by opening the Edit menu and selecting Edit Signals/Slots, or by pressing the F4 key.
All widgets and layouts on the form can be connected together. However, spacers just provide spacing hints to layouts, so they cannot be connected to other objects.
|
Highlighted Objects
When the cursor is over an object that can be used in a connection, the object will be highlighted. |
To make a connectionn, press the left mouse button and drag the cursor towards the object you want to connect it to. As you do this, a line will extend from the source object to the cursor. If the cursor is over another object on the form, the line will end with an arrow head that points to the destination object. This indicates that a connection will be made between the two objects when you release the mouse button.
You can abandon the connection at any point while you are dragging the connection path by pressing Esc.
|
Making a Connection
The connection path will change its shape as the cursor moves around the form. As it passes over objects, they are highlighted, indicating that they can be used in a signal and slot connection. Release the mouse button to make the connection. |
The Configure Connection dialog (below) is displayed, showing signals from the source object and slots from the destination object that you can use.
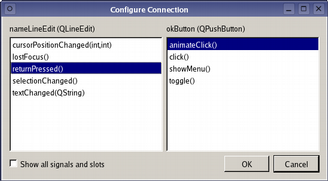
To complete the connection, select a signal from the source object and a slot from the destination object, then click OK. Click Cancel if you wish to abandon the connection.
Note: If the Show all signals and slots checkbox is selected, all available signals from the source object will be shown. Otherwise, the signals and slots inherited from QWidget will be hidden.
You can make as many connections as you like between objects on the form; it is possible to connect signals from objects to slots in the form itself. As a result, the signal and slot connections in many dialogs can be completely configured from within Qt Designer.
|
Connecting to a Form
To connect an object to the form itself, simply position the cursor over the form and release the mouse button. The end point of the connection changes to the electrical «ground» symbol. |