Pyqt6-tools 6.1.0.3.2
Содержание:
- Как выпускать сигналы в PyQt5
- An application icon
- Showing a tooltip in PyQt5
- PyQt5 message box
- Виджет QLineEdit
- System Tray and Notifications
- References
- Portable or not, the choice is yours!
- Установка PyQt5 Designer
- Using Qt Designer and .ui files
- Closing a window
- Multiple windows
- OpenPGP Public Keys
- Packaging
- Other Useful Items
- Using Qt Designer’s Signal/Slot Editor
- Виджет QComboBox
Как выпускать сигналы в PyQt5
Мы увидели, как работают сигналы и слоты. Все сигналы, с которыми мы работали, являются предопределенными для нас.
Но что на счет выпуска собственного сигнала?
Это очень просто! Вы можете сделать это, просто использовав класс pyqtSignal, как показано ниже:
- Определите ваше событие типом pyqtSignal;
- Вызовите метод emit() в том месте, где вы хотите, чтобы произошло событие.
Скажем, у нас есть классnut, и мы хотим, чтобы сигнал cracked был выпущен.
Как использовать сигнал
Сейчас мы сделаем наш пример более практичным, создаем экземпляр класса nut и выпуская сигнал cracked:
Сигнал cracked успешно выпущен.
Переопределение сигнала (события) в PyQt5
Иногда нам может понадобиться переопределить поведение по умолчанию для особенных событий или сигналов.
Давайте рассмотрим практичный пример для этого случая. Если вы хотите закрыть окно, когда пользователь нажимает на определенную клавишу, вы можете переопределить keyPressEvent внутри вашего главного окна следующим образом:
Теперь, если пользователь нажмет клавишу F12, главное окно будет закрыто.
Здесь мы переопределили основной сигнал нажатия в главном окне и закрыли это окно.
An application icon
The application icon is a small image which is usually displayed
in the top left corner of the titlebar. In the following example we will
show how we do it in PyQt5. We will also introduce some new methods.
Some environments do not display icons in the titlebars. We need to enable them.
See my
on Stackoverflow for a solution, if you are seeing no icons.
icon.py
#!/usr/bin/python

"""
ZetCode PyQt5 tutorial

This example shows an icon
in the titlebar of the window.

Author: Jan Bodnar
Website: zetcode.com
"""

import sys
from PyQt5.QtWidgets import QApplication, QWidget
from PyQt5.QtGui import QIcon


class Example(QWidget):

    def __init__(self):
        super().__init__()

        self.initUI()


    def initUI(self):

        self.setGeometry(300, 300, 300, 220)
        self.setWindowTitle('Icon')
        self.setWindowIcon(QIcon('web.png'))

        self.show()


def main():

    app = QApplication(sys.argv)
    ex = Example()
    sys.exit(app.exec_())


if __name__ == '__main__':
    main()
The previous example was coded in a procedural style. Python programming language
supports both procedural and object oriented programming styles. Programming in
PyQt5 means programming in OOP.
class Example(QWidget):

    def __init__(self):
        super().__init__()
        ...
Three important things in object oriented programming are classes,
data, and methods. Here we create a new class called .
The class inherits from the class.
This means that we call two constructors: the first one for the
class and the second one for the inherited class. The
method returns the parent object of the class and we call its constructor.
The method is a constructor method in Python language.
self.initUI()
The creation of the GUI is delegated to the method.
self.setGeometry(300, 300, 300, 220)
self.setWindowTitle('Icon')
self.setWindowIcon(QIcon('web.png'))
All three methods have been inherited from the class.
The does two things: it locates the window on the screen and sets
it size. The first two parameters are the x and y
positions of the window. The third is the width and the fourth is the height of the
window. In fact, it combines the and methods
in one method. The last method sets the application icon. To do this, we have created a
object. The receives the path to our icon to be displayed.
def main():

    app = QApplication(sys.argv)
    ex = Example()
    sys.exit(app.exec_())
The application and example objects are created. The main loop is started.
![]() Figure: Icon
Figure: Icon
Showing a tooltip in PyQt5
We can provide a balloon help for any of our widgets.
tooltip.py
#!/usr/bin/python

"""
ZetCode PyQt5 tutorial

This example shows a tooltip on
a window and a button.

Author: Jan Bodnar
Website: zetcode.com
"""

import sys
from PyQt5.QtWidgets import (QWidget, QToolTip,
    QPushButton, QApplication)
from PyQt5.QtGui import QFont


class Example(QWidget):

    def __init__(self):
        super().__init__()

        self.initUI()


    def initUI(self):

        QToolTip.setFont(QFont('SansSerif', 10))

        self.setToolTip('This is a <b>QWidget</b> widget')

        btn = QPushButton('Button', self)
        btn.setToolTip('This is a <b>QPushButton</b> widget')
        btn.resize(btn.sizeHint())
        btn.move(50, 50)

        self.setGeometry(300, 300, 300, 200)
        self.setWindowTitle('Tooltips')
        self.show()


def main():

    app = QApplication(sys.argv)
    ex = Example()
    sys.exit(app.exec_())


if __name__ == '__main__':
    main()
In this example, we show a tooltip for two PyQt5 widgets.
QToolTip.setFont(QFont('SansSerif', 10))
This static method sets a font used to render tooltips.
We use a 10pt SansSerif font.
self.setToolTip('This is a <b>QWidget</b> widget')
To create a tooltip, we call the method. We can use
rich text formatting.
btn = QPushButton('Button', self)
btn.setToolTip('This is a <b>QPushButton</b> widget')
We create a push button widget and set a tooltip for it.
btn.resize(btn.sizeHint())
btn.move(50, 50)
The button is being resized and moved on the window. The
method gives a recommended size for the button.
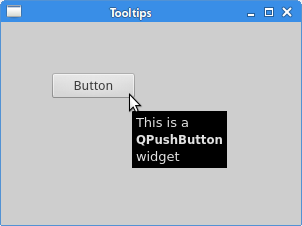 Figure: Tooltips
PyQt5 message box
By default, if we click on the x button on the titlebar,
the is closed. Sometimes we want to modify
this default behaviour. For example, if we have a file opened in an editor
to which we did some changes. We show a message box to confirm the action.
messagebox.py
#!/usr/bin/python

"""
ZetCode PyQt5 tutorial

This program shows a confirmation
message box when we click on the close
button of the application window.

Author: Jan Bodnar
Website: zetcode.com
"""

import sys
from PyQt5.QtWidgets import QWidget, QMessageBox, QApplication


class Example(QWidget):

    def __init__(self):
        super().__init__()

        self.initUI()

    def initUI(self):

        self.setGeometry(300, 300, 250, 150)
        self.setWindowTitle('Message box')
        self.show()

    def closeEvent(self, event):

        reply = QMessageBox.question(self, 'Message',
                                     "Are you sure to quit?", QMessageBox.Yes |
                                     QMessageBox.No, QMessageBox.No)

        if reply == QMessageBox.Yes:

            event.accept()
        else:

            event.ignore()


def main():
    app = QApplication(sys.argv)
    ex = Example()
    sys.exit(app.exec_())


if __name__ == '__main__':
    main()
If we close a , the
is generated. To modify the widget behaviour we need to reimplement
the event handler.
reply = QMessageBox.question(self, 'Message',
                             "Are you sure to quit?", QMessageBox.Yes |
                             QMessageBox.No, QMessageBox.No)
We show a message box with two buttons: Yes and No. The first string appears
on the titlebar. The second string is the message text displayed by the dialog.
The third argument specifies the combination of buttons appearing in the dialog.
The last parameter is the default button. It is the button which has initially
the keyboard focus. The return value is stored in the variable.
if reply == QtGui.QMessageBox.Yes:
    event.accept()
else:
    event.ignore()
Here we test the return value. If we click the Yes button, we accept
the event which leads to the closure of the widget and to the
termination of the application. Otherwise we ignore the close event.
Figure: Message box
Виджет QLineEdit
Виджет QLineEdit – это редактируемое поле, где вы можете принимать данные от пользователя. LineEdit содержит множество методов, с которыми можно работать.
Я создам новый дизайн qline.ui, используя дизайнер PyQt5 и внесу шесть виджетов QLineEdit и экспортирую его в файл qline.py.
Cодержимое файла qline.py после конвертации:
Давайте познакомимся с методами QLineEdit:
Результат:
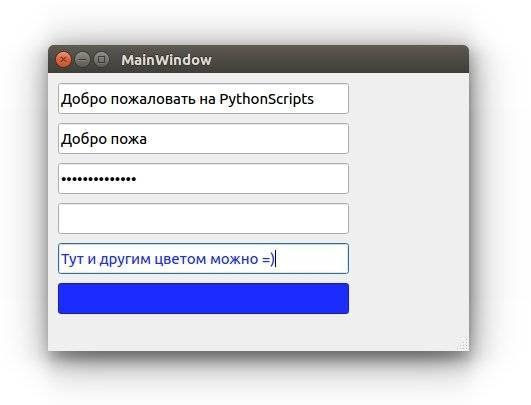
- Для 1-го QLineEdit, мы изменили текст, при помощи метода setText().
- Для 2-го QLineEdit, мы установили максимум доступных 10-и символов, так что более 10-и приниматься не будут.
- Для 3-го QLineEdit, мы установили режим пароля, так ваши введенные данные отображаются как звездочки;
- Для 4-го QLineEdit, мы установили режим «только для чтения», так что редактировать контент не представляется возможным.
- Для 5-го QLineEdit мы изменили цвет шрифта при помощи метода setStyleSheet() и указали нужный цвет с помощью CSS (как и для обычной веб страницы).
- Для 6-го QLineEdit мы изменили цвет фона при помощи метода setStyleSheet() и CSS.
Метод setStyleSheet()
Метод setStyleSheet() может быть использован с виджетами PyQt5 для изменения стилей.
Вы можете изменить следующие параметры, пользуясь методом setStyleSheet():
- Размер и тип шрифта;
- Цвет текста;
- Цвет заднего фона;
- Цвет верхней границы;
- Цвет нижней границы;
- Цвет левой границы;
- Цвет правой границы;
- Цвет выделения;
- Цвет выделения заднего фона.
Это наиболее важные значения, которые можно передать методу setStyleSheet().
Большая часть ваших программ Python будут содержать виджет QPushButton. Вы нажимаете кнопку, и какой-нибудь код выполняется.
Если у вас имеется опыт в программировании, вы могли слышать об обработке событий, где вы взаимодействуете с виджетом и функция выполняется.
Суть идеи сохранилась такой же и в PyQt5, только определения немного отличаются.
Так что при нажатии на QPushButton, сигнал издается. Названием сигнала в данном случае, является clicked().
Чтобы связать сигнал со слотом, вам нужно использовать метод connect(), что вы сейчас и увидите.
Этот процесс обработки события продолжает работать до тех пор, пока вы не закроете вашу форму, или главный виджет.
Давайте создадим форму myform.ui при помощи QLabel и QPushButton и экспортируем её в файл myform.py.
Экспортируем myform.ui в myform.py
Сейчас, мы подключим сигнал clicked() к слоту при помощи метода connect(), вот так:
Здесь, btnClicked – это слот, или функция, которая будет выполнена после того, как вы кликните на QPushButton.
Итак, ваш код будет выглядеть следующим образом:
Результат:
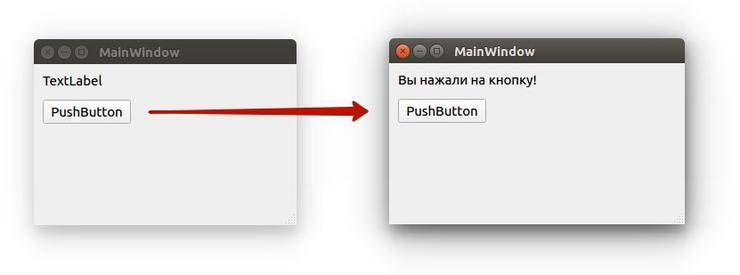
Замечательно!
System Tray and Notifications
Creating a system tray icon for your application can be
very useful. A common task is to keep an application
running even when the main window is closed while leaving
an icon in the system tray.
This example will demonstrate how to:
- Create a system tray icon
- Add a right-click context menu
- Add custom action handlers to the context menu items
- Capture window close event, ignore, and hide window (exit to system tray)
- Add an Exit option to the context menu of the system tray
- Generate a desktop notification
You can also create application that doesn’t have a main window
at all and lives entirely in the sytem tray. In that case,
don’t make your main widget a Q or a .
Instead, make it a
References
- Official Qt C++ Documentation
- PyQt5 Reference Guide
- PtQt5 Class Documentation
- https://www.qt.io/
- https://github.com/DevDungeon/PyQt5-Bitcoin-Price-Checker
- https://www.devdungeon.com/content/live-coding-pyqt5-guis-w-python
- https://www.qt.io/download
- https://github.com/baoboa/pyqt5/tree/master/examples
- https://www.riverbankcomputing.com/static/Docs/PyQt5
- https://www.riverbankcomputing.com/static/Docs/PyQt5/signals_slots.html
- https://github.com/baoboa/pyqt5/tree/master/examples/
- https://github.com/DevDungeon/Cookbook/tree/master/python/pyqt5_examples
- https://setuptools.readthedocs.io/en/latest/
- https://www.pyinstaller.org/
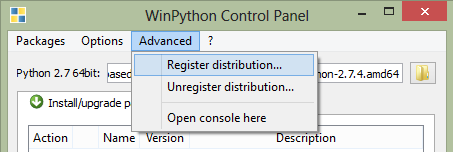
Portable or not, the choice is yours!
WinPython is a portable application, so the user should not expect any integration into Windows explorer during installation. However, the WinPython Control Panel allows to «register» your distribution to Windows (see screenshot below).
Registering your WinPython installation will:
- associate file extensions .py, .pyc and .pyo to Python interpreter
- register Python icons in Windows explorer
- add context menu entries Edit with IDLE and Edit with Spyder for .py files
- register WinPython as a standard Python distribution (standard Python Windows installers will see WinPython in Windows registry)
(*) For recent WinPython, Windows 8..10 users may have to install missing system DLL Microsoft Visual C++ Redistributable for Visual Studio 2017..2019 (vc_redist_x86.exe for WinPython 32bit, vc_redist_x64.exe for Winpython 64bit)
(*) For best Winpython 2018-01 and later experience, it is recommended to have WinPython base directory path smaller than 37 characters. example: C:\Users\xxxxxxxx\Downloads\WinPython
(**) Since WinPython 2019-02, all installers are just 7zip auto-extracts.
Установка PyQt5 Designer
Есть два способа создания GUI приложений при помощи PyQt5:
- Дизайн виджетов при помощи кода;
- Использование PyQt5 Designer.
В этом руководстве мы используем PyQt5 Designer, который упрощает процесс на столько, что вы можете выполнить большой объем работы за секунды.
Дизайнер PyQt5 поставляется вместе с набором инструментов. Для его установки, вам нужно установить эти инструменты.
Где находится дизайнер PyQt5?
После удачной установки, вы можете найти дизайнер PyQt5 здесь:
Кстати, если вы установили только для своего текущего пользовательского аккаунта, вы найдете дизайнер PyQt5 вот здесь:
Вы можете создать короткий путь для него, вместо того, чтобы постоянно переходить к этому расположению для запуска дизайнера PyQt5.
Как использовать дизайнер PyQt5
Откройте designer.exe и увидите диалоговое окно, спрашивающее о том, какую форму шаблона вы предпочитаете.
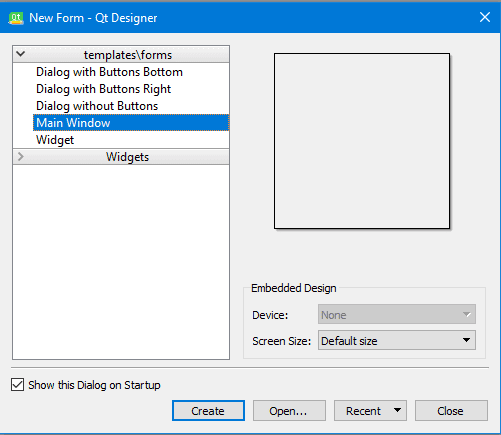
Существует пять видов доступных шаблонов:
- Диалоговое окно с кнопками внизу (Dialog with Buttons Bottom): создает форму с кнопками ОК и Cancel в правом нижнем углу формы.
- Диалоговое окно с кнопками справа (Dialog with Buttons Right): создает форму с кнопками OK и Cancel в верхнем правом углу формы.
- Диалоговое окно без кнопок (Dialog without Buttons): создает пустую форму;
- Главное окно (Main Window): создает окно с панелью меню и набором инструментов. Унаследовано из QmainWindow;
- Виджет (Widget): создает виджет, наследуемый из класса Qwidget. Отличается от диалоговых шаблонов тем, что они наследуются из класса QВialog
Итак, у нас есть три типа шаблонов. В чем между ними разница?
Using Qt Designer and .ui files
Using the Designer is optional, but it can be a very helpful way to layout
interfaces. I highly recommend using the Designer.
Once you have created a file in the Designer, you can either
convert it to a Python file which will create the interface programmatically,
or you can load the file directly. The next sections will cover both options.
Convert UI file to Python code
From the terminal, you can convert a QtDesigner .ui file to
a Python file. This method works fine, however it becomes difficult
to iterate rapidly on changes with this extra step. You also cannot
modify the .py file if you ever want to regenerate it. I recommend
using the method in the next section, where you load the .ui file
directly.
The Python file output will have all the code needed to recreate
the interface created in Designer.
Load the UI file in Python
My preferred option for loading interfaces, is to the load the file
directly. This means you will need to include the file with your
distribution, but it means you can easily make changes in the Designer
and quickly test them in Python w/o the extra step of converting the file.
Closing a window
The obvious way to close a window is to click on the x mark on the titlebar.
In the next example, we show how we can programatically close our window.
We will briefly touch signals and slots.
The following is the constructor of a widget that we use
in our example.
QPushButton(string text, QWidget parent = None)
The parameter is a text that will be displayed on the button.
The is a widget on which we place our button.
In our case it will be a . Widgets of an application form a hierarchy.
In this hierarchy, most widgets have their parents. Widgets without parents are toplevel windows.
quit_button.py
#!/usr/bin/python

"""
ZetCode PyQt5 tutorial

This program creates a quit
button. When we press the button,
the application terminates.

Author: Jan Bodnar
Website: zetcode.com
"""

import sys
from PyQt5.QtWidgets import QWidget, QPushButton, QApplication

class Example(QWidget):

    def __init__(self):
        super().__init__()

        self.initUI()


    def initUI(self):

        qbtn = QPushButton('Quit', self)
        qbtn.clicked.connect(QApplication.instance().quit)
        qbtn.resize(qbtn.sizeHint())
        qbtn.move(50, 50)

        self.setGeometry(300, 300, 350, 250)
        self.setWindowTitle('Quit button')
        self.show()


def main():

    app = QApplication(sys.argv)
    ex = Example()
    sys.exit(app.exec_())


if __name__ == '__main__':
    main()
In this example, we create a quit button. Upon clicking on
the button, the application terminates.
qbtn = QPushButton('Quit', self)
We create a push button. The button is an instance of the
class. The first parameter of the constructor is the label of the button.
The second parameter is the parent widget. The parent widget is the
widget, which is a by inheritance.
qbtn.clicked.connect(QApplication.instance().quit)
The event processing system in PyQt5 is built with the signal & slot
mechanism. If we click on the button, the signal is
emitted. The slot can be a Qt slot or any Python callable.
, which is retrieved with
, contains the main event loop—it processes
and dispatches all events. The clicked signal is connected to the
method which terminates the application. The communication
is done between two objects: the sender and the receiver. The sender is the push
button, the receiver is the application object.
Figure: Quit button
Multiple windows
You can use the same principle for creating multiple windows — as long as you keep a reference to the window, things will work as expected. The simplest approach is to create a separate method to toggle the display of each of the windows.
- PyQt5
- PyQt6
python
python
 A mainwindow with two child windows.
However, you can also create a generic method which handles toggling for all windows — see transmitting extra data with Qt signals for a detailed explanation of how this works. The example below shows that in action, using a function to intercept the signal from each button and pass through the appropriate window. We can also discard the value since we aren’t using it.
OpenPGP Public Keys
Source and binary executables are signed by the release manager or binary builder using their
OpenPGP key. Release files for currently supported releases are signed by the following:
- Pablo Galindo Salgado (3.10.x and 3.11.x source files and tags) (key id: 64E628F8D684696D)
- Steve Dower (Windows binaries) (key id: FC62 4643 4870 34E5)
- Łukasz Langa (3.8.x and 3.9.x source files and tags) (key id: B269 95E3 1025 0568)
- Ned Deily (macOS binaries, 3.7.x / 3.6.x source files and tags) (key ids: 2D34 7EA6 AA65 421D, FB99 2128 6F5E 1540, and Apple Developer ID DJ3H93M7VJ)
- Larry Hastings (3.5.x source files and tags) (key id: 3A5C A953 F73C 700D)
- Benjamin Peterson (2.7.z source files and tags) (key id: 04C3 67C2 18AD D4FF and A4135B38)
Release files for older releases which have now reached end-of-life may have been signed by one of the following:
- Anthony Baxter (key id: 0EDD C5F2 6A45 C816)
- Georg Brandl (key id: 0A5B 1018 3658 0288)
- Martin v. Löwis (key id: 6AF0 53F0 7D9D C8D2)
- Ronald Oussoren (key id: C9BE 28DE E6DF 025C)
- Barry Warsaw (key ids: 126E B563 A74B 06BF, D986 6941 EA5B BD71, and ED9D77D5)
You can import a person’s public keys from a public keyserver network server
you trust by running a command like:
or, in many cases, public keys can also be found
at keybase.io.
On the version-specific download pages, you should see a link to both the
downloadable file and a detached signature file. To verify the authenticity
of the download, grab both files and then run this command:
Note that you must use the name of the signature file, and you should use the
one that’s appropriate to the download you’re verifying.
(These instructions are geared to
GnuPG and Unix command-line users.)
Packaging
You can package your PyQt5 app in a number of ways including:
- Python setuputils packaging (for and pypi.org).
- PyInstaller to create an , , or Linux executable
We will only look at using PyInstaller here since regular Python packaging
is already well documented. You can also check out my
PyInstaller Tutorial.
PyInstaller can be used to create .exe files for Windows, .app
files for Mac, and distributable packages for Linux.
Optionally, it can create a single file which is more convenient for
distributing, but takes slightly longer to start because it unzip itself.
Use to generate a file based on your application.
You can find more details about spec files at https://pythonhosted.org/PyInstaller/spec-files.html.
After generating the spec file, you can customize it to suit your needs.
For example, to add template files, modify the variable.
Note that starting in PqyQt 5.13.0 there is an additional build step
for the files to be found. When packaging, it expects
the libraries to be in but they get put in the root
directory. You can manually move the files in to that directory after
build or you can set it in the flag or object.
If you add it in the object, it will put the files
in the right spot, but it still ALSO leave the same files in the root
of the output directory. You will need to clean up the duplicates.
For example:
Then, after the spec file is complete, you can build it using PyInstaller.
Alternatively, instead of using a file, you can specify
all the options at the command line. For example:
When a Hello World type application is packaged with PyInstaller,
it comes out to about 100MB on disk, and uses about 13MB or RAM
when running.
Other Useful Items
- Looking for 3rd party Python modules? The
Package Index has many of them. - You can view the standard documentation
online, or you can download it
in HTML, PostScript, PDF and other formats. See the main
Documentation page. - Information on tools for unpacking archive files
provided on python.org is available. -
Tip: even if you download a ready-made binary for your
platform, it makes sense to also download the source.
This lets you browse the standard library (the subdirectory Lib)
and the standard collections of demos (Demo) and tools
(Tools) that come with it. There’s a lot you can learn from the
source! - There is also a collection of Emacs packages
that the Emacsing Pythoneer might find useful. This includes major
modes for editing Python, C, C++, Java, etc., Python debugger
interfaces and more. Most packages are compatible with Emacs and
XEmacs.
Using Qt Designer’s Signal/Slot Editor
First design a simple form with a LineEdit control and a PushButton.
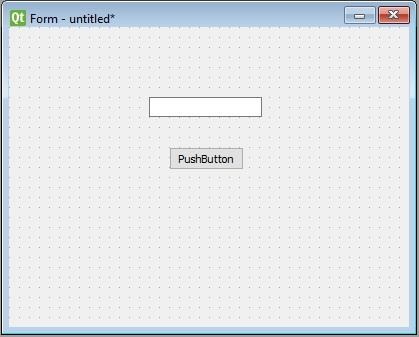
It is desired that if button is pressed, contents of text box should be erased. The QLineEdit widget has a clear() method for this purpose. Hence, the button’s clicked signal is to be connected to clear() method of the text box.
To start with, choose Edit signals/slots from Edit menu (or press F4). Then highlight the button with mouse and drag the cursor towards the textbox

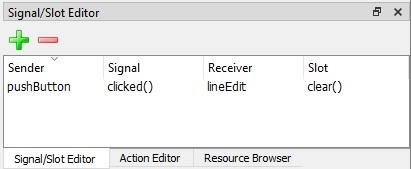
As the mouse is released, a dialog showing signals of button and methods of slot will be displayed. Select clicked signal and clear() method
![]()
The Signal/Slot Editor window at bottom right will show the result −
Save ui and Build and Python code from ui file as shown in the below code −
pyuic5 -x signalslot.ui -o signalslot.py
Generated Python code will have the connection between signal and slot by the following statement −
self.pushButton.clicked.connect(self.lineEdit.clear)
Run signalslot.py and enter some text in the LineEdit. The text will be cleared if the button is pressed.
Виджет QComboBox
Вместо того, чтобы разрешить пользователю вводить свои данные в QLineEdit, или любом другом редактируемом виджете, мы можем использовать виджет QCombobBox, чтобы дать список данных, из которого он сможет выбирать.
Давайте перетянем QComboBox в нашу форму и взглянем на её методы.

Сохраняем файл как combobox.ui и конвертируем его в combobox.py:
Если вы запустите приложение сейчас, обратите внимание на то, что QComboBox — пустой. Чтобы вносить объекты в QComboBox, используйте метод addItem():
Получаем все элементы из QComboBox
Нет прямого способа получить все значения из QComboBox, но вы можете применить цикл Python для этой цели. Для этого подойдет функция range.
Выбор одного элемента из QCombobox
Чтобы выбрать элемент из QComboBox, у вас есть два метода:
Обратите внимание на то, что при выборе элемента по тексту, следует убедиться в том, что вы вводите правильный текст. В противном случае, QComboBox останется на первом элементе