Support center of aiseesoft
Содержание:
- Part 13: Tool 9 — Video Merger
- HEIC vs. JPG vs. PNG
- Hot Tutorials
- 4K UHD VS 1080p Full HD
- Part 8: Tool 4 — 3D Maker
- Part 9: Tool 5 — Video Enhancer
- A simple and powerful video converter
- Part 4: Edit Video/Audio with Multiple Effects
- More News
- Aiseesoft’s Mac Video Converter Ultimate Exceeds All Expectations
- Aiseesoft iPhone Transfer — The Premier Solution for Transferring iPhone Files
- Aiseesoft DVD Creator — DVD Burning’s Reigning Champion
- Aiseesoft Updates Transfer Software — Super Fast Transferring Speed
- Aiseesoft Releases Update for MP4 Converter for Mac
- Aiseesoft Releases WTV Converter — Enjoy Recorded TV Shows Everywhere
- Aiseesoft Releases 3D Converter for Mac — Helps Users Create 3D videos from 2D videos
- Aiseesoft Releases DVD Creator for Mac for Better Video File Burning
- Convert HEIC to JPG/JPEG or PNG on Windows or Mac
- The ultimate tool for ripping and converting videos
- How to use HD Video Converter
- Affordable Pricing
- HD Video Converter Review
- Tips & Tricks
- Our Customers Also Like
- Part 10: Tool 6 – Video Trimmer
- Part 1: Convert Video/Audio to Various Formats
- How to Convert HEIC to JPG/JPEG or PNG on Mac
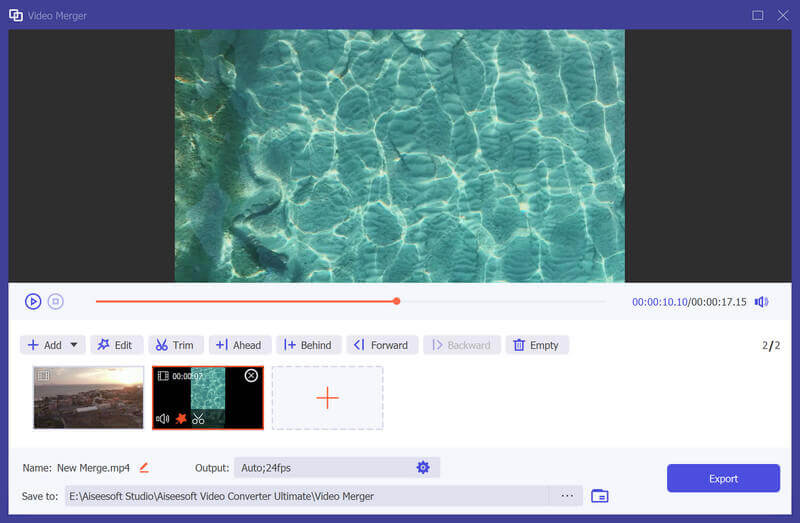
Part 13: Tool 9 — Video Merger
Step 1. Find Video Merger in Toolbox. Add the video(s) to Video Merger.
Step 2. After importing your files, you are able to adjust the order by dragging the clips to the correct position or use the Forward/Backward feature. If you need to add new clips, you can simply click on the Add/Plus button or click Ahead/Behind to locate the clip to the right place directly. You can also edit and trim the video clips according to your need. To remove all the clips please hit on Empty button.
Step 3. Once you finish editing, you can change the name, settings, and saving path for the output file. Then click on the Export button to export the merged video.
HEIC vs. JPG vs. PNG
In iOS 11, Apple announces the HEIF(.HEIC) format to be replacing the JPEG image format. So What is HEIC and how is this new image format?
HEIC is the image format named by Apple for the new HEIF standard. And HEIF stands for High Efficiency Image Format. As its name implies, HEIC format is a more streamlined way for storing image items. It adopts more advanced and modern compression, allowing digital photographs taken by iPhone, iPad or iPod to be created in smaller file sizes, while keeping higher image quality.
JPG is a file type developed by JPEG, also referring to the Joint Photographic Experts Group. It is a standard for professional photographers. JPG images compress image data by reducing sections of images. Due to the lossy nature of JPG, this image format cannot be an ideal way to store digital photographs or other art files.
Hot Tutorials
-
-
How to Convert Videos to HD?
-
Best Video Cutters/Trimmers to Chop Your Video
-
5 Ways to Recover Overwritten Excel File
-
How to Recover Deleted Kik Pictures
-
How to Play DVDs on Wii?
-
Play MPG Video with Best MPG Player
-
-
-
The Easiest Way to Retrieve Deleted iMessages from iPhone
-
4 Ways to Delete Everything on iPhone
-
How to Record Facetime Calls
-
Best Way to Recover Lost/Deleted Bookmarks on Android
-
How to Recover Deleted Text Messages on Android?
-
How to Sync Contacts from iPhone to iPad?
-
-
-
How to Convert Videos to HD?
-
Best Video Cutters/Trimmers to Chop Your Video
-
5 Ways to Recover Overwritten Excel File
-
How to Recover Deleted Kik Pictures
-
-
-
How to Play DVDs on Wii?
-
Play MPG Video with Best MPG Player
-
The Easiest Way to Retrieve Deleted iMessages from iPhone
-
4 Ways to Delete Everything on iPhone
-
-
-
How to Record Facetime Calls
-
Best Way to Recover Lost/Deleted Bookmarks on Android
-
How to Recover Deleted Text Messages on Android?
-
How to Sync Contacts from iPhone to iPad?
-
-
-
How to Convert Videos to HD?
-
Best Video Cutters/Trimmers to Chop Your Video
-
5 Ways to Recover Overwritten Excel File
-
-
-
How to Recover Deleted Kik Pictures
-
How to Play DVDs on Wii?
-
Play MPG Video with Best MPG Player
-
-
-
The Easiest Way to Retrieve Deleted iMessages from iPhone
-
4 Ways to Delete Everything on iPhone
-
How to Record Facetime Calls
-
-
-
Best Way to Recover Lost/Deleted Bookmarks on Android
-
How to Recover Deleted Text Messages on Android?
-
How to Sync Contacts from iPhone to iPad?
-
-
-
How to Convert Videos to HD?
-
Best Video Cutters/Trimmers to Chop Your Video
-
-
-
5 Ways to Recover Overwritten Excel File
-
How to Recover Deleted Kik Pictures
-
-
-
How to Play DVDs on Wii?
-
Play MPG Video with Best MPG Player
-
-
-
The Easiest Way to Retrieve Deleted iMessages from iPhone
-
4 Ways to Delete Everything on iPhone
-
-
-
How to Record Facetime Calls
-
Best Way to Recover Lost/Deleted Bookmarks on Android
-
-
-
How to Recover Deleted Text Messages on Android?
-
How to Sync Contacts from iPhone to iPad?
-
4K UHD VS 1080p Full HD
Offering wider color gamut and greater bit depth, 4K videos show you much more details of the original images than 1080p full HD videos. The common UHD video is 3840*2160, 2 times on both horizontal and vertical resolution of 1080p (1920*1080). The 4K video is actually DCI 4K, which has a resolution of 4096*2160 with 1.9:1 aspect ratio while the UHD is 16:9. You can easily tell the differences between 4K UHD and 1080p Full HD when you watch them on UHDTVs. If you do not have any 4K TV to play the 4K videos, you can use this HD converter to convert your 4K videos to lower resolution for common use (See 4K VS 1080p).
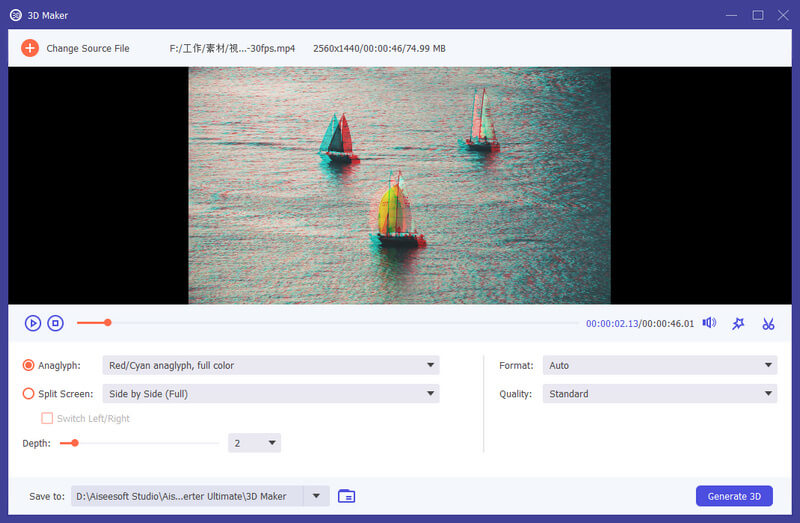
Part 8: Tool 4 — 3D Maker
Step 1. Find 3D Maker in Toolbox. Add the video to 3D Maker.
Step 2. It offers various options to make 3D video.
Anaglyph: You can choose one 3D anaglyph effect from Red/Cyan anaglyph, monochrome/half color/full color/quality Dubois; Green/Magenta anaglyph/half color/full color; Amber/Blue anaglyph, monochrome/half color/full color.
Split Screen: Side by Side (Half-Width), Side by Side (Full), Top and Bottom (Half-Height), Top and Bottom (Full)
Depth: You can change the depth of an anaglyph 3D image from 0 to 15.
Switch Left/Right: Use the Switch Left/Right option to change from Left/Right to Right/Left or Right/Left to Left/Right.
Step 3. Click Generate 3D to create your 3D video.
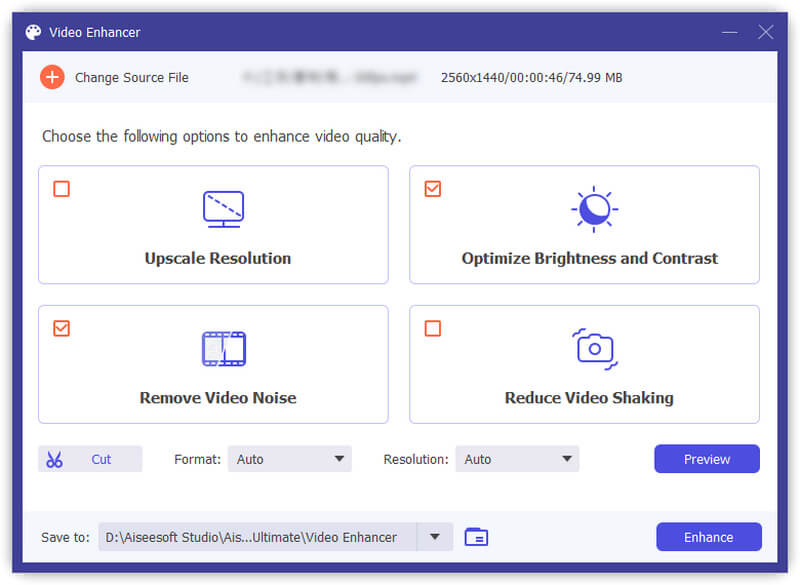
Part 9: Tool 5 — Video Enhancer
Step 1. Find Video Enhancer in Toolbox. Add the video to Video Enhancer.
Step 2. There are 4 options you can choose to enhance your video file.
Upscale Resolution: With this function, you will get a high-resolution video from a low-resolution video.
Optimize Brightness and Contrast: It will optimize the brightness and contrast automatically to make your video more enjoyable.
Remove Video Noise: This feature can remove dirt-like video noise from your video.
Reduce Video Shaking: It can stabilize your shaky video footage to make it more smoother and more watchable.
Step 3. Click Enhance button to enhance your video.
A simple and powerful video converter
Not all video file formats are the same. They all have their different uses and purposes. With that in mind, it’s very important to convert your videos to an appropriate file format that is optimized for playing on your device. Aiseesoft Total Video Converter is a utility program that can convert videos to other file types and formats. The question is, with all of the great video converters in the market today, can Aiseesoft Total Video Converter keep up with the stiff competition?
First Things First
In terms of functionality, there’s no denying that the Aiseesoft Total Video Converter is a good and acceptable program. The first thing to note about this program is its quick installation. The process took no time at all, and without much ado, the program was up and running. The design of the program is incredibly stylish and modern. It has a black and blue color scheme that’s very pleasing to the eye.
The interface of the program is also very intuitive. All the essential tools that you need are conveniently placed in an easy to find place on the screen. At the top is the menu bar and below that are the most common commands that you need such as Add File, Clip, 3D, and Edit. After that are the files and preview windows where the files that you added are going to be displayed and where you can view the final product, respectively. Finally, at the bottom is a drop-down menu where users can choose the profile of their videos. You can also choose the destination folder of your output.
Converting and editing videos are easy and quick. All you have to do is add the file that you need and click the convert button. You can add several files and merge them into a single file. You can edit videos by clicking the Edit button. Some of the editing features available in the Aiseesoft Total Video Converter include being able to add 3D effects, crop videos, adjust video brightness, contrast, and more. You can also add a watermark and adjust the audio of your videos.
Problematic Features
While the Aiseesoft Total Video Converter is a pretty good converter overall, it does have some problematic aspects. For example, the conversion process takes a bit of time. While this isn’t a problem on its own, other video converters can accomplish the task in less time. Another frequent complaint against the program is its lack of DVD burning tools, and that’s a pretty valid point against it.
Worth It Despite the Problems
Ultimately, the Aiseesoft Total Video Converter is a worthwhile program despite the problems. The converted output is pretty good. In my opinion, it has a lot of features that more than make up for the problematic aspects. It’s simple, intuitive, and powerful. I think the Aiseesoft Total Video Converter can totally keep up with its competition. Go ahead and get your hands on it when you need to convert some videos because it can definitely deliver.
Part 4: Edit Video/Audio with Multiple Effects
Trim & Split Video
Step 1. Select a video file and click the Cut icon.
![]()
Step 2. To cut off unwanted parts, you can drag the clipper on the progress bar or enter the start and end time directly on the bottom Duration bar. The part you chose is what will be left. If you want more segments, click Add Segment and a new clip will be created. Choose another wanted part in the same way.
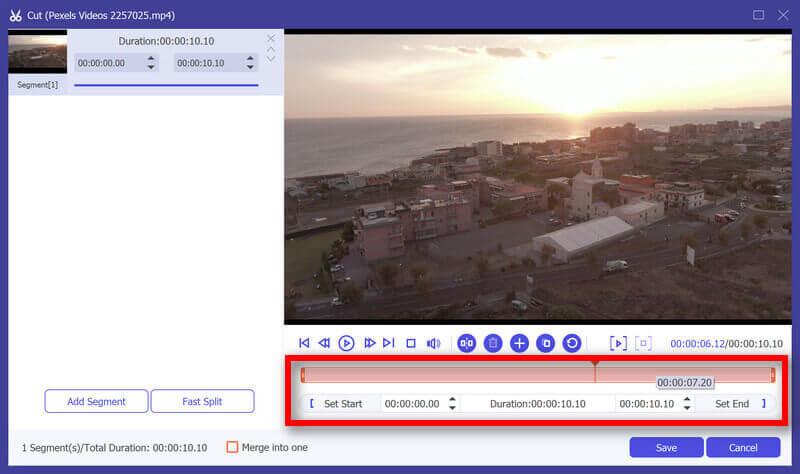
Step 3. After you make all right, you can click Save. If you want to merge them into one, check on Merge into one on the bottom left of the Cut window.
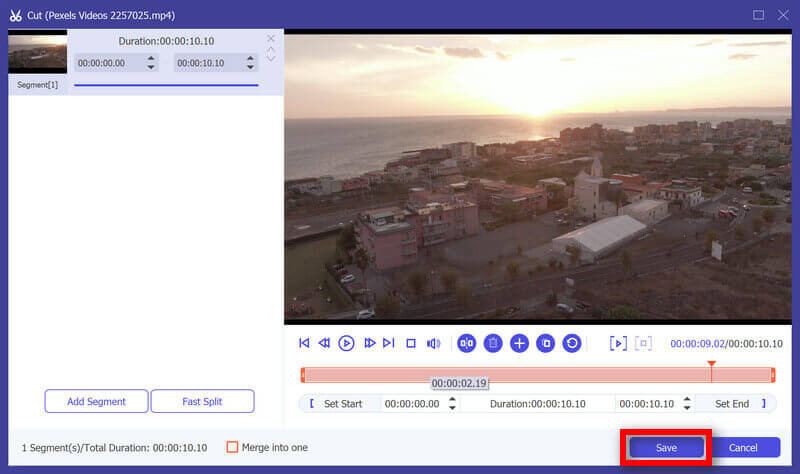
Step 4. Now you are back to the main interface. Preview the video by clicking the thumbnail. If that’s just what you want, Click Convert All. If you still need to modify the video, click the scissor icon again, the segments are still there.
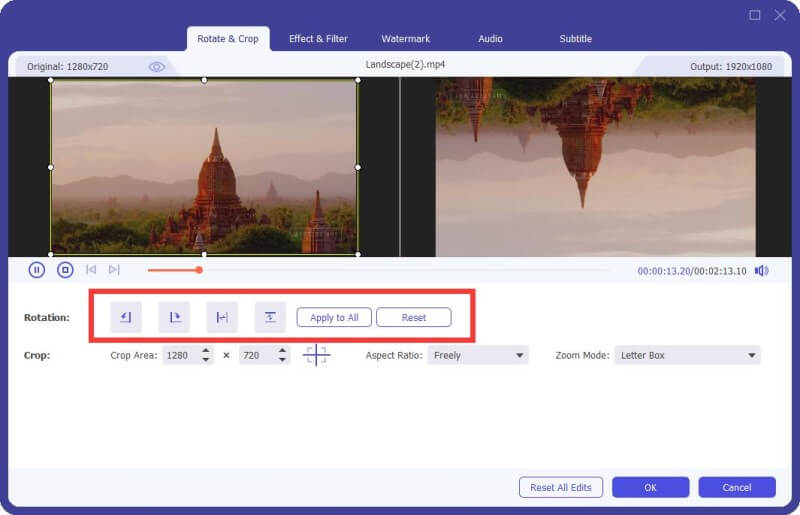
Rotate & Crop Video
Step 1. Click the Edit icon. Find Rotate & Crop in pop-up window. And you can see other editing features in this window.
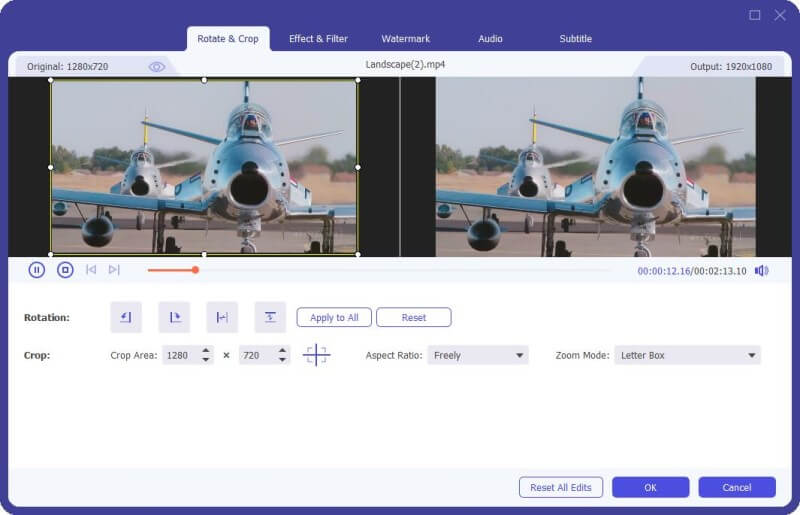
Step 2. Here you can flip video vertically and horizontally, rotate 90 degrees, rotate 180 degrees or rotate 270 degrees. Then, you can check the result in the preview.
Step 3. Below the Rotate option is the Crop option. there are several types in Aspect Ratio, like 16:9, 4:3, 1:1 and 9:16. It can help you quickly get the size you want.
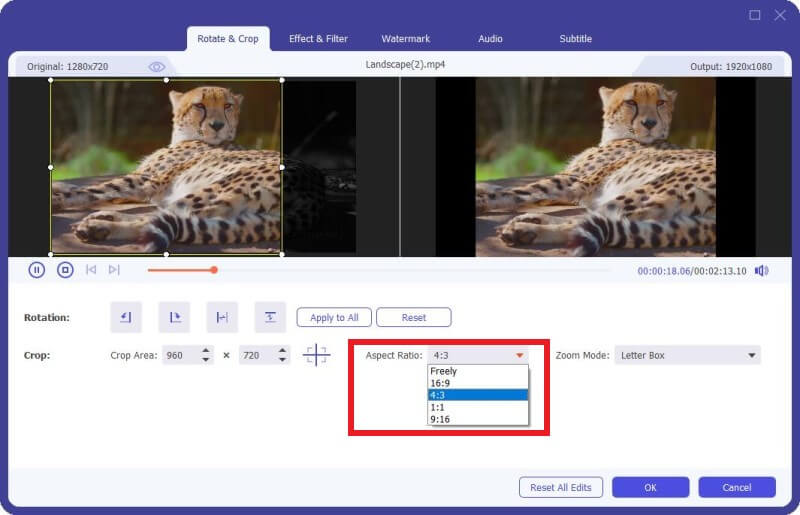
If you have other size needs, you need to select Freely in Aspect Ratio first, then input number in Crop Area to set the size. Dragging the frame of the left playing screen is also the same. If you want the center screen, click Cross icon after setting the size and it will put the cropped screen in the center.
Besides Ratio, you can also select the right Zoom Mode to get the best effect.
Full Mode: Make the selected screen become the biggest size, which would stretch the screen.
Letter Box: Add black edges up and down.
Pan & Scan: Make the screen size to 16:9. But it would not show left and right edges in 16:9 or up and down in other size.
It is up to your needs.
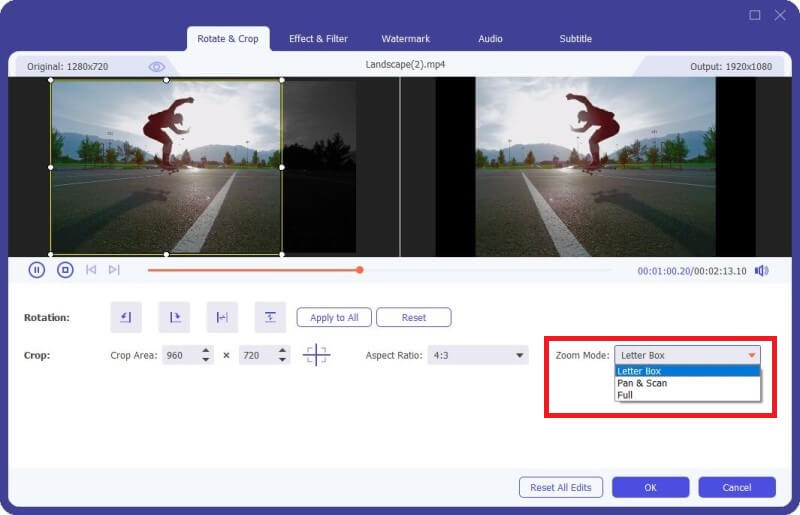
Step 4. Click the OK button to save the changes.
Effect & Filter
Step 1. Find Effect & Filter in the Edit window. You can adjust brightness, contrast, saturation, hue and select deinterlacing as you need. Besides, you can choose a filter to beautify your video.
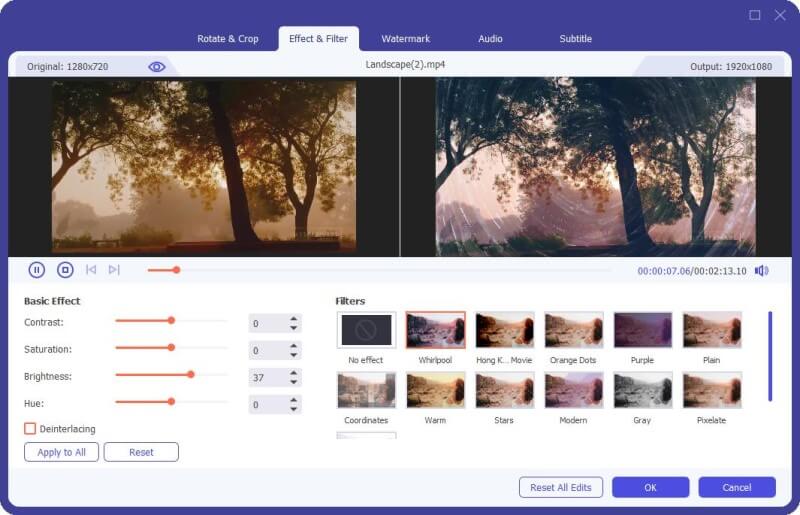
Step 2. Click the OK button to save the changes.
Watermark
Step 1. Find Watermark in the Edit window. If you want to add a text watermark, check Text and enter the text to the blank. You can adjust the text fonts, colors, writing system and size. Then place the text watermark by dragging or setting size.
Furthermore, you also can rotate text and set opacity.
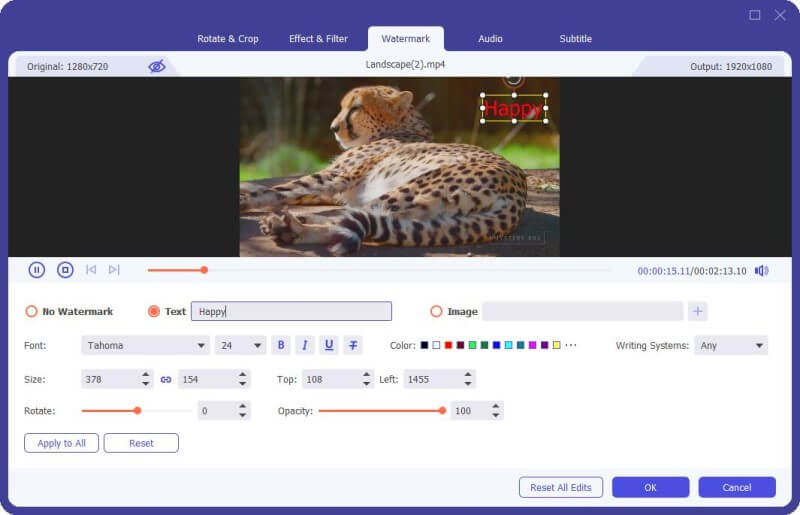
If you want to add an image watermark, check image and click the Add icon to select an image. And then adjust the size and place it on your video. You can also rotate text and set opacity.
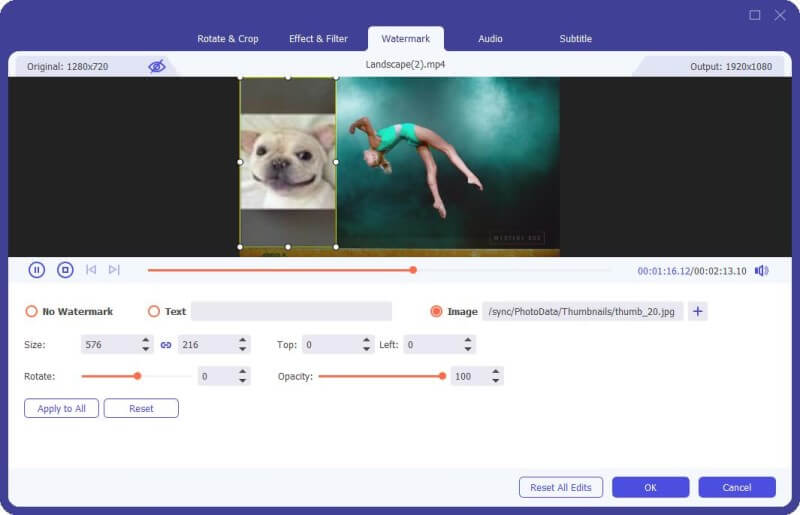
Step 2. Click the OK button to save your settings.
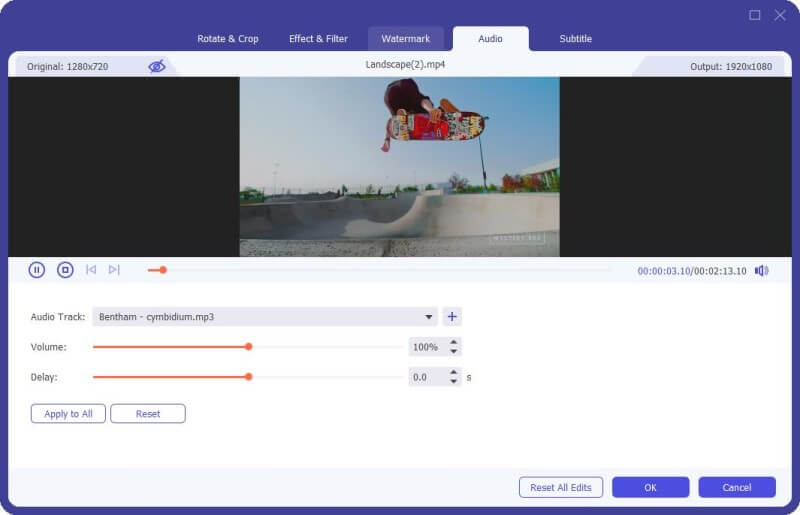
Audio
Step 1. Find Audio in the Edit window. Select the audio track you would like to play. Or click the Plus icon besides the Audio Track bar. You can adjust the audio volume and change the delay time to decide when to play audio track.
Step 2. Click the OK button to save your settings.
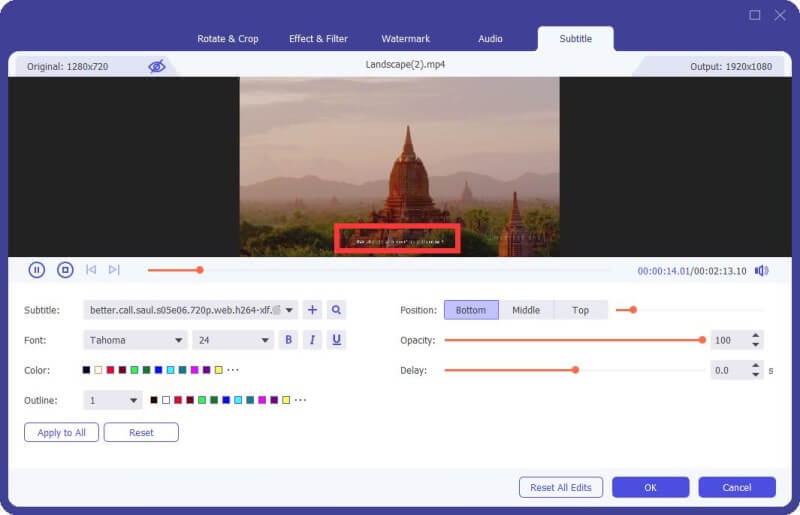
Subtitle
Step 1. Find Subtitle in the Edit window. Click + to import the subtitle file (*.srt; *.ssa; *.ass) from your computer. After that, you can adjust the position, font, color, opacity, delay time and outline.
Step 2. Click OK to save the adjustments.
More News
2013 2012
Aiseesoft’s Mac Video Converter Ultimate Exceeds All Expectations
May 14, 2013
Aiseesoft has released its new product, Mac Video Converter Ultimate, offering unmatched conversion speed and excellent output quality. Mac Video Converter Ultimate, as its name suggests, is the ultimate video utility for Mac that combines the power of Video Converter, 2D to 3D…
Aiseesoft iPhone Transfer — The Premier Solution for Transferring iPhone Files
May 07, 2013
Aiseesoft iPhone Transfer lets users easily transfer information, such as music, movies, playlists, photos, pictures and ringtones, from their iPhone, iPad, or iPod to a Mac, PC or an iOS-powered device. Transferring videos, music, playlists, and ringtones to iTunes is also easy to do.
Aiseesoft DVD Creator — DVD Burning’s Reigning Champion
Apr 28, 2013
Aiseesoft DVD Creator, the most-advanced DVD burning software, continues to get better. Its advanced DVD burning engine simply lets users burn reliable and personalized DVDs. With more incredible features and support for Windows 8, there is no reason to use anything else.
Aiseesoft Updates Transfer Software — Super Fast Transferring Speed
Apr 16, 2013
Aiseesoft released an update for its transfer series software with faster transferring speed and better compatibility with the iPad 4 and iPad mini. Plus, the new interface is easier to navigate and is more intuitive than previous versions.
Aiseesoft Releases Update for MP4 Converter for Mac
Mar 30, 2013
Aiseesoft updates MP4 Converter for Mac to 6.2.78 version with more powerful kernel to improve the coding and encoding capability and enhance the ability to recognize all the related audio tracks very well when loading Panasonic P2 MXF video files.
Aiseesoft Releases WTV Converter — Enjoy Recorded TV Shows Everywhere
Feb 28, 2013
Aiseesoft today released its new WTV Converter. Both Mac and Windows versions are available. It allows users to convert WTV, DVR-MS and WMV video files directly to MP4, AVI, MOV and other popular video formats with a quick conversion speed.
Aiseesoft Releases 3D Converter for Mac — Helps Users Create 3D videos from 2D videos
Jan 31, 2013
Aiseesoft has released the Mac version of its 3D video conversion software — 3D Converter for Mac, which is a professional 2D to 3D video converter for Mac that allows users to convert 2D movies to 3D on Mac without hassle, and is also able to convert 3D video files to standard 2D videos or…
Aiseesoft Releases DVD Creator for Mac for Better Video File Burning
Jan 11, 2013
Aiseesoft has released DVD Creator for Mac, providing an easy solution for Mac users looking to burn SD or HD video files to DVD. The video-to-DVD burning software can create DVDs, DVD folders or ISO files. Additionally, this excellent software delivers a wide range of useful functions, including…
Convert HEIC to JPG/JPEG or PNG on Windows or Mac
HEIC is the image format on iOS 15/14/13/12/11. This photo format saves much space without compressing image quality. It is considered as the replacement of JPEG image format. However, HEIC has some disadvantages. HEIC photos cannot be opened and viewed on outdated versions of the iOS or many other platforms. But image format like JPG or PNG are much more compatible.
Aiseesoft HEIC Converter is here for you to solve compatibility problems. With this powerful HEIC converting tool, you can convert all your HEIF (.heic) photos to JPG/JPEG or to PNG on Windows or Mac computer without any hassle.
The ultimate tool for ripping and converting videos
Need to rip a DVD or convert a video file? Aiseesoft Video Converter Ultimate is a handy one-stop shop for video conversion, giving you complete control over the resulting file. It also includes some video editing tools, including support for 3D video conversion.
What can it do?
Aiseesoft Video Converter Ultimate certainly lives up to its name. It contains pretty much everything you could imagine you’d need to convert video files on your computer. The software allows you to rip DVDs, convert video files, or download online videos and save them to your PC.
The software supports conversion to and from a huge range of different file formats, including all the usual suspects such as MP4, AVI, MOV, WMV, FLV, etc. Aiseesoft Video Converter Ultimate makes it easy for you to convert video files to the right format, with custom conversion presets for a wide range of mobile devices, online streaming video, as well as user-defined profiles.
There are plenty of video conversion settings that you can tweak, including the encoding method, frame rate, aspect ratio, and resolution.
One of the standout features of Aiseesoft Video Converter Ultimate is its support for 3D video, allowing you to make 3D videos using one of several supported output methods. Besides this 3D option, there are various other video editing tools within the software, such as Crop, Watermark, Audio, and Effects. The Effects option allows you to control visual elements of the video, such as brightness, contrasts, saturation, etc.
There’s also a Clip option within Aiseesoft Video Converter Ultimate that lets you trim your videos down. You can split videos into segments and set the start and end points of clips, which is a useful feature to have within a conversion suite.
What’s it like to use?
For such a powerful application, Aiseesoft Video Converter Ultimate is refreshingly simple to use. The skinnable user interface lays everything out in an intuitive manner, making it easy to navigate. The basic options are listed in the toolbar at the top (Load Disc, Add File, Download, Clip, and Edit), and there are video preview panels throughout the software so you’re never in doubt about how the converted video will turn out.
The conversion profiles are particularly useful and well laid out. The inclusion of a profile search makes it very easy to find which particular device you want to use your video on, then apply the conversion profile.
Conversion in Aiseesoft Video Converter Ultimate is fast enough and I experienced no issues with videos failing to convert during my tests of the application. The only feature I really would’ve liked to see added to the software would be the ability to rip Blu Ray disks, but perhaps this is too much to ask!
A converter for all seasons
Whatever your video converting needs, Aiseesoft Video Converter Ultimate is sure to have the right tools for you. It supports a wide range of file formats, it’s easy to use, and its video editing and 3D features come in very handy.
How to use HD Video Converter
- Step 1. Run this software on your Windows computer. Click «Add File» and load the HD video to the program.
- Step 2. (Optional) Click «Edit» to edit your video files before converting. You are able to rotate, crop, watermark, enable 3D, and adjust effects for your video file
- Step 3. Click the drop-down list from «Profile», choose the one format hat suit your player or editor best. Click «Convert» to start to make the HD video conversion.
Affordable Pricing
1 Year License
$32.00$25.60
Use it 1 Year
Use it on 1 PC
30-Day Money Back Guarantee
Lifetime License
$45.00$36.00
Use it lifetime
Use it on 1 PC
30-Day Money Back Guarantee
Multiple-User Personal License (Up to 8 PCs)
$229.00$183.20
Use it lifetime
Use it on 8 PCs
30-Day Money Back Guarantee
HD Video Converter Review
Check what famous editor and our customer talk about our product.
-
Wow, so fantastic. I have many HD video files from my Sony Camcorder, and I cannot play on my iPad. With this software, now I can convert the M2TS files to MP4 and play on my iPad Pro easily.
From Leah
-
I download some online SD video files, but the definition seems not good. Using your program, and the video files are clearer than before. Thanks.
By Edwards
-
I know a lot of video converters called themselves as HD video converter but they are really not. I have test this HD video converter the results really satisfies me.
By Jones
-
I used this software to convert HD videos, the output video quality are surprisingly great. high recommend it.
By Nelson
Write a Review ->
Convert Any AVCHD, H.264/AVC, H.265/HEVC, DivX and other HD Video.
Free Download
Buy Now-20%
Tips & Tricks
- How to Convert 4K UHD to 1080p HD Videos With Ease
- How to Convert HD Video to SD with Super Fast Speed
- How to Convert 4K UHD to 1080p HD Videos With Ease
- Top 5 4K Video Editing Software for Mac and Windows
- Best Way to Convert AVCHD to MP4 without Losing Quality
- How to Enhance and Convert Video to 4K UHD Resolution
- How to Convert Common Videos to HD Quality (4K, 1080p and 720p)
- How to Burn HD Video to Blu-ray Disc/ISO File/Folder
- How to Convert QuickTime HD Video Without Loss
Our Customers Also Like
-
The best video recording tool to easily record screen, meetings, game, webinar, audio, and webcam videos.
BUY NOW BUY NOW
-
Multi-media helper to convert, edit and enhance video and audio file in one click.
BUY NOW BUY NOW
-
Best DVD/Blu-ray burner to edit and burn video to DVD disc/folder/ISO file or Blu-ray disc/folder/ISO file.
BUY NOW
Video HD Video Converter
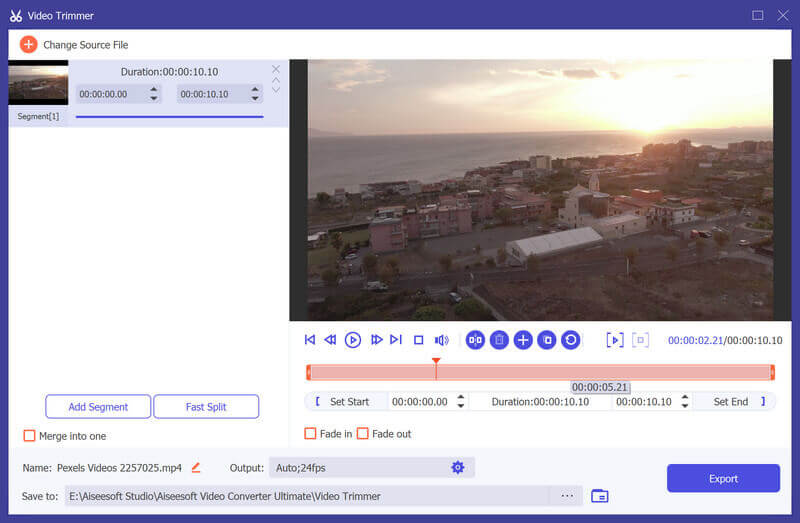
Part 10: Tool 6 – Video Trimmer
Step 1. Find Video Trimmer in Toolbox. Add the video to Video Trimmer.
Step 2. To cut off unwanted parts, you can drag the clipper on the progress bar or enter the start and end time directly on the bottom Duration bar. The part you chose is what will be left. If you want more segments, click Add Segment and a new clip will be created. Choose another wanted part in the same way. You can also use the Fast Split feature to split the current segment into pieces by average or by time.
Step 3. If you need to add the Fade in/out effect, just enable the options under the progress bar. After you make all right, you can rename the video, adjust the output settings, and select the destination. If you want to merge all clips into one, check on Merge into one on the bottom left of the Video Trimmer window. Click on the Export button to export the trimmed video.
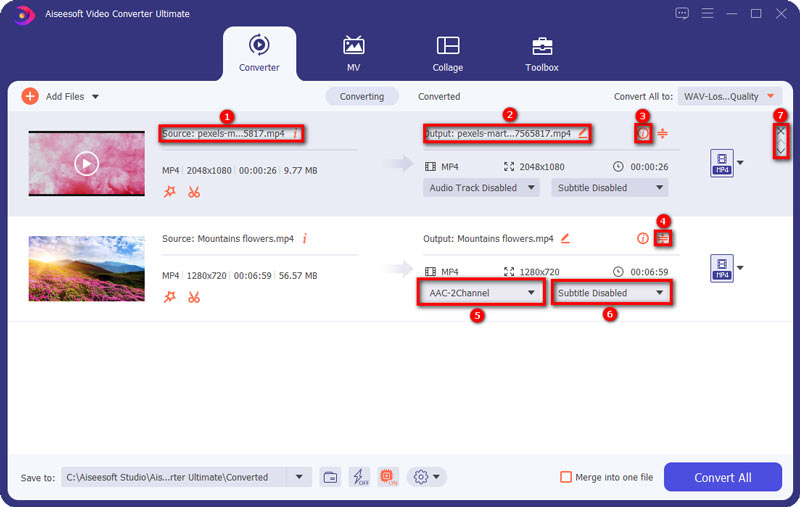
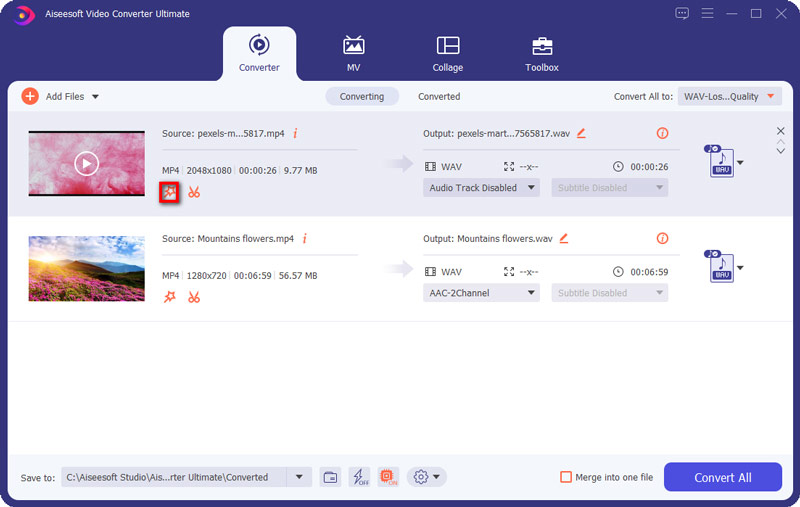
Part 1: Convert Video/Audio to Various Formats
Step 2. Click Add File and select the Add File or Add Folders to add files. Or directly drag multiple video and audio files to this program.
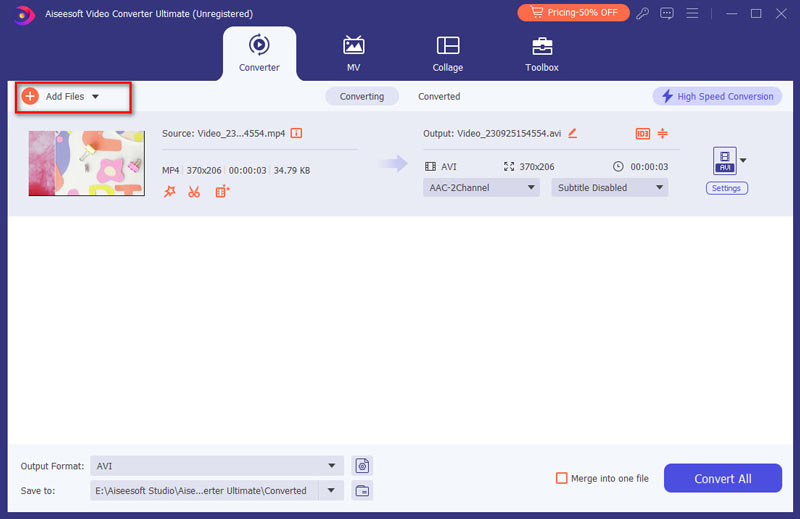
After adding files, you can see its information on the interface, like the original format, the screen size and the time length. And here are some options you can choose.
1. See the information of the video
2. Rename the files
3. Edit Metadata
4. Compress the file
5. Add audio track or not
6. Add subtitle or not
7. Put the video on the first or the last
You can click the video to play it. On the playing interface, you also can take snapshot and edit the video.
If you want to edit videos or cut them, you can click the Cut icon or the Edit icon. .
Step 3. Click on the format icon on the right side of the video file. Then you can see a list of presets. Choose a preset and adjust the profile settings according to your need.
![]()
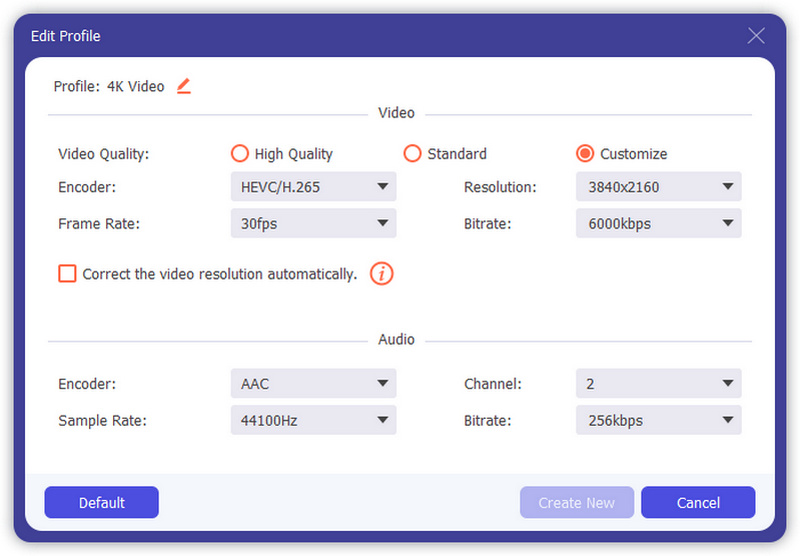
If you want to change the format settings, you can click the Gear icon on the right to custom profile. In the pop-up-window, you can change settings as follows.
Video: Quality, Encorder, Resolution, Frame Rate and Bitrate.
Audio:Encorder, Channel, Sample Rate and Bittrate.
Step 4. Select a path for the converted files on the bottom bar. And then click the Convert All button on the main interface to start converting on your computer.
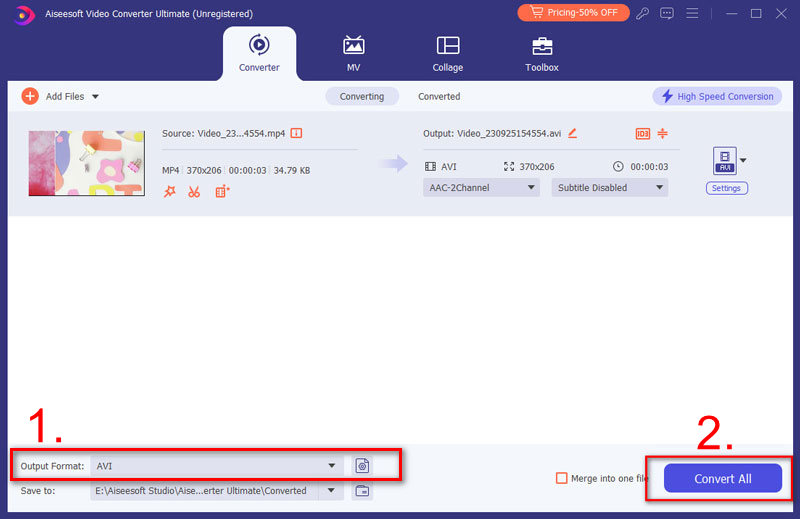
Note: If you want to merge them into one, tap on Merge into one file on the left of Convert All.
How to Convert HEIC to JPG/JPEG or PNG on Mac
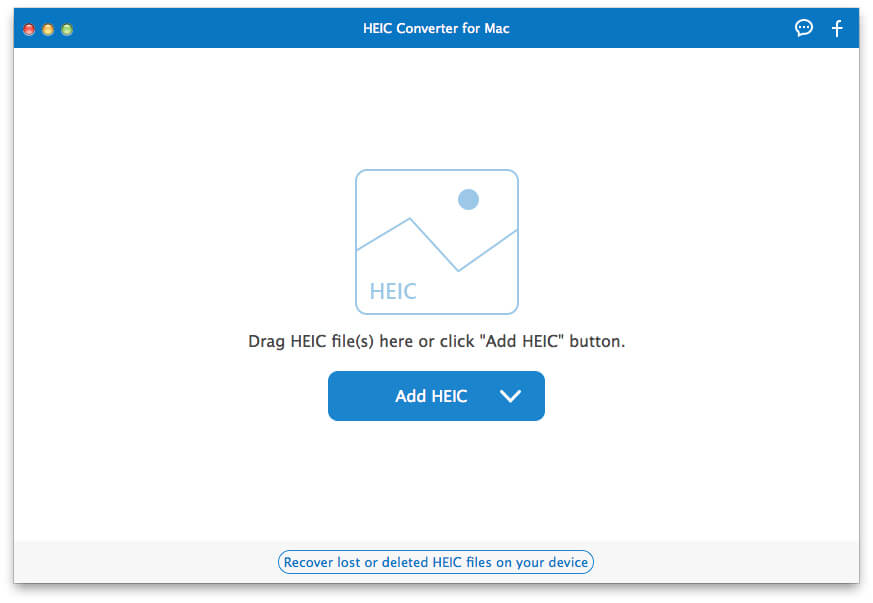
Step 1. Download and install HEIC Converter on your Mac computer. If HEIC images are from iPhone iPad or iPod, you should connect the device with Mac.
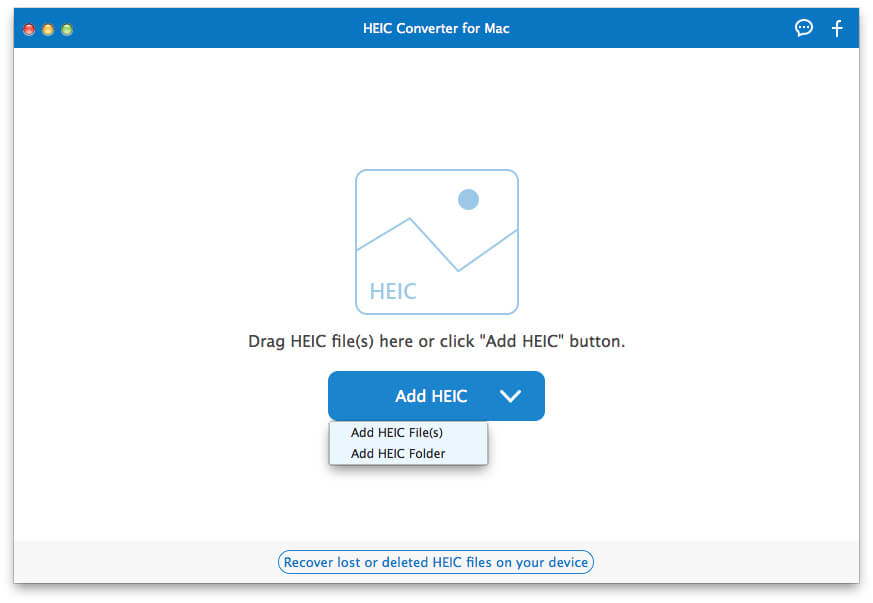
Step 2. Click the button of «Add HEIC» to load the HEIC photos or directly drag them from Mac to the program. Want to add HEIC images from iOS device? Go to the folder where your iPhone iPad or iPod store the photos.
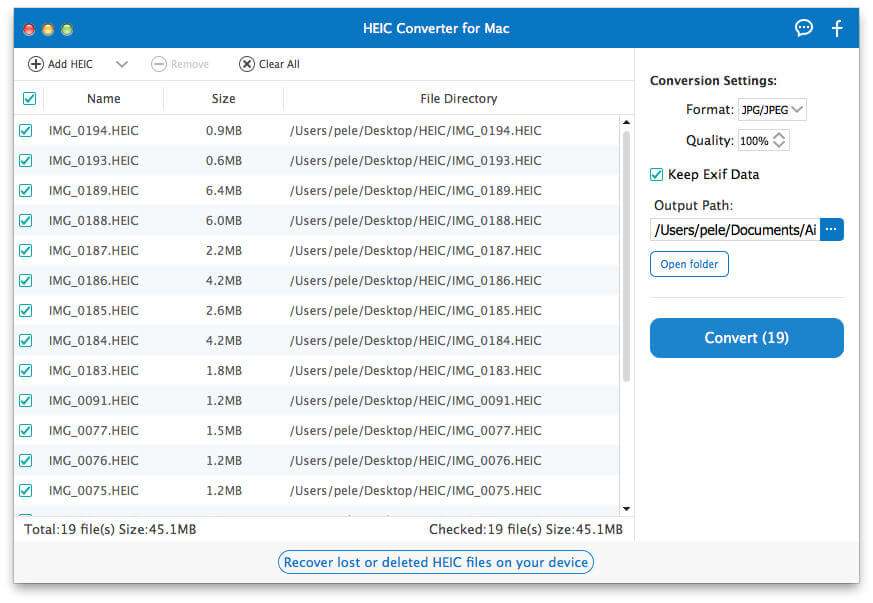
Step 3.HEIC photos will be listed in program interface. Choose the images that you want to convert to JPG or PNG.
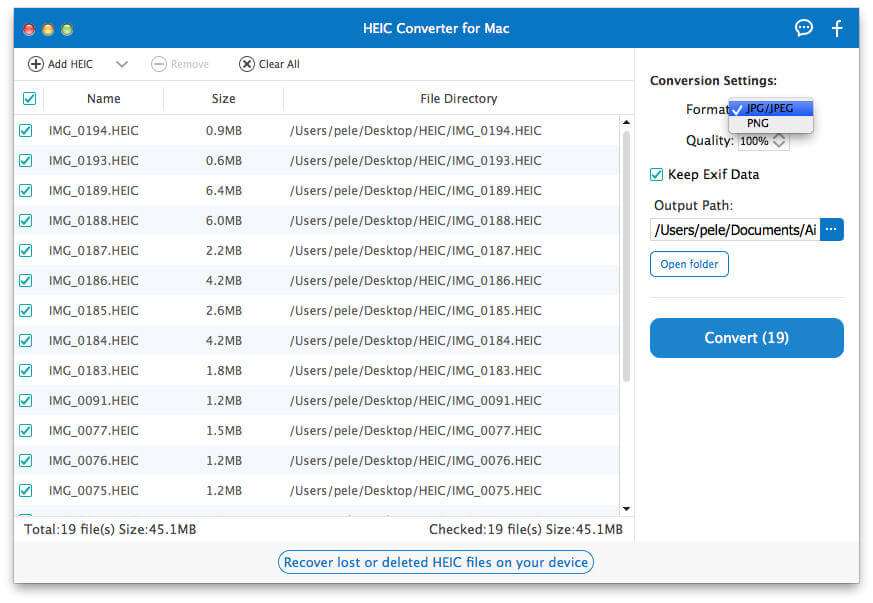
Step 4. Set JPG/JPEG or PNG to be the output format. You can also choose «Keep Exif Data», and customize the output path.
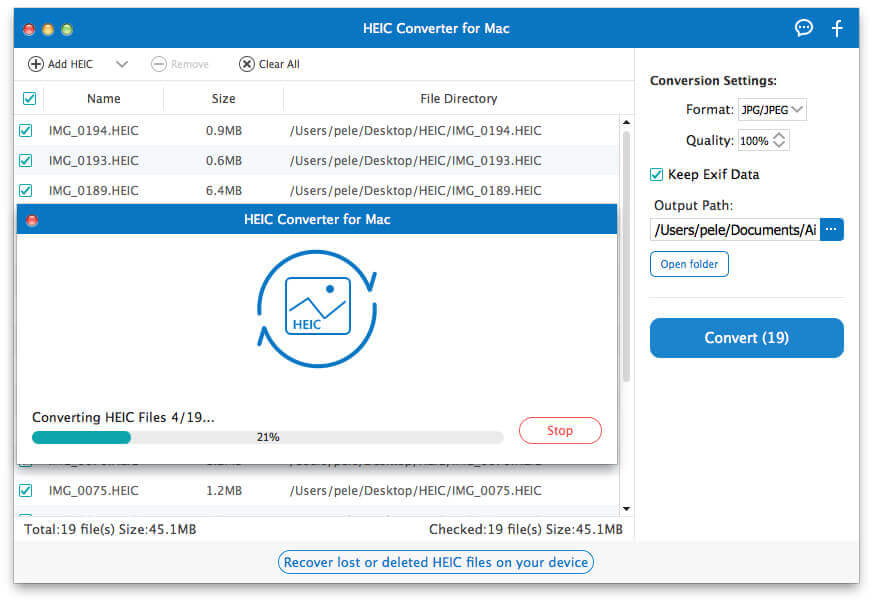
Step 5. Finally click the «Convert» button and let HEIC Converter for Mac convert HEIC to JPG/JPEG or PNG.
