Vsdc free video editor
Содержание:
- Системные требования
- Group object editing
- Paper burn effect (Pro version)
- Free non-linear video editors
- What does “video overlay” mean?
- Customizable Bokeh glare effect
- Cheap But Hard to Use
- Достоинства и недостатки
- Как настроить набор данных для конкретного столбца на диаграмме
- How to apply effects and transitions in VSDC
- Basic Video Editing
- VSDC: обзор функционала
- Настройка динамики графика
- VSDC Free Video Editor Pro 6.7.3.298 на русском + лицензионный ключ активации
- HitFilm Express
- Начало работы с модулем Motion tracking в VSDC: как построить карту движения
- Color Grading in VSDC
- DaVinci Resolve
Системные требования
Обычно профессиональные видеоредакторы требовательны к компьютерному «железу». Разработчики VSDC специально создавали программу, которая будет без тормозов работать на компьютерах небольшой мощности.
Для работы утилиты нужно:
- процессор с частотой 1,5 Гц;
- 256 Мб ОЗУ;
- около 50 Мб свободного места на диске;
- установленный DirectX 9.0c.
И это все. Если сравнивать с той же Sony Vegas, требования ну очень доступные. Для работы редактора Sony Vegas нужен многоядерный процессор с частотой не менее 2 Гц, наличие 4 Гб ОЗУ (а рекомендуется вообще 8 Гб) и минимум 500 Мб места на диске.
Редактор VSDC будет работать даже на самых бюджетных ноутбуках за 200$.
Group object editing
The following update is designed for those working with a large number of files. Starting version 6.8, group object editing becomes available in VSDC. This means you can select multiple objects on the timeline and change their parameters simultaneously working with them as a group.
Notice that if the objects are of the same type – say, two text objects or a duplicated effect – you can change any parameter in the selected group. However, if the objects in the group are of different types, you can only change common settings or basic settings – the latter case is true if you’re working with shapes, images, and videos.
Paper burn effect (Pro version)
The paper burn transition effect creates a realistic illusion of a burning piece of paper that reveals the following scene. You can apply it to videos, however, it looks even more impressive when applied to a still image.
Like all effects in VSDC, the paper burn transition is fully customizable. You can adjust the color, size, direction, and intensity of the flame. As an alternative template for this transition, you can select freezing.
The cherry on top? If you activate time inversion for this transition, the effect gets reversed. For instance, instead of a burning piece of paper, you’ll get a piece of paper that is restored from being burnt.
Free non-linear video editors
1. VSDC Free Video Editor (Windows)
VSDC is a free NLE designed for those who are familiar with the basic principles of video editing and willing to move forward to more advanced techniques. It boasts lots of stunning effects, customizable blur filters, a color correction toolset, and a powerful Chroma Key. Keep in mind that VSDC only works on Windows.
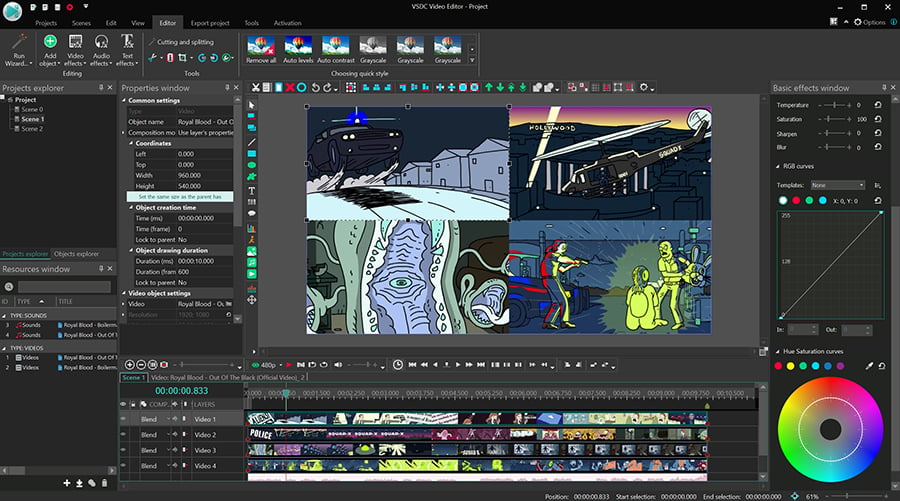
If you worry about the system requirements — because most NLEs are indeed quite demanding — worry not. Compared to other video editors, VSDC is the most lightweight one. You won’t need a powerful PC to use it and will be just fine with as little as 2GB of RAM.
The Pro version of VSDC includes a few features aimed at more professional-level users. It’s available at $19.99 per year and includes video masking, motion tracking, hardware acceleration, and audio waveform. However, as a beginner, you’ll most probably find the free version of VSDC more than sufficient for your needs.
iMovie is a default non-linear video editor that comes pre-installed on Mac computers. Of all video editors in this list, iMovie seems to have the simplest, most intuitive interface, yet the least feature flexibility. In other words, you may not be able to perform advanced tricks, such as video masking or a custom animated intro, but you’ll be able to quickly enhance your footage, add music, and apply effects like picture-in-picture.
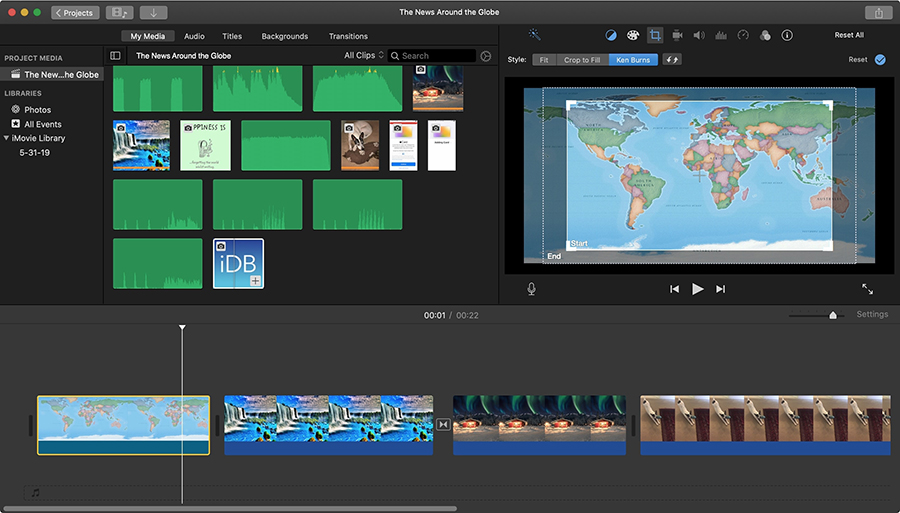
Although you can’t use iMovie on Windows, you can use it on your iPhone and iPad. This is a noteworthy feature if you have multiple Apple devices, because this means you can start cutting out the unwanted footage on the go and perform post-production later on your computer.
Overall, iMovie is a great choice if you’re a beginner or an intermediate-level user. It includes a decent color correction functionality, Chroma Key, titles, a set of basic transitions and themes for slideshows and presentations.
Davinci Resolve is a professional-grade NLE used by indie filmmakers and Hollywood producers alike. Its free version is widely popular because of its outstanding color correction abilities and an abundance of convenient shortcuts — essential for those working with large amounts of footage on a daily basis.
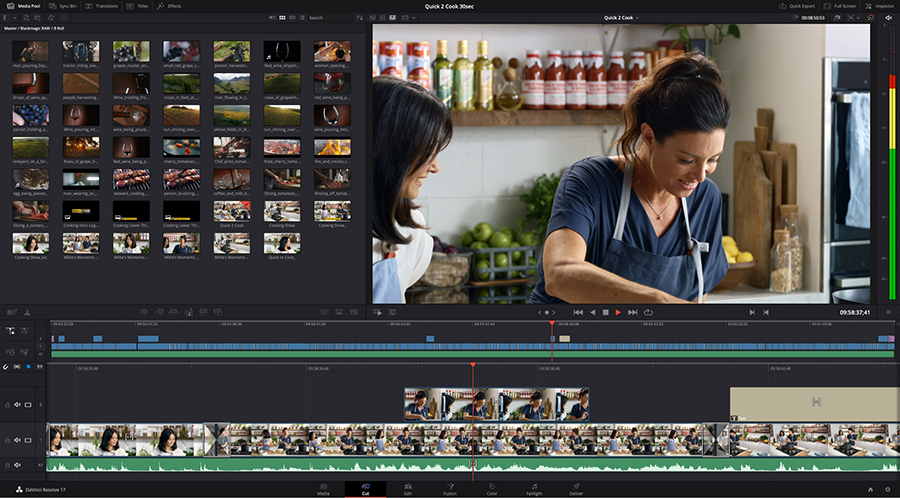
The main downside of Davinci Resolve is that it requires quite a lot of resources, and you won’t be able to run it on a slow PC — the program is likely to crash. Although, keep in mind that if you’re serious about your video editing hobby, eventually, you may have to upgrade your computer anyway.
If you’re surprised by such a powerful NLE being available for free, there’s an upgrade available as well. Blackmagic Design, the company developing Resolve, offers a commercial version of the program known as DaVinci Resolve Studio. The aptly-named software is designed for filmmaking studios and supports resolution higher than HD, frame rate higher than 60fps, additional OpenX plugins, motion blur, and some other pro-level tools. The Studio version is available for a one-time payment of $299.
What does “video overlay” mean?
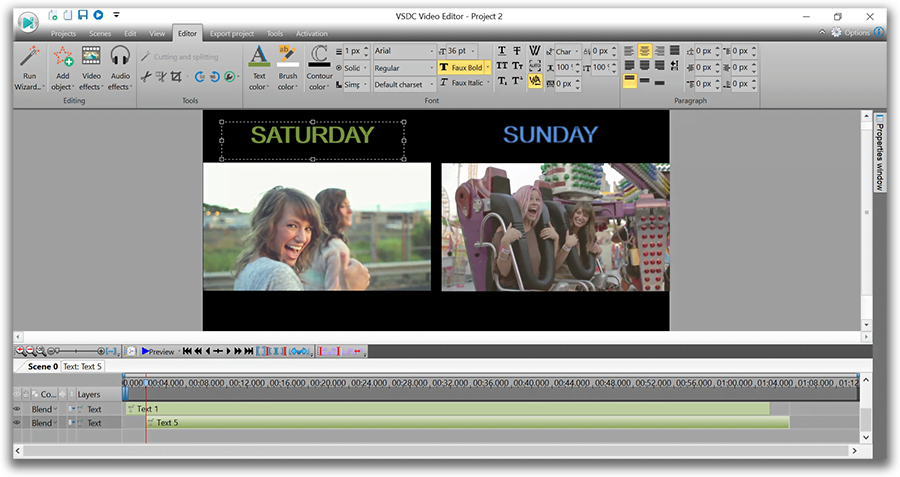
Video overlays are directly related to the idea behind non-linear video editing. And if you’ve never worked in a non-linear video editor before, here is what you need to know. Unlike linear software that forces you to place media files one after another in a direct sequence (think Movie Maker), non-linear editors give you much more freedom. You can layer videos and images one over another, place them side by side or even diagonally on the same scene. You can also adjust the opacity level for each file, which means an image can serve as a half-transparent layer placed over a video – or vice versa. And that brings us to the main point…
When you add a layer with a media file (image or video) over your existing footage to blend them into one composition, you create an overlay.
There are many ways to do it, and based on your goals, you may have in mind any of the following:
- Light or color effect overlays (see the example above)
- A watermark placed on a video (half-transparent text object over footage)
- A picture-in-picture effect (video playing in a small window over another video)
Technically, all the above can be considered as an overlay but in the instruction below, we’ll focus on the first one.
If you need to create a cinemagraph, add a watermark to a video or create a picture-in-picture effect, just check out the links.
Customizable Bokeh glare effect
“Bokeh” comes from a Japanese word meaning «blurred» or «hazy» and describes the character of the out-of-focus areas of an image.
In video editing, Bokeh is a popular effect achieved with a special shooting technique. It involves bright lights in the background that appear out of focus because of the way the camera renders them. As a result, you get a soft blurry background with round or edgy lights shining through.
With the new version of VSDC, you don’t need to recreate the special shooting conditions to achieve this look. The quick effect allows you to overlay the Bokeh glare on a video and customize its parameters including the shape, size, color, and the opacity level.
Cheap But Hard to Use
If you really don’t want to pay for a more established video-editing program and don’t mind digging into its less intuitive interface, VSDC Video Editor Pro can do some powerful things with your digital media. Features that worked well include picture-in-picture, transparency, and the effect filters. Accordingly, the app’s score goes up half a star since our last review. All that said, it’s still just too hard to use to climb any higher for now, even though it’s cheaper than the competition.
For both more ease of use and power, check out our Editors’ Choice-winning consumer video editing software, Corel VideoStudio and CyberLink PowerDirector on the PC. You may also consider the free but powerful, open-source Shotcut video editor, which we’re planning to review later this year.
Pros
-
Inexpensive
-
Powerful capabilities, such as 360 VR, 4K, chroma key, color wheel, and PiP
-
Motion tracking and text animation
- AI art filters
View More
Cons
- Interface lacks polish
- Nonstandard layout and workflow impede ease of use
- Too many functions are hidden in submenus
- No canned background music
- No full-screen video preview
- Crashed during our testing
View More
The Bottom Line
The inexpensive VSDC video editing program has improved in both power and usability, but its nonstandard workflow makes learning it too much of a chore.
Like What You’re Reading?
Sign up for Lab Report to get the latest reviews and top product advice delivered right to your inbox.
This newsletter may contain advertising, deals, or affiliate links. Subscribing to a newsletter indicates your consent to our Terms of Use and Privacy Policy. You may unsubscribe from the newsletters at any time.
Thanks for signing up!
Your subscription has been confirmed. Keep an eye on your inbox!
Sign up for other newsletters
Достоинства и недостатки
Также нам обязательно необходимо рассмотреть сильные и слабые стороны программы VSDC Free Video Editor Pro.
Достоинства:
- Наличие огромного количества видеоэффектов, применить каждый из которых можно всего в 1 клик.
- Поддержка видео в самом высоком разрешении, включая работу с 360VR.
- Присутствует так называемый режим наложения. Путем смешивания нескольких эффектов вы можете получить совершенно уникальный результат.
- Поддерживается работа с масками.
- Как и у профессиональных решений, тут мы можем использовать хромакей.
- Аудио в программе отображается в виде волны, что дает возможность определить точное положение громкости звука.
- Присутствует возможность вставки различных диаграмм и графиков.
- Поддержка всех существующих графических, аудио и видео форматов.
- Имеется стабилизация.
Недостатки:
К недостаткам можно отнести некоторую запутанность пользовательского интерфейса. Однако, если в вопросе разобраться, все встанет на свои места.
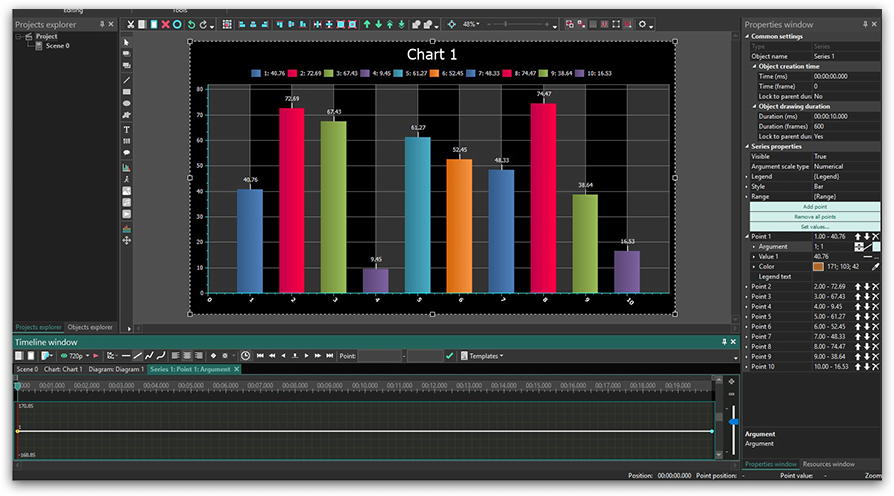
Как настроить набор данных для конкретного столбца на диаграмме
В разделе «Свойства набора данных» доступны настройки для каждого отдельного столбца на диаграмме (они обозначены «Точка 1», «Точка 2» и так далее). Для каждой «точки» вы можете задать значения на начало и на конец показа, подписи, цветовое решение, и конкретное значение в легенде.
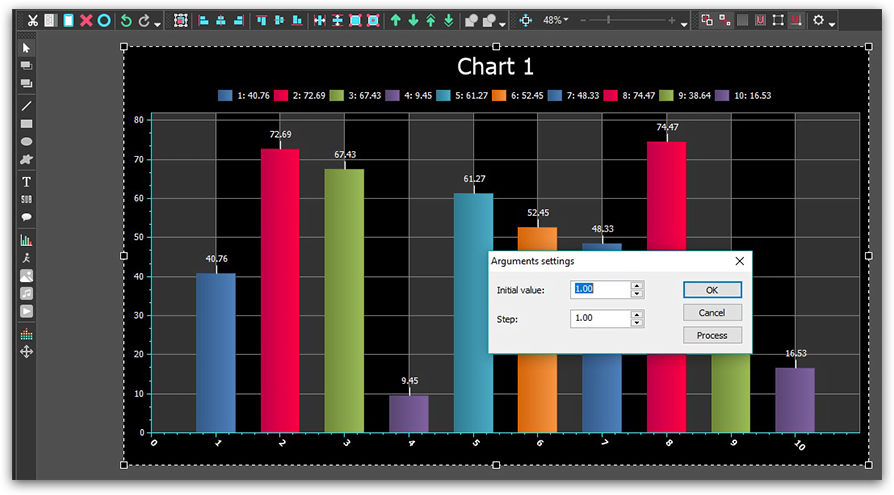
При нажатии на кнопку “Установить значения” и выборе опции «Установить значения аргументов» появится всплывающее окно, где вам необходимо ввести начальное значение и интервал.
- Начальное значение. В данном окошке задается значение по оси Х для первого элемента графика (в нашем случае – столбца). По умолчанию здесь всегда стоит 1.
- Интервал. В данном окошке задается интервал между столбцами. По умолчанию здесь всегда стоит 5.
После того, как вы зададите необходимые значения – следует нажать на кнопку «Process», а затем – «Ок».

Вторая опция в меню «Установить значения» — «Установить случайные значения». Она устанавливает случайные значения по оси Y для всех столбцов. Сколько раз вы нажмете на данную позицию – столько раз и произойдет установка случайных значений.
Следующая опция позволяет установить цвета для столбцов аналогичным образом – применением случайных значений или использованием стандартной палитры.
How to apply effects and transitions in VSDC
VSDC allows for creating dozens of eye-catching video effects. Some of them are applied in one click and require no experience. They are located on the “Video effects” tab at the top ribbon menu and include quick Instagram-style filters, basic color adjustments, transitions, transformational and transparency effects.
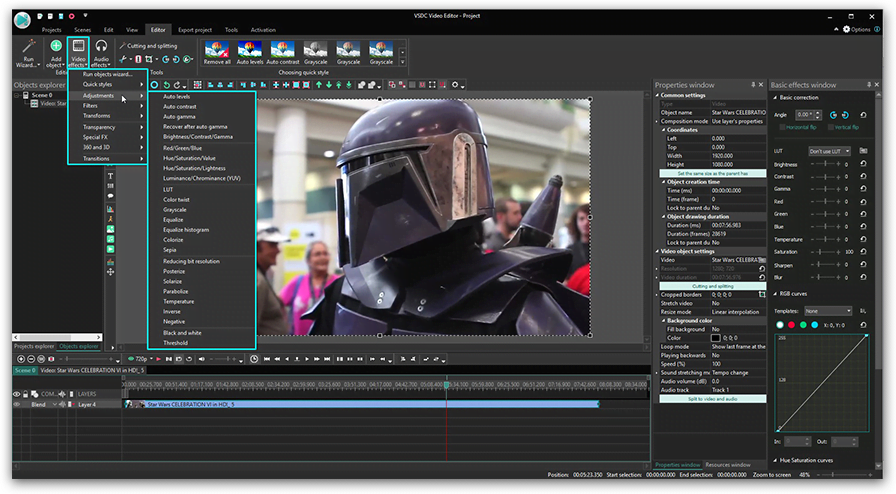
To apply one, select the video file you want to modify, go to the Video effects tab and choose the necessary effect. A new tab will be created on the timeline – it will contain all the effects applied to the selected object. There, you’ll be able to change the effect duration and its position timewise by dragging it with the mouse. Other parameters can be configured in the properties window located on the right-hand side.
The same rule applies to transitions. Place a cursor exactly where the transition should start, select the transition from the Video effects dropdown menu, and adjust its duration manually.
Basic Video Editing
If you choose Import Content from the starting screen, you can only add one file at a time, but once you’re in a project, you can add multiple files at once. You can now also add multiple video clips directly to the timeline, either simply by adding them all to the main track (which the program terms layer) or via the File Sequence wizard, which can apply transitions, cropping, color presets, region cutting, and rotation. One-button rotation is handy and not always offered by video apps. The pre-edited clips are added to the timeline as a single sprite, which initially shows up as one track on the timeline, but double-clicking this expands to the full number of component tracks.
Drag-and-drop now works within the timeline. You can drag clips onto the video preview window and move them from track to track, but I had trouble moving a clip within a track from right to the beginning—I had to select the clip, set the cursor to the spot I wanted to move the clip to, and then choose the Move Blocks to Cursor Position or Set Block Order, which opens a small dialog with up and down arrows for moving the clips in the timeline. If you’re not trying to move a clip to the start, you can use drag-and-drop to rearrange its position.
One thing that was more difficult than in other applications was closing up gaps created by moving clips. Many apps have a simple right-click Ripple Delete choice, but it took quite a bit of figuring how to do this in VSDC. Again, it was a matter of selecting multiple clips and moving them to the cursor position. The fact that the cursor is not magnetic—meaning clips don’t snap to their neighbor clip when you move them—makes this harder. In most apps the cursor snaps to the end or start of a clip on the timeline. The timeline track heads are still less clear than those in most other programs, with a spreadsheet-like design and unusual choices in very tall menus. Luckily, hover-over tooltips indicate their function, but it’s still not great interface design.
VSDC: обзор функционала
VSDC – это бесплатный нелинейный видеоредактор на русском языке для Windows. “Нелинейный” (в отличие от линейных редакторов, отличным примером которых является Movie Maker) означает, что вы сможете комбинировать видеофайлы и изображения в любой последовательности. Эта технология позволяет создавать видео на профессиональном уровне, и используется для достижения большинства популярных эффектов. Если вы никогда не слышали о нелинейном редактировании прежде, и всё ещё не понимаете, о чём речь, представьте себе возможности фотошопа, применимые не к статичному изображению, а к видео. Таким же образом, вы сможете работать со слоями, размещать несколько объектов в одном кадре, применять визуальное наложение одного объекта на другой, смешивать цвета и фрагменты, используя настройки прозрачности, и многое другое.
Вот, например, некоторые популярные эффекты, которых можно достичь именно благодаря технологии нелинейного видеоредактирования:
- Картинка-в-картинке
- Разделение экрана
- Видео внутри текст
- Удаление зелёного фона на видео
- Двойная экспозиция
Если всё это звучит сложнее, чем вы ожидали, стоит отметить, что для более простых целей VSDC тоже подходит. Вы сможете легко вырезать необходимый фрагемент, смонтировать кадры файлы, добавив переходы, повернуть кадр, снятый под углом, обрезать края видео, добавить заголовки и субтитры, применить фильтры и видеоэффекты. Большинство из этих операций применяются в VSDC в один-два клика, и не требуют специальных знаний и навыков.
Если вы ищете инструкции по работе с видеоредактором, они есть на сайте, а также на официальном канале компании на YouTube. Среди более 200 роликов об использовании VSDC, есть целый плейлист для начинающих пользователей. Не забудьте подписаться!
Понравились отзывы о VSDC? Вы можете скачать этот видеоредактор бесплатно здесь
Настройка динамики графика
Наконец мы перешли к самой интересной части инструкции – создание непосредственно анимированных графиков. Суть динамических графиков заключается в том, что его элементы (например, столбцы) меняют свои значения по осям X и Y на протяжении видеоролика.
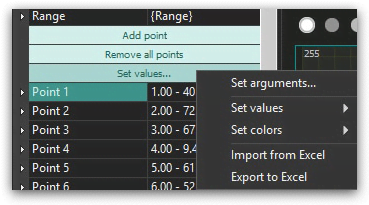
Чтобы добавить элемент динамики, необходимо пройти путь «График –Диаграмма – Набор данных – Свойства набора данных — Точки». По отдельности выбирайте те точки, значения которых вы планируете менять для динамического отображения. Затем в параметре «Аргумент» или в параметре «Значение» для выбранной точки нажмите на иконку с изображением трёх точек <…> — и в окне таймлайна появится прямая траектория.
Данная прямая соответствует значению оси X или оси Y конкретной точки в статике – в зависимости от того, какой параметр вы выбрали — “Аргумент” или “Значение”. Другими словами, это траектория. Для изменения траектории вам необходимо расставить на ней контрольные точки двойным щелчком мыши и сместить их вверх или вниз — таким образом задавая положительные или отрицательные значения для параметров “Аргумент” и “Значение” в конкретные моменты времени.
Например, для иллюстрации ниже мы настроили динамические значения для Точки 1.
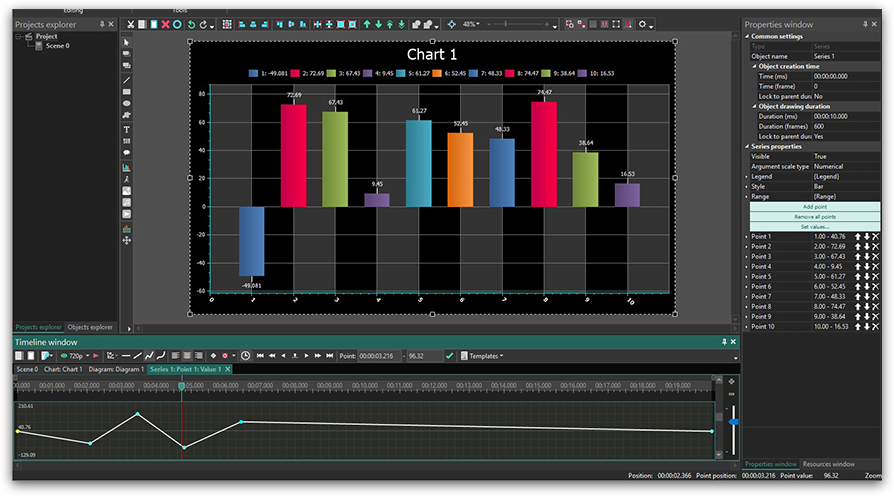
Вот и всё. Теперь у вас есть подробное понимание того, как создать и настроить анимированный график в бесплатном видеоредакторе VSDC.
Хотите больше инструкций по работе с редактором? Тогда обязательно подпишитесь на наш YouTube канал.
VSDC Free Video Editor Pro 6.7.3.298 на русском + лицензионный ключ активации
VSDC Video Editor — это программа, которая предназначена для нелинейного монтажа. Утилита поддерживает большое количество эффектов, а также форматов. В список поддерживаемых форматов можно отнести: MKV, 3GP, AAC, WMV, FLAC, JPG, MPG, MP4, MP3, ICO и многие другие.

Программа предоставляет большие возможности для нелинейного монтажа. У пользователей имеется возможность комбинировать видеоролики, накладывать звуковое сопровождение, добавлять текст, применять различные переходы, использовать встроенные фильтры или создавать свои.
Пароль ко всем архивам: 1progs
Важно отметить, что программа распространяется в демо-режиме, поэтому необходимо скачать лицензионный ключ активации VSDC Video Editor. Его можно найти в архиве с программой
Активация VSDC Video Editor позволяет использовать функциональные возможности программы без всяких ограничений.

Главные особенности программы:

Кроме этого, в программе можно создавать диаграммы разного типа: динамическая, пошаговая, точечная, линейная, пузырьковая и прочие. Внешний вид этих диаграмм есть возможность настроить. К примеру, внешний вид, оси координат, наименование и других элементов.
Качество материала, которое было снято с помощью экшн-камеры или дронов является не самым лучшим. В программу встроенный инструмент стабилизации, который служит в качестве виртуального штатива. С помощью него можно устранить дрожание и другие дефекты на видеоролике.

Преимущества программы:
- Запуск два видеоролика параллельно.
- Поддержка различных аудио и видео форматов.
- Встроенный конвертер.
- Редактор видео и аудио файлов.
- Интуитивно понятный пользовательский интерфейс.
Аналоги программы
Похожие программы смотрите в наших подборках программ
Программы для видео
Программы для обрезки видео
Программы для редактирования и монтажа видео
HitFilm Express
The last Movie Maker alternative is called HitFilm Express. We’ve already mentioned it among the best video editors for Windows 10 for its impressive selection of effects.
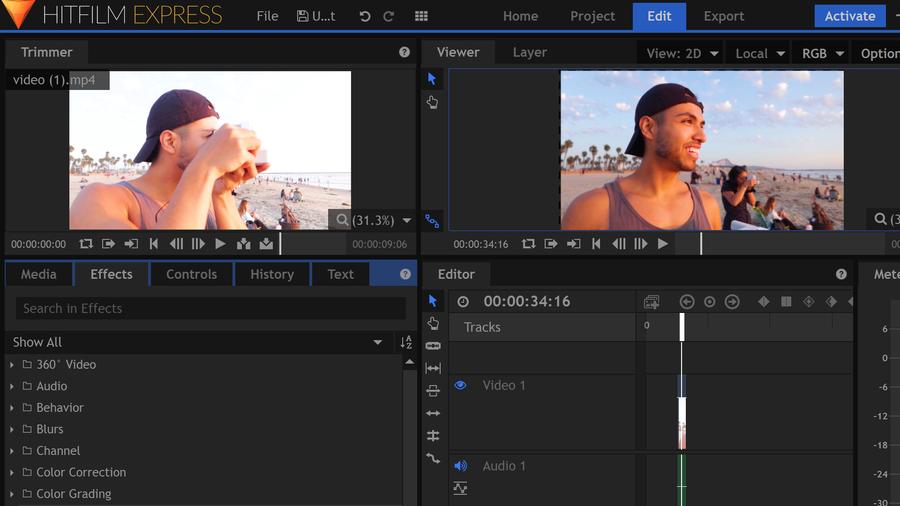
The HitFilm Express team aims to help amateurs achieve Hollywood-level effects
Although it may look like a tool for real filmmakers, HitFilm Express is beginner-friendly and can be used for simpler tasks like compiling a vacation video if you’re willing to invest a bit of time to get familiar with the main tabs and controls.
With the exception of a few details, the workflow here is similar to what you’ve seen in Olive, Kdenlive, and VSDC. First, HitFilm automatically breaks down imported video files into video and audio tracks and displays them on the timeline as a storyboard and a waveform. You can unlink them and remove the soundtrack in one click if necessary. Next, most basic actions can be performed right here on the timeline, too. The cutting tools are available on the left and upon right mouse click. Make sure to check out the Rate Stretch Tool – it helps you adjust the playback speed by stretching or shortening the file on the timeline manually. Rotation, resizing, and image aligning are available in the Controls tab and easily regulated by the arrows on the preview window.
Notice the white horizontal line striking through both video and audio tracks? By moving it up or down you can change image opacity and volume level.
Right next to the Controls tab, there is a library of effects – the feature-set HitFilm is known for. Go ahead and drag any of them right to the timeline and adjust the properties. The software brings dozens of eye-catching effects including color wheels, cinematic looks, special styles inspired by Van Gogh, and much more. Keep in mind that some of the effects require add-ons.
Overall, HitFilm is a good choice if you’re looking for a more powerful Movie Maker alternative – just make sure to have at least 4-8Gb RAM to run this beast on your PC.
Начало работы с модулем Motion tracking в VSDC: как построить карту движения
Чтобы начать работу, запустите программу и импортируйте ролик с объектом, движение которого вы планируете отслеживать. Затем необходимо создать так называемую «карту движения» — траекторию движения объекта на сцене, построенную программой в процессе отслеживания.
Сделать это можно следующим образом:
- Правой кнопкой мыши щёлкните по видеоролику.
- В открывшемся контекстном меню выберите опцию «Создать карту движения».
- Выберите место для хранения карты (на вашем компьютере) и дайте ей название. Нажмите «Сохранить».
- На экране предпросмотра появится контурная рамка – она определяет область, в которой находится отслеживаемый объект. Измените её размер и положение так, чтобы объект находился внутри рамки и, по возможности, занимал бОльшую её часть.
-
Нажмите на иконку «Начать анализ» в меню модуля Motion tracker, чтобы запустить процесс отслеживания выделенного объекта.
- По мере проигрывания видео, зелёным цветом на экране предпросмотра будет вырисовываться карта движения. В конце видео оцените полученную траекторию, и если она вас устраивает, нажмите «Применить редактирование». Таким образом, вы сохраняете созданную карту движения в обозначенном ранее месте на ПК, а программа переходит в обычный режим редактирования.
Color Grading in VSDC
New for the latest major update of VSDC is color-wheel based color grading. This pro-level capability is a staple of Adobe Premiere Pro and Final Cut Pro, but it has been showing up in more and more prosumer editing apps over the past year or so. You access it from the Basic Effects panel’s Hue Saturation curves section.
There are six preset color dots (red, yellow, green, etc.), which, when clicked, add control points on the wheel. You can also use a dropper to isolate an exact color in your video. It’s a powerful tool that lets you perform interesting effects like color pop, or just enhancing a sky. In addition to using the wheel, you can adjust colors with Photoshop-like RGB Curves and YUV curves. The program also supports LUT (look up table) presets, which can produce lighting effects like day-for-night and candlelight. Like the VirtualDub filters, you import these from the main button menu’s Templates option.
DaVinci Resolve
Если вас не смущает английский язык интерфейса и сложность программ видеомонтажа, DaVinci Resolve — лучший видео редактор из бесплатных. Первоначальные версии в большей степени были предназначены для работы со цветом, но начиная с версии 16, это более чем полноценный инструмент нелинейного видеомонтажа, содержащий множество профессиональных инструментов для работы, которые с большой вероятностью смогут покрыть любые ваши потребности.

Даже если вы не профессионал и вам не требуется создавать серьезные фильмы, разбираться с цветокоррекцией, DaVinci Resolve после непродолжительного обучения (а материалов и видео уроков в сети достаточно, бесплатные учебники DaVinci Resolve на русском есть и на официальном сайте разработчика в разделе «Обучение») может стать удобным инструментом для создания собственных видео с эффектами, переходами, титрами и быстрого экспорта проектов с использованием ускорения на видеокарте.
Указать всё, что может DaVinci Resolve в рамках этого списка видеоредакторов не получится, но здесь реализуемо практически всё, что только может пригодиться. И, когда я устану платить за Adobe Premiere Pro, перейду именно на этот продукт.
