Скачать libreoffice
Содержание:
- Participation
- 19. Wie kann ich ein Sonderzeichen per Tastenkombination eingeben?
- 21. Wie kann ich ein PDF-Dokument einfügen und/oder bearbeiten?
- Getting Involved
- 16. Wie fasse ich zwei Tabellen zusammen?
- Совместимость со сторонним ПО, требующим использования MSO
- Apache OpenOffice ReadMe
- OpenOffice in Native Languages
- Окна, панели, меню и настройки
- Долго появляется контекстное меню по клику правой кнопки мыши (30 сек. и более)
- В предварительном просмотре страницы две кнопки для печати. В чём разница?
- Названия закладок на русском языке в Навигаторе отображаются некорректно.
- Невозможно закрепить панели инструментов, чтобы не исчезали (в меню эти пункты не активны)!
- Куда делись дополнительные поля пользователя из свойств документа?
- Создание пустого документа
- Product Development
- 2. Wie kann ich Text auf den Kopf stellen (um 180° drehen)?
- Current Development
- Создание документа на основе шаблона
- Открытие существующего документа
- Сохранение документа
- 8. Wie schalte ich die Seitennummerierung auf der ersten Seite aus?
- Extension Development
- Publipostage
- Documents proposés par le CIRB (Centre d’Informatique pour la Région Bruxelloise)
- Запуск существующего документа
Participation
You can find various resoures here on this page as well as in our
OpenOffice.org
Wiki. So, what are you looking for?
Documentation
There are several entries in our Wiki
that are related to the several subprojects within this OOo
project. Please visit the Draw
Wiki for Drawing application related documentation,
visit the Impress
Wiki for Impress application related information and
visit the Chart2
Wiki for Chart 2 related documentation.The
OpenOffice.org
Wiki
will soon feature also whole categories dedicated to end user
documentation for each of the mentioned subprojects. There, you’ll
find articles, HowTo’s, frequently asked questions (and answers).
You might also want to visit the Tutorials category for taking a
look at an Impress
Tutorial for example.As always, you’re
encouraged to contribute to the Wiki — if you find something is
missing, or otherwise have information to share with the community:
just add it!
-
Development
You want to contribute some comprehensive coding or some code
snippets, but don’t know where to start? Welcome!IssueZilla, the OOo internal bugtracking system features a
keyword «easy2dev», which indicates issues which are easy
to fix — that easy, that new developers should have not much trouble
with them. Not much of the projects issues have this flag been set
so far, but this will change in the near future to attract more and
more developers to participate in the success of OOo and so to
be a part of this great community. So, if you’re looking for some
small fixes to do: take a look at this
list.
If you’re interested in one of the mentioned engagements,
just ask the owner of the issue, and/or the person who added
the keyword. They are able to tell you how to fix it the best
way. Ask them, or send a mail to our graphics developer
mailing list — and we’ll help you getting started!If you’re looking for a greater challenge, pick the issue
or RFE
which you would most like to get fixed. Ask in the issue,
or in our graphics developer
mailing list, for help in fixing it.We also maintain a list of small to medium self-contained
projects for developers, so if you’re interested in such a project,
please have a look at our graphics open
projects lists. -
Quality Assurance
We’re working hard to make all parts of the grapghics project
perfect, but let’s face the truth: we’re not there (yet). If you
found a bug, or are missing a feature, you can help by describing
it in IssueZilla, which is OpenOffice.org’s own bug tracking
system.If you have some more time to spend to make OpenOffice.org
better, please consider joining the QA
Team. -
Miscellaneous
n/a
-
Important Links
-
Impress
Wiki -
Chart
2
Wiki -
Impress
Tutorial -
Open
projects lists.
-
Developer
mailing list
-
19. Wie kann ich ein Sonderzeichen per Tastenkombination eingeben?
Sonderzeichen können über den Dialog Einfügen -> Sonderzeichen… eingegeben werden. Tastenkombinationen
können über den Dialog Extras -> Anpassen… (Register Tastatur) definiert werden. Jedoch ist es zur Zeit
nicht möglich beides zu kombinieren, d.h. für das Einfügen eines bestimmten Sonderzeichens (z.B. ç) eine
Tastenkombination zu vergeben (z.B. AltGr+c).
Folgende Alternativen bieten sich an:
- Sie schalten in Ihrem Betriebssystem das Tastaturlayout (vorübergehend) auf die fremde Sprache um.
- Sie passen in Ihrem Betriebssystem das Tastaturlayout (für Deutsch) so an, dass Ihnen die gewünschte Tastenkombination
für das gewünschte Zeichen zur Verfügung steht. - Sie verwenden in OpenOffice.org einen AutoText (Bearbeiten -> AutoText…) für das Zeichen.
- Sie verwenden in OpenOffice.org die AutoKorrektur (Extras -> AutoKorrektur…) für das Zeichen.
Weiterlesen: Für eine detailliertere Beschreibung empfehlen wir Ihnen das
OpenOffice.org-Wiki.
21. Wie kann ich ein PDF-Dokument einfügen und/oder bearbeiten?
Ein PDF-Import steht in OpenOffice.org erst ab Version 3.0 zur Verfügung. Dazu muss zur Zeit noch
die entsprechende Extension separat heruntergeladen
und nachträglich installiert werden. Bis auf Weiteres ist ein Import jedoch nur in das Modul DRAW möglich.
Häufiger Fehler: Wenn Sie versuchen über Einfügen -> Datei ein PDF-Dokument in Ihr Textdokument
einzufügen, öffnet sich zunächst der Dialog ASCII-Filteroptionen. Entsprechend werden, wenn man diesen
Dialog bestätigt, die Rohdaten des PDF-Dokuments als reiner Text (sog. ASCII-Text) in das Textdokument eingefügt,
was in aller Regel aber nicht beabsichtigt ist.
Getting Involved
The OpenOffice Community would very much benefit from your active participation in the development of this important open source project.
As a user, you are already a valuable part of the suite’s development process and we would like to encourage you to take an even more active role with
a view to being a long-term contributor to the community. Please join and check out the user page at
https://openoffice.apache.org/get-involved.html
Subscribe
- News: announce@openoffice.apache.org *recommended to all users* (light traffic)
- Main user forum: users@openoffice.apache.org *easy way to lurk on discussions* (heavy traffic)
- General project development and discussion list: dev@openoffice.apache.org (heavy traffic)
Joining the Project
You can make major contributions to this important open source project even if you have limited software design
or coding experience. Yes, you!
At Get Involved you will find a first overview where you can start,
ranging from Localization, QA, and user support to some real core coding projects.
If you are not a developer, you can help with Documentation or Marketing, for example.
The OpenOffice marketing is applying both guerrilla and traditional commercial techniques to marketing open source software,
and we are doing it across language and cultural barriers, so you can help just by
spreading the word and telling a friend about this office suite. You can help by joining the marketing
mailing list marketing@openoffice.apache.org where you can provide point communication contact with press, media,
government agencies, consultants, schools, Linux Users Groups and developers in your country and local community.
We hope you enjoy working with the new OpenOffice 4.1.5 and will join us online.
The Apache OpenOffice Community
16. Wie fasse ich zwei Tabellen zusammen?
- Löschen Sie zunächst alle Absätze zwischen den beiden Tabellen bzw. schneiden Sie die Inhalte zwischen
den Tabellen aus und fügen Sie sie an anderer Stelle wieder ein. - Es kann sein, dass es schon jetzt so aussieht, als würde es sich nur noch um eine Tabelle handeln. Ein Blick auf
die Anzeige in der Statusleiste ganz rechts unten verrät Ihnen jedoch, dass es noch zwei getrennte Tabellen sind
(die Anzeige wechselt z.B. von Tabelle1 zu Tabelle2, wenn Sie den Cursor in eine andere Zelle setzen). - Rufen Sie jetzt das Kontextmenü der zweiten unteren Tabelle auf (mit der rechten Maustaste anklicken)
und wählen Sie daraus den Punkt Tabellen verbinden.
Tipp: Für den umgekehrten Weg eine Tabelle in zwei einzelne teilen gehen Sie über den Punkt
Tabelle auftrennen aus dem Kontextmenü der Tabelle.
Совместимость со сторонним ПО, требующим использования MSO
Как правило, никак. Если стороннее ПО обращается к MSO как к OLE-объектам, то ООо не сможет заменить MSO.
Обращайтесь к разработчикам стороннего ПО.
Существует проект AutomateIT! по реализации интерфейса OLE для ОО как у MSO. Проект ещё находится в состоянии «альфа», то есть находится в состоянии разработки и интерфейс OLE поддерживается не полностью.
Текущая версия — 0.7 — alfa имеет инсталлятор, работает с версиями OpenOfice.Org 2.x, 3.0 beta.
Авторами заявлена совместимость с «Налогоплательщик ЮЛ» и Windows Vista.
Проект Uni Office@Etersoft – транслятор COM-объектов MS Office. На данный момент (версия 0.2) поддерживаются только COM-объекты Excel.
Сравнительная таблица AutomateIT! 0.6 и Uni Office 0.1
2.3
К сожалению, решить эту проблему в настоящее время не представляется возможным.
2.3
Многое из современного ПО требует наличия MSO на компьютере пользователя в той или иной степени. Будет ли решена эта проблема для пользователей ООо?
Apache OpenOffice ReadMe
Last Update: 2017-12-30
Dear User
This file contains important information about this program. Please read this information very carefully before starting work.
The Apache OpenOffice Community, responsible for the development of this product, would like to invite you to participate as a community member.
As a new user, you can check out the Apache OpenOffice project site at openoffice.apache.org.
Please also read the sections below about getting involved in the Apache OpenOffice project.
Is OpenOffice really free for any user?
OpenOffice is free for use by everybody. You may take this copy of OpenOffice and install it on as many computers as you like,
and use it for any purpose you like (including commercial, government, public administration and educational use).
For further details see the license text delivered together with OpenOffice or https://www.openoffice.org/license.html
Why is OpenOffice free for any user?
You can use this copy of OpenOffice today free of charge because individual contributors and corporate sponsors have designed, developed, tested,
translated, documented, supported, marketed, and helped in many other ways to make OpenOffice what it is today — the world’s leading open-source
office software.
If you appreciate their efforts, and would like to ensure Apache OpenOffice continues into the future,
please consider contributing to the project — see https://openoffice.apache.org/get-involved.html for details on contributing time,
and https://www.apache.org/foundation/contributing.html for details on donations. Everyone has a contribution to make.
OpenOffice in Native Languages
The Native Language websites offer information, resources, and much more in a user’s native language.
We rely exclusively on volunteers to provide native language releases of Apache OpenOffice. We can always use more help even for languages where we already have maintainers. Please visit the Native Language Information area of the Apache OpenOffice project to find out more about native language support specifically, and please see Getting Involved for additional information on getting involved in Apache OpenOffice.
Please see:
- The download page for a list of officially released languages.
- Pootle for an overview of the current localization status.
- The OpenOffice source code for a full list of available languages, including those that are not yet on Pootle and those for which we have no website available (for example, many of the African localizations are not listed below).
In the following table, the status definitions for the Website column are:
| Status | Explanation |
|---|---|
| maintained | This web site is localized and current, and the download links are localized and working. |
| help wanted | This website needs help and may be incomplete, outdated or unmaintained. If you can help, please e-mail the saying that you can volunteer for updating a specific website translation. |
| Language | Website | OpenOffice availability |
|---|---|---|
| Afrikaans (af) | help wanted | outdated |
| Amharic (am) | help wanted | outdated |
| Arabic (ar) | help wanted | outdated |
| Armenian (hy) | maintained | outdated |
| Asturian (ast) | help wanted | current 4.1.x |
| Basque (eu) | help wanted | current 4.1.x |
| Bulgarian (bg) | help wanted | current 4.1.x |
| Catalan (ca) | help wanted | current 4.1.x |
| 正體中文 Chinese trad. (tw) | maintained | current 4.1.x |
| 简体中文 Chinese sim. (cn) | maintained | current 4.1.x |
| Czech (cs) | maintained | current 4.1.x |
| Danish (da) | maintained | current 4.1.x |
| Dutch (nl) | maintained | current 4.1.x |
| Esperanto (eo) | help wanted | outdated |
| Estonian (et) | help wanted | outdated |
| Finnish (fi) | maintained | current 4.1.x |
| French (fr) | maintained | current 4.1.x |
| Galician (gl) | help wanted | current 4.1.x |
| Gaelic — Scottish (gd) | help wanted | current 4.1.x |
| German (de) | maintained | current 4.1.x |
| Greek (el) | maintained | current 4.1.x |
| Hebrew (he) | maintained | current 4.1.x |
| Hindi (hi) | help wanted | current 4.1.x |
| Hungarian (hu) | help wanted | current 4.1.x |
| Icelandic (is) | help wanted | outdated |
| Indonesian (id) | help wanted | outdated |
| Italiano (it) | maintained | current 4.1.x |
| Japanese (ja) | maintained | current 4.1.x |
| Kabyle (kab) | help wanted | outdated |
| Khmer (km) | help wanted | current 4.1.x |
| Korean (ko) | help wanted | current 4.1.x |
| Lithuanian (lt) | maintained | current 4.1.x |
| Norwegian (no) | maintained | current 4.1.x |
| Oromo (om) | help wanted | outdated |
| Polish (pl) | maintained | current 4.1.x |
| Portuguese Europeu (pt) | maintained | current 4.1.x |
| Portuguese of Brasil (pt-br) | help wanted | current 4.1.x |
| Romanian (ro) | help wanted | outdated |
| Russian (ru) | maintained | current 4.1.x |
| Serbian — Cyrillic (sr) | help wanted | current 4.1.x |
| Serbian — Latin (sr-Latn) | maintained | current 4.1.x |
| Slovenian (sl) | help wanted | current 4.1.x |
| Slovakian (sk) | maintained | current 4.1.x |
| Spanish (es) | maintained | current 4.1.x |
| Swedish (sv) | maintained | current 4.1.x |
| Tamil (ta) | help wanted | current 4.1.x |
| Thai (th) | help wanted | current 4.1.x |
| Turkish (tr) | maintained | current 4.1.x |
| Ukrainian (uk) | help wanted | outdated |
| Valencian AVL (ca-XV) | help wanted | current 4.1.x |
| Valencian RACV (ca-XR) | help wanted | current 4.1.x |
| Vietnamese (vi) | help wanted | current 4.1.x |
(Legacy information for the Native Language Confederation, not accurate for Apache OpenOffice.)
Окна, панели, меню и настройки
Долго появляется контекстное меню по клику правой кнопки мыши (30 сек. и более)
Возможные причины:
- В системе установлено слишком много шрифтов.
- В OpenOffice.org установлено слишком много расширений. В этом случае рекомендуется вызвать менеджер расширений Сервис — Управление расширениями и обязательно нажать кнопку Закрыть. Это приведёт к обновлению файлов конфигурации программы, и после этого меню должно работать быстрее.
2.3
Используйте возможности Вашей операционной системы.
2.3
Используйте Формат — Символы — Положение
2.3
В предварительном просмотре страницы две кнопки для печати. В чём разница?
| Принять участие в проекте! |
|---|
| Общие вопросы |
| Форматирование ответов |
| Вопросы использования |
| Популярные разделы: |
| Writer: Часто задаваемые вопросы |
| Calc: Часто задаваемые вопросы |
| Орфография и грамматика |
| Полезности и секреты |
| Главная страница |
Вторая кнопка — предназначена для печати эскиза документа, рядом находится кнопка «параметры печати», с её помощью можно задавать печать нескольких страниц в одной и другие опции
2.3
В настоящее время нет.
Но пользователи KDE(Linux) имеют возможность просматривать такой документ в миниатюре при наведении мыши. Текста при таком способе просмотра не разглядишь, но представление о документе получить можно.
2.3.1
Щёлкните по кнопке дважды, кнопка зафиксируется в нажатом состоянии. Применяйте форматирование столько раз, сколько Вам необходимо. По окончании щёлкните ещё раз — кнопка примет начальное положение.
2.3.1
Названия закладок на русском языке в Навигаторе отображаются некорректно.
Проблема существует в том случае, если файл в формате doc. В настоящее время она пока не решена. Issue 85820
В файле ODT проблема отображения корректных названий закладок в не наблюдается.
2.3.1
Это обозначение режима выделения.
- СТАНД — Стандартный режим выделения. Любое новое выделение аннулирует результат старого.
- РАСШ — Расширенный режим. Если область текста уже выделена, новое выделение изменяет старое от его начала до позиции нового щелчка мышкой.
- ДОБАВ — Режим добавления. Если область текста уже выделена, новое выделение не отменяет старое.
2.3.1
Невозможно закрепить панели инструментов, чтобы не исчезали (в меню эти пункты не активны)!
Это особенность интерфейса OpenOffice.org. Такая панель инструментов называется контекстной, то есть отображается на экране только в соответствии с позицией курсора. Это позволяет экономить место на экране, не занимая его ненужными в данный момент значками.
Например, если курсор находится в таблице, то отображается контекстная панель Таблица.
Обычно такие панели отображаются в виде плавающего окна, также можно закрепить такую панель, нажав на значок «треугольник» и выбрав команду Блокировать панель. При переходе курсора в другой контекст закреплённая панель исчезнет.
2.3.1
Данная функция доступна в OpenOffice.org начиная с версии 3.0.
3.0
Начиная с версии 2.3 положение страницы отцентрировано
2.3
В ООо возможно получить доступ одновременно к неограниченному, в отличии от MS Word, количеству мест документа.
Для этого надо выполнить команду Окно — Новое окно, появится новое окно с этим же документом. Изменения, сделанные в одном окне отобразится и во втором. Количество таких окон не ограничено.
Этот способ особенно хорош для широкоформатных мониторов, когда окна можно расположить слева направо, что значительно удобней. Для обычных мониторов можно расположить окна одно окно над другим и получить, тем самым, полный аналог Word’овского разделения окон документа.
3.0
Куда делись дополнительные поля пользователя из свойств документа?
При работе в Word’е в свойствах документа созданы и заполнены дополнительные поля. Однако, при открытии .DOC-файла в OpenOffice.org из этих полей, в свойствах документа, видны только четыре.
Просмотр и редактирование всех полей пользователя в свойствах документа доступен через меню Вставка — Поля — Дополнительно — Сведения о документе — Особый. Здесь отображаются все введённые пользователем свойства документа. Здесь же можно их отредактировать.
3.0
Создание пустого документа
Создать новый, пустой документ в Apache OpenOffice Writer можно несколькими способами.
Когда Apache OpenOffice запущен, но никакой документ в нём не открыт (например, если закрыты все открытые документы, но не закрыта сама программа), будет открыт стартовый центр. По щелчку или на одном из значков документов создастся новый документ соответствующего типа, или по значку Шаблоны создасться новый документ на основе одного из имеющихся шаблонов.
Новый документ можно создать и одним из следующих способов. Если в Apache OpenOffice уже открыт какой-либо документ, то новый документ откроется в новом окне.
- Нажать сочетание клавиш Ctrl + N . Откроется новый, пустой документ того же типа, что и текущий. Если в Apache OpenOffice уже открыт какой-либо документ, то новый документ откроется в новом окне.
- Выбрать в меню Файл → Создать → Текстовый документ. Результат будет таким же, как при нажатии сочетания клавиш Ctrl + N .
- Щёлкнуть по кнопке Создать на панели инструментов Стандартная.
Product Development
| Project | Short Name | Description | |
|---|---|---|---|
| Security | security | To improve security and privacy features in OpenOffice.org | |
| Performance | performance | To improve the performance of OpenOffice.org | |
| Word Processing | sw | The word processing application Writer the formula editor Math. | |
| Spreadsheet | sc | The spreadsheet application Calc. | |
| Graphic Applications | graphics | The Graphic applications like Impress, Draw and Chart. | |
| Graphic System Layer | gsl | The Graphic System Layer (GSL) project is an umbrella project to provide graphic output on different devices. Graphic output refers to a range of operations starting from simple line drawing to complex raster operations. | |
| Base / Database Access | dba | Base is OpenOffice.org’s database application. Additionally, this project provides the other applications with access to a variety of relational data sources in various formats. | |
| API | api | The application programming interface. | |
| Application Framework | framework | This project contains modules that define the general behaviour of the OpenOffice application components ( Writer, Calc etc. ) | |
| Build Tools and Environment | tools | The tools used in the build process and the build environment. | |
| Quality Assurance | qa | Quality Assurance: testing and qualifying all builds of OpenOffice.org. | |
| UNO Development Kit / Component Technology | udk | Object model development and component technology. Includes the old OI and Scripting projects. | |
| User Experience | ux |
The main goal of the User Experience Team is to make OpenOffice.org the best office suite in terms of usability, productivity and enjoyment. |
|
| User Interface | ui | Common user interface for OpenOffice.org applications. | |
| XML Project | xml | The OpenOffice.org XML project is the home of of XML related features of OpenOffice.org, like its OASIS OpenDocument/ISO/IEC 26300 file format implementation. It further provides some XML base implementations, like XML parser and printer components. |
2. Wie kann ich Text auf den Kopf stellen (um 180° drehen)?
Sie benötigen für eine besondere Anwendung Text, der auf dem Kopf steht,
(z.B. für faltbare Tischkarten). Hierfür gehen Sie folgendermaßen vor:
- Fügen Sie in Ihr Dokument einen Textrahmen ein: Einfügen -> Rahmen….
- Im Register Zusätze wählen Sie in der Dropdown-Box (ganz unten) Rechts-nach-links (vertikal).
- Formatieren Sie den Textrahmen weiterhin wie gewünscht.
- Fügen Sie nun Ihren Text ein.
- Markieren Sie den Text und wählen Format -> Zeichen -> Rotation «270 Grad».
Alternative: Sie können Ihren Text auch mit der Zeichenfunktion einfügen und dann beliebig drehen:
- Blenden Sie die Symbolleiste Zeichnen ein: Ansicht -> Symbolleisten -> Zeichnen.
- Wählen Sie auf dieser Symbolleiste das Werkzeug Text (das Icon mit dem großen T).
- Ziehen Sie damit einen Rahmen auf. Geben Sie Ihren Text ein.
- Klicken Sie neben bzw. auf den Rahmen, sodass er mit kleinen grünen Rechtecken markiert ist.
Wählen Sie nun aus dem Kontextmenü des Rahmens (Klick mit der rechten Maustaste auf die Umrandung)
den Punkt Position und Größe…. - Auf dem Register Drehung können Sie unter Drehwinkel nun einen beliebigen Wert (Grad) eingeben,
um den der Rahmen (samt Inhalt) um seinen Mittelpunkt gedreht werden soll.
Current Development
To see what the Calc team at Sun is doing, look for the weekly
update entries in the GullFOSS
blog.
Currently, the major topics of Calc development are:
-
Performance
Current Calc activities within the performance
project are listed on the performance
wiki page. -
Excel 2007 import filter
The import filter for Excel 2007 files is continually improved.
For details about the filter implementation, see its
wiki page. -
ODF formula specification
Within the OASIS OpenDocument Formula
Subcommittee, a specification for spreadsheet formulas is being
created. Necessary changes are being implemented. -
Integration of R into Calc
A Summer of Code project has integrated the R environment with
Calc, see the
page in the wiki. The Summer of Code project is completed, but
the integration will continue to be improved. -
Usability improvements
There’s a separate wiki
page about our usability activities. -
Solver
Calc has a built-in
dialog to control different solver components, and a linear
solver component included in the installation set. A non-linear
component is available as a preliminary
version.
Создание документа на основе шаблона
Для создания новых документов в Apache OpenOffice Writer можно использовать шаблоны. Они служат в качестве основы для создания документов, которые имеют схожую компоновку. Например, все документы в руководстве по использованию Apache OpenOffice Writer основаны на одном и том же шаблоне. В результате, все документы по виду схожи между собой; в них использованы схожие верхние и нижние колонтитулы, одинаковые шрифты и т. д.
По умолчанию в Apache OpenOffice имеется только небольшое количество шаблонов. Пользователи могут самостоятельно добавлять новые шаблоны и использовать их для создания новых документов. Работа с шаблонами подробно описана в главе 10 (Работа с шаблонами). Также дополнительные шаблоны можно найти в интернете, в частности на сайте extensions.services.openoffice.org.
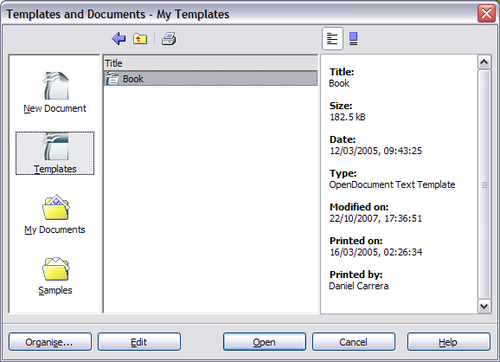
Для создания документа на основе шаблона служит меню Файл → Создать → Шаблоны и документы. Откроется окно выбора шаблонов, которые можно использовать для создания документов.
На иллюстрации показан пример использования шаблона под названием “Книга”, расположенного в папке Мои шаблоны. Если его выбрать и щёлкнуть по кнопке Открыть , то будет создан новый документ с заранее определённым форматированием.
 Создание документа на основе шаблона
Открытие существующего документа
Когда ни один документ не открыт, то стартовый центр предоставляет возможность щелчком на значке Открыть документ перейти в диалоговое окно открытия существующих документов.
Любой существующий документ можно открыть и одним из следующих способов. Если в Apache OpenOffice уже открыт какой-либо документ, то новый документ откроется в новом окне.
- Выбрать меню Файл → Открыть.
- Щёлкнуть по кнопке Открыть на панели инструментов Стандартная.
- Нажать сочетание клавиш Ctrl + O на клавиатуре.
В результате появится диалоговое окно Открыть, в котором можно выбрать необходимый файл и щёлкнуть по кнопке Открыть .
В этом диалоговом окне представлены все типы файлов, которые Apache OpenOffice способен открыть и этот список можно сократить, если выбрать конкретный тип файлов. Например, если выбрать тип файлов Текстовые документы, то отобразятся только те документы, которые могут быть открыты в Apache OpenOffice Writer (прежде всего *.odt, *.doc, *.txt). Таким способом можно открывать как документы MS Word (*.doc), так и документы, созданные в Apache OpenOffice и других текстовых редакторах.
Существующие документы Apache OpenOffice Writer можно открывать тем же способом, который используется в операционной системе для открытия любых документов.
Если ассоциированы файлы форматов Microsoft Office с Apache OpenOffice, то можно просто сделать двойной щелчок на значках таких файлов.
Сохранение документа
Чтобы сохранить новый документ в Apache OpenOffice Writer, надо выполнить одно из следующих действий:
- Нажать сочетание клавиш Ctrl + S .
- Выбрать в меню Файл → Сохранить.
- Щёлкнуть по кнопке Сохранить на панели инструментов Стандартная.
При первом сохранении появится диалоговое окно Сохранить и нужно ввести имя файла и проверить (если необходимо) тип сохраняемого файла.
Чтобы сохранить открытый документ с тем же именем, выберите в меню Файл → Сохранить. В результате будет перезаписана предыдущая сохранённая копия файла.
8. Wie schalte ich die Seitennummerierung auf der ersten Seite aus?
Seiten mit unterschiedlichem Aussehen müssen jeweils unterschiedliche Seitenvorlagen zugewiesen werden.
Wenn Sie auf der ersten Seite keine Kopf- oder Fußzeile möchten, so weisen Sie der ersten Seite die Seitenvorlage
Erste Seite oder eine andere Seitenvorlage, bei der die Kopf- bzw. Fußzeile ausgeschaltet ist, zu
(Doppelklick auf die Vorlage im Bereich Seitenvorlagen des Fensters Format -> Formatvorlagen).
Die Seitenvorlage für die übrigen Seiten (z.B. Standard) kann jetzt unabhängig von der für
die erste Seite verwendeten Vorlage (z.B. Erste Seite) verändert werden. Schalten Sie also nun die Kopf- bzw.
Fußzeile für die Seitenvorlage Standard ein, indem Sie aus dem Menü Einfügen -> Kopfzeile -> Standard
bzw. Einfügen -> Fußzeile -> Standard wählen. Fügen Sie nun den Feldbefehl Seitennummer
in die Kopf- bzw. Fußzeile ein (Einfügen -> Feldbefehle -> Seitennummer).
Extension Development
| Project | Short Name | Description |
|---|---|---|
| Extensions | extensions | The purpose of this project is to help produce, organize and deploy extensions. An extension is a third party tool that brings OOo new functionality. This can be done through addons, addins, deployed by UNO packages. Extensions also covers templates and galleries. |
| External | external | This project will host all the external code allowed. |
| Universal Content Broker | ucb | Allows the applications to transparently access content with different structures. |
| Bibliographic Project | bibliographic | To provide integrated bibliographic functionality in OpenOffice.org. |
Publipostage
|
Titre |
Description |
Formats |
|
Publipostage avec Calc |
C’est le tutoriel incontournable si vous venez de MS-Office pour comprendre le |
|
|
Publipostage avec dBase |
Comment réaliser un publipostage à partir |
PDF ODT |
|
Publipostage avec Base |
Comment réaliser un publipostage avec le module |
PDF ODT |
|
Publipostage après importation depuis Calc sous Base |
Ce tutoriel vous expliquera comment importer un tableau Calc |
PDF ODT |
|
Publipostage avec l’Assistant |
Ce tutoriel vous expliquera comment réaliser un |
PDF ODT |
|
Requêtes dans les Publipostages |
Comment réaliser des requêtes dans |
PDF ODT |
Documents proposés par le CIRB (Centre d’Informatique pour la Région Bruxelloise)
|
Titre |
Description |
Formats |
|
Listes numérotées |
Comment créer des listes numérotées. |
PDF ODT |
|
Publipostage |
Comment réaliser un publipostage. Publipostage à |
PDF ODT |
|
Structurer un long document |
Comment structurer un long document. Appliquer des styles de |
PDF ODT |
|
Modèles de document |
Comment utiliser les modèles de document. Utilisation et |
PDF ODT |
|
Styles de page |
Comment utiliser les styles de page. Création et |
PDF ODT |
|
Styles de texte |
Comment utiliser les styles. Utilisation de styles de |
PDF ODT |
|
Tableaux |
Comment utiliser les tableaux. Techniques d’insertion et de |
PDF ODT |
Запуск существующего документа
Все документы Writer ассоциированы с этим приложением. Это значит, что можно запустить OpenOffice.org автоматически, просто дважды щёлкнув по любому документу Writer в окне файлового менеджера, например, в Windows Explorer.
Документ OpenOffice.org Writer обозначается вот этим значком: .
Примечание для пользователей Windows
Если вы ассоциировали типы файлов Microsoft Office с OOo, то после двойного щелчка по файлу с расширением *.doc (Word), он откроется в OOo Writer.
Если вы не изменяли ассоциации этих типов файлов, то двойной щелчок по документу Microsoft Word откроет его в Microsoft Word (если, конечно, Word установлен на вашем компьютере).
Можно также использовать и другой способ, позволяющий открывать файлы с расширением *.doc в OOo и сохранять их в том же формате из OOo. Подробно об этом говорится в разделе .
