Compile and build applications with intellij idea
Содержание:
- Database tools
- JavaScript
- Install as a snap package on Linux
- Profiler
- Создание простого проекта на Kotlin
- Compose HTTP requests
- Первая программа в IntelliJ IDEA
- Built-in tools and integrations
- Configuration Details
- Инструменты для работы с базами данных
- Other improvements
- User Experience
- Системы контроля версий
- Kotlin
- View options
- Kubernetes
- Deep code insight
- Silent installation on Windows
Database tools
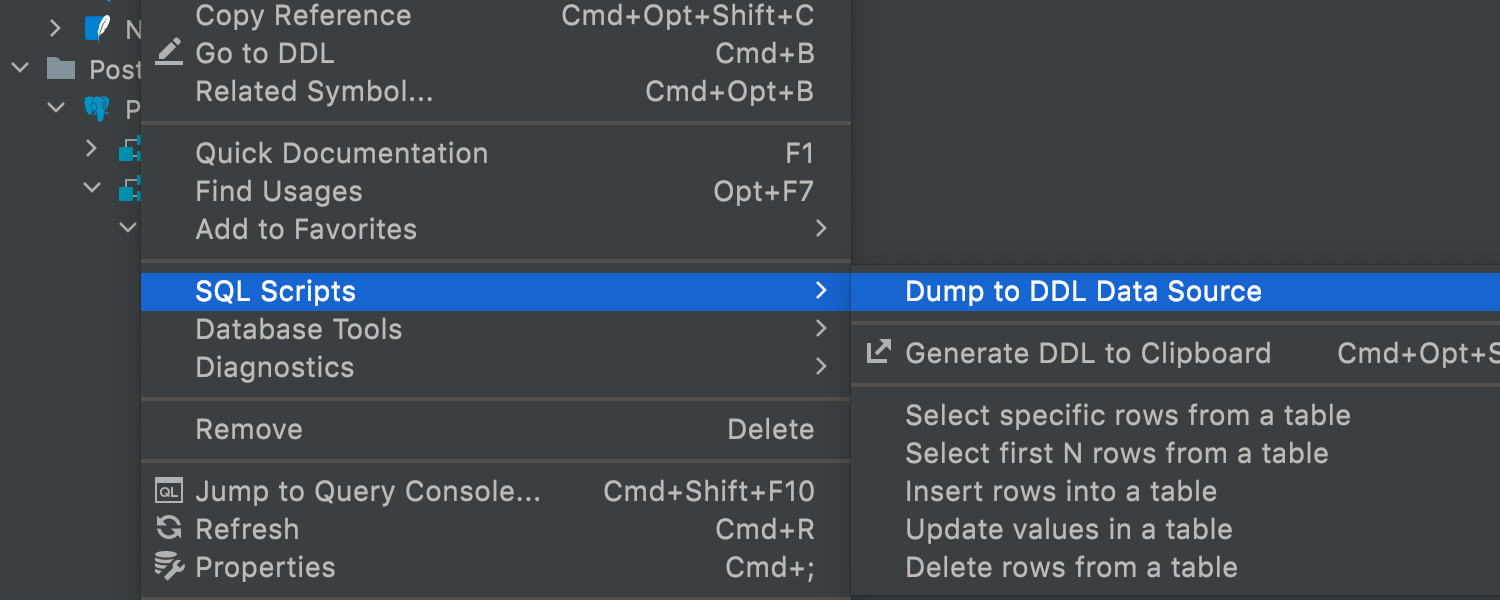
DDL data source
Ultimate
It is now possible to generate a DDL data source based on a real one. The DDL files
will be created on the disk and the new data source will be based on them. That way
you’ll always be able to regenerate these files and refresh the DDL data source.
Step-by-step instructions on how to apply this feature are available in our
blog post.

Managing the popping up of Services tool window
Ultimate
When a query returns no data, there’s no need for the Services tool window to
appear if it was hidden already. Now you can define which operations make the
Services tool window appear on your own in
Preferences / Settings | Tools | Database | General.
JavaScript
Reload pages in browser on save
Ultimate
IntelliJ IDEA lets you preview HTML files in a browser using the built-in web server.
Now, it will automatically update the pages in a browser as you edit and save your HTML,
CSS, and JavaScript files. To get started, open an HTML file in the editor, hover over it,
and click on the icon for the browser you want to use – all browsers are supported.
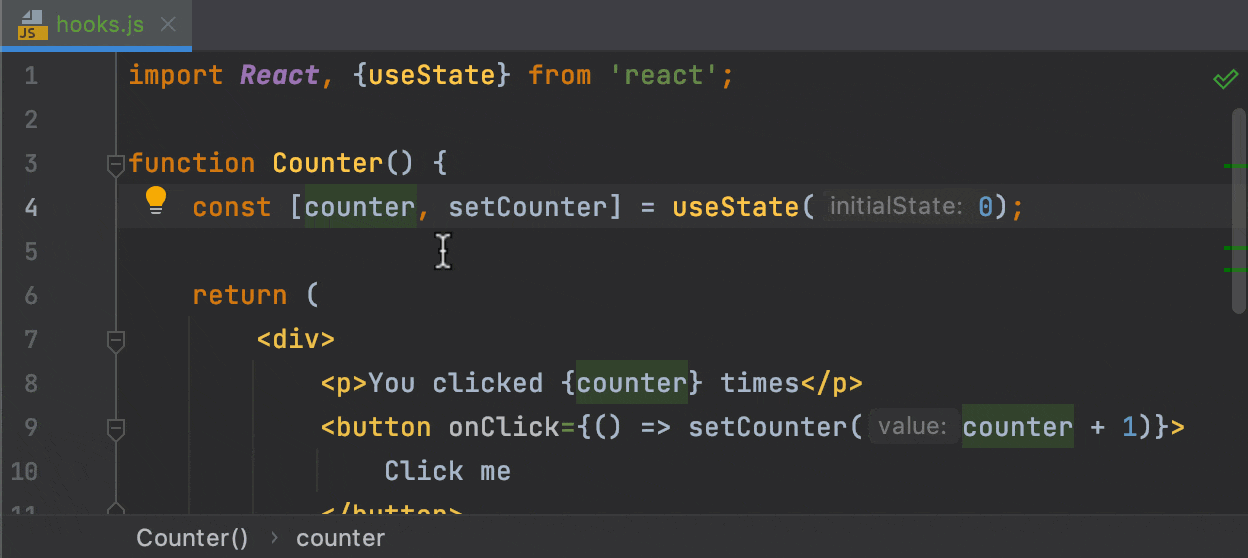
Rename refactoring for React useState hooks
Ultimate
You will no longer need to waste time on refactoring useState values and functions one
by one – IntelliJ IDEA can now rename both for you! Place the caret on a state value
and press Shift+F6 or go to Refactor | Rename from
the right-click context menu.
Install as a snap package on Linux
You can install IntelliJ IDEA as a self-contained snap package. Since snaps update automatically, your IntelliJ IDEA installation will always be up to date.
IntelliJ IDEA is distributed via two channels:
-
The stable channel includes only stable versions. To install the latest stable release of IntelliJ IDEA, run the following command:
sudo snap install intellij-idea-ultimate —classic
sudo snap install intellij-idea-educational —classic
sudo snap install intellij-idea-community —classic
The option is required because the IntelliJ IDEA snap requires full access to the system, like a traditionally packaged application.
-
The edge channel includes EAP builds. To install the latest EAP build of IntelliJ IDEA, run the following command:
sudo snap install intellij-idea-ultimate —classic —edge
sudo snap install intellij-idea-educational —classic —edge
sudo snap install intellij-idea-community —classic —edge
When the snap is installed, you can launch it by running the , , or command.
To list all installed snaps, you can run . For information about other snap commands, see the Snapcraft documentation.
Profiler
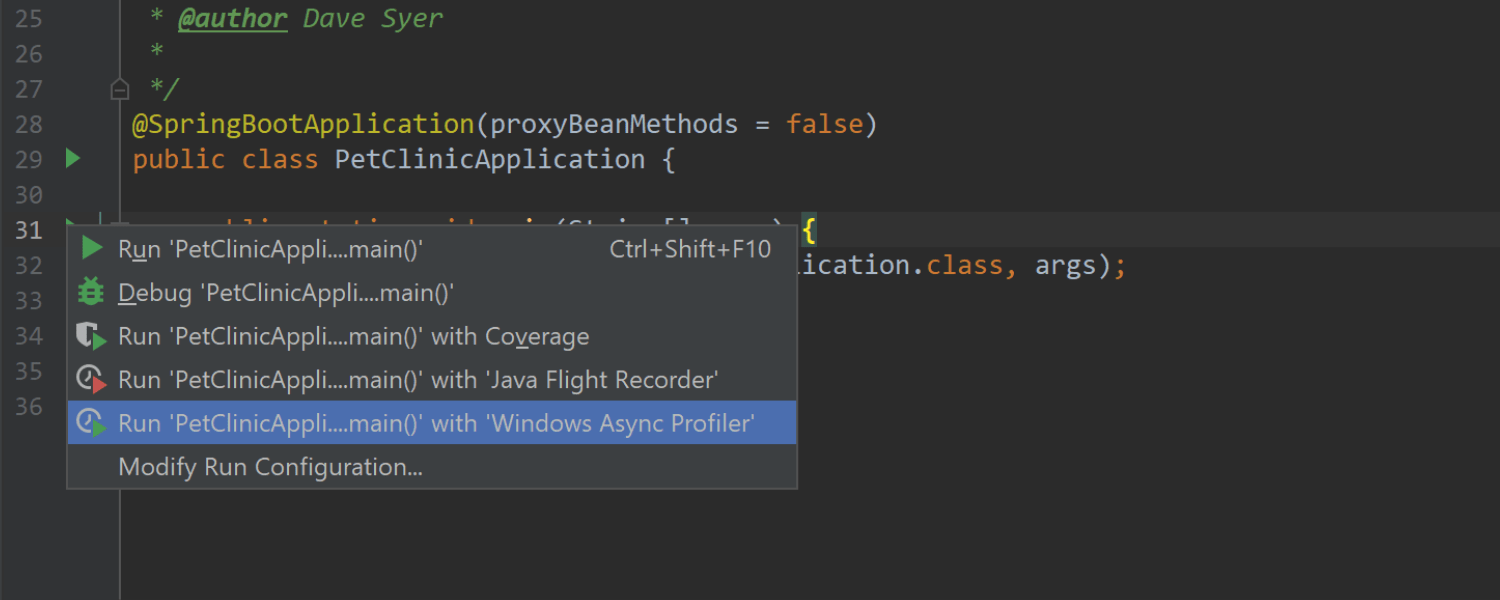
Support for Async profiler on Windows and Apple M1
Ultimate
Async Profiler is the profiling tool of choice for many developers because of its
accuracy and reliability. IntelliJ IDEA now fully supports the profiler on Windows
and Apple M1, in addition to Linux and non-M1 macOS, which means you can now use it
in most environments.
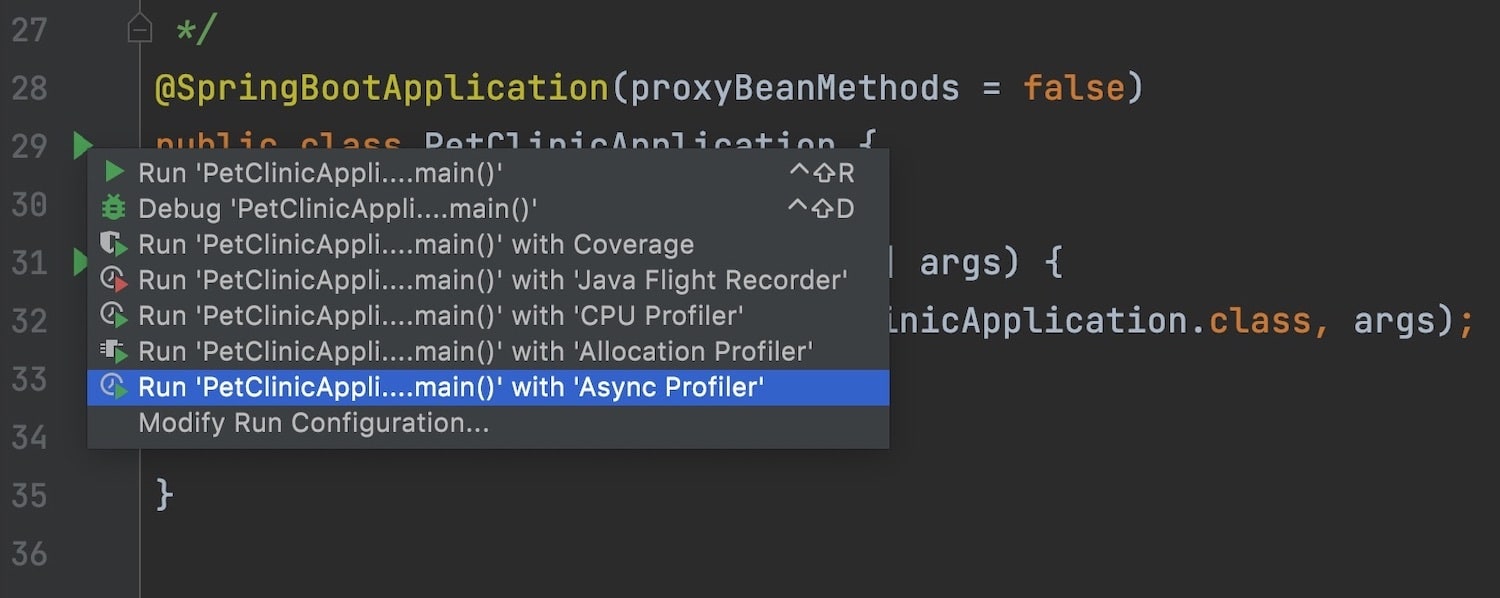
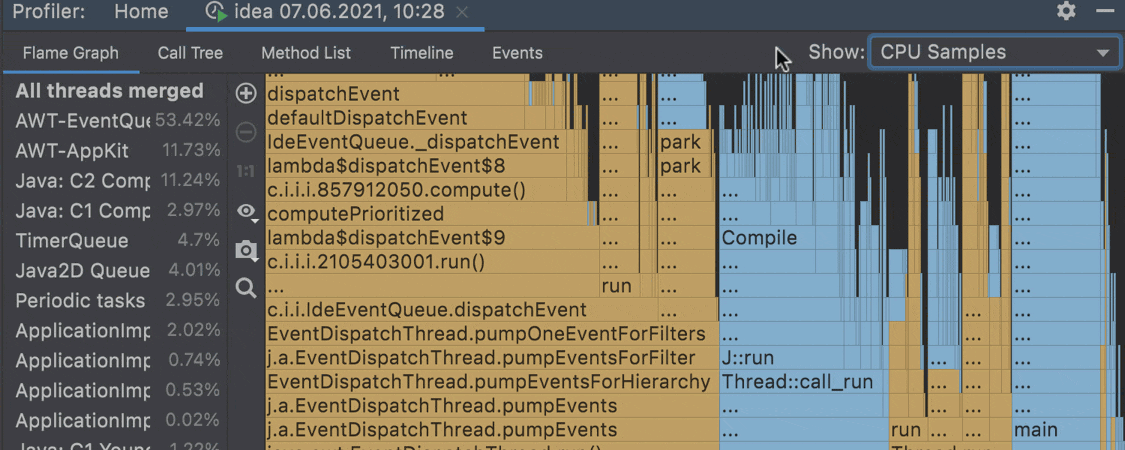
Support for Async profiler 2.0
Ultimate
IntelliJ IDEA has support for Async Profiler 2.0. It works via the new Async Profiler
configuration, combining the power of the CPU and Allocation profilers. In the
Flame Graph, Call Tree, and Method List tabs, the new Show
dropdown list lets you choose whether you want to be shown CPU samples or memory
allocations. The Timeline displays both of them. You can filter what to show by using
the controller in the top right-hand corner.
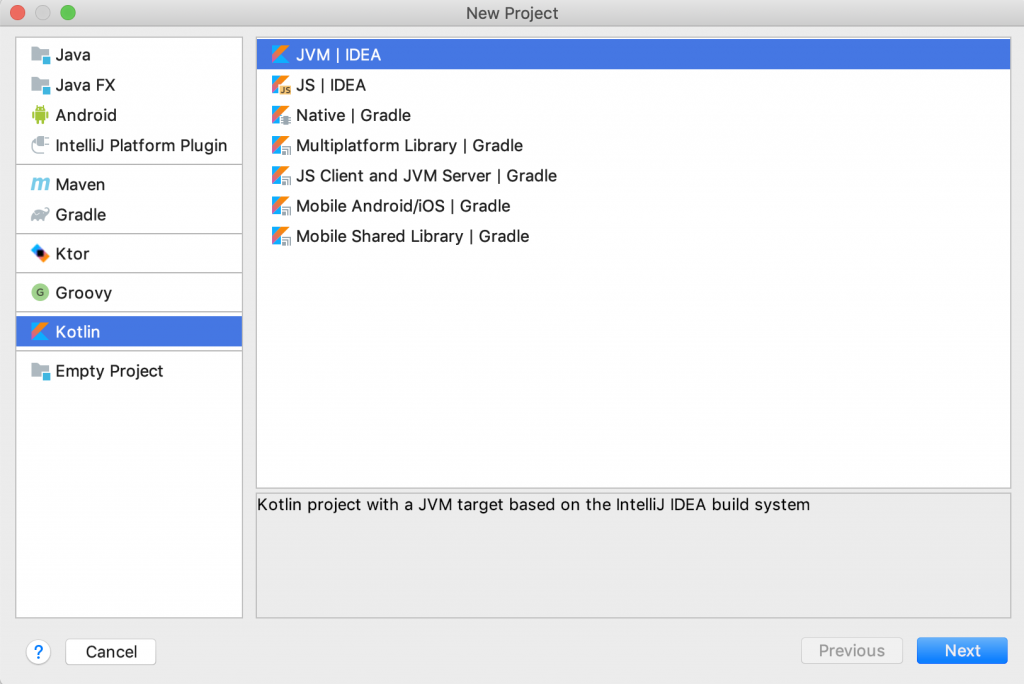
Создание простого проекта на Kotlin
В приветственном окне выберите пункт Create New Project. Вы увидите первый экран конфигурации.
Выберите Kotlin из списка опций слева, Kotlin JVM в качестве типа проекта и нажмите Next.
Вы должны увидеть следующее:
Затем вы увидите экран для проекта с названием и местом хранения файлов. Вы также увидите Project SDK, который должен быть установленной ранее версией JDK — или другой версией JDK, если у вас на ПК установлено более одной версии.
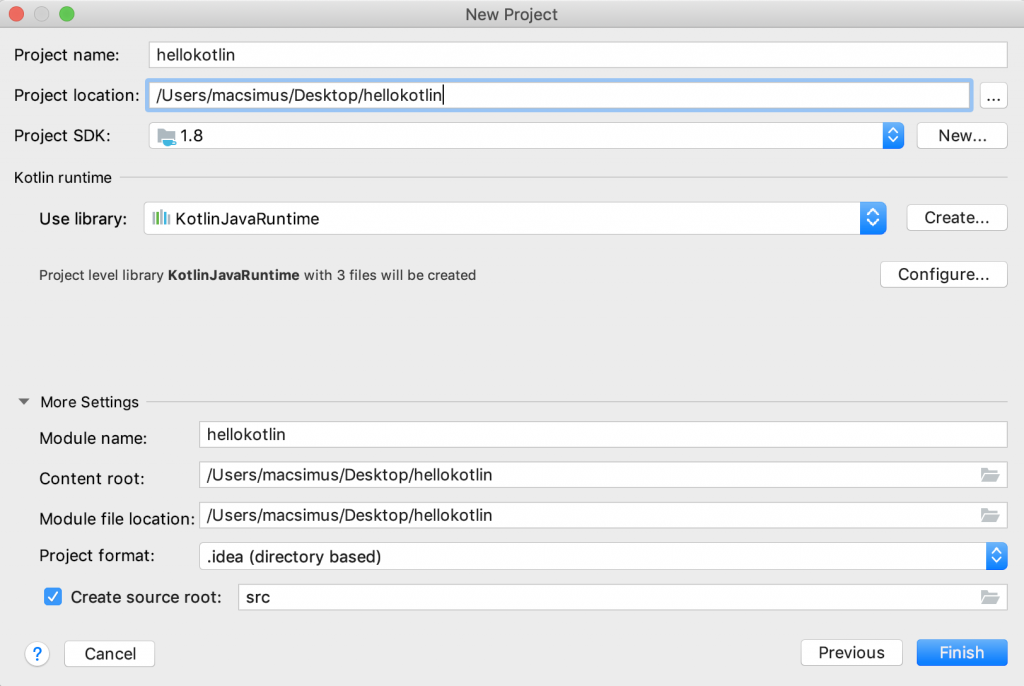
Введите hellokotlin для названия проекта, выберите место для проекта или просто оставьте значения по умолчанию. Ничего больше не указывайте и нажмите Finish.
IntelliJ IDEA создает и конфигурирует ваш проект.
По завершении вы попадете в окно Tip of the Day, или Совет дня, в котором каждый раз при открытии приложения показываются полезные советы по IntelliJ IDEA.
Вы должны увидеть следующее:
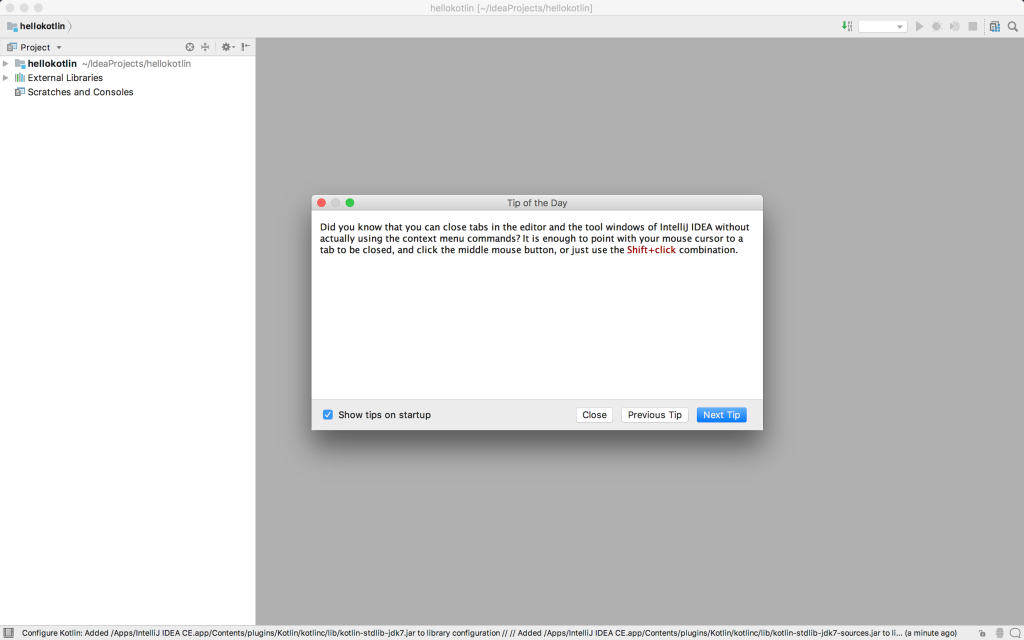
Закройте окно подсказки и проверьте панель Project слева от главного окна IntelliJ IDEA. На панели Project можно управлять всеми файлами, связанными с проектом, например файлами исходного кода Kotlin, у которых расширение .kt.
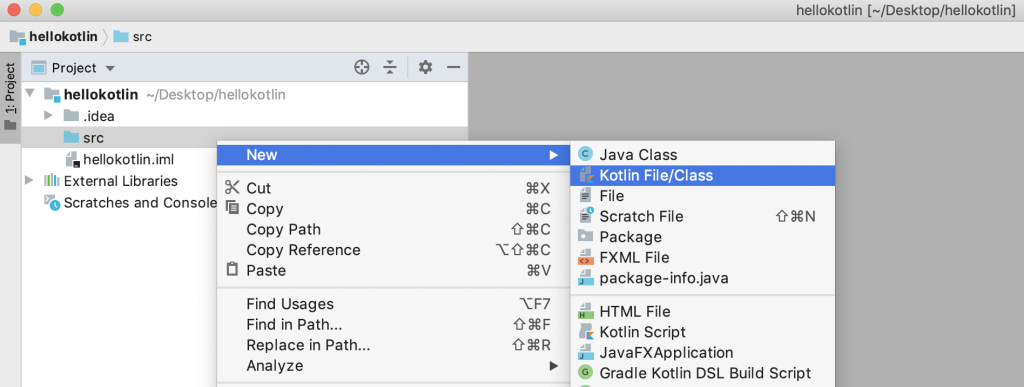
Кликните на стрелку рядом с hellokotlin, чтобы открыть его содержимое, и вы увидите папку src для проекта. Щелкните правой кнопкой мыши на папку src и выберите New ▸ Kotlin File/Class.
Должно открыться новое диалоговое окно New Kotlin File/Class. Введите hello и кликните OK.
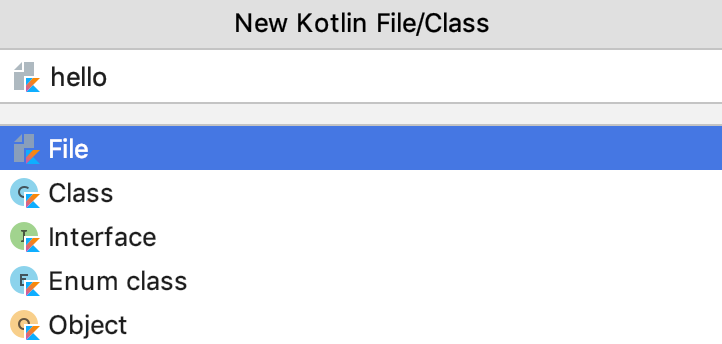
Затем файл hello.kt откроется редакторе IntelliJ IDEA.
Базовый макет окна IntelliJ IDEA содержит панель Project слева, панель Editor посередине и Toolbar в верхней правой части, который можно использовать для запуска кода.

По ходу настройки проекта мы разобрали главные части окна IntelliJ IDEA. Пришло время для запуска Kotlin-кода!
Compose HTTP requests
IntelliJ IDEA uses the HTTP request in Editor format, which provides a simple way to create, execute, and store information about HTTP requests. You can type them directly in the using the following general syntax:
Method Request-URI HTTP-Version
Header-field: Header-value
Request-Body
To speed up composing HTTP requests, click the Add request shortcut link on top of the request’s editor panel. In the popup menu, choose the type of the request to add.

Alternatively, use live templates. In the editor, you can press Ctrl+J to view the list of available templates. For example, gtr expands to a simple GET request; mptr expands to a POST request.

To get an overview of the HTTP Client possibilities, you can explore the HTTP Requests Collection, which is a handful selection of composed requests.
Первая программа в IntelliJ IDEA
Последнее обновление: 28.09.2020
В прошлой теме мы рассмотрели, как создавать первую программу с последующим ее запуском в командной строке. Однако в реальности,
как правило, крупные программы разрабатываются не при помощи простого текстового редактора, а с использованием таких средств как IDE или интегрированные среды
разработки, которые упрощают и ускоряют написание кода и создание приложений. На данный момент самой популярной средой разработки для Java является
IntelliJ IDEA от компании JetBrains (по ряду опросов на момент середины 2018 ею пользовалось до 60% разработчиков на Java).
Рассмотрим, как использовать данную среду.
Конечно, Community-версия не имеет ряда многих возможностей, которые доступны в Ultimate-версии (в частности, в Community недоступны опции для
веб-приложений на Java). Но Community-версия тоже довольно функциональна и тоже позволяет делать довольно много, в том числе приложения на JavaFX и Android.
После установки запустим IntelliJ IDEA и создадим первый проект. Для этого на стартовом экране выберем New Project:
Далее откроется окно создания проекта. В левой части в качестве типа проекта выберем Java.
Кроме того, в поле Project SDK можно указать путь к Java SDK, который будет использоваться
в проекте. Как правило, это поле по умолчанию уже содержит путь к SDK, который установлен на локальном компьютере. Если это поле пусто, то его надо установить.
После этого нажмем на кнопку Next. Далее будет предложено отметить шаблон проекта. По умолчанию тут один шаблон проекта — Command Line App, который предполагает запуск приложения как
консольного.
И в конце откроется окно, где надо будет ввести название проекта и пакета, а также указать его расположение на жестком диске. Здесь можно ввести
любые данные. Ну в данном случае проект будет называться HelloApp, а базовый пакет «com.metanit».
И после этого для создания проекта нажмем на кнопку Finish. После этого среда создаст и откроет проект.
В левой части мы можем увидеть структуру проекта. Все файлы с исходным кодом помещаются в папку src.
По умолчанию она содержит каталог, который называется по имени пакета и который имеет один файл Main.java.
В центральной части программы открыт исходный код программы в виде класса Main. Изменим его следующим образом:
package com.metanit;

public class Main {

    public static void main(String[] args) {

        System.out.println("Hello Java!");
    }
}
С помощью зеленой стрелки на панели инструментов или через меню Run -> Run запустим проект.
И внизу IntelliJ IDEA отобразится окно вывода, где мы можем увидеть результат работы нашей программы.
НазадВперед
Built-in tools and integrations
IntelliJ IDEA comes with mission-critical built-in tools and integrations that help you work in
a familiar environment and allow you to avoid switching between applications.

Build tools
IntelliJ IDEA includes fully functional integration with the
Maven,
Gradle,
Ant,
and
Gant
build tools, which help automate the build process. The IDE provides built-in options
for compiling and packaging Java code, running tests, deployment, and other activities.

Collaborative development (Code With Me)
IntelliJ IDEA provides a service for collaborative development and pair programming –
Code With Me.
It lets you share the project currently open in your IDE with others so you can work on
it together in real-time. Code With Me also features video and voice calls from the IDE,
allowing you to organize both 1-on-1 meetings and group sessions with dozens of participants.
You can learn all about Code With Me in this series of
blog posts.

Space integration
IntelliJ IDEA offers integration with JetBrains
Space,
an all-in-one solution for software projects and teams. Connect IntelliJ IDEA to your
Space organization to view and clone project repositories, review your teammates’ code,
and write Space Automation scripts.

Database support Ultimate
You can manage databases right from the IDE with the
Database tools
that are shipped with IntelliJ IDEA Ultimate. Take advantage of intelligent coding
assistance when editing SQL queries, connect to live databases, run queries, browse and
export data, and even manage your schemes in a visual interface.

Profiler Ultimate
The built-in
profiler
helps you to optimize the performance of your application by analyzing your code and
providing you with accurate info about its CPU-intensive and memory-intensive sections.
In IntelliJ IDEA, you can open and snapshots,
attach the profiler to running processes, and view live charts that visualize CPU and
memory consumption in running applications. IntelliJ IDEA’s integration with the Async
Profiler and Java Flight Recorder profiler tools allows you to do all this right from
the IDE.

HTTP Client Ultimate
If you develop a web service, you will likely test it by sending and receiving HTTP
requests. Such requests are stored in or files,
which you can create, edit,
and execute in the HTTP client. This tool is built into the IntelliJ IDEA editor, providing
extensive coding assistance for your HTTP requests, including code completion, highlighting,
refactorings, and so on. You can easily access the HTTP Client from the source code: click
the globe icon next to the URL and select Open in HTTP client.
Configuration Details
In this area, specify the connection parameters and mappings to be used during debugging sessions. Note that the Validate Remote Environment button has been removed from this page, this functionality is now available through Run | Web Server Debug Validation on the main menu.
| Item | Description |
|---|---|
| Name | In this field, type the name of the server debug configuration. |
| Host | In this field, type the name of the host where the target application is deployed. |
| Port | In this field, type the port to connect to the specified host through. If you are using localhost on your machine, this setting should correspond with the port specified in the configuration file of the local Web server where the application will be executed or debugged. |
| Debugger |
From this list, select the debugging engine to use. The available options are:
|
| Use path mappings |
If you do not specify any path mappings and start debugging an application that is not under the server document root, IntelliJ IDEA displays an error message: The Click to set up path mappings link brings up the Resolve Path Mappings Problem dialog, where you can define the path mappings: When you click OK and leave the dialog, the Use path mappings checkbox on the Servers page gets selected automatically. |
| Shared | Select this checkbox to share the debug server configuration across a team. The host/port settings and the path mappings are stored in the .idea/php.xml file is available to all team members through a version control system. Note that mappings are shared only for directories inside the project. |


Инструменты для работы с базами данных
-
Мы добавили интерфейс для изменения прав доступа при редактировании объектов. Это обновление доступно для PostgreSQL, Redshift, Greenplum, MySQL, MariaDB, DB2, SQL Server и Sybase.
-
Добавлены шаблоны Live Templates, с помощью которых можно генерировать простые операторы прямо из проводника баз данных.
-
Упростилась навигация: действие Go to declaration (Ctrl/Cmd+B), вызванное для объекта в SQL, теперь открывает DDL, а не проводник базы данных.
-
Мы улучшили сортировку данных.
-
Появилась возможность копировать, вырезать и вставлять источники данных при помощи всем известных сочетаний клавиш Ctrl/Cmd+C/V/X.
-
Теперь вы можете редактировать данные в коллекциях MongoDB. Также доступен предпросмотр запросов.
Other improvements
New Commit tool window
We have been working on the new commit tool window for quite some time. In the previous EAP series, we tested several approaches to the Commit UI. Now in 2020.1 we’ve come up with a new tool window for the task. Here is what it looks like:
The new commit tool window incorporates the Local Changes and Shelf tabs. This tool window covers all commit-related tasks, like checking diffs, selecting files and chunks to commit, and entering a commit message. Commit is a vertical tool window located on the left, which leaves room for the entire editor to show the diff.
We are still working to improve the new tool window, and your suggestions and general feedback are very welcome in the comments!
LightEdit Mode
The new LightEdit Mode allows you to open files in a simple editor window without creating or loading a project. It’s been developed in response to a frequent request to use IntelliJ IDEA as a general-purpose text editor .
The easiest way to try LightEdit mode is to open a file from the command line by executing “idea file” where file refers to a file that exists in the local file system:

For more information on how to create a command line launcher, see Opening files from command line.
You can also use the Open action from the IntelliJ IDEA’s welcome screen or Open with…| IntelliJ IDEA from your OS’s system file manager.
Though the LightEdit Mode doesn’t provide the full set of the IDE features, it starts and works considerably faster. LightEdit mode is convenient for quick changes in arbitrary local text, source, and configuration files. This feature is in an early stage of development, and we are planning to implement gradual improvements and fixes over the coming EAP builds.
Preview intentions
You can now preview intentions before you apply them to your code. After pressing Alt+Enter to choose an available intention action, you now can also press Alt+Space to see a preview:

Zen Mode
The new Zen Mode has been added to get rid of possible distractions and to help you focus completely on your code. In its essence, this new mode combines the Distraction Free Mode and the Full Screen Mode, so that you don’t have to enable or disable both of these modes every time you want to enter or exit them.
Just like with any other editor mode, to enable the Zen Mode, go to View | Appearance | Enter Zen Mode, or choose it from the Quick Switch Scheme popup (Ctrl+` | View mode | Enter Zen Mode).
Check out the full release notes for the exact list of closed tickets.
That’s it for now! We’ll keep publishing the EAP builds for v2020.1 with more fixes and improvements each week. Stay tuned!
And Happy Developing!
IntelliJ IDEA 2020.1
Newsletter
End of support for TFS 2014 and olderIntegrating Java Dataflow Analysis and the Debugger
User Experience

Quick access to Eclipse projects
IntelliJ IDEA can detect Eclipse projects stored locally on your machine, and it
allows you to open them from the Welcome screen. If it is your first IDE launch,
select the Open existing Eclipse projects option. If not, automatically
detected Eclipse projects will appear in the dedicated node among the recent projects.
Advanced Settings
If you need to configure some use-case-specific options in IntelliJ IDEA, you can do
it in the new Advanced Settings node in Preferences/Settings. For example,
you can add a left margin in Distraction-free mode or set the caret to move down
after you use the Comment with Line Comment action.
Organize tool windows by drag and drop
It is now easier to drag and drop a tool window to the desired place within the
main IDE window or in a separate window. You can drag it by clicking and holding
the tool window name bar and drop it in any highlighted place.
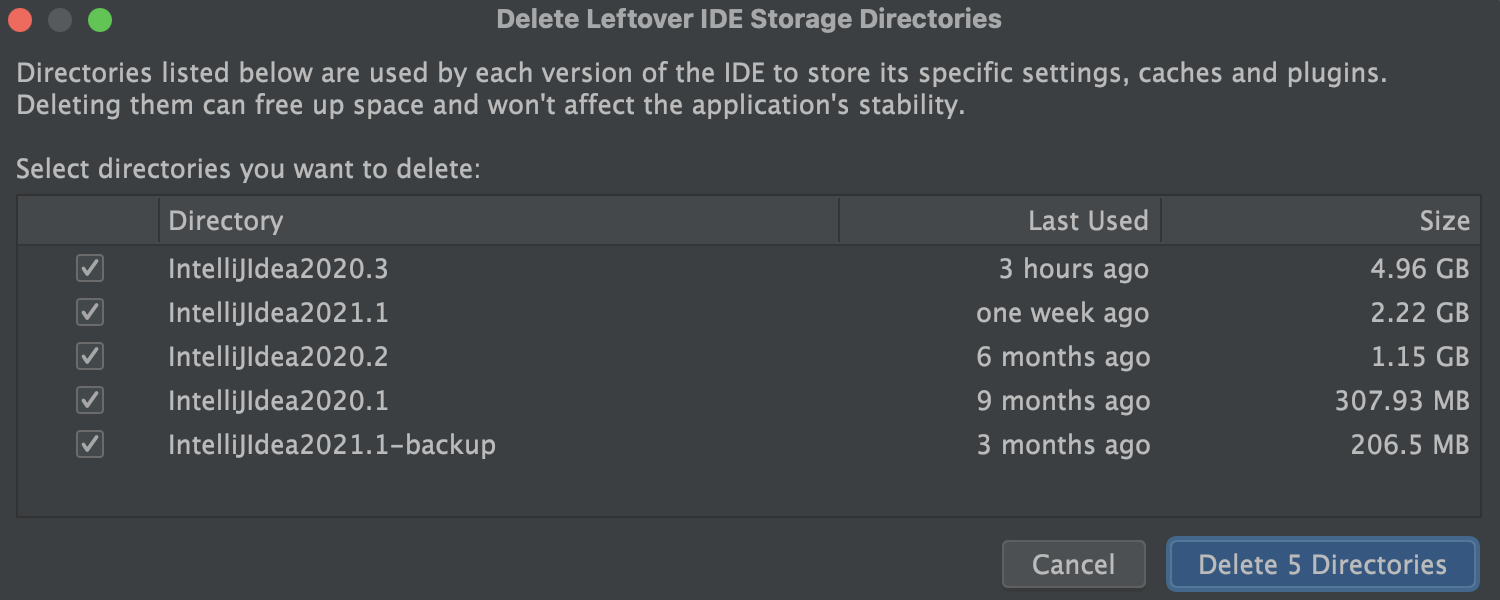
Automatic cache and logs cleanup
IntelliJ IDEA automatically cleans up any cache and log directories that were last
updated more than 180 days ago. This process doesn’t affect system settings and
plugin directories. You can initiate the process manually via
Help | Delete Leftover IDE Directories.
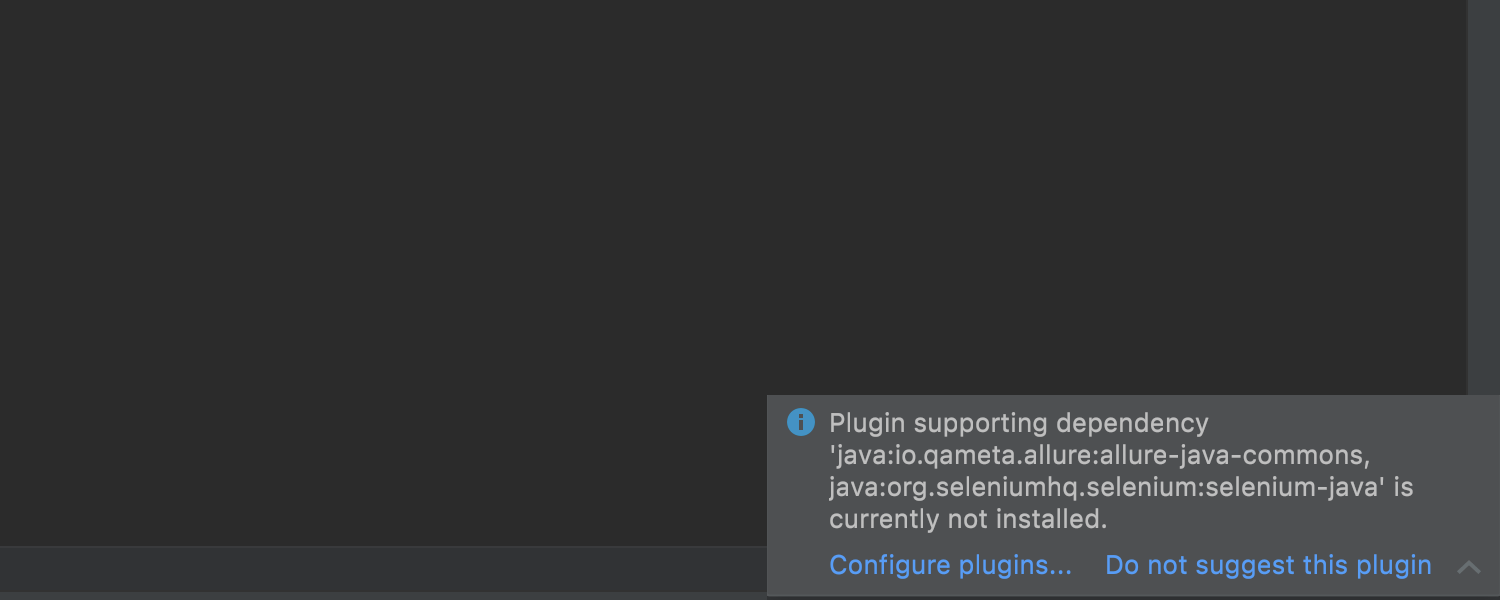
Missing plugin notifications
If your project uses a framework that works in IntelliJ IDEA via a plugin, the IDE
will notify you and offer to enable it directly from this notification.
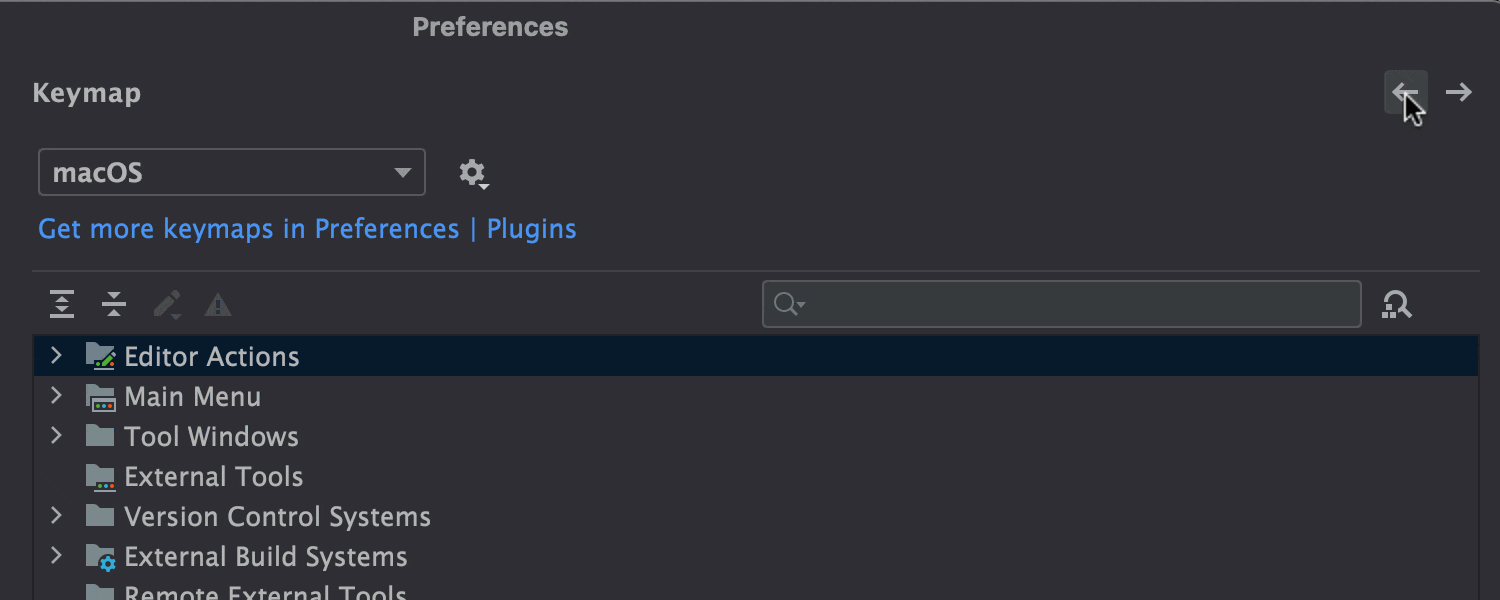
We’ve simplified navigation in Preferences/Settings by adding arrows to the
top right-hand corner of the window. They allow you to quickly jump back and forth
between the sections you’ve opened.
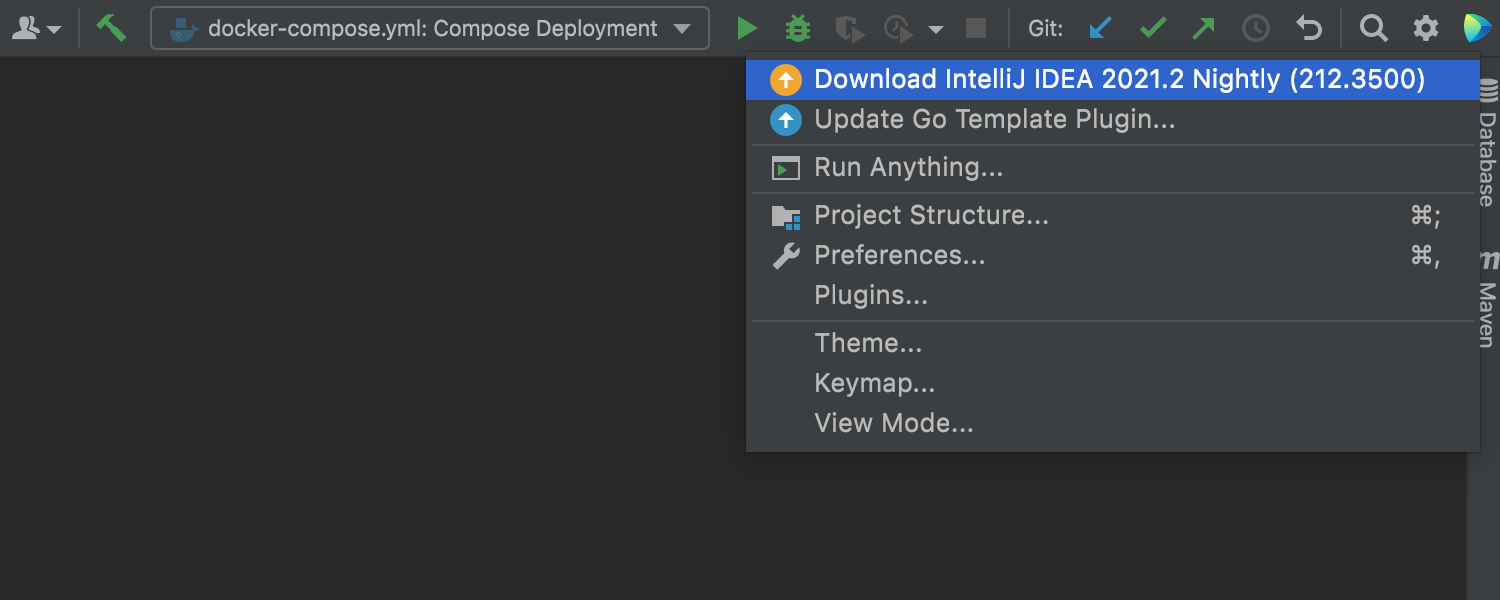
Update notifications from the Toolbox App
When any product updates appear in the Toolbox App, your IDE will inform you. If
there is a new version available for download, you’ll be able to upgrade to it right
from IntelliJ IDEA. Toolbox App 1.20.8804 or later is required to use this feature.
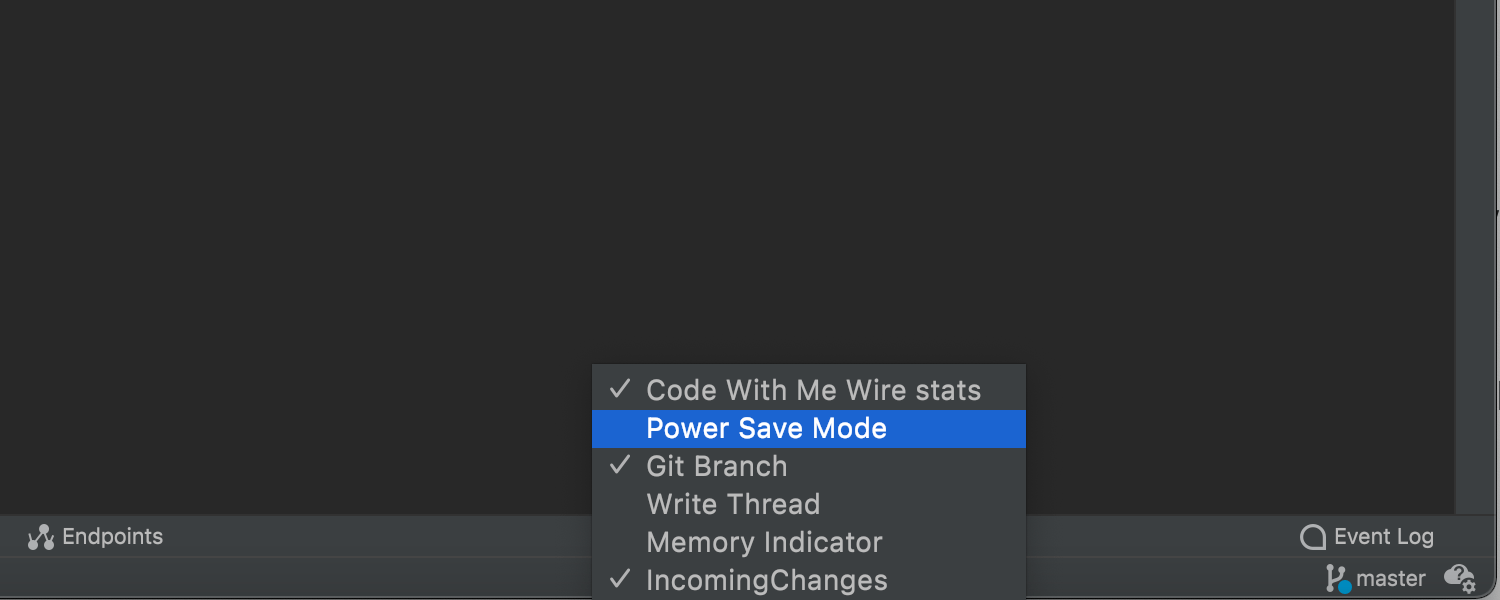
Quick access to Power Save mode
IntelliJ IDEA has a Power Save mode to help you extend the battery life on your laptop.
To make this mode easier to access, we’ve made it possible to manage it from the
status bar. Right-click on the status bar and select Power Save Mode – you’ll
see a new icon appear in the bottom right corner of the IDE. Click on this icon
whenever you want to turn the mode on or off.
Accessibility updates
IntelliJ IDEA 2021.2 includes a number of helpful updates for coding with the enabled
screen reader mode on macOS. We’ve voiced available suggestions for code completion,
the content of the selected combo box and combo box lists, and the results of your
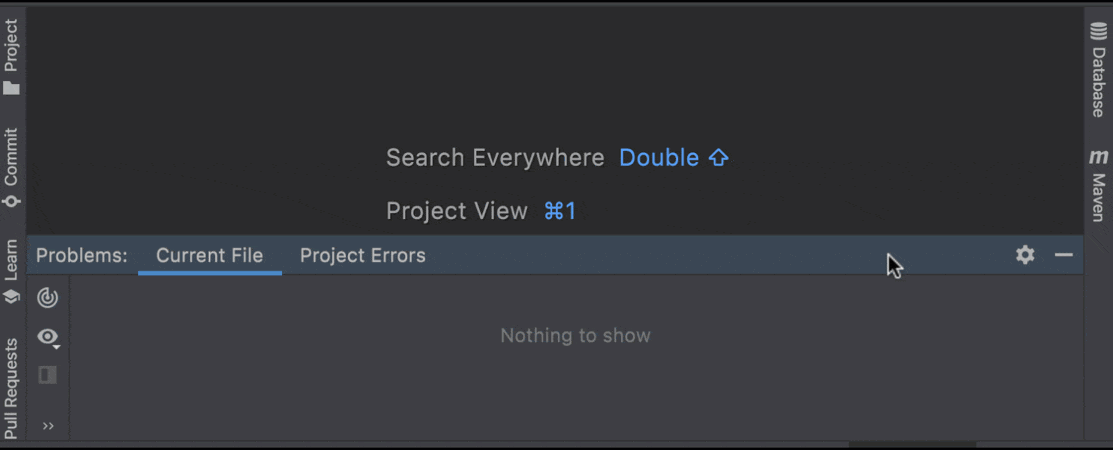
queries in Search Everywhere.
Системы контроля версий
-
В этом релизе представлены обновления для работы с пул-реквестами: ускорился процесс их создания, появилась возможность быстро открывать diff в редакторе и добавилась поддержка шаблонов пул-реквестов.
-
Появилась поддержка шаблонов Git-коммитов, и в них можно вносить любую информацию, которая должна быть в сообщении коммита.
-
Теперь можно просто выбрать профиль инспекций кода перед коммитом. Нажмите на значок шестеренки, чтобы открыть параметры коммита, отметьте галочкой Analyze code, кликните Choose profile и выберите нужный профиль.
-
С помощью нового действия рядом с Show diff в можно получить файл из другой ветки.
-
Новое действие Save to Shelf позволяет скопировать изменения на вкладку Shelf, сохранив их при этом в локальной истории.
-
Perforce-плагин теперь полностью совместим с IntelliJ IDEA Community Edition и поставляется вместе с IDE.
Kotlin
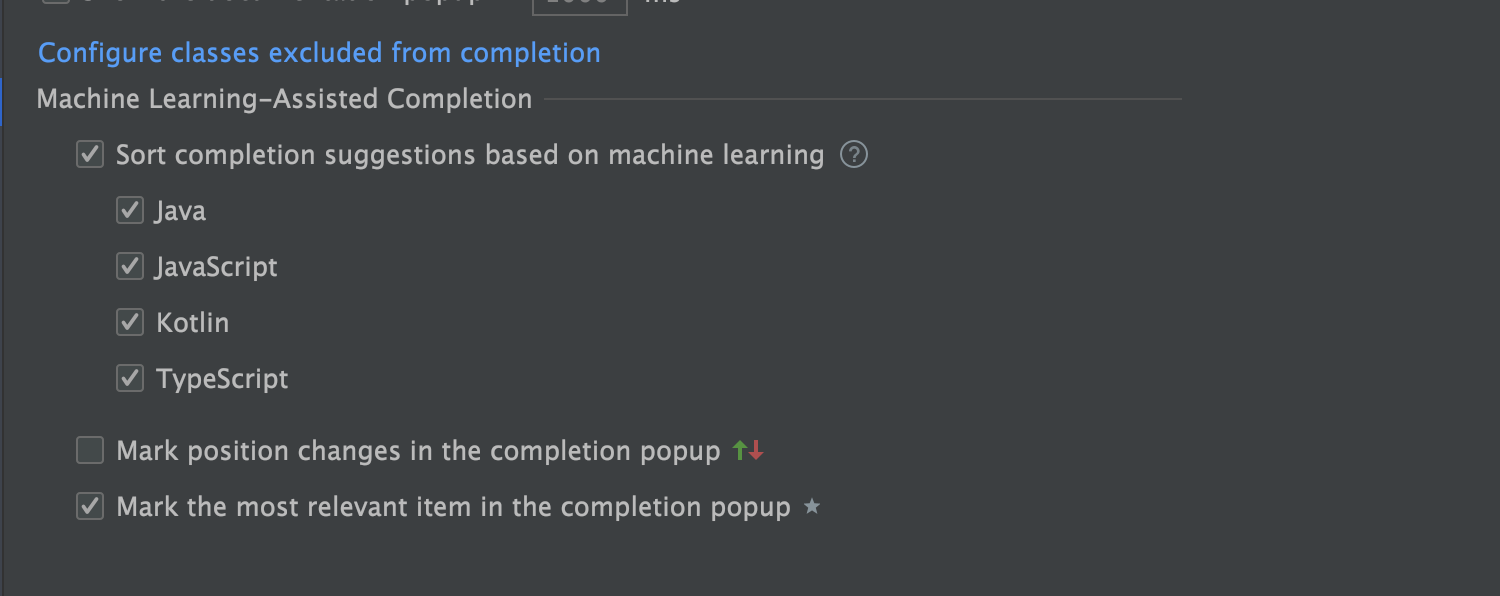
Automatic ML-completion
Starting from v2021.2, Kotlin code completion works based on the machine learning
mechanism by default. Code suggestions are prioritized more carefully as the IDE
relies on the choices of thousands of real users in similar situations. You can
configure ML-assisted completion in Preferences/Settings | Editor | Code Completion.

Run tests before code analysis finishes
Previously you had to wait for code analysis to finish before you could start running
your tests. In the current version, you can launch tests immediately after opening the
file by clicking the Run test icon in the gutter.
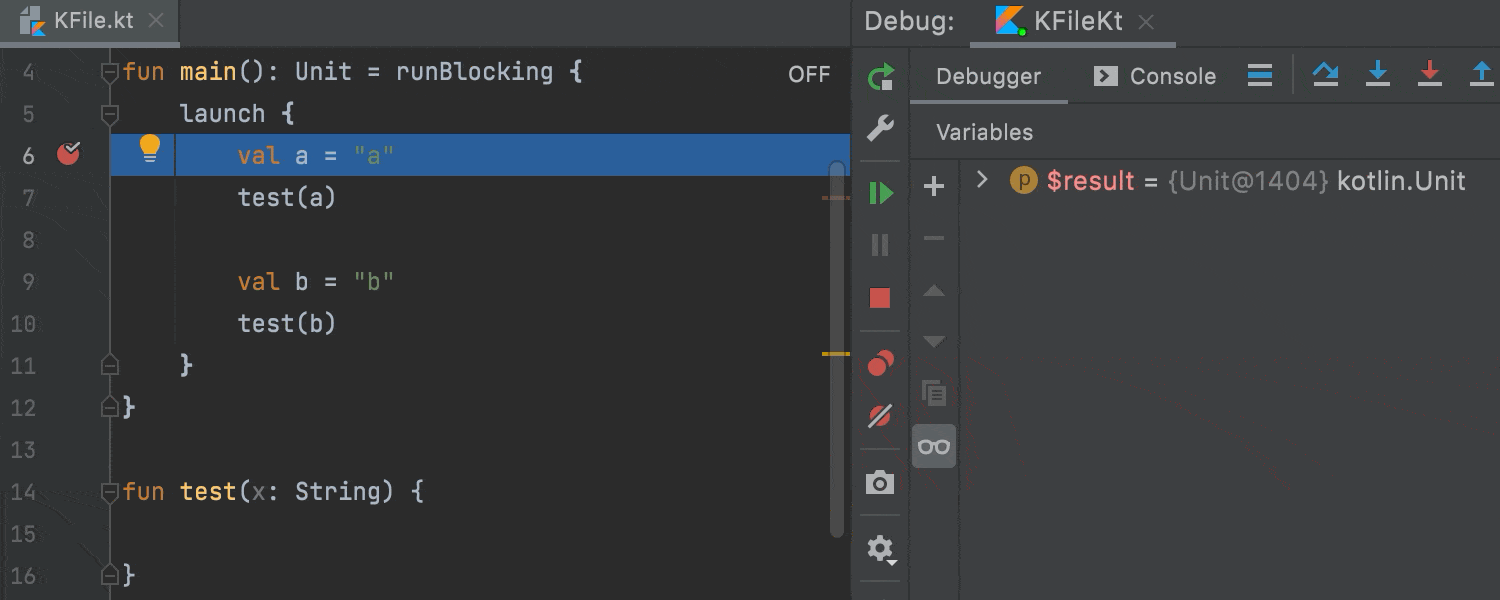
Debugger updates
We’ve introduced some useful improvements and updates to our coroutine agent in the
debugger. The coroutines agent is now available via the Coroutines tab in the
Debug tool window. It works for Java run configurations with a dependency on
kotlinx.coroutines, and Spring and Maven run configurations.
We’ve also fixed an issue when local variables were not used after passing a suspension
point and disappeared in the Variables view of the Debugger tool window.
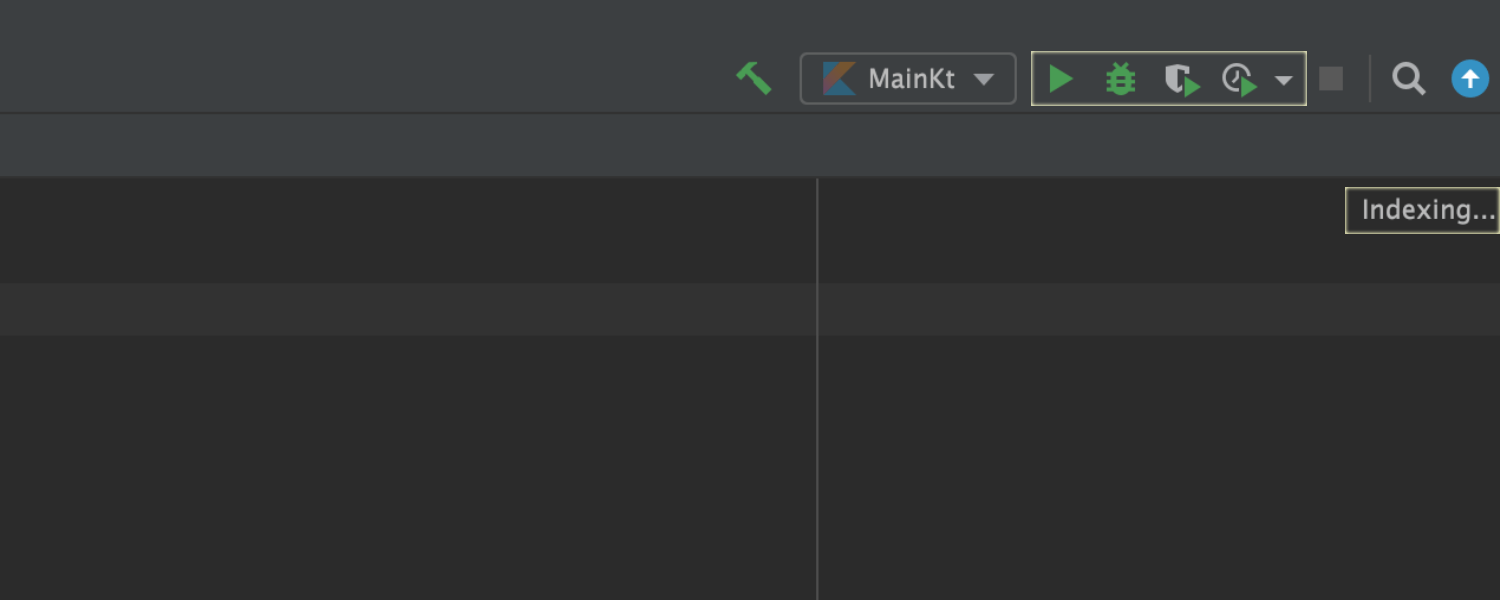
More room for action during indexing
Don’t waste another minute! While the IDE is indexing a project you can run and debug
your application. The buttons associated with Run/Debug Configuration are active
during indexing.
Kotlin support for WSL 2 and Run Targets
In IntelliJ IDEA 2021.1, we’ve introduced
support and the
Run Targets
feature. In v.2021.2, you can use these features for Kotlin.
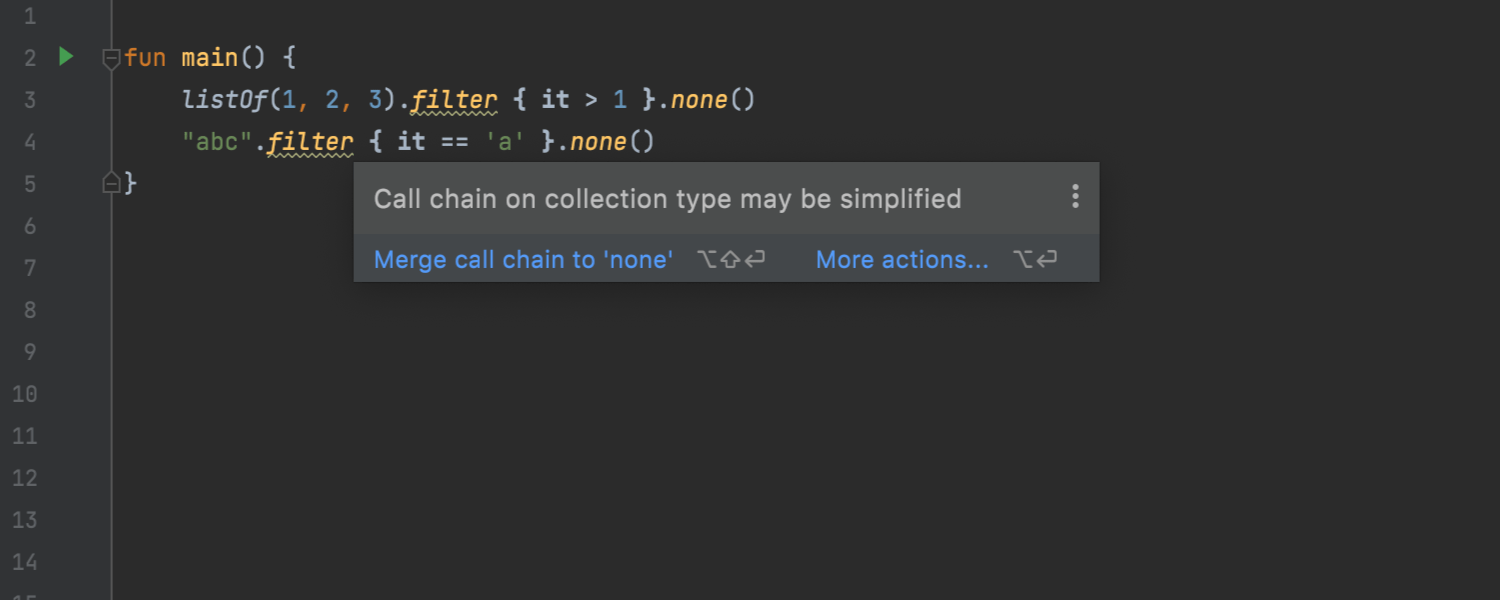
Inspection to simplify call chain on collection type
In this release, we’ve added a useful inspection that helps you simplify the syntax and
combine several calls into one when calling methods in a chain inside a collection.
View options
The view options, generally, define what is shown in the tool window and how. To view or change these options, click on the title bar.
| Option | Description | ||||
|---|---|---|---|---|---|
| Group Data Sources |
Displays folders for data sources if you created any.
|
||||
| Group Server and Database Objects |
Displays folders for server and database objects. This setting concerns users, roles, tablespaces, modules, foreign data wrappers and other rarely-used objects.
|
||||
| Group Schema Objects |
Defines how schema elements are shown. When on, there are separate nodes for tables, views and stored routines (shown as folders). Tables, views and routines (procedures and functions) are shown as elements of the corresponding groups. When off, there is no explicit grouping for tables, views, and routines. Tables and views are followed by procedures and functions. |
||||
| Group Object Elements |
This option defines how table elements are shown. When on, there are separate nodes for columns, indexes, primary and foreign key constraints, and triggers (shown as folders). The elements appear in the corresponding groups. When off, there is no such grouping and, generally, only columns are shown for tables. |
||||
| Show All Namespaces |
Show all databases and schemes even if they are not selected for introspection. When the Show All Namespaces option is disabled, databases that are not selected for introspection do not appear in the Database tool window (View | Tool Windows | Database). When the Show All Namespaces option is enabled, databases that are not selected for introspection are displayed in the Database tool window (View | Tool Windows | Database). |
||||
| Show Empty Groups |
If the or options are selected, you can select to show or hide the categories that contain no elements. The Show Empty Groups option is on: The Show Empty Groups option is off: |
||||
| Show Intermediate Nodes |
Shows or hides parent nodes only when you do not have other objects on the same level with a parent.
|
||||
| Show Generated Objects |
For Oracle, shows or hides auto-generated objects in the tree. It concerns the following objects:
|
||||
| Separate Procedures and Functions |
In Microsoft SQL Server, Oracle, and PostgreSQL, separates procedures and functions into different folders. |
||||
| Sort Alphabetically |
Order database objects alphabetically. When the option is disabled, natural sort order is applied.
|
||||
| Place Constraints and Similar Objects under Schema |
Display nodes for object names that exist in a schema namespace. For example, nodes for keys, CHECK constraints, indexes, triggers, rules, and other objects. You can use this option in the following situations:
|
||||
| Show Toolbar | Display the toolbar in the Database tool window (View | Tool Windows | Database) . |


Kubernetes
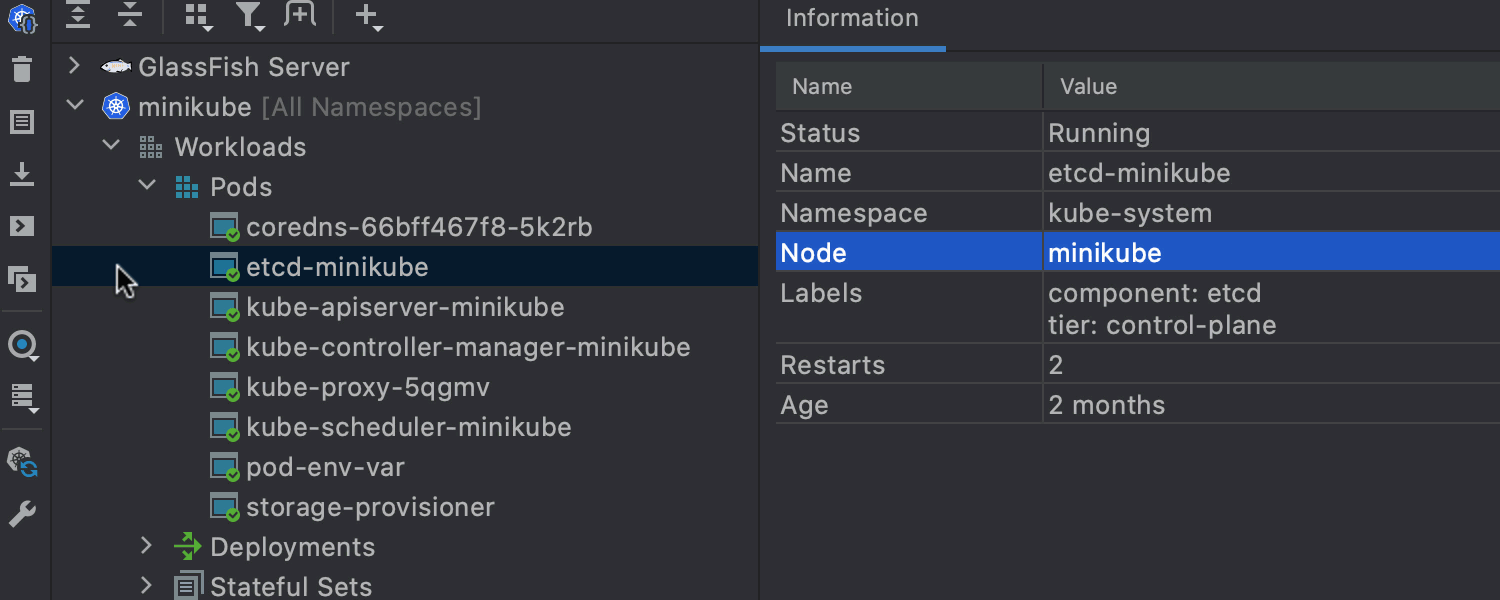
Download logs Ultimate
You can now download logs to your local machine – just click the Download Log button
in the
left pane of the Services tool window. By default, your pods will be saved to Scratches
and
Consoles | Kubernetes Files |
<context> |
<namespace> | pods, but you can change the settings in the Pod Logs section
of
Settings / Preferences | Build, Execution, Deployment | Kubernetes.

Open Console and Run Shell Ultimate
Two new actions have been added to the left pane of the Services tool window:
Open Console
for connecting containers that include consoles, and Run Shell for launching Shell
for a pod
container. Click the tools icon for quick access to the Pod Shell section of the
settings.
Deep code insight
Though designed primarily for Java development, IntelliJ IDEA understands many
other programming languages, including Groovy, Kotlin, Scala, JavaScript, TypeScript, and SQL,
and it provides smart coding assistance for each of them. Initial indexing of source code allows
the IDE to create a virtual map of your project. Using the information from the virtual map, it
can detect errors on the fly, suggest code completion variants with precise context-awareness,
perform refactoring, and more.

Inspections and context actions
IntelliJ IDEA is very good at checking over the quality and validity of your code with
on-the-fly inspections. These inspections help you code faster, comply with the highest
quality standards, and stay confident through the whole development process. We provide
a host of standard inspections, as well as dozens of framework-specific ones covering a
wide range of problems, such as Spring bean class autowiring errors, etc.
If IntelliJ IDEA finds any issues, it offers to help solve them via context actions, which
include quick-fixes for highlighted errors and intention actions for changing your code if
the issues are minor. To invoke a context action, click the light bulb icon
(or press Alt+Enter).

Intelligent code completion
IntelliJ IDEA provides context-sensitive code completion, offering you suggestions that are
only valid for the current caret position. You don’t need to use any shortcuts or configure
additional settings; code completion will start as soon as you begin typing your code in the
editor.
IntelliJ IDEA uses machine learning to ensure the most relevant suggestion is at the top of
the list.
To learn more about code completion, check out this
blog post.

Language injections
IntelliJ IDEA lets you work with elements of code in other languages embedded in your code.
You won’t notice a difference between your experience working with the core Java code and
your experience with the code that you’ve injected. We provide code highlighting, completion,
error detection, and other coding assistance features for embedded code fragments. To add a
snippet of alternative code into Java, just press Alt+Enter, select Inject
language or reference, and select the desired language from the list.

Diagrams
IntelliJ IDEA has lots of useful diagrams that can help you visualize and analyze your code
and navigate through it. Depending on their types, these diagrams can reflect the structure
of classes and methods in your application, of the database objects, of entity beans defined
in your module, and so on. You can call a list of available diagrams via
Diagrams / Show Diagram from the context menu.

Live templates
Live templates
is a powerful feature that helps speed up your coding. Just type in an abbreviation
predefined in the template to insert standard code constructs into your work quickly.
You can also create your own custom templates, which you can use to insert snippets of
code that you use repeatedly.
Silent installation on Windows
Silent installation is performed without any user interface. It can be used by network administrators to install IntelliJ IDEA on a number of machines and avoid interrupting other users.
To perform silent install, run the installer with the following switches:
-
: Enable silent install
-
: Specify the path to the
-
: Specify the path to the installation directory
This parameter must be the last in the command line and it should not contain any quotes even if the path contains blank spaces.
For example:
ideaIU.exe /S /CONFIG=d:\temp\silent.config /D=d:\IDE\IntelliJ IDEA Ultimate
To check for issues during the installation process, add the switch with the log file path and name between the and parameters. The installer will generate the specified log file. For example:
ideaIU.exe /S /CONFIG=d:\temp\silent.config /LOG=d:\JetBrains\IDEA\install.log /D=d:\IDE\IntelliJ IDEA Ultimate
