Что такое система tizen и почему samsung ее использует?
Содержание:
- Установка Tizen Studio
- Displaying Profile Templates
- Израильский исследователь обнаружил более 40 уязвимостей в ОС Tizen, используемой Samsung
- Создание сертификатов автора и дистрибьютора. Способ №2
- Установка и запуск на телевизоре
- Updating Packages
- Разработка веб-приложений на Tizen: разновидности и (не)удобство
- IDE and Tools
- Установка и настройка Tizen Studio
- Application Marketplace
- Building the Project
- Building Your Application
- Designing a Simple UI
- Обновление браузера
- Using the GUI Installer
Установка Tizen Studio
Для работы потребуется скачать дистрибутив и поставить необходимый софт на ПК. Установка пакетов Tizen Studio и программного комплекса Java на Windows 7/10 выполняется с учётом разрядности ОС (32 bit – X86/64 bit – X64). Узнать количество битов Виндовс, установленной на вашем устройстве, можно, например, если нажать на «Мой (Этот) компьютер» ПКМ – Свойства.
Чтобы установить Тайзен Студио, поочерёдно выполняем следующие действия:
- Устанавливаем актуальную версию программной среды Java.
- Качаем Tizen Studio, инсталлируем, приняв условия лицензионного соглашения и, если требуется, изменив путь установки.
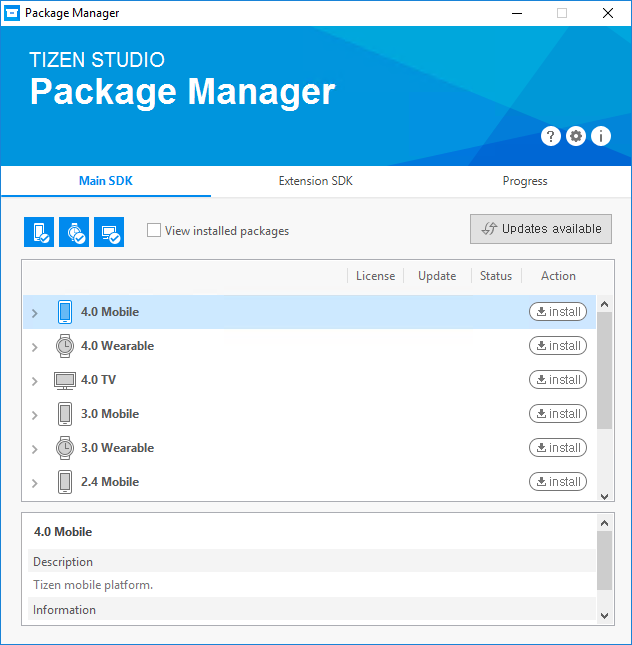
- После успешной инсталляции ПО откроется Package Manager (если инструмент не запустился, идём в каталог с установленным софтом tizen-studio\package-manager и открываем его вручную с экзешника);
- В Менеджере пакетов Тизен Студио на вкладке «Main SDK» также устанавливаем модуль «Tizen SDK tools» путём нажатия «Install» напротив названия, после чего идём на вкладку «Extension SDK» и инсталлируем Extras. Подтверждаем инсталляцию.
Displaying Profile Templates
The command displays a list of project templates or rootstraps suitable to a given option.
Syntax:
tizen list <option>
Options:
| Option | Description |
|---|---|
| Displays the list of project templates for Tizen native applications. | |
| Displays the list of project templates for Tizen Web applications. | |
| Displays the list of available rootstraps. The rootstrap is a set of build configurations, which consists of the profile, platform version, and target architecture. If you specify the argument, a set of frameworks installed for this rootstrap is displayed. |
Examples:
- List all native application templates.
Windows, Ubuntu, and macOS:
> tizen list native-project


mobile-2.3		service_app
mobile-2.3		basic_edc_ui
mobile-2.3		shared_library
wearable-2.3		service_app
wearable-2.3		basic_edc_ui
wearable-2.3		shared_library
- List rootstraps.
Windows, Ubuntu, and macOS:
> tizen list rootstrap

mobile-2.3-device.core		Mobile 2.3, armel
mobile-2.3-emulator.core	Mobile 2.3, i386
mobile-2.4-device.core		Mobile 2.4, armel
mobile-2.4-emulator.core	Mobile 2.4, i386
wearable-3.0-device.core	Wearable 3.0, armel

> tizen list rootstrap wearable-3.0-device.core
rootstrap : wearable-3.0-device.core

Native_API              base        Native_API Libraries
bixby                   add-on
Израильский исследователь обнаружил более 40 уязвимостей в ОС Tizen, используемой Samsung
Рекомендуем почитать:
Xakep #254. Android: атака и защита
- Содержание выпуска
- Подписка на «Хакер»-30%
Операционная система Tizen построена на базе ядра Linux. Она была разработана и продолжает поддерживаться участниками Technical Steering Group, в состав которой входят такие гиганты индустрии, как Intel и Samsung. И именно компания Samsung попыталась использовать Tizen в качестве своебразной замены Android. Хотя полноценной замены из Tizen явно не вышло, в настоящее время под ее управлением работают около 30 миллионов «умных» телевизоров, стиральные машины, холодильники, «умные» часы (в том числе Samsung Gear), а также некоторые смартфоны Samsung, в основном выпускаемые для рынков России, Индии и Бангладеш. Так, в этом году компания планирует поставить на рынок более 10 миллионов Tizen-смартфонов.
Еще восемь месяцев назад Амихай Нейдерман (Amihai Neiderman), глава исследовательского подразделения израильской компании Equus Software, решил провести аудит безопасности ОС Tizen, так как, по его словам, больше этим вопросом никто не интересовался. На конференции Security Analyst Summit специалист выступил с докладом, рассказав о своих «находках», обнаруженных в ходе анализа. Дело в том, что Нейдерман выявил в ОС более сорока 0-day уязвимостей и пришел в ужас от качества кода. «Уязвимы практически все системные приложения», — сетует эксперт.
Исследователь обнаружил, что разработчики Samsung не стали утруждаться и позаимствовали немалую часть кода из операционной системы Bada, которую Samsung разрабатывала ранее. В итоге кодовая база ОС выглядит устаревшей «будто на дворе все еще 2005 год», — говорит Нейдерман.
Впрочем, большинство уязвимостей все-таки новые: они содержатся в коде, который был написан специально для Tizen в последние годы. К примеру, эксперту удалось взломать Samsung Smart TV при помощи уязвимости в каталоге приложений Tizen Store, который является эквивалентом Google Play Store. С помощью Tizen Store на устройство можно доставить любую малварь, а за счет высоких привилегий каталога возможности хакера ничем не ограничены, он получает полный контроль над устройством. Плюс heap overflow баг позволяет обойти аутентификацию Tizen Store.
Дальнейшее изучение ОС также выявило некорректное использование функции strcpy (), большие проблемы с реализацией SSL-шифрования, из-за которых информация передается в открытом виде, и множество других уязвимостей.
По словам Нейдермана, Samsung определенно планирует развивать Tizen и далее, для ОС явно готовят что-то крупное. В ходе своего выступления исследователь рассказал, что Samsung в частности призывает разработчиков писать для операционной системы больше приложений и активно расширяет инфраструктуру поддержки. «Велика вероятность, что в следующем году Galaxy S9 будут работать на Tizen, но ОС для этого еще недостаточно зрелая», — говорит специалист.
При этом за все прошедшие месяцы специалист так и не сумел связаться с представителями Samsung, хотя долго и безуспешно пытался сообщить им о проблемах. Только теперь, когда Нейдерман публично рассказал о небезопасности Tizen на Security Analyst Summit, и информация попала в прессу, представители Samsung «заметили» исследователя и поспешили заверить общественность, что работа над исправлением уязвимостей уже ведется. Нейдерман подтвердил, что связь с разработчиками Samsung налажена. В настоящий момент он помогает компании в работе над патчами.
Создание сертификатов автора и дистрибьютора. Способ №2
Заходим в Tools — Certificate Manager.

Далее нажимаем на значок Плюса.

Выбираем Samsung.

Ставим галочку на TV и нажимаем Next.

Вводим произвольное название сертификата.

Вводим произвольные Author name и Password, запомните их или запишите, возможно понадобится в будущем. После нажатия Next появитсяокно с просьбой войти в свой аккаунт, нажимаем OK.

Вводим данные аккаунта, который ранее создали на сайте Samsung.
После удачного входа просто нажимаем Next.

Ещё раз Next.

Далее вводим Password, можно такой же как ранее создавали, всё остальное оставляем как есть.

Если всё сделали правильно появится окно с сообщением о создании сертификатов. Обязательно сохраните в другом месте сертификаты, возможно получить их можно только один раз на телевизор, папка с сертификатами находится в Диск:\Users\Имя пользователя\SamsungCertificate.

Установка и запуск на телевизоре
Далее настройка Tizen Studio выполняется путём организации связи с телеприёмником.
ВАЖНО. Девайсам следует обеспечить бесперебойный доступ к интернету, при этом они должны находиться в одной сети
Это главное условие успешного взаимодействия.
Чтобы настроить телеприёмник для работы с Tizen Studio, выполняем следующее:
- Подключаем телеприёмник к той же сети, что и комп.
- На телевизоре идём в меню Smart Hub, раздел приложений.
- На пульте по очереди жмём кнопки 1, 2, 3, 4, 5.
- В результате активируется режим разработчика и появится соответствующее окно, где нужно выставить тумблер в положение ON и внести IP-адрес ПК в соответствующее поле, после чего нажать кнопку «Ок».
- Перезагружаем устройство путём выключения с кнопки Power и отключения от электросети.
- Включив телеприёмник, идём в раздел «Приложения». Если всё было сделано правильно, здесь в верхней области экрана появится сообщение «Developer Mode».
- Далее следует авторизоваться в учётной записи Самсунг. Жмём на «+» и вносим нужные данные.
- Выясняем IP-адрес телевизора в сети, для чего идём в раздел «Сеть» – «Состояние сети», жмём «Настройки IP».
- На компе открываем Tizen Studio с экзешника, находящегося в каталоге, куда ставили софт (tizen-studio/ide/).
- В программе в правой области интерфейса находим кнопку и открываем Remote Device Manager для подключения ТВ, жмём «+», чтобы добавить девайс, в открывшемся окошке прописываем имя, IP-адрес телевизора и жмём «Add» (данные в поле порт оставляем неизменными). После этого жмём «Connect» и переключаем тумблер в положение «On».
https://youtube.com/watch?v=I1OwvHPwKuw
На этом настройка Tizen Studio для установки виджетов на Samsung Smart TV Q, R, N, M, K и J серий завершена, но, чтобы обеспечить совместимость приложения пользователя с телевизором, нужно правильно создать и установить сертификаты.
Updating Packages
If you are connected to the Internet and updates are available for your installed Tizen Studio packages, an Updates available button appears in the Package Manager. Click it to update all the packages you have installed. To ensure system integrity across all packages in Tizen Studio, the Package Manager does not support updating packages individually.
Figure: Updates available button
If you are using the Tizen Studio offline, you can update the packages with an image file. To install a package with the image file:
- Click Configuration () in the Package Manager.
- Enter the full path of the image file in the Package Repository box, or click … next to the combo box to open the file browser. In the file browser, select the image file, and click Open to close the dialog. If the image file is valid, detailed information about the image is displayed below the combo box.
- Click OK to close the Configuration dialog. The Update available button appears after the platforms and tools in the image file are re-loaded. Now you can update and install additional platforms and tools with the image file.
Разработка веб-приложений на Tizen: разновидности и (не)удобство
У Tizen есть две разновидности веб-приложений: локальные (packaged) и серверные (hosted).
Обычное packaged-приложение устанавливается в телевизор и хранит все ресурсы локально — стили, скрипты, шаблоны, картинки, config.xml и т.д. При разработке или дебаге такого приложения приходится ждать сборки, загрузки и установки wgt-файла на устройство. Написание стилей, разработка новых модулей или отладка поведения плеера сулит боль, фрустрацию и большие временные потери на восстановления контекста.
Лучшим решением на первых этапах будет разработка для десктопного Chrome. При подготовке html-макетов (layouts) и отладке пространственной навигации также можно обойтись без телевизора.
Счастливым обладателям сертификата Samsung уровня Partner доступен вариант hosted-приложения. Телевизор выступает в роли загрузчика ресурсов и разработка напоминает привычную браузерную. Для работы с hosted-приложениями понадобится сделать две вещи:
-
Добавить в проект любимый http-сервер с автозагрузкой (autoreload).
-
Создать пустой проект в Tizen Studio и прописать редирект на IP локальной машины в index.html
Готово! Теперь телевизор выступает в роли webview.
Главный минус такого решения – урезанный API webapis устройства. Это критично, если вам нужно, например, получить DUID устройства для привязки к бэкенду.
При этом API Tizen остается доступен в полной мере: можно добавлять кнопки RCU, управлять громкостью и т.д.
IDE and Tools
Known Issues
- Tizen Studio
- In macOS, if the UI perspectives are not displayed properly after updating Tizen Studio, it is recommended to restart the IDE. This issue is because of the uncleared cache from the previous installation.
- In case if you see any old perspective, it is recommended to create a new workspace and import the projects to the new workspace to resolve the issue.
- In macOS from catalina and above versions, Native Templates-5.5 will not build with CLI when compiler is set to gcc.
- Common
- Web and Native IDE
- Web IDE
- The preview tab in the Web Page Editor sometimes does not appear properly. Use an alternative feature, named Web SDK HTML Editor, which has enhanced features compared to the Web Page Editor. Instead of the preview tab in the Web Page Editor, use the preview feature Ctrl + 4 of the Web SDK HTML Editor.
- In Rapid Development Support (RDS) mode, the web unit test result is not updated.
- Remote Inspector does not allow audit in the updated version of Chrome.
- Certificate Manager
- Emulator
- In the Tizen 5.5 version, the emulator images app un-installation might take some time to complete if the app name contains more than 14 characters. A patch for the same is expected to be released in the next update.
- To use Tizen Emulator, use Intel VTx supported CPU and the latest version of the graphic card driver provided by the vendor. To verify the prerequisites for Tizen Emulator, see Prerequisites for Tizen Studio.
- If the host machine is using NVIDIA Optimus technology on either Ubuntu or Windows, you must set the Tizen Emulator to run with your NVIDIA graphics card. For Ubuntu, verify the . For Windows, select High Speed NVIDIA Processor as Preferred Graphics Processor in the NVIDIA control panel.
- On Ubuntu, if the graphics driver is out-of-date, your Ubuntu desktop session occasionally logs out while launching Emulator Manager, or the emulator skin is displayed improperly. Verify the prerequisites and upgrade to the latest graphics driver.
- On Windows, depending on your OS theme (such as Non-Aero themes and Windows XP themes), a display surface can be erased for a while if the emulator window is covered with another window. If you click the emulator window, the display surface runs correctly again.
- On Windows, if an error with message “failed to allocate memory” occurs while executing the emulator, try the following:
- Close some other programs and try to launch the emulator again.
- If the RAM size is set to 768 or 1024 MB for the VM in Emulator Manager, change it to 512 MB.
- Increase the user area of the virtual memory in the system to 3 GB by entering the bcdedit /setincreaseuserva 3072 command on the console with administrator rights (only in Windows 7), and reboot.
- If you use a MacBook Pro that has both Intel HD and NVIDIA GPUs, the emulator can terminate unexpectedly when you execute the emulator with OpenGL ES version 1.1 or 2.0. Verify the emulator configuration in Emulator Manager and on the General tab in the emulator configuration window, set OpenGL ES version to version 2.0, or to version 3.0.
- When you launch Emulator Manager in the Tizen IDE, the shortcut image of Emulator Manager may not be displayed properly.
- Basic Web applications are not installed on SD cards.
- To use Tizen Emulator in Tizen platform 3.0 or lower, disable the CPU VT option in the HW Support tab of Emulator Configuration.
- CLI and SDB
- Dynamic Analyzer
- When analyzing applications on commercial devices running Tizen 3.0, newly-released or after a firmware update, the following problems exist:
- The Core Frequency information is not shown.
- The screenshots on the scene transitions feature will not work.
- When analyzing applications on the Tizen 4.0 emulator or reference device, the startup profiling information is not shown.
- The UI Hierarchy viewer feature and startup profiling are not performed simultaneously.
- The Dynamic Analyzer cannot show lifecycle information for Web applications.
- Widget applications cannot be profiled with the Dynamic Analyzer. They are hidden in the application list on the toolbar for all Tizen platforms, except Tizen 2.3.2.
- The Dynamic Analyzer sometimes gets stuck which is caused by an internal security checking program.
- When analyzing applications on commercial devices running Tizen 3.0, newly-released or after a firmware update, the following problems exist:
Установка и настройка Tizen Studio
Для начала, нужно скачать и установить нужный софт на Ваш ПК или ноутбук. Загружаем и ставим Java, далее нужно скачать Tizen Studio with IDE installer
Важно: выбирайте версию которая соответствует Вашей системе Windows: 32/64 bit
После установки Java, переходим к установке Tizen Studio, если необходимо, то можно поменять путь установки.
После успешной установки приложения, должен появится Package Manager, но если в друг этого не произошло то идём в папку с установленной программой (tizen-studio\package-manager) и находим там файл package-manager.exe и запускаем Package Manager.
Далее выбираем install напротив Tizen SDK tools.
После установки переходим на вкладку Extension SDK и выбираем install напротив Extras.
Теперь переходим к настройке самого телевизора на Tizen OS. Открываем Smart Hub, переходим в раздел Приложения и по очередности нажмите на пульте последовательно кнопку «1», «2», «3», «4», «5», если их нет на пульте нажмите на экранном пульте. В окне разработки выбираем ON и нажимаем Enter, далее введите IP вашего компьютера и выбираем OK.
Далее перезагружаем телевизор. (Выключаем с пульта и отключаем от электро сети секунд на 30)
Теперь включаем телевизор и переходим в раздел Приложения, если Вы всё сделали правильно, то появиться надпись Developer Mode.
Теперь заходим в Ваш, ранее созданный аккаунт Самсунг. Нажимаете на плюсик и вводите свои данные.
Также, Вам нужно узнать IP адрес тв, для этого переходим в Menu и выбираем Сеть/Состояние сети/ Настройки IP.
Теперь, возвращаемся к Вашему ПК, и запускаем уже установленное приложение Tizen Studio, найти его можно в папке 9tizen-studio/ide/TizenStudio.exe). После запуска Tizen Studio: 1) Выбираем Подключение ТВ, 2) выбираем Плюсик, 3) вводим любое имя (Name), 4) вводим IP телевизора, 5) теперь нажимаем Add (как показано на фото ниже).
Далее переводим переключатель в положение On.
Теперь нужно создать сертификат автора и дистрибьютора. Для этого, нужно зайти в раздел Tools, и выбрать Certificate Manager.
Выбираем Плюсик.
Далее Samsung.
Теперь устанавливаем галочку на TV и выбираем далее (Next).
Здесь можете ввести любое название сертификата.
Дальше нужно ввести любое Author name и Password (Важно: эти данные нужно где то сохранить, так как вполне возможно они понадобится вам будущем
Дальше видим окно с просьбой войти в свой аккаунт. Вводим данные аккаунта, который ранее создали на оф сайте Samsung.
После удачного входа переходим дальше Next.
Теперь нужно ввести Password, можно использовать такой же как ранее создавали, всё остальное оставляем как есть.
Если всё сделано правильно, то появится окно с сообщением о создании сертификатов
Важно: нужно сохранить сертификаты в другом месте, не факт, что получить их можно только один раз на конкретный телевизор, папка с сертификатами находится в Диск:\Users\Имя пользователя\SamsungCertificate
Создание проекта в Tizen Studio и установка приложений на телевизор
Выбираем значок создания проекта (слева в вверху), выбираем Template и нажимаем далее.
Здесь нужно выбирать TV.
Теперь выбираем Web Application.
Basic Project.
Здесь можно ввести любое Project name и выбираем Finish.
Теперь, Вам нужно скачать и распаковать, например приложение ForkPlayer для Tizen TV или выбрать Другое. Дальше нужно открыть архив с файлами приложения и перетащить в проект, согласившись со всем.
Теперь нужно нажимать правой кнопкой мышки по названию проекта и выбрать Run As — 1, а затем Tizen Web Application. Если всё сделано правильно, то приложение запустится на вашем телевизоре.
Application Marketplace
As a platform, Tizen provides the foundation for many different applications and services, which lead to rich user experiences and chances of new businesses. For easy access and reliable trade of applications, efficient distribution channels are necessary for both users and developers. The Tizen Store is a marketplace of Tizen applications, where users can find useful applications and developers can distribute their valuable creations. It provides various application categories, such as All Games, Education, Entertainment, Kids, Finance, Lifestyle, and Social networking. Users can download applications of their choice and enrich their experiences with the Tizen devices. Application developers can monetize or share their applications for free in the marketplace.
Building the Project
The command builds the Tizen native or Web project. To build the native project, 3 options are needed: architecture, compiler, and configuration. If you do not set these options, the default values are used. You can check or set the default build options with the command.
Syntax:
tizen <sub-command>
Sub-commands:
| Sub-command | Description |
|---|---|
| Build the Tizen native project.
Options are:
|
|
| Build the Tizen Web project.
Options are:
|
Examples:
- Build the native project with the , , and options.
Windows:
> tizen build-native -a x86 -c llvm -C Debug -- C:\Users\workspace\basic
> dir C:\Users\workspace\basic\Debug
Ubuntu and macOS:
$ tizen build-native -a x86 -c llvm -C Debug -- ~/workspace/basic
$ ls ~/workspace/basic/Debug
- Build the native project with the default configuration and the bixby add-on framework.
Windows:
> tizen build-native -f bixby -- C:\Users\workspace\basic
> dir C:\Users\workspace\basic\Debug
Ubuntu and macOS:
$ tizen build-native -f bixby -- ~/workspace/basic
$ ls ~/workspace/basic/Debug
- Build the native project with a rootstrap.
Windows:
> tizen build-native -r mobile-2.4-device.core -C Release -- C:\Users\workspace\basic
> dir C:\Users\workspace\basic\Release
Ubuntu and macOS:
$ tizen build-native -r mobile-2.4-device.core -C Release -- ~/workspace/basic
$ ls ~/workspace/basic/Release
- Build the Web project with default options.
Windows:
> tizen build-web -- C:\Users\workspace\basicWeb
> dir C:\Users\workspace\basicWeb\.buildResult
Ubuntu and macOS:
$ tizen build-web -- ~/workspace/basicWeb
$ ls ~/workspace/basicWeb/.buildResult
Building Your Application
After you have created the application project, you can implement the required features. In this example, only the default features from the project template are used, and no code changes are required.
When your application code is ready, you must build the application. The building process performs a validation check and compiles your JavaScript and CSS files.
You can build the application in the following ways:
-
Automatically
The automatic build means that the Tizen Studio automatically rebuilds the application whenever you change a source or resource file and save the application project.
To use the automatic build:
- Select the project in the Project Explorer view.
- In the Tizen Studio menu, select Project > Build Automatically.
A check mark appears next to the menu option.
You can toggle the automatic build on and off by reselecting Project > Build Automatically.
-
Manually
The manual build means that you determine yourself when the application is built.
To manually build the application, right-click the project in the Project Explorer view and select Build Project.
Figure: Manually building the application
Alternatively, you can also select the project in the Project Explorer view and do one of the following:
- In the Tizen Studio menu, select Project > Build Project.
- Press the F10 key.
After you have built the application, run it.
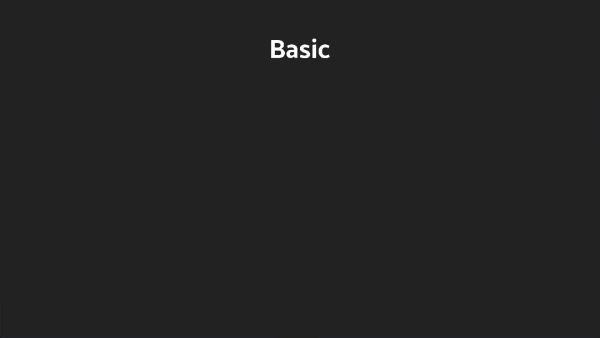
Designing a Simple UI
The TV application created with the Basic UI template has a simple user interface with a text component showing the Basic text in the middle of the screen.
The UI is created using W3C/HTML. The W3C specifications provide HTML and CSS features for creating a user interface. With HTML, you can define the structure of the application screens, while CSS allows you to define the look and feel of the screens.
Figure: User interface in the Basic UI template
Creating the Basic UI
The UI in the Basic UI template uses the HTML DOM, which is a structured model to control Web elements. It is an official W3C standard to express the document regardless of platforms or languages, and the foundation of the HTML5 APIs. The template contains the following components:
-
The element is the top-level element of the HTML DOM tree that wraps the entire document, and it has the and elements as child nodes:
<!DOCTYPE html> <html> <head> <!--Content--> </head> <body> <!--Content--> </body> </html> -
The element contains the information that the browser refers to when rendering the body element to interpret information, such as the title of the HTML document, and the location of the related CSS and JavaScript files:
- : Defines the title of the document.
- : Defines information, such as encoding, creator, and keywords of the document.
- , : Sets the styles of the document.
- , : Adds functions to the document.
<head>
   <meta charset="utf-8"/>
   <meta name="viewport" content="width=device-width, initial-scale=1.0, maximum-scale=1.0">
   <meta name="description" content="Tizen TV basic template generated by Samsung TV Web IDE"/>

   <title>Tizen TV Web IDE - Tizen TV - Tizen TV basic Application</title>

   <link rel="stylesheet" type="text/css" href="css/style.css"/>
   <script src="js/main.js"></script>
</head>
-
The element defines the area displaying content on the browser screen. In this case, it defines the Basic text component:
<body>
   <div class="contents">
      <div style='margin:auto;'>
         <span class="content_text" id="textbox">Basic</span>
      </div>
   </div>
</body>
Modifying Existing Components with CSS
CSS (Cascading Style Sheets) specifies the layout and styling of the Web application.
There are various ways to connect CSS with HTML:
- attribute in an HTML element
- element in the element
- attribute in the CSS area
- element in the element
Applying the style of an HTML element directly with the attribute has the highest priority. On the other hand, creating a separate CSS file and managing it separately is convenient when it comes to applying changes in the future.
In the Basic UI template, the CSS file is connected to the HTML file using a element in the element:
<head>
   <meta charset="utf-8"/>
   <meta name="viewport" content="width=device-width, initial-scale=1.0, maximum-scale=1.0">
   <meta name="description" content="Tizen TV basic template generated by Samsung TV Web IDE"/>

   <title>Tizen TV Web IDE - Tizen TV - Tizen TV basic Application</title>

   <link rel="stylesheet" type="text/css" href="css/style.css"/>
   <script src="js/main.js"></script>
</head>
The following lines in the CSS code describe the styling of the text in an element with the class:
.content_text {
	font-weight:bold;
	font-size:5em;
	color:#fff;
}
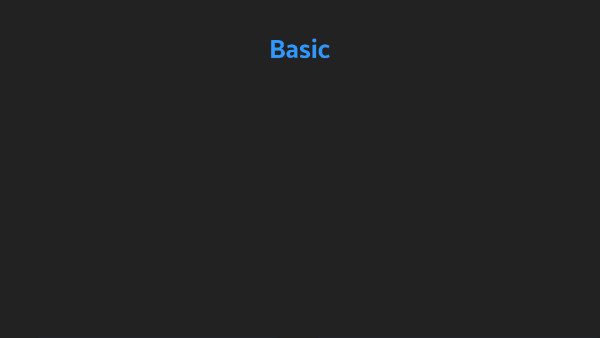
The text is set to show up as bolded, and colored white (). To change the color of the text, change the CSS code by modifying the attribute (in this case, it is changed to to make the text blue):
.content_text {
	font-weight:bold;
	font-size:5em;
	color:#2e9afe;
}
Figure: Application screen with the new text color
Обновление браузера
После успешного скачивания браузера можно пользоваться им какое-то время. Затем высока вероятность, что начнутся проблемы – страницы медленно открываются, приложение вылетает, работа его нестабильна. Причин может быть две – заполнен кэш или устарела версия ПО. Обновить встроенный браузер на телевизоре samsung smart tv можно только вместе с прошивкой. Сделать это можно через Интернет или использовать USB-накопитель.
Но обновление необходимо, только если вышла новая версия ПО – при установке через Интернет удастся проверить это автоматически. Но что делать, если можно провести апгрейд только через флэшку? В этом случае нужно зайти в настройки телевизора и узнать версию настоящего ПО, а затем на официальном сайте самсунга сравнить его со свежим обновлением. Если они совпали – пока следует отложить процедуру, в противном случае, нужно готовить флэшку.
Через интернет
Более простой способ – обновление через Интернет.
- В режиме Smart Hub открыть меню.
- Перейти в пункт Поддержка.
- Выбрать раздел Обновление ПО.
- Нажать на Обновить сейчас или Обновить по сети – в зависимости от модели может появиться одна из надписей.
- Произойдет автоматическая проверка на наличие обновлений. Если они будут обнаружены, появится окно с просьбой подтвердить действие.
- После утвердительного ответа начнется обновление.
Пока происходит установка новой прошивки ни в коем случае нельзя выключать телевизор. По окончании процесса – он может занять несколько минут или более получаса, система перезагрузится.
Через флешку
Обновление через флешку выручит, если нет возможности подключить телевизор к интернету или скорость подключения слишком медленная. Единственное условие – перед процедурой флешку нужно отформатировать. Для этого существует простой порядок действий:
- Вставить накопитель в разъем компьютера.
- Открыть «Мой компьютер», кликнуть на флешку правой кнопкой мыши или зайти в Свойства.
- Найти раздел Форматирование.
- В пункте Файловая система выбрать «FAT 32».
- Нажать на Начать.
После этого флешка будет читаема для телевизора и с нее будут удалены все имеющиеся файлы. Поэтому лучше держать для обновлений прошивки телевизора отдельный накопитель. После того, как форматирование будет завершено, можно приступать к основным действиям:
Распаковать архив, указав путь на отформатированную флешку.
Вытащить накопитель из разъема ПК и вставить в разъем телевизора (тот, что с пометкой HDD).
Зайти в меню смарт тв. Открыть раздел Поддержки в настройках и выбрать пункт «Обновление ПО». Среди вариантов выбрать тот, который через USB.
После этого система обработает запрос в течение нескольких минут и запустит обновление. В это время нельзя выключать телевизор, дождаться перезагрузки после завершения процесса.
Обновление сторонних браузеров
Рано или поздно даже сторонние браузеры нужно обновлять – иначе программа будет зависать, выдавать плохое качество изображения. В отличие от встроенного типа, эти приложения можно обновлять отдельно, а не вместе с прошивкой. Для этого снова в меню программ Smart Hub нужно найти искомый браузер и кликнуть на него – если обновления есть, они установятся. Конечно, это займет гораздо меньше времени, чем апгрейд прошивки, но все равно делать в этом время ничего не рекомендуется.
Реально даже упростить себе жизнь и сделать этот процесс автоматическим. Для этого нужно перейти в настройки приложения и в разделе обновлений выбрать строку «обновлять автоматически». После этого не придется следить за новыми версиями, а приложения будут работать стабильно.
Using the GUI Installer
To install Tizen Studio:
- Launch the Tizen Studio installer.
- Accept the software license.
The license contains important legal notices for using Tizen Studio. Read it fully, and click Accept only if you agree with the license statement:
- Click the … button and specify a new directory to set the SDK and data location. If the new directory is valid and shows no errors, click Install:
- Click Install to install the required packages and tools in the specified directory.
You can monitor the installation process or cancel the installation. The installation process is completed in a few minutes, unless you cancel it.
- Click Finish and close the installer:
If you want to install additional platforms and tools, launch the Package Manager by checking the Launch the Package Manager check box and click Finish.
Using the Tizen Studio Package Manager, you can install and update additional tools. For more information on the Package Manager, see Updating Tizen Studio.
Note If you install Tizen Studio in a directory that requires administrator privileges for access, such as , administrator privileges are required to run the Tizen SDK tools.
