The foundry nuke 5.2 [2009, видеоредактор]
Содержание:
- Miscellaneous Enhancements
- Version Linking
- Hiding Tab Names and Controls
- Saving and Loading Workspaces
- Setting the Startup Workspace
- Timeline Menu
- Extended Monitor Out
- VFX Reference Platform 2020
- Blink Particles
- Version Linking
- Saving Preferences
- Adding Tabs
- OCIO Improvements
- Machine Learning Tools (AIR)
- File Format Updates
- Hiding Tab Names and Controls
- Saving and Loading Workspaces
- Setting the Startup Workspace
- HDR Display — macOS Only (Beta)
- Shuffle
- High DPI Support
- Music MP3 Downloader 5.2.9.2 [2011, Менеджер закачек]
- Version Linking
- Создаём проект со скриптом сборки
- Adding Tabs
Miscellaneous Enhancements
• ID 158422/199269 — FrameHold: A new Set to Current Frame button has been added to the Properties panel.
• ID 421243 — Nuke’s Preferences > Project Defaults > Color Mangement options are now the same as Nuke Studio’s, allowing you to set separate Default Color Transforms on a file type basis.
• ID 457334 — CaraVR: The C_GenerateMap gizmo has been replaced by a plug-in for Nuke 13.0. This work includes the addition of a new Format control, which allows you to set the format of output ppass or stmaps when the node is not connected to a parent node. When the Source input is connected to any other node, the format is obtained from the parent node and the Format control is disabled.
Version Linking
Version Linking allows linking and unlinking of source clip versions between project bin clips and shots in a sequence that reference a clip. You can define if a shot is linked to its source clip or not, and we’ve introduced three new states to bin clips: Linked, Unlinked and Mixed. Two new states govern shots: Linked or Unlinked.
These states are indicated by an icon on the clips that have been unlinked and there is a new column in the Project bin and spreadsheet view for Version and Link Status. Bin clips can be set as Linked or Unlinked on import using the Preferences > Project Defaults > General > Link bin and track item version.
See Version Linking for more information.
Hiding Tab Names and Controls
You can hide the names and control buttons of tabs, as you may not need them with all panels, such as the Toolbar panel. To hide the names and controls on tabs, click the content menu button in the top-left corner of the tab, and disable Show Tabs.
You can show the names and controls on tabs again by moving the cursor over the top of the pane area until the top edge of the pane highlights, right-click to open the content menu, and select Show Tabs.
Saving and Loading Workspaces
After you have customized a workspace and you are happy with it, you can save it by selecting Workspace > Save Workspace… You are then asked to name it. After saving it, your custom workspace appears in the Workspace dropdown under the existing default workspaces. Select it from the dropdown to load it.
Workspaces are saved in your .nuke file under Workspaces > Nuke or NukeStudio, depending on which Nuke mode you’re currently using.
Note: The location of the .nuke file varies by platform. See Loading Gizmos, NDK Plug-ins, and Python and Tcl Scripts for more detailed information.
Setting the Startup Workspace
When you launch Nuke, it opens in the workspace set in the Preferences. You can change the startup workspace to any other default workspace or a custom workspace, by doing the following:
| 1. | Open the Preferences dialog by pressing Shift+S. |
| 2. | In the Behaviors section, select Startup. |
| 3. | Use the startup workspace dropdown to select the workspace you want Nuke to load on startup. |
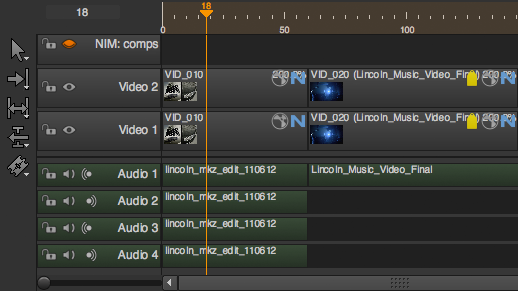
Timeline Menu
Right clicking on a clip or a group of clips in a sequence will bring up the Timeline context menu.
- Within this menu is the NIM Timeline menu which includes options for:
-
-
Update Selected Shots in NIM
-
Build Track From Elements
-
Clear NIM Tags from Selected Shots
-
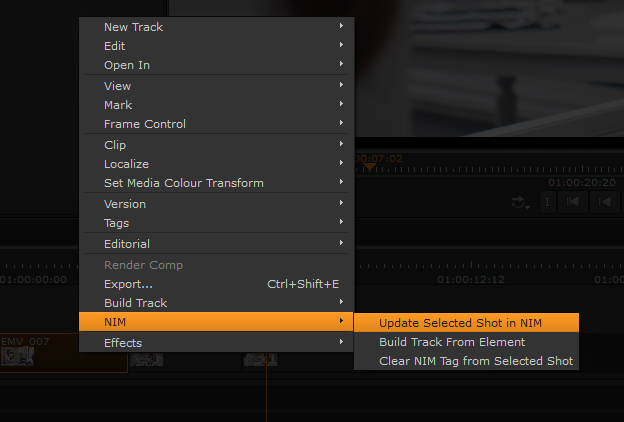
Update Selected Shots in NIM
- Updating selected shots in NIM will update the selected NIM show with the current shot information including:
-
-
Start & End time
-
Duration
-
Handles
-
Shot Icon
-
To update shots in NIM select a shot or a group of shots, right click, and select NIM / Update Selected Shots in NIM.
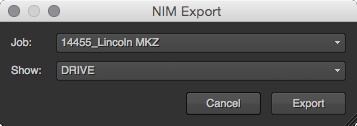
- You will be presented with a dialog box with three dropdowns.
-
-
Job — the job containing the desired show
-
Show — the show to update the shots in
-
After selecting the Job and Show click the export button.
- NukeStudio will connect to NIM and look for corresponding shots by two methods:
-
-
Existing NIM Tag information
-
Matching shot names
-
If either of these cases exist NIM will update the shots with the corresponding information as well as update the shot icon.
If a shot is NOT found in the selected show, a new shot will be created in the show with the corresponding information and a new shot icon. Additionally the track item on the timeline will be tagged with a NIM tag containing the matching NIM shot information.
Note
Timeline track items can only be associated with a single shot in NIM.
To change a track items associated NIM shot clear the NIM Tag from the track item.
Build Track From Elements
Building a track from elements will create a new track in the current sequence with the latest published elements in the corresponding NIM shots.
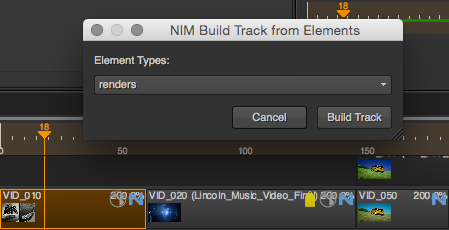
To build a track, select a shot or a group of shots, right click, and select NIM / Build Track From Elements.
- You will be presented with a dialog box to choose the NIM Element Type.
-
NIM Element Types are defined within the Administrative section of NIM
Select the desired Element Type from the dropdown and click Build Track.
NukeStudio will communicate with NIM to find the most recently published elements for each corresponding shot and will construct a new track with these elements.
- The new track will be labeled with a prefix of NIM: and a suffix of the selected element type:
-
eg. NIM: renders
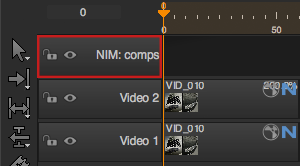
NIM Tags
All clips that have corresponding NIM information are marked with Tag.
The NIM tag included metadata for the NIM show and shot ID as well as corresponding output directories if a NIM project structure has been defined.
Extended Monitor Out
We have extended the Monitor Out feature and unified the systems in Nuke and Nuke Studio, bringing a more stable and consistent experience across the Nuke family. This work brings many exciting new features into Nuke, including independent output transform controls, and the floating window, a separate display that can be viewed without a monitor out card. These additions will benefit artists working without a separate SDI out device as well as those who frequently use monitor out within the Nuke family.
As well as the valuable enhancements for Nuke users, stability, reliability and usability have all been greatly improved in the Nuke Studio workflow. The experience moving between the timeline and nodegraph when using the monitor out is also much smoother.
Monitor Out features (Nuke and Nuke Studio)
- New Monitor Out node for selecting and controlling output devices
- Supports floating window as well as AJA and BMD SDI/HDMI devices
- Minimize floating window with application
- Improved layout of video card resolution settings
- Resolutions now grouped together in easy to use cascade menu
- PsF formats added to BMD cards
- Display of SDK and Driver versions for AJA and BMD devices
- Online help provided in the Help button (?) of the Properties panel
- New workspace added for quick access to Monitor Out strip
- New overflow menu added to Monitor Out strip
- New Preferences:
- Viewer (Monitor Out)
-
Color Management
OCIO preferences and Default Color Transforms added to Nuke
preferences updated to include Monitor Out
- Background color choice in floating window
- Keep floating window on top
- Control to disable VR headset devices
Monitor Out Features in Nuke (previously exclusive to Nuke Studio)
- Floating Window
- Output transform color settings are independent from the Viewer
- Input Process activation independent from the Viewer
- Gain and Gamma control activation independent from the Viewer
- Buffer control activation independent from the Viewer
- Flip the monitor output vertically
AJA Kona SDK Update
- AJA SDK has been updated to 15.5.4
- There may be AJA issues when using macOS 11.0 (Big Sur)
Note: When testing this beta you will need to update the driver on your card to 15.5.3This unified software, driver and firmware package contains everything you need in order to start using your AJA video I/O hardware and includes enhancements.macOS Driver InstallerWindows Driver InstallerLinux Driver InstallerPlease read the AJA Desktop Software – Release Notes v15.5.3 for complete detail.
BMD Decklink SDK Update
- BMD DeckLink SDK has been updated to 11.7
- This update adds support for macOS 11.0 (Big Sur)
Note: When testing this beta you will need to update the driver on your card to 11.7This unified software, driver and firmware package contains everything you need in order to start using your BMD video I/O hardware and includes enhancements.macOS Driver InstallerWindows Driver InstallerLinux Driver InstallerPlease read the BMD Decklink software — Release Notes v11.7 for complete detail.
VFX Reference Platform 2020
The VFX Reference Platform is a set of tool and library versions to be used as a common target platform for building software for the VFX industry. See https://www.vfxplatform.com/ for more information.
In addition to upgrading these core libraries, Nuke uses numerous third-party libraries, many of which were also upgraded. This is a broad and significant upgrade, that sees Nuke using the latest versions of technologies like Python and OpenEXR.
Library Upgrades
- Boost → 1.70.0
- FBX → 2020.1.1
- Intel MKL → 2019.5.281
- Intel TBB → 2019 Update 6
- OpenEXR → 2.4.2
- OpenSubDiv → 3.4.3
- Ptex → 2.3.2
- Python → 3.7.7
- QT Python (Pyside) → 5.12.6 (with Patch)
Blink Particles
For Nuke 12.1 we have added the ParticleBlinkScript node. This node works in a similar way to the BlinkScript node but allows you to write Blink scripts which operate on particles. This enables you to write your own Particle nodes, to create the specific behavior you need.
Additionally, we are providing some example particle gizmos, all of which have been written with ParticleBlinkScript. This adds new behavior and functionality to the Particle system, and each node has the ParticleBlinkScript script available as a teaching tool.
See Using the ParticleBlinkScript Node for more information.
Version Linking
Version Linking allows linking and unlinking of source clip versions between project bin clips and shots in a sequence that reference a clip. You can define if a shot is linked to its source clip or not, and we’ve introduced three new states to bin clips: Linked, Unlinked and Mixed. Two new states govern shots: Linked or Unlinked.
These states are indicated by an icon on the clips that have been unlinked and there is a new column in the Project bin and spreadsheet view for Version and Link Status. Bin clips can be set as Linked or Unlinked on import using the Preferences > Project Defaults > General > Link bin and track item version.
See Version Linking for more information.
Saving Preferences
Nuke stores your preference settings in a file called preferences11.1.nk, which resides in your .nuke directory. The location of this is dependent on your operating system.
• Linux: /home/login name/.nuke
• Mac: /Users/login name/.nuke
• Windows: drive letter:\Users\login name\.nuke
Note: On Windows, .nuke resides in the directory pointed to by the HOME environment variable. If this variable is not set (which is common), the .nuke directory is under the folder specified by the USERPROFILE environment variable.
Each Nuke user can maintain his or her own unique settings. After making a change in the Preferences dialog, you can simply click OK to save and close your preferences. If you click Cancel, any changes that you made are not saved.
To save your preferences
Make the desired changes inside the Preferences dialog, then click OK. Nuke writes the new settings to preferences11.1.nk file, which you can find in the .nuke directory:
• On Windows: The .nuke directory can be found under the directory pointed to by the HOME environment variable. If this variable is not set (which is common), the .nuke directory is under the folder specified by the USERPROFILE environment variable — which is generally of the form drive letter:\Documents and Settings\login name\ (Windows XP) or drive letter:\Users\login name\ (Windows Vista).
To find out if the HOME and USERPROFILE environment variables are set and where they are pointing at, enter %HOME% or %USERPROFILE% into the address bar in Windows Explorer. If the environment variable is set, the folder it’s pointing at is opened. If it’s not set, you get an error.
• On Mac: /Users/login name/.nuke
• On Linux: /users/login name/.nuke
Your new preferences remain in effect for the current and all subsequent sessions.
Adding Tabs
When you can’t fit more elements into your display, you can use tabs to save space. You can also use tabs to move the Toolbar into a new location.
You can add a tab by clicking on the content menu button in the top-left corner of the pane, and then selecting the type of tab you want to add. For example, you can add Node Toolbar, Node Graph, New Viewer, or Script Editor. The new tab is added on top of the existing tabs.
To move tabs, click on the name of the tab and drag it to a new position inside the same pane or in another pane.
You can close tabs again by clicking the X in the top-right corner of the tab you want to close.
Note: Closing a linked tab closes all associated tabs. If you hold Alt while closing a linked tab, it only closes that tab.
OCIO Improvements
This beta contains the first of several OCIO updates that will be added during the beta period. A new Preference has been added, Project Defaults > Color Management > Prioritize OCIO Roles, which is enabled by default to match legacy behavior.
Prioritizing OCIO Roles creates them in the main menu of cascading dropdowns, with Colorspaces in a sub-menu. If the checkbox is disabled, roles are demoted to a submenu called Roles.
The Allow OCIO Roles in Colorspace Knobs control allows you to enable and disable OCIO roles in all colorspace controls.
Warning: If you plan to disable roles using this control, restart the application before changing any other Color Management settings. Disabling this control may cause knob errors when loading scripts created in Nuke 12 builds.
OCIO Environment Variable (Nuke and Nuke Studio)
An environment variable has been added to control the state of the OCIO Roles preference. This allows you to set up the desired behavior at an environment level for all artists, rather than setting it individually and risk users having different settings. If the environment variable is set, the OCIO Roles preference is disabled, so individual artists cannot change the setting. The variable has three settings:
• NUKE_OCIO_ROLES=0 Roles are hidden
• NUKE_OCIO_ROLES=1 Roles are prioritised (Current behavior of 12.2)
• NUKE_OCIO_ROLES=2 Roles are de-prioritised
Machine Learning Tools (AIR)
Nuke 13.0 introduces a new suite of machine learning tools designed to assist artists with some of the heavy-lifting in VFX work. These tools require an NVIDIA GPU with a minimum compute capability of 3.0 to enable GPU acceleration.
CopyCat
Enables you to copy sequence-specific effects, such as garbage matting, beauty repairs, or deblurring, from a small number of frames in a sequence and then train a network to replicate this effect on the full sequence. Connect a selection of the original frames to the Input along with what you want them to look like in the Ground Truth and click Start Training. The plug-in outputs a trained network ready for the Inference node to apply your effect.
Note: CopyCat requires a NukeX or Nuke Studio license.
Inference
Runs the neural networks produced by the CopyCat node. Once CopyCat has successfully trained a network, its weights are saved in a checkpoint .cat file, which is then referenced by the Inference node to apply the effect to the remainder of the sequence, or even a different sequence altogether.
Note: Inference requires a NukeX or Nuke Studio license to select the .cat file used, but can be processed using a Nuke Render license (nuke_r).
Upscale
The Upscale node increases the input format by a factor of two using a pre-trained machine learning network. Upscale also includes a Tile Size control that allows you to process the image in smaller chunks to cut down the use of OS resources.
AIR on Ampere GPUs
In order to run the AIR plug-ins on Ampere GPUs, you must set a global environment variable CUDA_CACHE_MAXSIZE to a value between 2147483648 (2 GB) and 4294967296 (4 GB). This is because the AIR plug-ins need to compile CUDA kernels in order to run on this GPU. This process is only necessary once and should take about half an hour.
The compiled kernels are stored in the CUDA cache and require about 2 GB of space, so the environment variable CUDA_CACHE_MAXSIZE must be set accordingly.
Note: It is important to set this environment variable globally, otherwise running Nuke in a terminal where it is not set may invalidate the cache.
The cache is stored in different default locations by OS:
Windows
%APPDATA%/NVIDIA/ComputeCache
Linux
~/nv/ComputeCache
The location can be changed by setting the environment variable CUDA_CACHE_PATH.
File Format Updates
DNxHR MXF Writer for Nuke (Video only)
MXF format added to Write Node — File Type
DNxHR codec support
OP-1a and OP-Atom Patterns
Profiles
• 4:4:4 12-bit
• HQX 4:2:2 12-bit
• HQ 4:2:2 8-bit
• SQ 4:2:2 8-bit
• LB 4:2:2 8-bit
Improvements to Reading .mxf and .mov Files
Nuke now uses file metadata to set the colorspace in Nuke for .mov and .mxf ProRes files. If no metadata exists, Nuke parses frame header information to retrieve transfer characteristics.
Note: Legacy scripts may not work as expected as a result of this update.
Additional support includes:
• Motion JPEG B — Reader using mov64
• Motion JPEG B — Writer using mov64 (Nuke only)
ArriRAW 6.2.1.0 Update
Nuke can now read Arri Codex HDE .arx and Alexa Mini LF files and additional SDK info is now displayed in Read node’s Properties panel. CUDA GPU debayering is now available for NVIDIA cards.
Hiding Tab Names and Controls
You can hide the names and control buttons of tabs, as you may not need them with all panels, such as the Toolbar panel. To hide the names and controls on tabs, click the content menu button in the top-left corner of the tab, and disable Show Tabs.
You can show the names and controls on tabs again by moving the cursor over the top of the pane area until the top edge of the pane highlights, right-click to open the content menu, and select Show Tabs.
Saving and Loading Workspaces
After you have customized a workspace and you are happy with it, you can save it by selecting Workspace > Save Workspace… You are then asked to name it. After saving it, your custom workspace appears in the Workspace dropdown under the existing default workspaces. Select it from the dropdown to load it.
Workspaces are saved in your .nuke file under Workspaces > Nuke or NukeStudio, depending on which Nuke mode you’re currently using.
Note: The location of the .nuke file varies by platform. See Loading Gizmos, NDK Plug-ins, and Python and Tcl Scripts for more detailed information.
Setting the Startup Workspace
When you launch Nuke, it opens in the workspace set in the Preferences. You can change the startup workspace to any other default workspace or a custom workspace, by doing the following:
| 1. | Open the Preferences dialog by pressing Shift+S. |
| 2. | In the Behaviors section, select Startup. |
| 3. | Use the startup workspace dropdown to select the workspace you want Nuke to load on startup. |
HDR Display — macOS Only (Beta)
This beta includes the ability to enable HDR display workflows on macOS. If you’re running Nuke on macOS Catalina or Big Sur and have a compatible screen capable of displaying values above 1, you can view your projects with HDR luminance ranges using sRGBf in OCIO Color Management. You can also display images in the P3 gamut, giving more accurate color on wide gamut displays.
Note: This feature requires a 2019 Mac Pro running macOS 10.15, or later, and a suitable display or a current generation iMac Pro, iMac or MacBook Pro with an HDR screen.
- On an Apple XDR, set the profile of your display to one of the HDR options in the OS System Display Preferences:
• Pro Display XDR (P3-1600 nits)
• Apple Display (P3-500 nits)
• HDR Video (P3-ST2084) — 1000 nits
On other monitors, enable the High Dynamic Range checkbox.
In the Preferences, open the Color Management > HDR section and check Enable macOS HDR Color Profile (Display P3) (Beta).
Note: Enabling this control requires you to restart the application.
This control sets the Viewer colorspace to Display P3, so that the screen can display values above 1. This setting also applies the P3 colorspace to the following;
• All Viewers
• Node Graph
• Dope Sheet
• Curve editors
• Scopes
In the Viewer Properties, set the gl buffer depth to half-float or float to allow HDR values to display.
Set the Viewer Process to sRGBf using OCIO Color Management or provide your own extended color space. This ensures that the frame buffer is not clamped at 1.

To use the HDR Video (P3-ST2084) setting on the monitor, select an appropriate ST2084 Output Transform in the MonitorOut Properties or in the Viewer.

A further color space conversion is required to allow HDR images to display correctly. An example of how this can be achieved in Nuke can be seen using a gizmo created by a customer, Nick Shaw — the gizmo is available for download here: PQ-EDR_v101.gizmo
For more information on gizmos and how to use them, see Accessing Gizmos in Nuke.
Using this gizmo as an Input Process and setting the input process order to after viewer process renders the correct image in the Viewer.

The gizmo also contains a slider called Normalization (nits). This allows you to set the PQ nit value which is normalized to 1.0. This is useful, for example, to prevent clipping of a 1000 nit PQ signal on the 16″ MacBook Pro’s 500 nit display.
Shuffle
Nuke 12.1 introduces an updated Shuffle2 node, which replaces both the Shuffle and ShuffleCopy nodes. It has an updated, more user-friendly UI, supports one or two inputs, and up to eight channels per layer. The new user interface features a node-like visual indicator of which channels are being copied. Connections are made by dragging sockets between layers. Inputs can have multiple outgoing connections, but outputs can only have one incoming channel. Channels can be set to solid black or solid white, by selecting the black or white button in the Output Layer.
Input and output channel layers can be set individually, using the channels dropdown. The source of the selected layer’s channel data can be set using the dropdown on the respective Input Layer. When connections have been made, but the Shuffle’s input pipe becomes disconnected, the connections from Input to Output are represented with dotted lines.
High DPI Support
Nuke supports high definition displays, automatically scaling the interface using the operating system’s scaling settings. On Linux operating systems, scaling is currently disabled by default. You can enable automatic scaling by setting the QT_AUTO_SCREEN_SCALE_FACTOR environment variable to 1.
Note: Auto-scaling in some multi-screen setups causes the interface to scale incorrectly when moving from lower resolution screens to higher resolution screens. This is possibly a symptom of the way Qt calculates screen scale.To avoid this issue, we recommend always placing your physical screens with the highest resolution on the far left-hand side of the setup.
Alternatively, you can set the screen scaling factor manually using the QT_SCALE_FACTOR environment variable to force scaling to 1, 1.5, or 2. The recommended scaling factor is 1.5.
In multi-monitor setups, you can manually scale the interface independently by screen using the QT_SCREEN_SCALE_FACTORS variable. Scaling uses the same recommended factors, separated by ; (semicolon). For example, QT_SCREEN_SCALE_FACTORS=»1.5;1″ where the first monitor is higher resolution than the second.
See Environment Variables for more information about setting environment variables.
Music MP3 Downloader 5.2.9.2 [2011, Менеджер закачек]
Год выпуска: 2011Жанр: Менеджер закачекРазработчик: CopyrightСайт разработчика: http://www.music-mp3-downloader.comЯзык интерфейса: АнглийскийПлатформа: Windows 2000, XP, Vista, 7Системные требования: Интернет соединениеОписание: Music MP3 Downloader — отличная программа, которая позволит вам элементарно просто загружать бесплатно более 100 миллионов MP3 из крупнейших сетевых серверов. Утилита обеспечивает прямой доступ к бесплатной музыке. Этот mp3 загрузчик надолго обеспечит Вас музыкальными композициями. В мире существуют тысячи групп и исполнителей, предлагающих свое творчество бесп …
Программы / Интернет и сети / Браузеры, Менеджеры загрузки
Подробнее
Version Linking
Version Linking allows linking and unlinking of source clip versions between project bin clips and shots in a sequence that reference a clip. You can define if a shot is linked to its source clip or not, and we’ve introduced three new states to bin clips: Linked, Unlinked and Mixed. Two new states govern shots: Linked or Unlinked.
These states are indicated by an icon on the clips that have been unlinked and there is a new column in the Project bin and spreadsheet view for Version and Link Status. Bin clips can be set as Linked or Unlinked on import using the Preferences > Project Defaults > General > Link bin and track item version.
See Version Linking for more information.
Создаём проект со скриптом сборки
Для этого необходимо выполнить команду:
Это запустит консольный конфигуратор проекта сборки. Привожу анимацию его работы из документации Nuke.
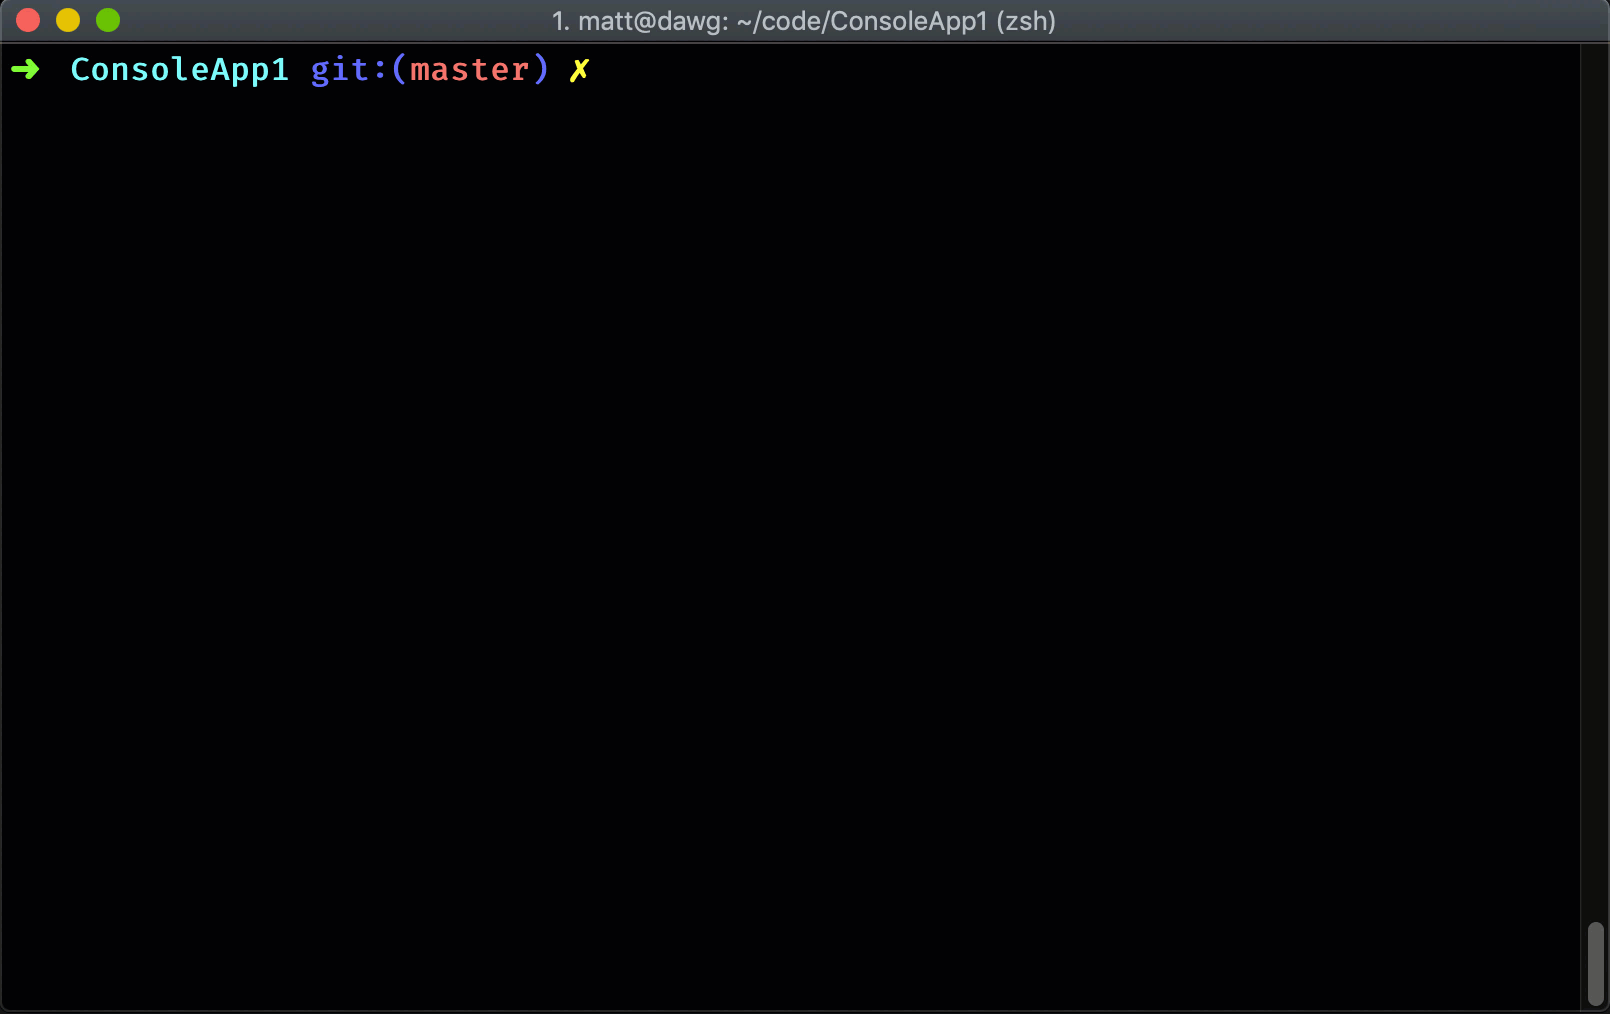
Давайте посмотрим, что изменилось в репозитории:
Если не трогать настройки по умолчанию, то скрипт установки nuke создаст проект сборки в отдельной папке репозитория. Таким образом, скрипты сборки лежат в , а исходники в . Те же настройки по умолчанию предполагают использование папки в корне репозитория в качестве выходной директории для сборки.
Разберём изменения по отдельности:
-
.nuke — файл-маркер, по которому nuke определяет корневую папку
-
build.* — бутстрапперы для запуска сборки. При необходимости могут и .net установить, если его нет на машине, на которой происходит сборка
-
_build.csproj — файл проекта сборки. Имеет такое странное название для того, чтобы всегда быть первым в списке проектов в Solution Explorer
-
.editorconfig и _build.csproj.DotSettings — просто настройки стиля
А теперь — самое интересное:
3.1. Изменения в sln

Проект _build был добавлен в решение. Но был добавлен очень хитрым способом. Он отображается в IDE, его можно собрать, но если выполнить сборку всего решения, то мы увидим следующий вывод:
То есть при пересборке решения проект _build не собирается. Действительно, если бы скрипт сборки при работе вызывал ещё и пересборку самого себя, это могло бы привести к проблемам.
3.2. Build.cs
Приведу полный код сгенерированного файла и объясню основные моменты.
Данный класс является точкой входа в приложения. В методе запускается сборка и выбирается цель сборки по умолчанию.
Цели сборки представлены свойствами типа . Синтаксис с кучей стрелочек сначала пугает, но потом привыкаешь. Для целей сборки можно задавать зависимости (), явный порядок выполнения (, ), условия выполнения (как статические, так и динамические), а главное — указывать с помощью , что вообще делает этот .
Следующая важная вещь для начинающего пользователя Nuke — параметры сборки. Достаточно просто пометить поле атрибутом , и можно передавать значение этого поля через командную строку. В данном случае — конфигурацию сборки Debug или Release. Механизм очень гибок — можно сделать параметр необходимым, и без него сборка не запустится. Также параметр можно делать необходимым только для конкретного .
Nuke предоставляет необходимые абстракции над решениями и проектами. Несколько решений в проекте? Нет проблем. Добавьте новое свойство типа Solution и пометьте его атрибутом — Nuke найдёт решение, распарсит его и предоставит доступ его содержимому.
Также в этом файле можно заметить пример расширения Nuke — модуль для работы с git установлен отдельным пакетом. С помощью полей и можно легко оперировать состоянием репозитория. Например, ориентируясь на имя ветки (master/не master), выбрать — ставить или нет preview метку при сборке nuget пакета.
Adding Tabs
When you can’t fit more elements into your display, you can use tabs to save space. You can also use tabs to move the Toolbar into a new location.
You can add a tab by clicking on the content menu button in the top-left corner of the pane, and then selecting the type of tab you want to add. For example, you can add Node Toolbar, Node Graph, New Viewer, or Script Editor. The new tab is added on top of the existing tabs.
To move tabs, click on the name of the tab and drag it to a new position inside the same pane or in another pane.
You can close tabs again by clicking the X in the top-right corner of the tab you want to close.
Note: Closing a linked tab closes all associated tabs. If you hold Alt while closing a linked tab, it only closes that tab.
