Ищем ошибки в monodevelop
Содержание:
- Windows
- Features
- macOS
- Source Code Editing
- Troubleshooting
- Implementing the Command
- General Questions
- Ссылки [ править ]
- Building and Running the Application
- Introduction
- Project Management
- Step 3: Using the new library
- MonoD
- Как загрузить и установить?
- История [ править ]
- Visual Design
- Writing Add-ins
- Core GUI Services
- Threading model
Windows
Установка под Windows гораздо проще, однако, некоторые шаги (особенно при отсутствии .NET Framework на компьютере) могут повергнуть в шок даже опытных пользователей:
- Заходим на сайт monodevelop.com и нажимаем кнопку Download.
- После этого, произойдет переход в один из подразделов сайта (сайт на английском, предупреждаю сразу), который обычно соответствует текущей платформе компьютера (отображает соответствующую для текущей операционной системы пакет под загрузку).
Нас интересует тот подраздел, который помечен логотипом Windows.
- После этого жмем кнопку Download Xamarin Studio и (если, вам также повезет) заполняем анкету, вводя свои «личные» данные (не волнуйтесь, это никак не отразится на вашем счете, если вы, конечно, не захотите сами стать их клиентом…).
- Устанавливаем Xamarin Studio, запустив выкачанный установщик.
Features
- D Project management
- Managing files & resources
- Managing inter-project dependencies in a solution
- Build projects and prepare them for being deployed
- Ad hoc DUB support. Despite the package.json/dub.json file not being a native format that is supported by the Mono/.Net facilities, there’s still a bunch of things wrapped for being used within MD.
- Open DUB package.json/dub.json files as projects
- Resolving package dependencies and subpackages and opening all of them as projects, too
- Build support
- …
- Basic Visual-D project format support
- dmd, gdc, ldc2, rdmd, dub, make toolchain support
-
Rich editing & refactoring facilities:
- Halfway decent auto code completion including pre-compile time
- template deduction & evaluation,
- mixins & mixin expression,
- expression value as well as
- compiler traits,
- op overload evaluation & deduction that is used to provide extremely more accurate information about which symbols could be accessed or typed in a particular code context
- Obligatory things like definition lookup,
- Code symbol reference highlighting,
- Semantic type identifer highlighting,
- Optional diff-based syntax highlighting (Can be toggled via pressing Ctrl+Alt+K or in the global D options),
- Diet template file highlighting.
- Mixin expression pre-compilation to see what a mixin will look like when being compiled
- Automatically generating method stubs for overridable methods
- Code declaration foldings
- User-generated foldings via
- Halfway decent auto code completion including pre-compile time
//region My Region
int myCodes;
//endregion
-
- Obligatory AST outlining for easy access of stuff declared in a D source file
- Intelligent code indentation
- Basic code formatting support which reorganizes all kinds of code elements, not only line beginnings
- Invoking a project’s unit tests via pressing Ctrl+T
- …
macOS
Building MonoDevelop from source on the Mac is straightforward when the latest Mono SDK package is installed. In general, the instructions in Development:Getting Started can be applied directly to building MD on macOS. However, there are a few caveats, so this page explains the Mac build process in more detail.
Building using Makefiles
Building
First you will need Xcode installed. If you have Xcode 4.3 or later, you will need to then install the Xcode Commandline tool from Xcode preferences, and install and from brew.
NOTE: Please ensure that you have the very latest Mono MDK.
Check out MD, configure using the Mac profile:
NOTE: DO NOT use configure –select on Mac — the Mac profile passes adds required arguments to the configuration of main. Instead edit profiles/mac manually to add any additional modules.
IMPORTANT: Do not install MonoDevelop into the install prefix. MonoDevelop will pick up libraries from the prefix automatically. If you configured with a non-default prefix, then when you build an app bundle, the entire prefix will be merged into the app bundle.
Things you might have to do before running the script
-
Tell aclocal where to find the pkgconfig M4 macro (pkg.m4), e.g.
Comment: this did not appear necessary
-
Add the GTK+ libraries’ location to the Mac dynamic loader path:
Comment: this did not appear necessary
Building extras
To include additional addins from extras in the build, instead of using the Mac profile, use to select addins. This will write the default profile. Next, replace the line in profiles/default that begins with “main” with the one from profiles/mac, then run configure again using the default profile.
Building the App package
To build the app package, navigate to the macOS build directory:
From here, build the MonoDevelop.app using . You can then build the .dmg using the script. To include addins from extras, manually copy their build directories into the MonoDevelop.app directory, e.g.
Building using MonoDevelop
When building MonoDevelop using MonoDevelop, be sure to select the Mac configuration, as this will enable building only the addins that work on Mac.
Main
Building main is straightforward. Open , select the Mac configuration, and run the Build command. Note that running MonoDevelop from within MD will currently only work if you export as described above.
Extras
Loading the full MonoDevelop.mdw workspace and building the addin solutions from extras will only work if the Makefiles’ configure script has been run. Even then, not all of them will build correctly. Until this is resolved, use the makefiles to build extras.
To update, run the following commands in the directory:
Source Code Editing
Find / Replace
- Special search strategies: wildcards, regular expressions.
- Search flags: case sensitive, whole word.
- Search / Replace in files.
- Support for search results list pinning (allows keeping several search results lists at once).
Code Completion
- Code completion of namespaces, types and members.
- ‘as’ and ‘new’ completion.
- Method parameter Completion.
- C# compilation directives.
Code templates
- Bind keywords to code templates.
- Keywords can be expanded by pressing TAB in the text editor.
- Different sets of templates can be assigned to different file extensions.
Refactory Operations
- Rename class, field, method, property, event
- Implement interface (explicit or implicit)
- Implement overridable method, property, event
Source Code Navigation
- Go to base class
- Go to declaration of class or member
- Find references to class or member
- Find subclasses
- Quick search of file or type
- Quick navigation of build errors and search results using the Browse Next/Previous command.
Troubleshooting
MonoDevelop fails to start with the error message: Unix transport error
This is due to a bad interaction between Mono 1.1.13 and Boo.
To fix this problem, you have three options:
- Upgrade Boo to 0.7.5, or
- Uninstall the boo add-in, by running “mdtool gsetup”, or
- Upgrade Mono to 1.1.14 or upper
This is the stack trace:
Copy/Paste is not working in the GUI Designer
If you can’t copy/paste (and cut only deletes) any designer objects, then you might have the GNOME applet “glipper” running. You can check that using:
If that outputs something, then glipper is active and should be disabled.
Enabling the NUnit Add-in
The NUnit add-in requires mono 1.1.9+. This is do to some cross-appdomain bug fixes. Debian users currently also have another particular problem in that NUnit packages are separated from Mono, and do not include the proper pkg-config files.
Configure monodevelop with the following command.
Debian users only
Install the nunit and libnunit-cil packages (requires unstable at this moment). Due to the separate packaging of nunit, we need to make a symlink so that monodevelop knows where to find the pkg-config file.
Implementing the Command
The command is now registered, but it doesn’t do anything. For that, we need a command handler. The simplest way to use it is with a default handler, which is a class that implements MonoDevelop.Components.Commands.CommandHandler.
Add the following attribute to the Command element in the addin manifest:
So the Command element now looks like this:
The project already references the MonoDevelop.Ide addin. If you look at the project’s references, you will see references to MonoDevelop.Ide.dll and Mono.TextEditor.dll. The “assembly version” of these assemblies may be a little older than the actual addins — this is simply to enable newer MonoDevelop versions to load assemblies of addins that were built against older versions of MonoDevelop, if permitted by the addin manifest’s dependencies. When you add more functionality to your addin, you may need to reference additional libraries such as MonoDevelop.Core.dll and gtk-sharp.dll.
Add a new class to the project with the name we assigned as the command’s default handler. It doesn’t need to be public.
We also need to define the enum for the command ID.
Now build and run the addin, and you will see the new command in the edit menu.
The command still doesn’t do anything, as the command handler is a stub. First, we want to make sure that the command is only enabled when the active document is an editable text document.
Many important services can be accessed via the MonoDevelop.Ide.Gui.IdeApp static class. The workbench represents the IDE window, including the Documents, which may contain multiple views. We query the active document to see whether any of the views offer the TextEditor instance.
First, import the namespaces:
Then alter the command handler’s Update method. This method is queried whenever a command is shown in a menu or executed via keybindings. By changing the info object, you can disable the command or make it invisible, populate array commands, update the state of check or radio commands, and many other things. We are just going to disable it if we can’t find an Editor in the active document.
Now we can implement the command’s Run method, which, unsurprisingly, is called when the command is run.
This uses the Editor directly — we know it’s not null, since the Run method could not be called unless our Update method had enabled the command. It simply inserts the current date at the cursor position using one of the convenience methods of the text editor.
General Questions
What is MonoDevelop?
MonoDevelop is a free GNOME IDE primarily designed for C# and other .NET languages, although open to any kind of language. However, MonoDevelop hopes to be more than just an IDE: it intends to be an extensible platform upon which any kind of development tool can be built.
MonoDevelop was originally a port of the SharpDevelop IDE to Gtk#, but it has evolved a lot since the initial port.
There are numerous goals that MonoDevelop hopes to achieve. Some of these are:
- To create a best of breed development environment for Unix systems for Mono.
- Since it’s written in Gtk#, and we like Gtk# and we get good support from Gtk#, most likely it will add functionality to improve the Gtk# experience.
- We integrate the tools we have been building so far, so things like MonoDoc, NUnit-Gtk and the debugger target MonoDevelop.
Under which license is MonoDevelop available?
The MonoDevelop Core is licensed under the LGPLv2, though much of the code and add-ins are licensed under the MIT/X11 license. All the source code is available through the Github file repository. Read the Download page for directions on downloading the source.
Why another IDE for GNOME?
A unique platform like Mono deserves a unique IDE like MonoDevelop that can take full advantage of the framework capabilities. Features like code completion, integrated unit testing, class browser, etc. would be much more difficult to implement for example in a C based IDE.
The Mono platform also provides some features that are ideal for the development of an IDE. Thanks to Mono, MonoDevelop offers:
- a fully object oriented API
- a very powerful add-in engine (based on the reflection capabilities of the framework, and which takes advantage of the portability of .NET assemblies)
- easy support for multiple languages, both for user projects and for writing add-ins.
Moreover, Gtk# rocks.
Does MonoDevelop work on Windows?
Yes. MonoDevelop can be run on Windows, and can build, run and debug apps with either Mono or .NET. A Windows installer for MonoDevelop is available in the Download page.
Can I import my Visual Studio 2K5+ project into MonoDevelop?
MonoDevelop can open, manipulate and save MSBuild-based projects directly in most cases. In fact, since MonoDevelop 2.0 the default project format has been VS2008-style MSBuild projects, but VS2005 and VS2010 formats are also handled.
Because MonoDevelop does not look for assemblies in the GAC. On Mac and Linux, MonoDevelop uses pkg-config to locate installed packages and get the list of assemblies that each package provides. A package specifies this list of assemblies in a .pc file which has to be installed in the standard pkg-config directory.
If you are developing a library, MonoDevelop can automatically generate a .pc file for your project (in the project options dialog, select “Linux Deployment Settings”, and check the “Generate .pc file” option).
When targeting .NET on Windows, MonoDevelop uses the same AssemblyFolders mechanism that VS uses.
Is there a Visual Designer for ASP.NET?
For all practical purposes, no.
There was an experimental ASP.NET Visual Designer called AspNetEdit built in the Google Summer of Code 2005, and integrated into MonoDevelop in 2006. It is present in MonoDevelop SVN, and interested parties are welcome to build it and experiment with it, but it is completely unsupported.
Although AspNetEdit can be used for simple demonstrations, it never reached a releasable state where it could be used for real projects, mainly because of Mozilla Composer’s extremely poor handling of modern HTML. There were also many difficulties with embedding Mozilla/Gecko/Firefox, which made it very difficult to install the add-in successfully. As a result of this, a decision was made to . However, since completing this effort would be a massive undertaking, it has currently been put on hold in favour of features that will be more immediately useful to users.
Ссылки [ править ]
- . MonoDevelop . Охлох . Проверено 27 января 2014 .
- ^ . monodevelop.com . Проверено 28 января 2016 .
- . Monodevelop.com . Проверено 26 июня 2010 .
- . Tirania.org. 2009-05-05 . Проверено 26 июня 2010 .
- . Tirania.org. 2009-09-09 . Проверено 26 июня 2010 .
- ^ . Monodevelop.com . Проверено 26 июня 2010 .
- . MonoDevelop. 2008-02-05. Архивировано из на 2016-02-21 . Проверено 26 июня 2010 .
-
Embarcadero Technologies. . Embarcadero.com. Архивировано из 2010-06-28 . Проверено 26 июня 2010 .
-
. dlang.org . Проверено 25 августа 2014 .
- . Monodevelop.com . Проверено 15 октября 2010 .
- Чу, Филипп (2013-08-04). . Апресс. ISBN
- . Документация Unity . Unity Technologies . Проверено 9 июня 2014 .
- Lukosek, Грег (2016-03-31). . Packt Publishing Ltd. ISBN
- . Unity Technologies . 5 января 2018 . Проверено 29 декабря 2018 .
-
^ Эйвери, Джеймс (26.06.2007). . О’Рейли. ISBN 978-0596527549.
monodevelop.
- ^ Мамон, Марк (2008-11-08). . Апресс. ISBN
- Васильев, Сергей (30 декабря 2015 г.). . Средний .
- Cogswell, Джефф (4 июня 2009). . eWeek .
- Пол, Райан (31 марта 2009 г.). . Ars Technica .
- де Икаса, Мигель (22 февраля 2013 г.). . Xamarin . Проверено 1 октября, 2016 .
- Эллис, Дин (15 мая 2013 г.). . Гамасутра .
- Тафт, Дэррил К. (14 марта 2008 г.). . eWeek .
- Де Икаса, Мигель (22 февраля 2013 г.). . blog.xamarin.com . Проверено 27 января 2014 .
- . Go-mono.com. Архивировано из на 2010-06-23 . Проверено 15 октября 2010 .
- . Opensolaris.org. Архивировано из на 2011-06-05 . Проверено 26 июня 2010 .
- . Mono-project.com . Проверено 26 июня 2010 .
Building and Running the Application
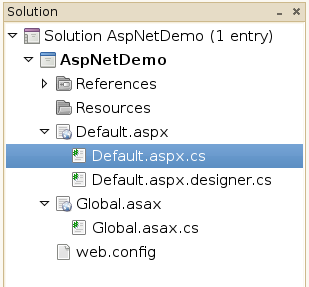
The new project contains a default set of files. There’s a page called Default.aspx, and grouped with it are its C# CodeBehind files Default.aspx.cs and Default.aspx.designer.cs. There’s a Global.asax file for global application code, with CodeBehind in Global.asax.cs, and there’s a Web.config file for application settings.
Edit the Default.aspx file, and between the form tags, add an ASP button and label:
Now run the application using the Run command in the toolbar or the Project menu, or by hitting F5. This compiles your application, runs it using Mono’s xsp web server, and after a short delay loads it up in your default web browser. You can click the button that says “Click Me”, and watch it post back to the server, but it doesn’t do anything yet. Note that there ‘s also a Stop command to end your applicatio’s execution, and commands to build individual projects or solutions without running them.
Introduction
The MonoDevelop addin architecture is designed to allow you to extend any part of MonoDevelop, for example supporting a new language or version control system, or custom source editing commands. This walkthrough will take you through the basics of writing addins, by describing the creating of a simple addin that adds a command to insert the current date into the source editor.
MonoDevelop is built around the concept of an extension tree. An addin is a set of extensions that plug into extension points defined in other addins, and can also define new extension points for other addins to extend. The whole of MonoDevelop is built this way, so there are many extension points available, and the core ones are described in the Extension Point Reference. MonoDevelop uses the Mono.Addins addin engine, so for advanced addin questions, refer to the Mono.Addins Reference Manual. You can also use Mono.Addins in your own applications.
Project Management
Building
- Support for 1.1, 2.0 and Moonlight Mono runtimes (Project/Options/General/Runtime Options).
- Support for multiple build configurations.
- Builds required project dependencies.
- Clean and Rebuild commands.
- Assembly signing.
- Command line tool for building: ‘mdtool build’.
Export
- Export a project to a different folder using a different file format:
- MonoDevelop native file format.
- Visual Studio 2005.
- Command line tool for exporting projects: ‘mdtool project-export’.
Custom commands
- Custom commands can be defined for projects and solutions
- Command hooks: after/before build, clean, execute
- Command replacement: build, clean, execute
- Custom commands: shown in the context menu of the solution pad.
Step 3: Using the new library
Setting the Startup Project
Now we have two projects in our solution: an executable and a library. A solution can have multiple executable projects. You can specify the startup project (i.e. the project which is built and run when using the “Run” command) by right clicking on the Solution icon in the Solution pad and choosing “Options”, then Common->Startup Properties. From there you can select single or multiple projects:
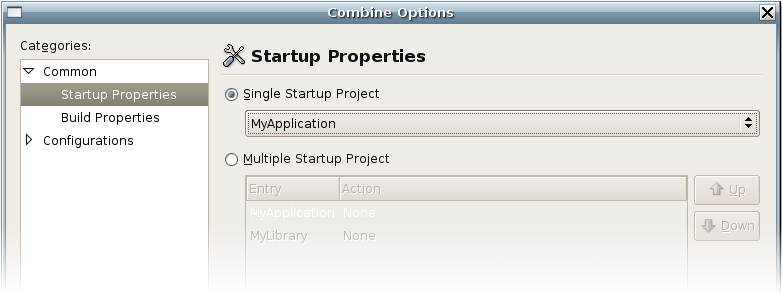
A solution with multiple projects will build and execute all of them in the order you specify. However, we want to set our startup application to “MyApplication” because this is the executable that we want to run.
Referencing our Library
If we are going to be able to use our new library, MonoDevelop needs to know this. We do this by adding a reference to it. From the Solution Pad, expand the node for our project “MyApplication”, this will reveal a References node among others. Right click this and select “Edit References”. This will bring up the References dialog. Select the “Project” tab. Our library should appear in the list, and we can check it as so:
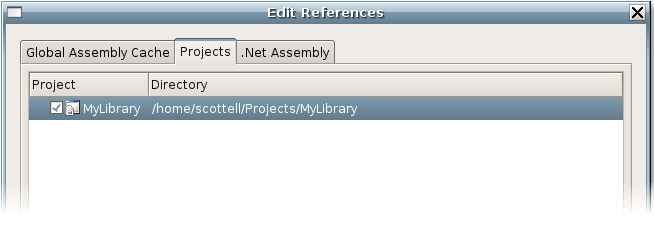
Click “Ok”. Now we have all the classes in our library “MyLibrary” available to our application (exactly one). Let’s test this by creating an instance of the class “MyClass”. Add the following to MyApplication->Main.cs:
MonoD
- После установки самой IDE, ставим дополнение MonoD (установка одинакова для всех платформ):
- Открываем Monodevelop и переходим в меню Утилиты (или в англоязычной версии Tools):

И выбираем пункт Менеджер дополнений (Addin Manager):

После чего переходим во вкладку Галерея (Gallery) и открываем выпадающий список, который озаглавлен как Репозиторий (Repository):

Нас интересует пункт списка Управление репозиториями… (Manage Repositories…), который мы и выбираем.
Открывается небольшое окно, в котором нужно будет нажать кнопку Добавить (Add):

И опять появляется окошко:

в котором мы выбираем переключатель с надписью Зарегистрировать глобальный репозиторий (Register global repository), а в текстовое поле ниже вводим вот этот адрес — http://mono-d.alexanderbothe.com/repo/ .
Жмем кнопку Ок, после чего автоматически произойдет обновление списков репозиториев.
Если, по какой-то причине, это не произошло, то в окне управления репозиториями нужно галочкой пометить указанный чуть выше адрес репозитория MonoD, после чего закрыв это окно, перейти во вкладку Галерея и нажать кнопку Обновить, находящуюся справа от списка репозиториев.
Далее нас интересует изображенное ниже окно и вкладка Установленные (Installed), в которой в разделе Языковые привязки (Language bindings) выбираем D Language bindings и нажимаем кнопку Установить (Install):

Вот и все, MonoD установлена и можно переходить к настройкам среды.
Как загрузить и установить?
Загружать MonoDevelop рекомендуется с официального сайта разработчика в разделе «Download», где пользователю доступны на выбор три платформы:
- Windows.
- Linux.
- MacOS.
Кликаем на нужную нам и следуем инструкции (раздел на английском языке!). Владельцам Linux доступны репозитории Mono для каждой версии операционной системы, которые позволяют установить пакет MonoDevelop. Для работы с macOS достаточно загрузить последнюю доступную Visual Studio.
Установка на Windows
Для работы MonoDevelop необходимо сначала подготовиться:

Теперь необходимо вручную собрать MonoDevelop из исходника. Для этого и понадобится как минимум Visual Studio 2017:
git clone https://github.com/mono/monodevelop —recursive -j8; открываем main/Main.sln; выбираем конфигурацию DebugWin32 и платформу AnyCPU (это важно!); получаем готовое ПО. Аналогичную операцию можно провести с помощью MSBuild
Для этого открываем командную строку в main и запускаем windbuild.bat
Аналогичную операцию можно провести с помощью MSBuild. Для этого открываем командную строку в main и запускаем windbuild.bat.
История [ править ]
В конце 2003 года группа разработчиков из сообщества Mono начала перенос SharpDevelop , успешной IDE .NET с открытым исходным кодом, с Windows Forms в Windows на инструментарий GNOME (Gtk #) в Linux. Форк также был нацелен на платформу Mono, а не на реализацию Microsoft .NET Framework . Будучи ранним форком SharpDevelop, MonoDevelop архитектурно отличается от последних выпусков SharpDevelop.
Со временем проект MonoDevelop был поглощен остальной частью проекта Mono и с 2016 года активно поддерживается Xamarin и сообществом Mono. Начиная с Mono 1.0 Beta 2, MonoDevelop связан с выпусками Mono.
Начиная с версии 4.x, Xamarin переименовал MonoDevelop в Xamarin Studio, но только для версии среды IDE для Windows. С 2016 года Xamarin Studio также работает на macOS.
Visual Design
Gtk# Designer
Integrated visual designer for building Gtk# interfaces.
- Allows targeting Gtk# 2.4, 2.6 and 2.8.
- Supports visual design of custom widgets.
- Support for reusable widget libraries. Custom widgets are shown in the toolbox.
- Dynamic reloading of custom widgets. After compiling a change in a custom widget, all design windows where the widget is being used will be automatically updated.
- Widget library reference tracking. When new widgets are added to a design surface, the required assembly references will be added to the project.
- Visual editing of stock icon factory.
- Glade project import.
Toolbox
- One single toolbox for all designers (Gtk#, ASP.NET, etc.)
- New items can be added by registering new assemblies.
- The toolbar is dynamically updated to show the items available for the active file and project.
- Two display modes: normal and compact (with no labels).
- Widget search
Writing Add-ins
Creating a Simple Add-in
This walkthrough will guide you through the process of creating a simple add-in, introducing the fundamentals of the add-in system and some of MonoDevelop’s core APIs.
Creating a Simple project template using Add-ins
This walkthrough will guide you through the process of creating a simple project template using add-ins (in Visual Studio for Mac).
Walk through: Extending the Project Pad
This tutorial explains how to implement an addin that extends the project pad. The idea for this extension is to be able to show the classes that are implemented in a file as child nodes of that file in the project pad.
How to extend the Project Model
This article explains how to extend the project model to support new types of projects or to add additional information to existing project types.
Syntax mode definition
This article explains how to create a syntax highlighting mode for a new file type.
Editor color scheme definition
This article explains how to create a syntax highlighting mode for a new file type.
Publishing an Add-in
This article explains how to publish an add-in to make it available to MonoDevelop users.
Introduction to Mono.Addins
This article explains the library basics and some examples. Mono.Addins is the add-in engine used by MonoDevelop.
Mono.Addins Reference Manual
An in-depth explanation of all Mono.Addins features. Mono.Addins is the add-in engine used by MonoDevelop.
Core GUI Services
Image and Stock Icon Management
The class provides several methods for managing images and stock icons:
| GetPixbuf (), GetColourBlock (), GetImage () | Get a Gdk.Pixbuf or Gtk.Image from an icon name and size |
| GetStockId (), GetStockIdFromResource () | Get an icon name for a file or resource containing an image |
Displaying Alerts and other Message Dialogs
The Message Service
The class provides methods for showing alert and other message dialogs.
Here are some of the most useful methods:
| ShowException () | Shows an error message with detailed information about an exception (this information is hidden by default, but it can be made visible by the user). |
| ShowError () | Shows an error message. |
| ShowWarning () | Shows a warning message. |
| Confirm () | Shows a confirmation message to the user. The message dialog will have two buttons: Cancel and an AlertButton provided by the caller. |
| AskQuestion () | Shows a message dialog asking a question to the user, and offers a set of AlertButtons the user can click on to answer. |
| GetTextResponse () | Presents a question and an entry to the user. |
Some of those methods take a as parameter. There are several pre-defined alert buttons, such as , , , etc (all defined as static members of ). You can also create your own AlertButton instances with custom icons and response codes.
The arguments for the and methods can also be provided using objects of type and respectively. Using those objects it is possible to specify the same arguments available in the other overloads, but they allow specifying additional options:
| AllowApplyToAll | When set, the message dialog will show a checkbox with the message “Apply to all”. If the user activates it, subsequent calls to Confirm or AskQuestion will automatically return the value selected when the option was activated. |
| AddOption () | Adds an additional option to the dialog, which is shown as a checkbox. |
| GetOptionValue () | Returns the value of an option. |
| SetOptionValue () | Sets the value of an option. |
Here is an example:
Additional Dialogs
There are also a couple of dialogs which can be used to display messages:
| MonoDevelop.Core.Gui.Dialogs ErrorDialog | A generic error dialog. |
| MonoDevelop.Core.Gui.Dialogs MultiMessageDialog | A dialog which allows displaying a set of messages (errors or warnings). It can be used for to show a list of errors and warnings reported through a progress monitor. |
| MonoDevelop.Components FileEntry | An entry with a button which allows selecting a file. |
| MonoDevelop.Components FolderEntry | An entry with a button which allows selecting a folder |
| MonoDevelop.Components ListView | A simple list view which shows an icon and a label for every item. |
| MonoDevelop.Components TooltipWindow | Abstract class which implements most of the functionality required for displaying custom tooltip windows. |
| MonoDevelop.Components DataGrid | A simple data grid (used for example to display database query results). |
| MonoDevelop.Components.Chart BasicChart | A simple chart. |
| MonoDevelop.Components.PropertyGrid PropertyGrid | A property grid which can automatically show and allows editing the properties of an object (based on System.ComponentModel). |
| MonoDevelop.Ide.Gui.Components ExtensibleTreeView | A tree view whose behavior can be customized and extended by add-ins. |
Threading model
The general rule is that the project model is thread safe for reading but not for writing. Methods that modify the model must be called in the UI thread, other methods can be called by background threads (unless otherwise specified).
Any subclass can be in two states: Shared and Not Shared. Objects in Shared state can only be modified in the UI thread. This is ensured by calls to in methods that modify the object, which will throw an exception if the method is not called from the UI thread.
Objects in Not Shared state are still not thread safe for modifications, but thread access is not checked, so it is up to the object creater to decide how to ensure that only one single thread is modifying the object at a given time.
By default (when instantiated), objects are in Not Shared state. The state can be switched to Shared by calling on the object. There is no way to transition back. When an object switches to Shared, the virtual method is called, both in the object and all its extensions.
Project and solution loading is done in a background thread, so they are in Not Shared state during all loading process. Once they are fully loaded, they are switched to Shared state.
Async methods
Methods that may take long time to execute are exposed as async methods. Continuations of async methods will be executed in the calling context.