Iperf — the ultimate speed test tool for tcp, udp and sctptest the limits of your network + internet neutrality test
Содержание:
- Виды и версии Iperf
- Known Issues
- IPERF Comparison with JPerf
- Bug Reports
- Script pour héberger un serveur iPerf3 avec Linux (Ubuntu / Debian)
- Параметры конфигурации только для клиентов
- Tuning a TCP connection
- iperf3 Omit Flag
- Code Authors
- Как пользоваться iperf
- iPerf C++ source :
- Как установить Iperf в CentOS 7
- Свой публичный сервер
- Installation
- Описание всех параметров
- Script to host a iPerf3 server with Linux (Ubuntu / Debian)
- Установка iperf на CentOS 8
- Bug Reports
Виды и версии Iperf
Сама утилита работает по умолчанию в режиме командной строки, но у нее так же есть надстройка на Java, для графического интерфейса. Так же есть две независимых ветки у данного инструмента по тестированию сети. Первая ветка, это Iperf2, вторая Iperf3.
Какова история iperf3 и в чем разница между iperf2 и iperf3?
iperf2 был заброшен в конце 2000-х годов на версии 2.0.5, несмотря на некоторые известные ошибки и проблемы. Потратив некоторое время на решение проблем с iperf2, ESnet к 2010 году решила, что нужен новый, более простой инструмент, и приступила к разработке iperf3. Цель состояла в том, чтобы сделать инструмент как можно более простым, чтобы другие могли внести свой вклад в код. По этой причине было решено сделать инструмент однопоточным и не беспокоиться о обратной совместимости с iperf2.Многие запросы функций для iperf3 поступили из проекта perfSONAR ( http://www.perfsonar.net).
Затем в 2014 году Боб (Роберт) МакМахон из компании Broadcom возобновил разработку iperf2. Он исправил многие проблемы с iperf2 и добавил ряд новых функций, похожих на iperf3. iperf2.0.8, выпущенный в 2015 году, сделал iperf2 полезным инструментом. Текущее развитие iperf2 сосредоточено на использовании UDP для тестирования задержки, а также на широкой поддержке платформ.
На момент написания статьи (2019), iperf2 и iperf3 активно (хотя и независимо) разрабатываются. Я рекомендуем ознакомиться с обоими инструментами и использовать те функции, которые лучше всего соответствуют вашим потребностям.
Known Issues
-
UDP performance: Some problems have been noticed with iperf3 on the
ESnet 100G testbed at high UDP rates (above 10Gbps). The symptom is
that on any particular run of iperf3 the receiver reports a loss rate
of about 20%, regardless of the -b option used on the client side.
This problem appears not to be iperf3-specific, and may be due to the
placement of the iperf3 process on a CPU and its relation to the
inbound NIC. In some cases this problem can be mitigated by an
appropriate use of the CPU affinity (-A) option. (Issue #55) -
The -Z flag sometimes causes the iperf3 client to hang on OSX.
(Issue #129) -
When specifying the TCP buffer size using the “-w” flag on Linux, Linux
doubles the value you pass in. (You can see this using iperf3’s debug flag).
But then the CWND does not actually ramp up to the doubled value, but only
to about 75% of the doubled value. This appears to be by design. -
On some platforms, it might be necessary to invoke “ldconfig”
manually after doing a “make install” before the iperf3 executable can
find its shared library. (Issue #153)
IPERF Comparison with JPerf
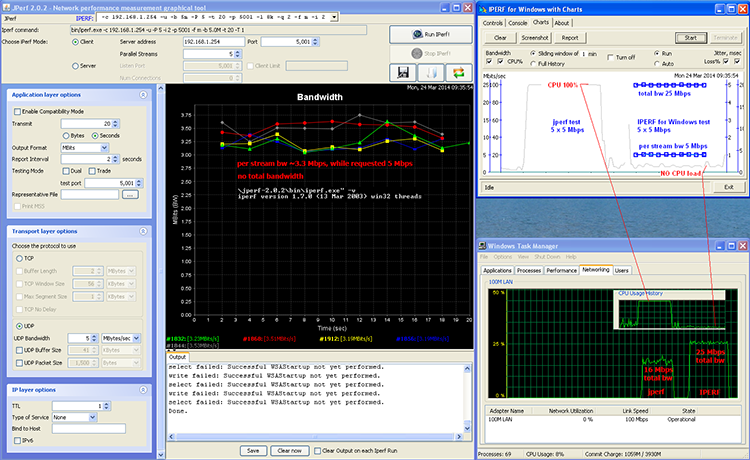
Fresh JPerf 2.0.2 installation from Google Code was used for comparison with IPERF for Windows. There is a confusion right from the beginning: don’t think you use iPerf 2.0.2! That’s JPerf 2.0.2, which in turn uses iPerf 1.7.0 from year 2003 — please go to /bin folder and check yourself, or click the screenshot below.
Let’s configure moderate traffic: 5 UDP streams of 5 Mbps each, to my default gateway — DSL router, where it will be dropped. Apparently each stream runs only ~3.3 Mbps not 5 Mbps as requested! Run Windows Task Manager as an independent arbiter — it shows total bandwidth of 16 Mbps, not requested 25 Mbps. It shows the problem as well: CPU load goes 100%! Obviously JPerf consumes all CPU cycles so can’t run requested 25 Mbps of traffic — what about 1G?
Let’s run IPERF for Windows with the same 5 UDP streams of 5 Mbps each. IPERF Charts displays per stream traffic of exactly 5 Mbps, with total traffic 25 Mbps, as requested. Task Manager confirms the same 25 Mbps of total traffic. Also Task Manager and IPERF show, that CPU load is negligible during IPERF test. It gives enough room to run much heavier bandwidth tests. All that was achieved by recent win32 update of original linux iPerf 2.0.5 code and compilation in Visual Studio 2013.
There is no QoS on Windows in JPerf (iPerf 1.7.0 — ‘Type of Service’), because Microsoft QoS code is different from linux code.
Comparative results are summarised below and on this screenshot, click it to enlarge:
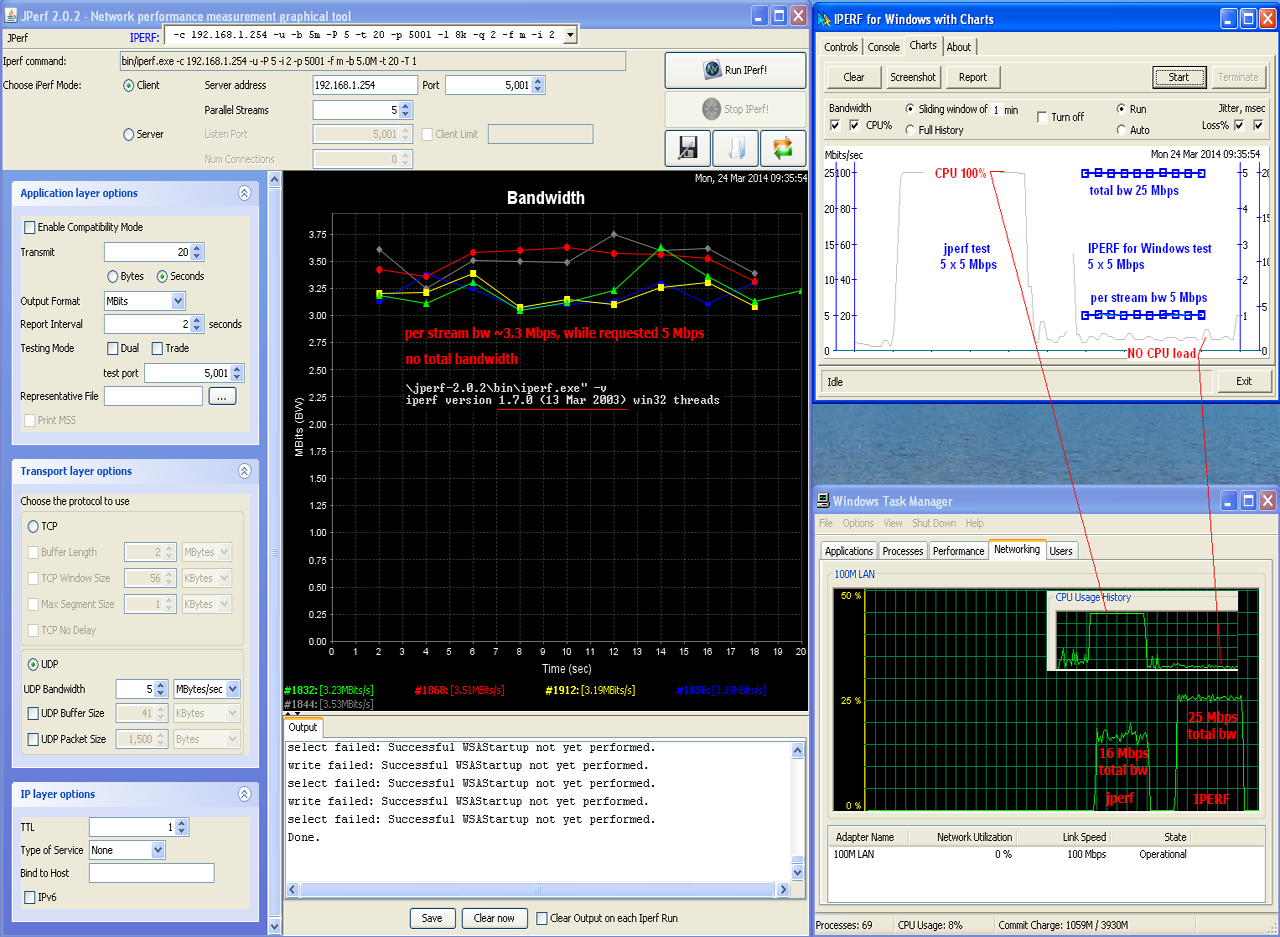
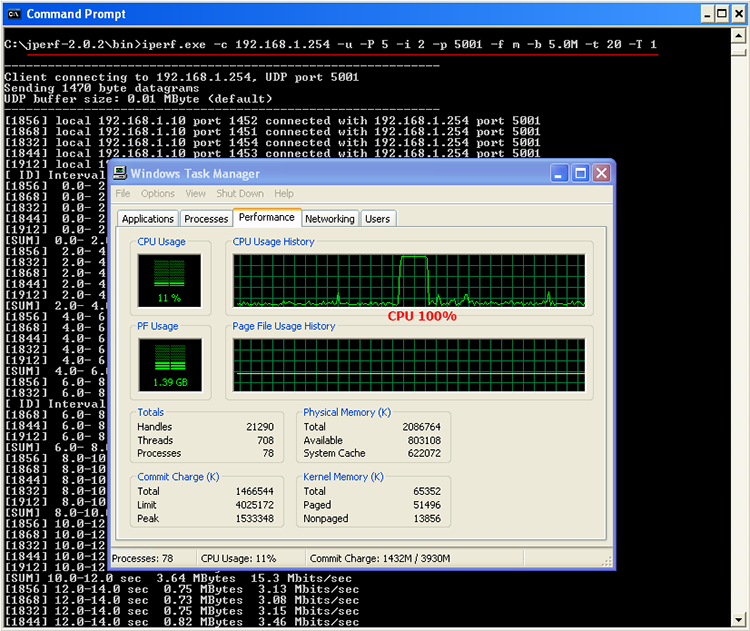
Apparently, high CPU load is produced not by JPerf code itself, but by iPerf 1.7.0. Try to run it without UI in command line with the same parameters — still CPU 100%:
Conclusion:
— JPerf 2.0.2 is unusable in default package, because of high CPU usage by outdated iPerf 1.7.0 from year 2003
— JPerf does not show CPU usage on the same chart like IPERF for Windows does, which is vital for modern high-bandwidth tests
— JPerf User Interface can be used if iperf.exe is replaced with newer binary, for example command-line version of IPERF for Windows (it works!)
— JPerf ‘Type of Service’ doesn’t work the way how QoS shoud work in Windows — DSCP set in IPERF for Windows
— JPerf User Interface has less controls compare to IPERF for Windows, and doesn’t have TestHistory drop-down list — which is very handy feature
— JPerf Chart doesn’t display total but only per stream values
It can not move charts left and right with a mouse
can not stretch/compress vertical axes with a mouse
does not have Full Time History mode in addition to Sliding Time Window
can not turn On/Off individual charts and axis
can not provide screenshots or HTML reports
Bug Reports
Before submitting a bug report, please make sure you’re running the
latest version of the code, and confirm that your issue has not
already been fixed. Then submit to the iperf3 issue tracker on
GitHub:
In your issue submission, please indicate the version of iperf3 and
what platform you’re trying to run on (provide the platform
information even if you’re not using a supported platform, we
might be able to help anyway). Exact command-line arguments will
help us recreate your problem. If you’re getting error messages,
please include them verbatim if possible, but remember to sanitize any
sensitive information.
Script pour héberger un serveur iPerf3 avec Linux (Ubuntu / Debian)
Краткое содержание
iPerf3 ne permet pas de multiples clients sur un serveur => il est nécessaire de lancer plusieurs processus iperf pour ne pas avoir le message iperf3: error – the server is busy running a test. try again laterScript bash restart_iperf.sh pour démarrer 10 serveurs iPerf3 (du port TCP 5200 au port TCP 5209) :
Lignes à ajouter au fichier /etc/rc.local avant exit 0, pour lancer iPerf3 automatiquement, lorsque vous démarrez le serveur.
le trafic UDP est bloqué avec iptables (IPv4) et ip6tables (IPv6) pour prévenir les attaques DDOS :
Lignes à ajouter à la crontab, pour redémarrer iPerf3 toutes les heures (Utilisez crontab -e pour modifier le crontab).
Le redémarrage régulier est nécessaire, car le processus peut se bloquer ou crasher.
Параметры конфигурации только для клиентов
Следующие аргументы могут быть введены после выполнения самой программы, а именно: «iperf3 -arguments» и порядок ввода аргументов не имеет значения. Эти аргументы можно использовать только в клиенте iperf3.
- -c IP_address: запустить iperf в режиме клиента для подключения к серверу, мы должны сразу определить IP-адрес.
- –Sctp — использовать этот протокол SCTP вместо TCP (по умолчанию).
- -u: использовать протокол UDP вместо TCP (по умолчанию).
- -b пропускная способность: позволяет определить пропускную способность в N бит / сек, по умолчанию она составляет 1 МБ / с для UDP и не ограничена для TCP. Если мы используем аргумент -P для отправки нескольких потоков данных, эта полоса пропускания применяется к каждому из них.
- -t время: в секундах для передачи информации на максимальной скорости. По умолчанию это 10 секунд, но мы можем поставить то, что хотим.
- -n число: количество данных для передачи, вместо времени (-t) мы используем данные.
- -k пакетов: количество пакетов для передачи вместо использования времени (-t) или данных (-n).
- -l (L в нижнем регистре): длина чтения или записи буфера.
- -P число: количество одновременных потоков данных, рекомендуется ставить 5 и выше, чтобы выжать сеть по максимуму.
- -R: трафик iperf обычно идет от клиента к серверу, если мы укажем этот аргумент, трафик будет идти от сервера к клиенту.
- -w размер: указать размер окна TCP
- -M mss: позволяет настроить TCP MSS
- -N: настраивает опцию TCP без задержки.
- -4: мы используем сети IPv4.
- -6: мы используем сети IPv6.
- -S: тип услуги для исходящих пакетов.
- -L label: позволяет настроить метку потока для сетей IPv6.
- -Z: использует метод нулевого копирования, значительно снижает загрузку ЦП программой.
- -O секунд: пропустить первые X секунд теста, чтобы избежать проблем с медленным запуском TCP и предоставить нам измерение без всплеска в начале.
- -T заголовок: позволяет помещать заголовок перед каждой строкой
- -C алгоритм: позволяет настроить алгоритм перегрузки, только в Linux с iperf 3.0 и во FreeBSD с iperf 3.1
Ниже вы можете увидеть несколько примеров.
Мы можем запустить клиент iperf3 с очень интересными аргументами:
- -c 192.168.1.10: работает в режиме клиента с указанным IP.
- -P 50: мы отправляем всего 50 TCP-соединений
- -p 5000: мы используем порт 5000, по умолчанию 5201
- -fg: показываем скорость в Гбит / с
- -t 5: запускаем тест на 5 секунд.
Как вы видели, эта программа iperf3 очень проста, поскольку позволяет запускать iperf с графическим пользовательским интерфейсом без необходимости вводить сложные команды и аргументы.
Tuning a TCP connection
bandwidth delay product
Note that many OSes and hosts have upper limits on the TCP window size.
These may be as low as 64 KB, or as high as several MB. iPerf tries to detect when these occur and give a warning that the actual and requested window sizes are
not equal (as below, though that is due to rounding in IRIX).
For more information on TCP window sizes, see the LaFibre.info.
Here is an example session, between node1 in Illinois and node2 in North Carolina. These are connected via the vBNS backbone and a 45 Mbit/sec DS3 link.
Notice we improve bandwidth performance by a factor of 3 using proper TCP window sizes.
Use the adaptive window sizes feature on platforms which allow setting window sizes in the granularity of bytes.
iperf3 Omit Flag
The “omit” flag (-O) allows a specified number of seconds to be removed from a test result. This was created to remove the ‘slow start’ portion of a TCP test, and focus on the steady state period that occurs. For example, a normal TCP based iperf3 test looks like the following:
$ iperf3 -c hostnameSENDER STARTConnecting to host REMOTE, port 5207 local LOCAL port 44605 connected to REMOTE port 5207 Interval Transfer Bandwidth Retr Cwnd 0.00-1.00 sec 6.28 MBytes 52.6 Mbits/sec 0 1.32 MBytes 1.00-2.00 sec 456 MBytes 3826 Mbits/sec 0 72.1 MBytes 2.00-3.00 sec 1.12 GBytes 9658 Mbits/sec 0 72.1 MBytes 3.00-4.00 sec 1.12 GBytes 9658 Mbits/sec 0 72.1 MBytes 4.00-5.00 sec 1.12 GBytes 9657 Mbits/sec 0 72.1 MBytes 5.00-6.00 sec 1.12 GBytes 9658 Mbits/sec 0 72.1 MBytes 6.00-7.00 sec 1.12 GBytes 9655 Mbits/sec 0 72.1 MBytes 7.00-8.00 sec 1.12 GBytes 9659 Mbits/sec 0 72.1 MBytes 8.00-9.00 sec 1.12 GBytes 9658 Mbits/sec 0 72.1 MBytes 9.00-10.00 sec 1.12 GBytes 9657 Mbits/sec 0 72.1 MBytes - - - - - - - - - - - - - - - - - - - - - - - - - Interval Transfer Bandwidth Retr 0.00-10.00 sec 9.45 GBytes 8114 Mbits/sec 0 sender 0.00-10.00 sec 9.43 GBytes 8103 Mbits/sec receiveriperf Done.SENDER END
The average will be reported as 8.1 Gbps, even though the majority of the time was spent at 9.6 Gbps. Using the Omit flag, we see the following happen in the data, and final reported average:
$ iperf3 -O 3 -c hostname SENDER STARTConnecting to host REMOTE, port 5208 local LOCAL port 37535 connected to REMOTE port 5208 Interval Transfer Bandwidth Retr Cwnd 0.00-1.00 sec 4.96 MBytes 41.6 Mbits/sec 0 987 KBytes (omitted) 1.00-2.00 sec 332 MBytes 2786 Mbits/sec 0 65.4 MBytes (omitted) 2.00-3.00 sec 1.12 GBytes 9636 Mbits/sec 0 72.1 MBytes (omitted) 0.00-1.00 sec 1.12 GBytes 9657 Mbits/sec 0 72.1 MBytes 1.00-2.00 sec 1.12 GBytes 9657 Mbits/sec 0 72.1 MBytes 2.00-3.00 sec 1.12 GBytes 9657 Mbits/sec 0 72.1 MBytes 3.00-4.00 sec 1.12 GBytes 9657 Mbits/sec 0 72.1 MBytes 4.00-5.00 sec 1.12 GBytes 9657 Mbits/sec 0 72.1 MBytes 5.00-6.00 sec 1.12 GBytes 9657 Mbits/sec 0 72.1 MBytes 6.00-7.00 sec 1.13 GBytes 9666 Mbits/sec 0 72.1 MBytes 7.00-8.00 sec 1.12 GBytes 9658 Mbits/sec 0 72.1 MBytes 8.00-9.00 sec 1.12 GBytes 9657 Mbits/sec 0 72.1 MBytes 9.00-10.00 sec 1.12 GBytes 9660 Mbits/sec 0 72.1 MBytes - - - - - - - - - - - - - - - - - - - - - - - - - Interval Transfer Bandwidth Retr 0.00-10.00 sec 11.2 GBytes 9659 Mbits/sec 0 sender 0.00-10.00 sec 11.3 GBytes 9719 Mbits/sec receiveriperf Done.SENDER END
Code Authors
The main authors of iPerf3 are (in alphabetical order): Jon Dugan, Seth Elliott, Bruce A. Mah, Jeff Poskanzer, Kaustubh Prabhu.
Additional code contributions have come from (also in alphabetical order): Mark Ashley, Aaron Brown, Aeneas Jaißle, Susant Sahani, Bruce Simpson, Brian Tierney.
iPerf3 contains some original code from iPerf2. The authors of iPerf2 are (in alphabetical order):
Jon Dugan, John Estabrook, Jim Ferbuson, Andrew Gallatin, Mark Gates, Kevin Gibbs,
Stephen Hemminger, Nathan Jones, Feng Qin, Gerrit Renker, Ajay Tirumala, Alex Warshavsky.
Acknowledgements for iPerf1: Thanks to Mark Gates (NLANR), Alex Warshavsky (NLANR) and Justin Pietsch (University of Washington)
who were responsible for the 1.1.x releases of Iperf.
For iPerf 1.7, we would like to thank Bill Cerveny (Internet2), Micheal Lambert (PSC), Dale Finkelson (UNL)
and Matthew Zekauskas (Internet2) for help in getting access to IPv6 networks / machines.
Special thanks to Matthew Zekauskas (Internet2) for helping out in the FreeBSD implementation.
Also, thanks to Kraemer Oliver (Sony) for providing an independent implementation of IPv6
version of Iperf, which provided a useful comparison for testing our features.
Thanks to ESnet for re-rolling iperf from the ground up. iPerf3 is a killer piece of software.
Thanks to
for hosting iPerf.fr.
Как пользоваться iperf
Для примеров я буду использовать сервер с адресом 192.168.0.101. Адрес клиента не имеет значения. Сначала необходимо запустить серверную часть программы. Для этого выполните:

Вы можете сразу указать в каких единицах измерения хотите видеть результаты. Для этого используется опция -f. Доступны такие варианты:
- k – килобиты;
- m – мегабиты;
- g – гигабиты;
- K – килобайты;
- M – мегабайты;
- G – гигабайты;
- T – терабайты.
Аналогично для сервера можно задать порт с помощью опции -p. По умолчанию он работает на порту 5201:
В любом случае, если на сервере установлен брандмауэр, то вам надо разрешить в нём подключение к порту 5201 или тому, который вы выбрали. Например, для ufw команда будет выглядеть так:
sudo ufw allow 5201
sudo firewall-cmd –permanent –add-port=5201/tcp sudo firewall-cmd –permanent –add-port=5201/udp sudo firewall-cmd –reload
И если вы хотите запустить программу в фоновом режиме, можете использовать опцию -D и перенаправить вывод в лог файл:
iperf3 -s -D –logfile /var/log/ipref.log
Убедится, что сервер запущен можно с помощью команды ss:
ss -tulpn | grep 5201

Обратите внимание на IP адрес, на котором слушает сервер, звездочка означает IPv4 соединения, а – IPv6. Поэтому, возможно вам придется вручную указать откуда надо ждать подключений:
iperf3 -s -4 -D –logfile /var/log/ipref.log
iperf3 -s -4 -D –logfile /var/log/ipref.log
Теперь к серверу можно подключаться. Для этого используйте опцию -c. Если вы меняли порт сервера, то здесь его надо указать с помощью опции -p:
iperf3 -c 192.168.0.101 -f K

В данном примере тест выполняется 10 секунд. Чтобы понять какая сейчас у вас пропускная способность сети следует смотреть на колонку Bitrate
Обращайте внимание на строки под чертой, они отображают среднее значение. В данном примере было передано 113 мебабайт со скоростью 11534 килобайт в секунду. По умолчанию утилита выводит промежуточный результат каждую секунду, вы можете изменить это поведение с помощью опции -i
Например, 5 секунд:
По умолчанию утилита выводит промежуточный результат каждую секунду, вы можете изменить это поведение с помощью опции -i. Например, 5 секунд:
iperf3 -c 192.168.0.101 -f M -i 5

А общую продолжительность теста можно задать с помощью опции -t. Например, 30 секунд:
iperf3 -c 192.168.0.101 -f M -i 5 -t 30
По умолчанию клиент отправляет данные серверу. Вы можете использовать опцию -R, чтобы сервер отправлял данные клиенту:
iperf3 -c 192.168.0.101 -f K -R

Если вы хотите видеть вывод сервера на клиенте, достаточно использовать опцию –get-server-output:
iperf3 -c 192.168.0.101 -f K –get-server-output
С помощью опции -P можно указать количество параллельных потоков тестирования, например, два:
iperf3 -c 192.168.0.101 -f K -P 2
Чтобы использовать UDP пакеты вместо TCP используйте опцию -u:
iperf3 -c 192.168.0.101 -f K -u

Если вы хотите узнать скорость работы вашего сетевого провайдера и у вас нет сервера в сети, можете использовать один из публичных iperf серверов. Полный список таких серверов можно найти здесь. Например:
iperf3 -c iperf.volia.net

iPerf C++ source :
iPerf3 version nuMiBers use (roughly) a Semantic Versioning scheme,
in which version nuMiBers consist of three parts: MAJOR.MINOR.PATCH
The developers increment the:
- MAJOR version when making incompatible API changes.
- MINOR version when adding functionality in a backwards-compatible manner.
- PATCH version when making backwards-compatible bug fixes.
| Iperf version | Date | Size |
|---|---|---|
| iPerf 3.1.4 | under development | |
| iPerf 3.1.3 | 8 jun 2016 | 537 KiB |
| iPerf 3.1.2 | 1 fev 2016 | 532 KiB |
| iPerf 3.1.1 | 19 nov 2015 | 530 KiB |
| iPerf 3.1 | 16 oct 2015 | 530 KiB |
| iPerf 3.0.12 | 8 jun 2016 | 423 KiB |
| iPerf 3.0.11 | 9 jan 2015 | 416 KiB |
| iPerf 3.0.10 | 16 dec 2014 | 416 KiB |
| iPerf 3.0.9 | 14 oct 2014 | 395 KiB |
| iPerf 3.0.8 | 30 sep 2014 | 394 KiB |
| iPerf 3.0.7 | 28 aug 2014 | 391 KiB |
| iPerf 3.0.6 | 28 jul 2014 | 389 KiB |
| iPerf 3.0.5 | 16 jun 2014 | 389 KiB |
| iPerf 3.0.4 | 12 jun 2014 | 492 KiB |
| iPerf 3.0.3 | 26 mar 2014 | 345 KiB |
| iPerf 3.0.2 | 10 mar 2014 | 343 KiB |
| iPerf 3.0.1 | 10 jan 2014 | 332 KiB |
| Iperf version | Date | Size |
| iPerf 2.0.10 | under development | |
| iPerf 2.0.9 | 6 jun 2016 | 271 KiB |
| iPerf 2.0.8 | 17 sep 2015 | 530 KiB |
| iPerf 2.0.7 | 22 aug 2014 | 511 KiB |
| iPerf 2.0.6 | 10 mar 2014 | 502 KiB |
| iPerf 2.0.5 | 8 jul 2010 | 243 KiB |
| iPerf 2.0.4 | 7 avr 2008 | 243 KiB |
| iPerf 2.0.3 | 18 mar 2008 | 241 KiB |
| iPerf 2.0.2 | 3 may 2005 | 228 KiB |
| iPerf 2.0.1 | 8 nov 2004 | 215 KiB |
| iPerf 1.7.0 | 13 mar 2003 | 178 KiB |
- Secure Hash Algorithm-256 : sha256sum.txt
- Source of the IPERF 3 project can be found at https://github.com/esnet/iperf
- Source of the IPERF 2 project can be found at https://sourceforge.net/projects/iperf2/
- Source of the IPERF project can be found at https://sourceforge.net/projects/iperf/
Как установить Iperf в CentOS 7
Хочу отметить, что в CentOS 7 и CentOS 8, придется делать слегка иначе. Производить инсталляцию я буду в последней версии CentOS 7, которую поставил ранее.
Начнем с установки Iperf2, для этого выполните команду:
yum install iperf
У вас должна выскочить ошибка
Failed to synchronize cache for repo ‘AppStream’, ignoring this repo. Failed to synchronize cache for repo ‘BaseOS’, ignoring this repo. Failed to synchronize cache for repo ‘extras’, ignoring this repo. No match for argument: iperf Error: Unable to find a match

Давайте посмотрим список репозиториев, делается это командой:
yum repolist
Как видим, список будет вот такой:
CentOS-7 – AppStream CentOS-7 – Base CentOS-7 – Extras
Напоминаю, что утилита Iperf является дополнительным пакетом, который не входит в основные репозитории, это прекрасно описано в Вики http://fedoraproject.org/wiki/EPEL. Дополнительные пакеты для Enterprise Linux (EPEL) – это одобренный сообществом репозиторий, который указан в вики CentOS в разделе “Доступные репозитории для Linux”, в котором отмечается, что хотя репозитории сообщества не связаны с проектом CentOS, эти репозитории часто рекомендованы сообществом. Выполните команду:
ls /etc/yum.repos.d

Как видите в файле yum.repos.d прописаны подключенные репозитории, и тут не хватает репозитория epel-release.
Давайте установим epel-release, для этого выполните:
yum install epel-release
или командой
yum install https://dl.fedoraproject.org/pub/epel/epel-release-latest-7.noarch.rpm -y

Пробуем теперь посмотреть список репозиториев в файле yum.repos.d и видим, что epel появился.

Произведем установку Iperf
yum install iperf
Все успешно выполнено. Конечно вам никто не запрещает подключить репозиторий от седьмой версии CentOS в восьмую, но они могут конфликтовать в будущем по зависимостям. Поэтому, если у вас CentOS 8, то я рекомендую сделать вот так.

Свой публичный сервер
Сервер iPerf может обрабатывать только одно подключение одновременно на порту. Поэтому, в условиях публичного использования необходим его запуск на множестве портов одновременно.
В официальной документации это предлагается делать скриптом:
#!/bin/dash
/bin/sleep 10
/usr/bin/killall iperf3
/bin/sleep 0.1
/usr/bin/killall -9 iperf3
/bin/sleep 0.1
if
then
/usr/bin/sudo -u nobody /usr/bin/iperf3 -s -p 5200 -D >/dev/null 2>&1
/usr/bin/sudo -u nobody /usr/bin/iperf3 -s -p 5201 -D >/dev/null 2>&1
/usr/bin/sudo -u nobody /usr/bin/iperf3 -s -p 5202 -D >/dev/null 2>&1
/usr/bin/sudo -u nobody /usr/bin/iperf3 -s -p 5203 -D >/dev/null 2>&1
/usr/bin/sudo -u nobody /usr/bin/iperf3 -s -p 5204 -D >/dev/null 2>&1
/usr/bin/sudo -u nobody /usr/bin/iperf3 -s -p 5205 -D >/dev/null 2>&1
/usr/bin/sudo -u nobody /usr/bin/iperf3 -s -p 5206 -D >/dev/null 2>&1
/usr/bin/sudo -u nobody /usr/bin/iperf3 -s -p 5207 -D >/dev/null 2>&1
/usr/bin/sudo -u nobody /usr/bin/iperf3 -s -p 5208 -D >/dev/null 2>&1
/usr/bin/sudo -u nobody /usr/bin/iperf3 -s -p 5209 -D >/dev/null 2>&1
fi
* пример данного скрипта будет работать не на всех системах. При его использовании необходимо внести в него корректировки.
Мы же настроим сервер при помощи systemd. Ранее мы уже создавали один юнит для запуска iperf. Повторяем процедуру с небольшими изменениями.
Создаем юнит со следующим содержимым:
vi /etc/systemd/system/iperfd5205.service
Description=iPerfService
After=network.target
Type=forking
PIDFile=/var/run/iperf3.5205.pid
ExecStart=-/bin/iperf3 -s -p 5205 -D -I /var/run/iperf3.5205.pid
ExecReload=/bin/kill -HUP $MAINPID
Restart=always
WantedBy=multi-user.target
* если сравнить с ранее созданным юнитом, мы добавили запуск сервера на порту 5205.
Перезапускаем systemd:
systemctl daemon-reload
Разрешаем юнит и запускаем сервис:
systemctl enable iperfd5205
systemctl start iperfd5205
Повторяем шаги для других портов — создаем для каждого отдельный юнит в systemd. Для публичного сервера лучше создать побольше.
Installation
It takes a while for a new version of any software to find its way into standard repositories. So, if you need to play with this new option, you’d have to compile from the source. Here is how to do it on Debian-based Linux:
wget https://downloads.es.net/pub/iperf/iperf-3.7.tar.gz
tar xzf iperf-3.7.tar.gz
cd iperf-3.7
./configure
make
|
1 2 3 4 5 |
wget https//downloads.es.net/pub/iperf/iperf-3.7.tar.gz tar xzf iperf-3.7.tar.gz cd iperf-3.7 .configure make |
If you don’t see any errors, you can find the new iPerf3 executable in the “src/” directory, and you can confirm that it works by printing the help output with the following:
cd src
./iperf3 —help
|
1 2 |
cd src .iperf3—help |
Keep in mind, that if you want to use this latest version of iPerf3 your working directory has to be “iperf-3.7/src” and to run the command use “./iperf3” If you just type iperf3 (without the dot and forward slash) you will end up using whatever iPerf3 executable you have installed in your system.
Описание всех параметров
Для просмотра всех возможных параметров с описанием (на английском), достаточно запустить iperf без параметров.
В большинстве случаев вполне достаточно запуска c параметрами по умолчанию, как это указано выше в разделе «Использование», для тонкой настройки привожу описание всех параметров iPerf3:
Общие:
-p, —port # установить порт для прослушивания/подключения (по умолчанию 5001 для iperf2 и 5201 для iperf3)
-f, —format формат отчёта: Kbits, Mbits, KBytes, MBytes
-i, —interval # пауза между периодическими отчётами, в секундах
-F, —file name указывает файл который будет передаваться в качестве нагрузки вместо псевдослучайной последовательности
-A, —affinity n/n,m запуск с привязкой к конкретному ядру процессора (только для linux)
-B, —bind <host> привязка к хосту, интерфейсу или групповому адресу
-V, —verbose вывод подробной информации
-J, —json вывод в JSON формате
—logfile f вывод лога в файл
-d, —debug вывод дополнительной информации для отладки
-v, —version вывод версии
-h, —help вывод списка параметров
Только для сервера:
-s, —server запуск в режиме сервера
-D, —daemon запуск в режиме сервера как процесс (демон)
-I, —pidfile file создать PID файл
-1, —one-off закрыть сервер после отработки одного подключения
Только для клиента:
-c, —client <host> запуск в режиме клиента и подключиться к серверу по адресу <host>
-u, —udp использовать UDP, вместо TCP
-b, —bandwidth # задать пропускную способность в бит/сек (по умолчанию без ограничений для TCP и 1 Мбит/сек. для UDP)
-t, —time # длительность измерения в секундах (по умолчанию 10 сек)
-n, —bytes # количество байт, после передачи которых остановить измерение (вместо длительности по времени -t)
-k, —blockcount # количество блоков (пакетов), после передачи которых остановить измерение (вместо длительности -t или объема -n)
-l, —len # размер буфера для записи/чтения (по умолчанию 128 KB для TCP и 8 KB для UDP)
—cport <port> задать локальный порт подключения (по умолчанию рандомный порт)
-P, —parallel # количество параллельных потоков
-R, —reverse запуск в обратном направлении (сервер будет отправлять, клиент принимать
-w, —window # размер TCP window size / размер буфера
-C, —congestion <algo> выбрать алгоритм управления перегрузками TCP (только Linux и FreeBSD)
-M, —set-mss # задать максимальный размера сегмента TCP/SCTP (MTU-40 байт)
-N, —no-delay задать TCP без задержки (отключение алгоритма Нэйгла)
-4, —version4 использовать только IPv4
-6, —version6 использовать только IPv6
-S, —tos N задать «тип сервиса» IP
-L, —flowlabel N задать IPv6 flow label (только Linux)
-Z, —zerocopy использовать «zero copy» метод передачи данных (меньше загрузка CPU)
-O, —omit N не учитывать измерение первых N секунд
-T, —title str префикс для каждой выводимой строки
—get-server-output выводить результаты серверной части
Script to host a iPerf3 server with Linux (Ubuntu / Debian)
iPerf3 not allow multiple tests to a server => it is necessary to start several iPerf processes for not having the message iperf3: error — the server is busy running a test. try again later
Systemd script to start 41 iPerf3 server (port 9200 to port 9240).
sudo adduser iperf —disabled-login —gecos iperf
sudo nano /etc/systemd/system/iperf3-server@.service
The «Restart = always» allows to restart iperf3 after one hour (RuntimeMaxSec = 3600) to limit the cases of no response or when the iperf3 server has ended abruptly.
sudo systemctl daemon-reload
To activate iperf3 when the server starts up:
for p in $(seq 9200 9240); do sudo systemctl enable iperf3-server@$p ; done
sudo reboot
To view the status and logs of iPerf3 :sudo systemctl status iperf3-server@*
sudo journalctl -u iperf3-server@*
To disable iperf3 when starting the server :for p in $(seq 9200 9240); do sudo systemctl disable iperf3-server@$p ; done
Установка iperf на CentOS 8
Ранее, я так же установил CentOS 8 в тестовой среде. Хочу отметить, что если вы попытаетесь добавить репозиторий epel-release командой:
yum install epel-release или yum install https://dl.fedoraproject.org/pub/epel/epel-release-latest-8.noarch.rpm -y
То он успешно установится, но когда вы попытаетесь сделать поиск iperf по нему, то обнаружите, что восьмая ветка не содержит данной утилиты.
dnf repository-packages epel list | grep -i iperf
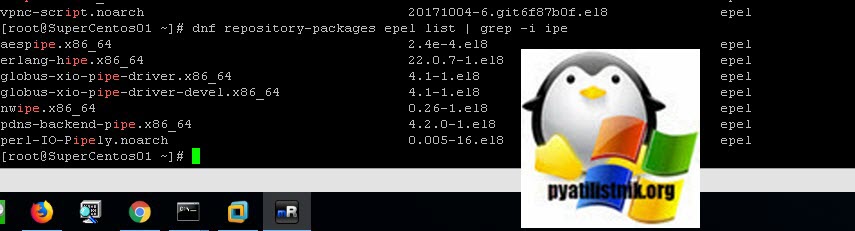
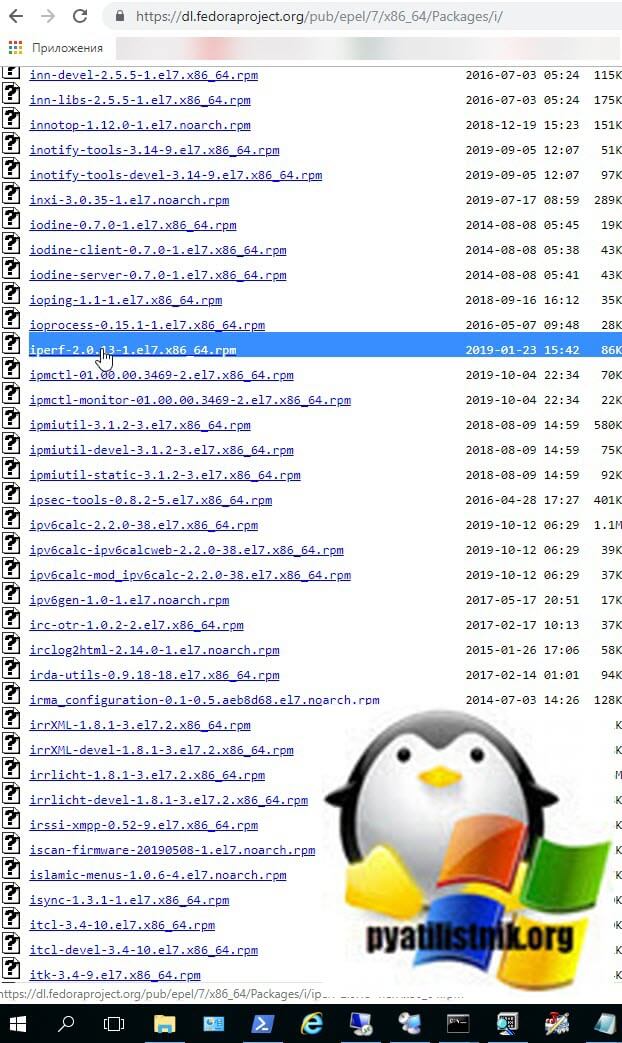
Как я и писал выше не желательно устанавливать epel 7 и 8 версии репозитория, я лично в такой ситуации просто выхожу подобным образом. Я открываю сайт https://dl.fedoraproject.org/pub/epel/7/x86_64/Packages/ и ищу нужный мне пакет, копирую на нужный мне прямую ссылку.
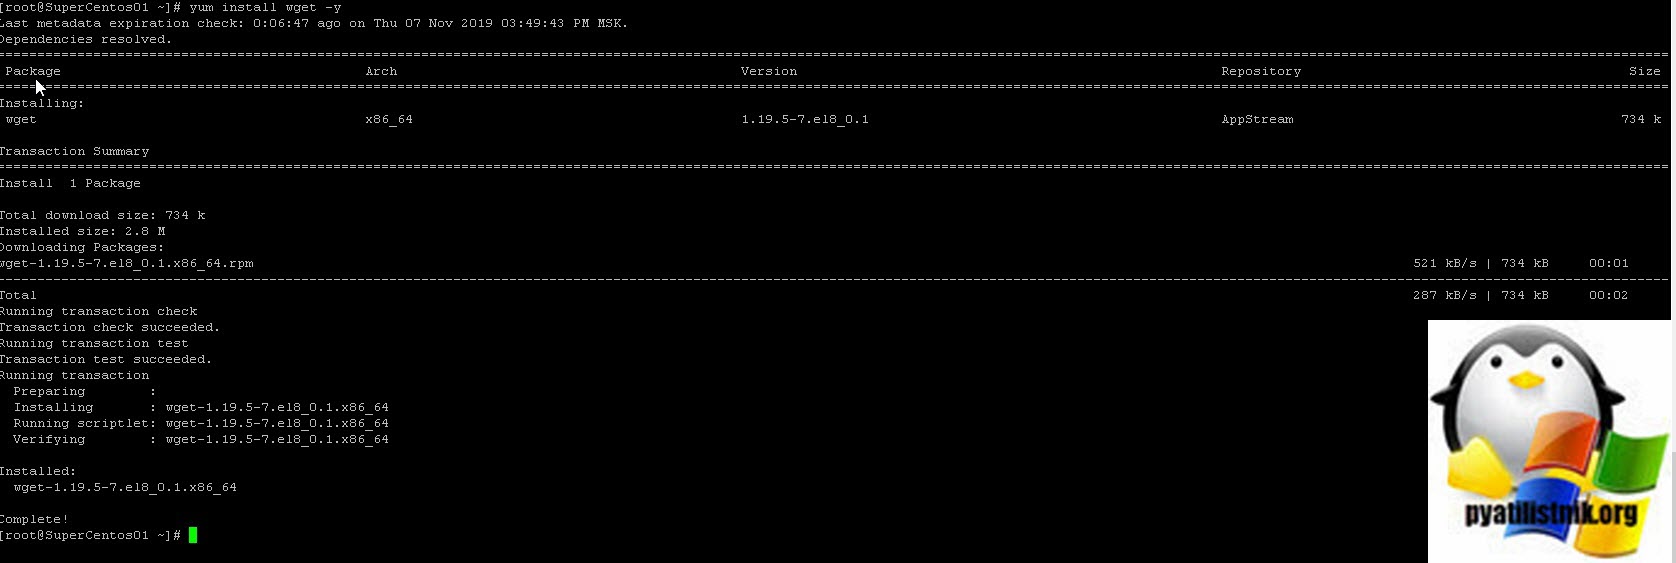
Далее я устанавливаю в CentOS 8 пакет wget, для этого выполняем:
yum install wget -y
Далее скачиваем пакет, ссылку на который мы заранее выяснили.
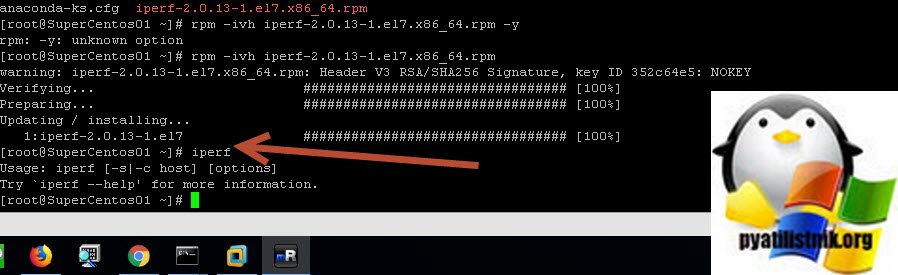
wget https://dl.fedoraproject.org/pub/epel/7/x86_64/Packages/i/iperf-2.0.13-1.el7.x86_64.rpm

Далее производим установку iperf2 в системе, через выполнение команды:
rpm -ivh iperf-2.0.13-1.el7.x86_64.rpm

Так же для CentOS 8 рекомендуется включить репозиторий PowerTools, поскольку пакеты EPEL могут зависеть от пакетов из него
dnf config-manager —set-enabled PowerTools
Bug Reports
Before submitting a bug report, please make sure you’re running the
latest version of the code, and confirm that your issue has not
already been fixed. Then submit to the iperf3 issue tracker on
GitHub:
In your issue submission, please indicate the version of iperf3 and
what platform you’re trying to run on (provide the platform
information even if you’re not using a supported platform, we
might be able to help anyway). Exact command-line arguments will
help us recreate your problem. If you’re getting error messages,
please include them verbatim if possible, but remember to sanitize any
sensitive information.
