Обработка цифровых фотоснимков — nikon capture nx-d 1.6.1
Содержание:
- GIMP 2.6.7 Free Rus Full Pack 2.6.7 [2009, Графический редактор]
- Системные требования
- SlimDrivers 2.2.4118.505 + RUS + Portable [2011, Установщик драйверов]
- FastStone Capture 6.8 Portable [2011, Снятие скриншотов, захват экрана]
- Обработка фото с цифровой камеры — Nikon Capture NX-D 1.6.3
- №0. Цвет
- Инструмент обрезки
- Levels & Curves
- Просмотр фото в режиме было-стало
- Photo Frame Studio 2.2 Rus Portable [2009, Графический редактор]
- Локальных корректировок U-point больше нет
- Straighten and Perspective Control
- Camera and Lens Corrections
- Picture Control Parameters
- LCH
- Noise Reduction
- Flock 2.6.2 Portable [2011, Браузер]
- Некоторые выводы по работе с бета-версией Capture NX-D
GIMP 2.6.7 Free Rus Full Pack 2.6.7 [2009, Графический редактор]
Год выпуска: 2009Жанр: Графический редакторРазработчик: GIMP.orgСайт разработчика: http://www.gimp.org/Язык интерфейса: Мультиязычный (русский присутствует)Платформа: Windows 2000, XP, VistaСистемные требования: минимальныеОписание: GIMP — свободный графический редактор, который поддерживает больше тридцати форматов изображений, умеет работать со слоями, масками, фильтрами и режимами смешивания. В арсенале программы есть огромный спектр инструментов для цветокоррекции и обработки любых фотографий и изображений. Благодаря удобному интерфейсу и приятным особенностям, научиться работать в …
Системные требования
|
Microsoft Windows 8.1Microsoft Windows 7 (с пакетом обновления SP1)Microsoft Windows Vista (с пакетом обновления SP2) — Поддерживаются 32- и 64-разрядные версии ОС Windows 8.1, Windows 7 и Windows Vista. Тем не менее только непосредственно программное обеспечение ViewNX 2 и Picture Control Utility 2 работает на компьютере под управлением 64-разрядной ОС в виде собственных 64-разрядных приложений. |
Mac OS X версии 10.10.1Mac OS X версии 10.9.5Mac OS X версии 10.8.5 |
|
ЦПФотографииCeleron / Pentium 4 / серия Core с тактовой частотой 1,6 ГГц или более мощный.ВидеороликиПросмотр: Pentium D с тактовой частотой 3,0 ГГц или более мощный.Редактирование: Intel Core i5 или более новая модель.Просмотр видеороликов с разрешением 1280 × 720 пикселей или выше либо 1920 × 1080 пикселей или выше, записанных со скоростью 30 кадров в секунду: рекомендуется использовать Intel Core i5 или более новую модель. |
ЦП ФотографииСерия Intel Core/Xeon.ВидеороликиПросмотр: Intel Core Duo с тактовой частотой 2 ГГц или более мощный.Редактирование: Intel Core i5 или более новая модель.Просмотр видеороликов с разрешением 1280 × 720 пикселей или выше либо 1920 × 1080 пикселей или выше, записанных со скоростью 30 кадров в секунду: рекомендуется использовать Intel Core i5 или более новую модель. |
|
Память (ОЗУ) 64-разрядная ОС Windows 8.1, Windows 7, Windows Vista: не менее 2 ГБ (рекомендуется не менее 4 ГБ) 32-разрядная ОС Windows 8.1, Windows 7, Windows Vista: не менее 1 ГБ (рекомендуется не менее 2 ГБ) |
Память (ОЗУ) Не менее 2 ГБ (рекомендуется не менее 4 ГБ) |
|
Свободное пространство на жестком диске Не менее 1 ГБ свободного пространства на загрузочном диске для установки и запуска (рекомендуется не менее 3 ГБ). |
|
|
Интерфейс
Необходим встроенный порт USB.Подключайте фотокамеру прямо к компьютеру. При подключении с помощью концентратора или другого устройства фотокамера может работать неправильно. |
|
|
Поддерживаемые форматы файлов
Изображения в формате JPEG (по стандарту Exif 2.2–2.3).Изображения в форматах RAW (NEF, NRW), MPO (3D) и TIFF, видеоролики, звуковые файлы, эталонные снимки для функции «Удаление пыли», данные журнала местоположения, журнала высоты и журнала глубины под водой, записанные с помощью цифровой фотокамеры Nikon.Изображения в форматах RAW (NEF, NRW), TIFF (RGB) и JPEG (RGB), а также видеоролики в форматах MOV, AVI, MPEG1 и WMV, сохраненные с помощью программного обеспечения Nikon. |
|
|
Поддерживаемые фотокамеры Цифровые зеркальные фотокамеры Nikon, начиная с модели D1 (выпущенной в 1999 г.) и заканчивая моделью D750 (выпущенной в сентябре 2014 г.), а также моделью D5500. Фотокамеры Nikon 1, начиная с моделей V1 и J1 (выпущенных в 2011 г.) и заканчивая моделями V3 и J4 (выпущенными в мае 2014 г.), а также модель S2. Все фотокамеры серии COOLPIX, выпущенные в период с 1997 г. по октябрь 2014 г., начиная с модели COOLPIX E100, а также фотокамеры моделей COOLPIX L31 (не выпускается в Японии), COOLPIX S3700, COOLPIX L32 и COOLPIX S2900 (не выпускается в Японии). |
|
|
Размер файла 64-разрядной версии — 108.67 МБ (64-разрядная версия) (S-VNX2__-021003WF-EUREN-64BIT_.exe) Размер файла 32-разрядной версии — 107.77 МБ (32-разрядная версия) (S-VNX2__-021003WF-EUREN-32BIT_.exe) |
Размер файла — 142.37 МБ (S-VNX2__-021003MF-EUREN-ALL___.dmg) |
SlimDrivers 2.2.4118.505 + RUS + Portable [2011, Установщик драйверов]
Год выпуска: 2011Жанр: Установщик драйверовРазработчик: DriverUpdate.netСайт разработчика: http://www.driverupdate.net/Язык интерфейса: Английский + РусскийПлатформа: Windows XP, Vista, 7 Описание: SlimDrivers — программа, которая была разработана в целях установления местонахождения и получения последних версий драйверов для установленного оборудования вашего ПК. Если с обновлениями программ проблем обычно не бывает, так как большинство программ сами умеют проверять обновления, либо же для проверки обновлений можно воспользоваться встроенными средствами Windows или специальными утилитам …
FastStone Capture 6.8 Portable [2011, Снятие скриншотов, захват экрана]
Год выпуска: 2011Жанр: Снятие скриншотов, захват экранаРазработчик: FastStone SoftСайт разработчика: http://www.faststone.orgЯзык интерфейса: РусскийПлатформа: Windows XP, Vista, 7Описание: FastStone Capture — утилита для снятия скриншотов рабочего стола Windows. Программа может делать полный снимок веб-страницы, даже если она прокручивается в браузере, производит захват всего экрана или же только его части – отдельного окна, его компонента, прямоугольной или произвольной области, указанной пользователем. Предусмотрена возможность добавления на скриншоты поясняющих надписей, подписей, ук …
Обработка фото с цифровой камеры — Nikon Capture NX-D 1.6.3

Программное обеспечение для обработки снимков Capture NX-D позволяет реализовать весь потенциал Вашей цифровой фотокамеры и объектива Nikon, создавая изображения с качеством, не имеющим себе равных, которое предусмотрено нашими разработчиками. Оно предлагает функции, специально разработанные для последующей обработки изображений RAW, и предоставляет их в интуитивной, легкой в обслуживании форме. В дополнение к обработке изображений RAW, оно может использоваться для повышения качества изображений JPEG и TIFF, сделанных цифровыми фотокамерами Nikon, посредством регулировки яркости, кривых контрастности, тонирования и других возможностей.Системные требования:• ОС: Microsoft Windows 8.1, 10. Поддерживаются 64- и 32-разрядные издания (рекомендуется 64-разрядное); работает в качестве родного 64-разрядного приложения на 64-разрядных системах.• ЦП: Celeron или Pentium Dual-Core 2,4 ГГц или более мощный процессор или серия Core i 1,6 ГГц или более мощный процессор (рекомендуется Core i5 или более мощный процессор).• ОЗУ: 32-разрядное издание: 4 ГБ, 64-разрядное издание: 4 ГБ или более.• HDD: Для установки требуется не менее 800 МБ свободного пространства на жестком диске (рекомендуется 2 ГБ или более).• Монитор: Разрешение: 1366×768 пикселей или более (рекомендуется 1920×1080 пикселей или более).Торрент Обработка фото с цифровой камеры — Nikon Capture NX-D 1.6.3 подробно:Поддерживаемые фотокамеры:• Z 7, Z 6, Z 5 и Z 50• Все цифровые зеркальные фотокамеры Nikon, начиная с D1 (выпущенные в 1999 г.) по D780 (выпущенные в январе 2020 г.) и D6• Все фотокамеры Nikon 1 начиная от V1 и J1 (выпущенные в 2011 г.) по J5 (выпущенные в апреле 2015 г.)• Все фотокамеры COOLPIX, начиная с COOLPIX E100 (выпущенные в 1997 г.) и заканчивая моделями, выпущенными в августе 2019 г., и COOLPIX P950• KeyMission 360, KeyMission 170, KeyMission 80Поддерживаемые типы файлов:Все изображения NEF/NRW (RAW), JPEG и TIFF, созданные с помощью поддерживаемых цифровых фотокамер или с помощью программного обеспечения Nikon.Изменения в версии 1.6.3 по сравнению с версией 1.6.2:• Добавлена поддержка Z5.• Исправлена ошибка, из-за которой разные изображения появлялись в областях Preview (Просмотр) и Thumbnail (Уменьшенное изображение), когда изображения в формате RAW, сделанные в режиме Непрерывная В на некоторых фотокамерах COOLPIX, отображались в Image Viewer (Программе для просмотра изображений).Русификация:Для русификации интерфейса скопируйте (с заменой) два файла CNXDStr.nlf и PrintLang.nlf (из папки RUS) в папку с установленной программой (путь по умолчанию: C:\Program Files\Nikon\Capture NX-D\CommonData). Рекомендую сделать бэкап оригинальных файлов, что бы в дальнейшем (при необходимости) была возможность вернуть всё на место.
Скриншоты Обработка фото с цифровой камеры — Nikon Capture NX-D 1.6.3 торрент:
Скачать Обработка фото с цифровой камеры — Nikon Capture NX-D 1.6.3 через торрент:

nikon-capture-nx-d-1_6_3.torrent (cкачиваний: 43)
№0. Цвет

Capture One (C1) лучше работает с цветом.
На мой взгляд, как изначальные профили камер, так и общие алгоритмы работы с цветом в Capture One реализованы на порядок лучше, чем в любых других RAW-конвертерах.

Насколько важен корректный цветовой профиль?
Корректный цветовой профиль просто необходим для серьезной обработки фотографий. Именно поэтому в Capture One для профессиональных камер есть несколько вариантов профилей — каждый из них немного по-разному отображает цвета.

Конечно, восприятие цвета и тем более его обработка — штука очень субъективная.
Но я просто не могу работать с цветами Лайтрума после Capture One Pro. И многие мои знакомые фотографы, которые попробовали работать с цветом в Capture Onе, уже никогда не вернутся к Апертурам и прочим замечательным RAW-конвертерам.
Это мое личное ощущение. У вас оно может быть совсем иным.
Поэтому перейдем к совершенно объективным сильным сторонам Capture One Pro.
Инструмент обрезки
При кропе предлагаются несколько вариантов соотношения сторон – 3:2, 5:4, 16:9, 6:6, 4:3, однако отсутствует вариант «Оригинальное соотношение сторон». Другими словами, пользователь либо должен точно знать соотношение сторон своих фотографий, либо вычислить это соотношение, узнав в EXIF ширину и высоту своей фотографии, либо применить метод «научного тыка» и подобрать нужное соотношение сторон.
Как применить кроп? Нажатие на Enter не срабатывает. Двойное нажатие кнопки мыши не срабатывает. Единственный вариант – в верхней панели инструментов «отключить», то есть отжать кнопку кропа. Фото обрежется. Повторное нажатие на этот инструмент позволить отредактировать параметры кропа.
Одновременной обрезки и вращения (как в Lightroom 5) не предусмотрено, это отдельные инструменты.
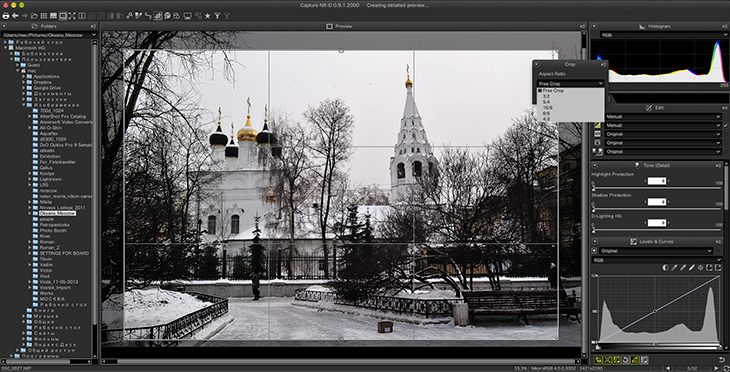
Скриншот 9. Работа инструментом обрезки (Crop)
Levels & Curves
Adjust contrast, tone (brightness), and color balance. Adjustments can be made over the entire image or to specific portions of the tone range (for example, the gamut of a specific printer, monitor, or other output device), allowing enhancements to be made without sacrificing detail.
- Channel
- The current color channel.
- Auto Contrast
- Increase contrast by setting the white and black points to exclude a set proportion of the brightest and darkest pixels in the image, creating a curve that makes optimal use of the output tone range while preserving details in shadows and highlights.
- Set Black Point
- Click this button and then click the image in the preview palette to set the black point for the red, green, and blue channels to the value for the pixel under the cursor.
- Set Neutral Point
- Click this button and then click the image in the preview palette to adjust gamma for the red, green, and blue channels to equalize the RGB values for the pixel under the cursor.
- Set White Point
- Click this button and then click the image in the preview palette to set the white point for the red, green, and blue channels to the value for the pixel under the cursor.
- Add Anchor Point
- Click this button and then click the image in the preview area to add a point to the curve corresponding to the value of the pixel under the cursor.
- Reset Current Channel
- Reset the curve for the current channel to linear.
- Reset All Channel
- Reset all curves to linear.
- White-point output-level slider
- Choose the maximum output level (white point). Dragging the slider down lowers the brightness of the brightest pixels.
- Histogram
- The histogram shows how the pixels in the image are distributed with respect to brightness. The horizontal axis corresponds to brightness (in the range 0–255), the vertical axis to the number of pixels.
- Tone curve
- The slope and shape of the curve determines the brightness of the image in the corresponding portion of the tone range.
- Black-point output-level slider
- Choose the minimum output level (black point). Dragging the slider up increases the brightness of the darkest pixels.
- Black-point input slider
- Any pixels in the portion of the tone range to the left of the black point are output at the minimum output level. Dragging the slider to the right steepens the curve and enhances contrast but may cause loss of details in shadows.
- Gamma
- Dragging the slider to the left increases the brightness of mid-tones, while dragging it to the right makes mid-tones darker.
- White-point input slider
- Any pixels in the portion of the tone range to the right of the white point are output at the maximum output level. Dragging the slider to the left steepens the curve and enhances contrast but may cause loss of details in highlights.
Sampling the Current Channel
By default, the black point, white point, add anchor point, and auto contrast controls respectively set the black point, anchor points, white point, and contrast for all channels. To apply these controls only to the current channel, press Ctrl (or on Mac computers, the option key) while clicking the control.
Просмотр фото в режиме было-стало
При попытке отобразить фото в режиме было-стало программа время от времени падает, хотя иногда работает вполне сносно. Допустим, я обработал фото и хотел бы посмотреть необработанный вариант слева, а обработку – справа и сравнивать. В Capture NX-D этим инструментом надо пользоваться так:
- Отобразить фото в режиме Before и After. Будет показан и там и там один вариант
- Нажать кнопку Original
- Изображение слева заменится на необработанный оригинал
- Дождаться завершения прорисовки деталей (у меня это заняло коло 3 минут)
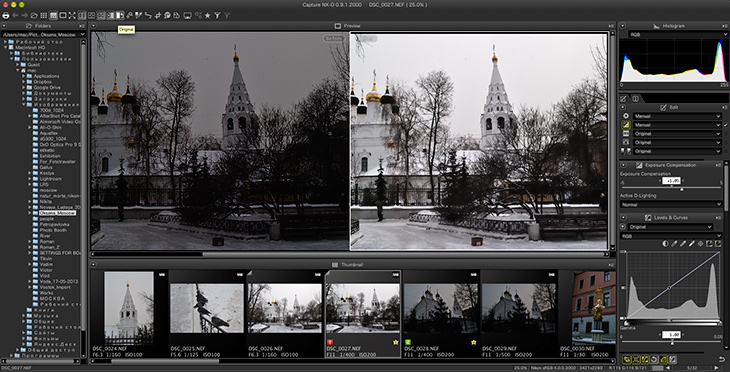
Скриншот 2. Просмотр фото в режиме было-стало
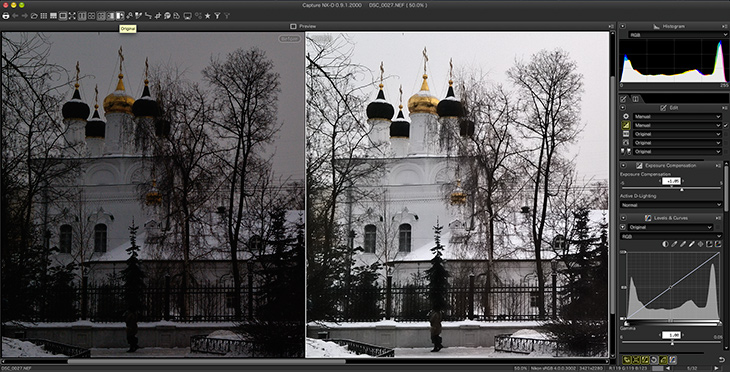
Скриншот 3. Если спрятать панели слева и снизу, сравнивать становится удобнее
Особенно удобно в режиме сравнения работать с балансом белого: щелчок пипеткой по ступенькам позволил получить отличный результат. Тонкая доработка (теплее-холоднее) далее производится по вкусу. Жаль, что не отображается полученная в результате щелчка температура в Кельвинах.
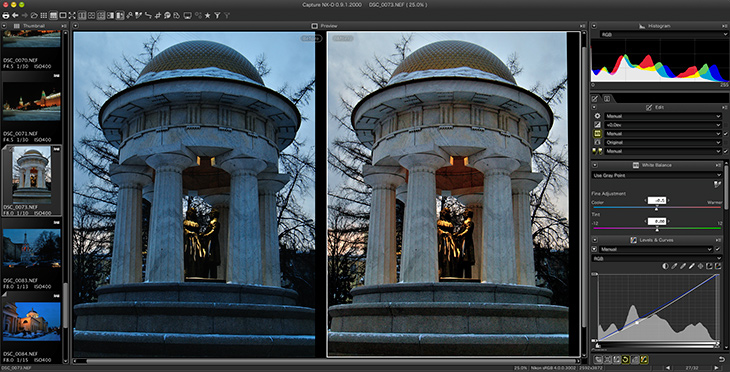
Скриншот 4. В режиме сравнения удобно работать с балансом белого
Photo Frame Studio 2.2 Rus Portable [2009, Графический редактор]
Photo Frame Studio 2.2 Rus PortableГод выпуска: 2009Жанр: Графический редакторРазработчик: mojosoft softwareСайт разработчика: www.photoframestudio.comЯзык интерфейса: Мультиязычный (русский присутствует)Платформа: Windows (2000), Windows (XP), Windows (Vista)Системные требования:Процессор: Pentium 4 / Athlon 1.5 ГГцПамять: 512 МБ Свободное место наЖД: 250 МБОписание: РаскрытьPhoto Frame Studio — новая потрясающая программа от польского разработчика MojoSoft, созданная для редактирования и декорации цифровых фотографий. Программа предлагает вам воспользоваться сотней шаблонов рамок …
Локальных корректировок U-point больше нет
Технология локальных корректировок U-point, которая являлась одной из основных фишек Capture NX2, теперь из программы убрана, так как она является собственностью NIK Software, другими словами, Google. С подобными гигантами шутки плохи, поэтому в новой версии программы Capture NX-D никаких локальных корректировок пока нет вообще. Программа Capture NX2 разрабатывалась именно компанией NIK Software, и технология U-point в ней отлично работает, но теперь из-за патентных разногласий (или в связи с покупкой Nik Software компанией Google) пострадают в первую очередь пользователи, которые привыкли к этой уникальной и очень удобной технологии.
Разработчики заявляют о том, что U-point вообще не планируется использовать, возможно в будущем будут найдены какие-то другие варианты локальных обработок.
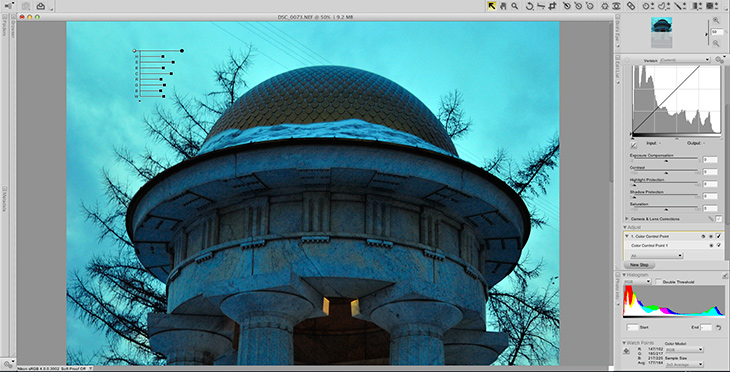
Скриншот 13. Технология локальных корректировок U-point в Capture NX2
Straighten and Perspective Control
Straighten pictures or correct for the effects of perspective.
Straighten
Straighten pictures by up to ±10°. Choose lower values to rotate the picture to the left, higher values to rotate it to the right. To hide the effects of straightening, remove the check from the Straighten checkbox.
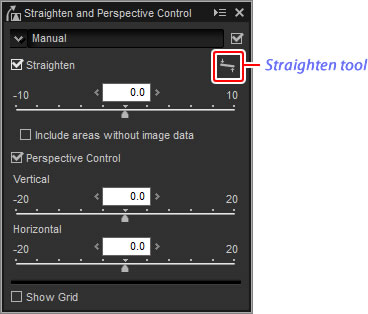
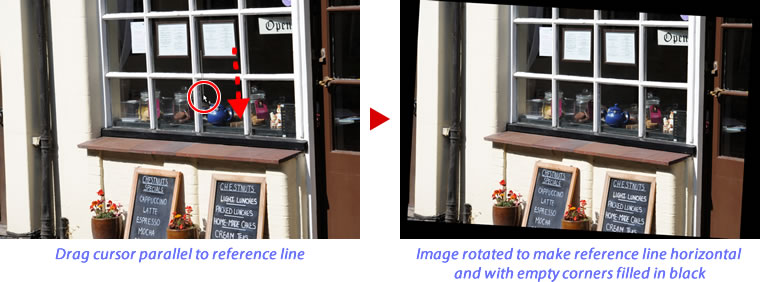
To straighten pictures manually, click the straighten tool in the image adjustment palette and drag the cursor parallel to a line in the preview (this option can not be used with ). The image will be rotated by up to ±10° to make the reference line horizontal or vertical, and the degree of rotation will be displayed in the text box in the image adjustment window. Unless Include areas without image data is selected, the image will automatically be cropped to remove any empty corners.
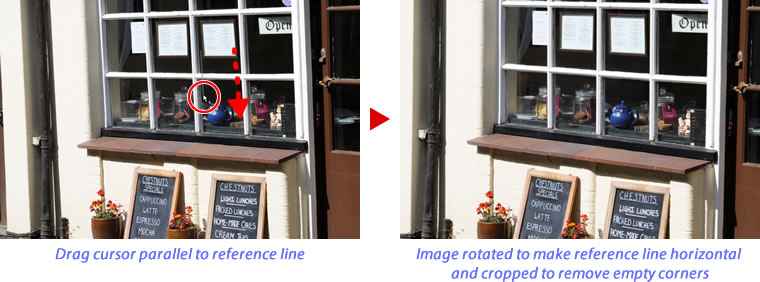
Select this option to fill empty corners with black.
Perspective Control
Correct the effect of perspective on, for example, photos taken with the camera angled up to frame a tall building. Perspective can be adjusted vertically and horizontally by up to ±20.

Camera and Lens Corrections
Selecting this tool displays the following controls in the image adjustment palette:
- Color Moiré Reduction (RAW images only)
- To reduce color moiré (an image artifact visible where regular patterns overlap), select this item and choose an option from the menu.
- (regular- or large-size RAW images only)
- Compare photos with reference data recorded using the camera to mitigate the effect of dust on the camera image sensor. Click Change… to choose the NDF file containing the desired data. For more information on recording reference data, see the camera manual.
- Lateral Color Aberration
- Reduce lateral color aberration (colored fringes and halos) in RAW images. At default settings, this option is not applied to JPEG and TIFF images.
- Axial Color Aberration
- Reduce blurred colors caused by axial color aberration. Choose from values between 0 and 100: the higher the value, the greater the effect.
- Auto Distortion Control
- This option uses the lens information recorded with photographs to reduce the barrel distortion associated with wide-angle lenses and the pin-cushion distortion associated with telephoto lenses. Auto distortion control can be turned on or off from the pull-down menu; if the photograph was taken with an advanced camera with interchangeable lens fitted with a waterproof lens, you will also be offered an On (underwater) option for reducing pin-cushion distortion in photos taken underwater.
- Auto Red-Eye
- Automatically detect and remove “red-eye”.
- Vignette Control
- Adjust for variations in peripheral illumination that occur with some lenses. Choose from values between –100 and +200: the higher the value, the greater the increase in brightness at the edges of the image.
- Diffraction compensation
- Reduce diffraction in pictures taken at small apertures (high f/-numbers).
- PF Flare Control
- Reduce ring flare, circular flare, and other flare effects caused by bright light sources in the frame. Depending on the type and shape of the light source, the desired effects may not be achieved, in which case you may wish to remove the check from this option.
- This option is available only with photos taken using AF DX Fisheye-Nikkor 10.5mm f/2.8G ED, AF Fisheye-Nikkor 16mm f/2.8D, or AF-S Fisheye NIKKOR 8-15mm f/3.5-4.5E ED lenses.
Image Dust Off
Follow the steps below to perform Image Dust Off.
- Click Change…. If the current folder contains an Image Dust Off reference file, a message will be displayed; proceed to Step 2. If no message is displayed, proceed to Step 3.
- To perform Image Dust Off using the file in the current folder, select Yes. Otherwise, select No and proceed to Step 3.
- Select a reference file and click OK to perform Image Dust Off.
Image Dust Off
Dust changes position from day to day; if possible, use reference data recorded in the last 24 hours. If the camera offers image sensor cleaning, use only data recorded after the most recent cleaning, as cleaning can change the position of the dust. Image Dust Off is not available with NEF (RAW) images recorded at an image size setting of Small.
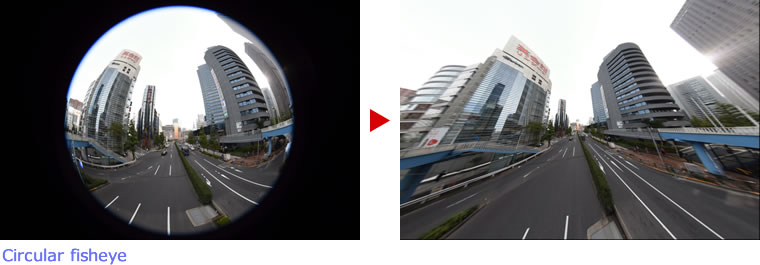
Fisheye
Select Fisheye to process photos taken with fisheye lenses so that they appear to have been taken with a wide-angle rectilinear lens. An area at the center of the image (circular fisheye lenses) or centered around lines drawn horizontally and vertically through the center of the image (full-frame fisheye lenses) is cropped to match the camera picture angle.
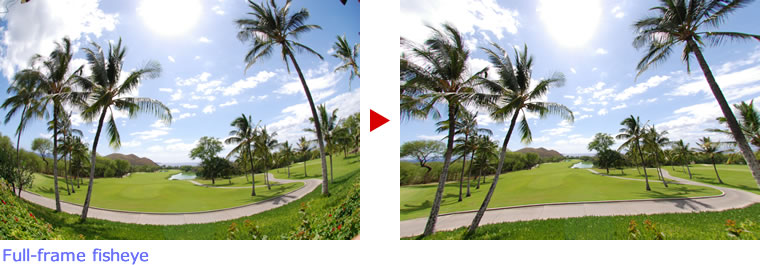
The AF DX Fisheye-Nikkor 10.5mm f/2.8G ED and AF Fisheye-Nikkor 16mm f/2.8D
If Include areas where there is no image data is selected, the image will not be cropped; instead, sections of the image will be bent. The bends contain no image data and are filled with the color selected in the Fill color menu.
The AF-S Fisheye NIKKOR 8-15mm f/3.5-4.5E ED
The Size of Crop slider controls the size of the crop. The smaller the crop, the more the center of the image will be enlarged. Choosing values closer to 1 with full-frame fisheye images will result in sections containing no image data, which are filled with the color selected in the Fill color menu.
The Distortion Control slider controls distortion. High values curve the image outward, while lower values curve it inward.
Picture Control Parameters
After choosing a , choose a Picture Control and adjust Picture Control parameters. The parameters available vary with the camera used and the color reproduction process and Picture Control selected.
Recent Picture Controls
- The parameters below are available when Latest picture control is chosen as the color reproduction process or if the picture was taken with a camera that supports only the most recent Picture Controls and only Camera compatible can be selected. Fine-tune settings using the sliders or select Auto to let Capture NX-D adjust settings automatically (note that Auto produces results that may vary with exposure and the position and size of the subject in the frame).
- Quick sharp
- Quickly adjust levels for balanced Sharpening, Mid-range sharpening, and Clarity, or select Auto to let the camera adjust sharpening automatically. Except when Auto is selected, you can also make manual adjustments to the following individual parameters:
◆ Sharpening: Control the sharpness of details and outlines.
◆ Mid-range sharpening: Adjust sharpness according to the fineness of the patterns and lines in mid-tones affected by Sharpening and Clarity.
◆ Clarity: Adjust overall sharpness and the sharpness of thicker outlines without affecting brightness or dynamic range.
- Contrast
- Adjust contrast. Choose lower values for less contrast, higher values for more contrast.
- Brightness
- Adjust brightness without losing detail in highlights and shadows.
- Saturation
- Control the vividness of colors. Choose lower values for less saturation, higher values for more saturation. This option is not available with the Monochrome Picture Control.
- Hue
- Adjust hue. This option is not available with the Monochrome Picture Control.
- Filter Effect
- Simulate the effects of color filters when using the Monochrome, Sepia, Blue, Red, or Pink Picture Control.
- Toning
- Choose a tint when using the Monochrome Picture Control.
- Adjust Saturation
- Choose the saturation of the tint used with the Monochrome, Charcoal, Graphite, Binary, and Carbon Picture Controls. Does not apply to black-and-white images.
Click Reset to reset all sliders. Note that Contrast and Brightness can not be adjusted for Picture Controls that use a custom curve.
Creative Picture Controls
An Effect level slider is displayed when a Creative Picture Control such as Dream, Morning, or Pop is selected. Use the slider to choose the effect level.
Earlier Picture Controls
If the color reproduction menu offers a choice between Latest picture control and Camera compatible, the parameters listed below will be available when Camera compatible is selected. Fine-tune settings using the sliders or select Auto to let Capture NX‑D adjust settings automatically (note that Auto produces results that may vary with exposure and the position and size of the subject in the frame).
- Quick adjust
- Drag the slider left or right to mute or heighten the effect of the selected Picture Control. Quick adjust affects all Picture Control settings simultaneously and cancels any changes made separately to the individual parameters. It is not available with neutral, flat, or monochrome Picture Controls.
- Sharpening
- Control the sharpness of outlines. Choose higher values for more sharpening.
- Clarity
- Adjust clarity (this option is available only with pictures taken using cameras that support the Clarity parameter).
- Contrast
- Adjust contrast. Choose lower values for less contrast, higher values for more contrast.
- Brightness
- Adjust brightness without losing detail in highlights and shadows.
- Saturation (non-monochrome only)
- Control the vividness of colors. Choose lower values for less saturation, higher values for more saturation.
- Hue (non-monochrome only)
- Adjust hue.
- Filter Effect (monochrome only)
- Simulate the effects of color filters on monochrome photographs.
- Toning (monochrome only)
- Choose the tint used in monochrome photographs.
- Adjust Saturation (monochrome only)
- Choose the saturation of the tint used in monochrome pictures. Does not apply to black-and-white images.
Click Reset to reset all sliders. Note that Contrast and Brightness can not be adjusted for Picture Controls that use a custom curve.
The “AUTO” Picture Control
The parameters for the AUTO Picture Control can be set values of from A−2 to A+2.
LCH
The LCH color space models color using values for lightness (a property similar but not identical to brightness or luminance), chroma (color saturation), and hue. These parameters can be accessed via the channel menu in the image adjustment palette when the LCH tool is selected.
Master Lightness
Adjust overall lightness without affecting chroma or hue.
- Auto Contrast
- Increase contrast by setting the white and black points to exclude a set proportion of the brightest and darkest pixels in the image.
- Add Anchor Point
- Click this button and then click the image in the preview palette to add a point to the curve corresponding to the lightness of the pixel under the cursor.
- Reset Current Channel
- Reset the master lightness curve to linear.
- Reset All Channel
- Reset the master lightness, color lightness, chroma, and hue curves to linear.
- White-point output-level slider
- Choose the maximum output level (white point).
- Histogram
- The histogram shows how the pixels in the image are distributed with respect to lightness. The horizontal axis corresponds to lightness (in the range 0–255), the vertical axis to the number of pixels.
- Luminosity curve
- The slope and shape of the curve determines the lightness of the image in the corresponding portion of the tone range.
- Black-point output-level slider
- Choose the minimum output level (black point).
- Black-point input slider
- Choose the minimum (black point) input level.
- Gamma
- Choose the midpoint (gamma value).
- White-point input slider
- Choose the maximum (white point) input level.
Color Lightness
Adjust the lightness of selected colors without affecting chroma or hue. This can be used, for example, to brighten the blue of a dark skies.
- Add Anchor Point
- Click this button and then click the image in the preview palette to add a point to the curve corresponding to the value for the pixel under the cursor.
- Reset Current Channel
- Reset the color lightness curve to linear.
- Reset All Channel
- Reset the master lightness, color lightness, chroma, and hue curves to linear.
- Color lightness curve
- Moving a point on the curve upwards makes colors in the affected portion of the color range brighter, while moving it downward makes the affected colors darker.
- Width slider
- Adjust the width of the curve that passes through the selected point, increasing or decreasing the range of colors affected by the change.
Chroma
Increase or decrease color saturation over the entire image or a portion of the color range, making colors more or less vivid.
- Add Anchor Point
- Click this button and then click the image in the preview palette to add a point to the curve corresponding to the chroma of the pixel under the cursor.
- Reset Current Channel
- Reset the chroma curve to linear.
- Reset All Channel
- Reset the master lightness, color lightness, chroma, and hue curves to linear.
- Chroma curve
- Moving a point on the curve upwards makes colors in the affected portion of the color range more vivid, while moving it downward makes the affected colors less vivid (grayer).
- Output slider
- Increase or decrease the saturation of all colors in the image.
- Width slider
- Adjust the width of the curve that passes through the selected point, increasing or decreasing the range of colors affected by the change.
- Exclude Gray
- Increasing chroma may make neutral colors (grays) seem over-saturated. Select this option to increase chroma without affecting grays.
Hue
Map selected colors in the original (input) image to a specific range of colors in the final (output) image. One application might be to deepen the colors in a pale blue sky.
- Add Anchor Point
- Click this button and then click the image in the preview palette to add a point to the curve corresponding to the hue of the pixel under the cursor.
- Reset Current Channel
- Reset the hue curve to linear.
- Reset All Channel
- Reset the master lightness, color lightness, chroma, and hue curves to linear.
- Scale
- Click to change the vertical scale from 60° through 120° to 180° and back again (in this case the degrees refer to a 360° color wheel). Increasing the scale increases the range of hues visible in the display, while decreasing the scale increases precision.
- Hue curve
- Select a point on the curve that corresponds to the desired input color and drag it up or down until it intersects with the desired output color.
- Output slider
- Modify the hue of all colors in the image.
- Width slider
- Adjust the width of the curve that passes through the selected point, increasing or decreasing the range of colors affected by the change.
Noise Reduction
Selecting this tool displays noise reduction controls in the image adjustment palette (see below). After enabling noise reduction by placing a check in the Noise reduction check box, adjust settings as described in this section.
The options available for Method vary with the camera used to create the current picture. If the only option available is Camera compatible, the remaining settings can be adjusted as follows:
- Amount
- Use the pull-down menu under Method to choose the amount of noise reduction performed.
- Edge Noise Reduction (RAW images only)
- Make outlines more distinct by reducing the occurrence of noise artifacts around edges.
- Astro Noise Reduction (RAW images only)
- Reduce the occurrence of randomly-spaced bright pixels in long exposures.
If the Method menu is available, choose Faster for faster processing or Better Quality 2013 (RAW images only) or Better Quality for more accurate noise reduction. You can also adjust the following items:
- Intensity
- Choose the noise reduction level from values between 0 and 100. The higher the value, the smoother the image and the less visible the artifacts caused by image “noise”.
- Sharpness
- Choosing high values for Intensity may smooth the image to the point that details are lost; this can be countered by increasing Sharpness.
- Edge Noise Reduction (RAW images only)
- Make outlines more distinct by reducing the occurrence of noise artifacts around edges.
- Astro Noise Reduction (RAW images only)
- Reduce the occurrence of randomly-spaced bright pixels in long exposures.
Better Quality 2013
Better Quality 2013 excels in reducing color noise at short wavelengths and over evenly-colored areas of the image. Selecting this option displays additional Luminance and Color items, allowing Intensity and Sharpness to be adjusted separately for each of these parameters.
Flock 2.6.2 Portable [2011, Браузер]
Год выпуска: 2011Жанр: БраузерРазработчик: Flock, Inc.Сайт разработчика: http://www.flock.com/Язык интерфейса: Мультиязычный (русский присутствует)Платформа: Windows 2000, XP, Vista, 7Системные требования: Интернет соединениеОписание: Flock — браузера, построенный на базе Mozilla Firefox, поэтому он обладает всеми характерными чертами этого высококачественного веб-браузера, схожими, интуитивно понятными меню, панелями и кнопками, персональными настройками, высокой степенью безопасности, усовершенствованной защитой конфиденциальной информации, а также возможностью автоматического обновле …
Некоторые выводы по работе с бета-версией Capture NX-D
Наличие бесплатного функционального, простого и удобного RAW-конвертера для пользователей Nikon несомненно послужит популяризации формата RAW.
Программа целиком и полностью оправдывает свое название – это именно сырая бета-версия (скорее даже альфа-), которая годится исключительно для знакомства с программой.
Чрезвычайно огорчает отсутствие инструмента локальных корректировок U-point.
Огорчает также отсутствие инструмента ретуши.
Пока не рекомендуется использовать Capture NX-D в реальной работе.
Разработчикам предлагается обратить внимание на перечень недоработок, выявленный при тестировании бета-версии.
* * *
Автор обзора: Константин Биржаков, март 2014 г.
При работе над обзором автор использовал фотографии: Оксана Швецова, 2013. Снято на Nikon D3000.
