Tesserocr 2.5.2
Содержание:
- Limits on the Application of Frequency-based Language Models to OCR
- Let’s create a simple Java Project in IntelliJ IDEA
- Распознавание текста с помощью Tesseract и Python
- Image Preparation
- Further Reading
- Использование OCR
- Limitations of Tesseract
- Other Platforms
- Running Tesseract
- Other Languages
- Development
- Usage
- Подготовка
- Что мы будем использовать?
- Adding Trained Data
- 6.2 Setup Tesseract (Implementing)
- Provide ground truth
- Adding the Tesseract Framework
- Adding Plugins
- Two types of models
- Train
- Improving Book OCR by Adaptive Language and Image Models
- Что такое оптическое распознавание символов?
Limits on the Application of Frequency-based Language Models to OCR
Publication Year: 2011
Although large language models are used in speech recognition and machine translation applications, OCR systems are “far behind” in their use of language models. The reason for this is not the laggardness of the OCR community, but the fact that, at high accuracies, a frequency-based language model can do more damage than good, unless carefully applied. This paper presents an analysis of this discrepancy with the help of the Google Books n-gram Corpus, and concludes that noisy-channel models that closely model the underlying classifier and segmentation errors are required.
Let’s create a simple Java Project in IntelliJ IDEA
Create a new project based on Maven and create an empty class. After creating the class my folder structure will be like this.
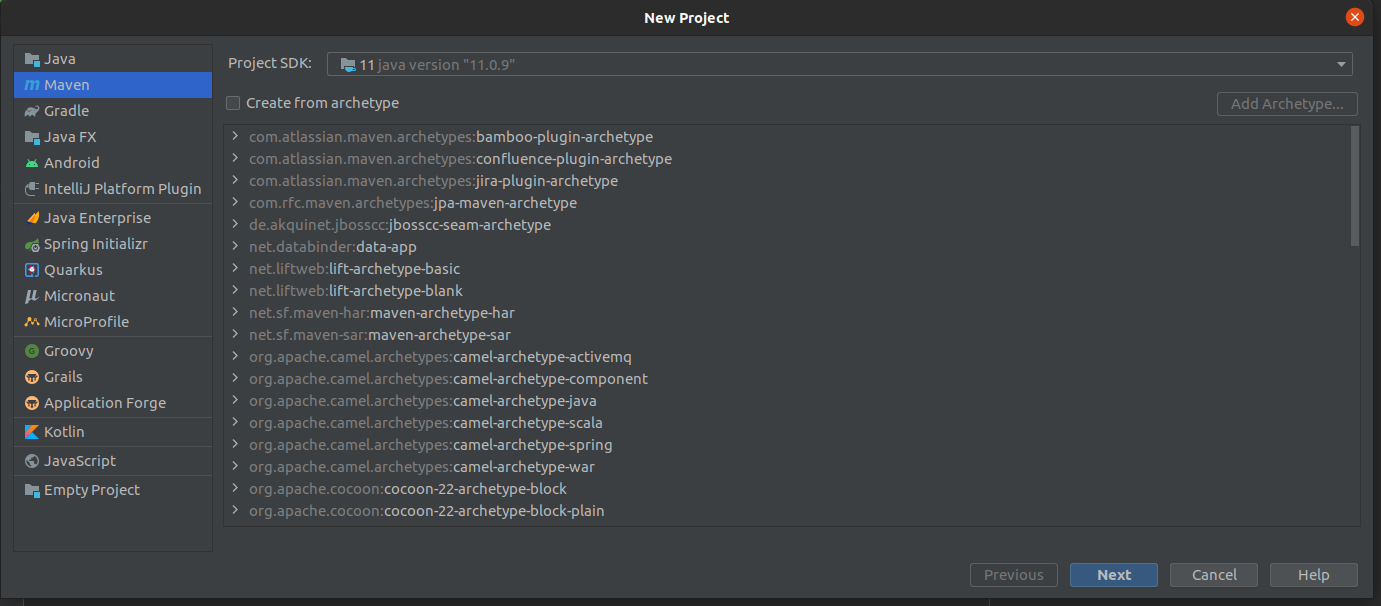
Creating a Project based on Maven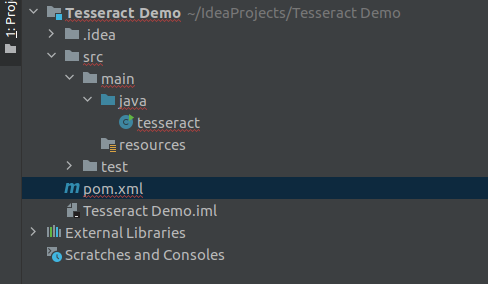
Folder Structure after creating the project
Modify your project’s pom.xml file to add the below dependency under dependencies element in pom.xml file to enable Maven.
Add Maven Dependency to pom.xml
After adding the above dependency, my pom.xml file will be like this.
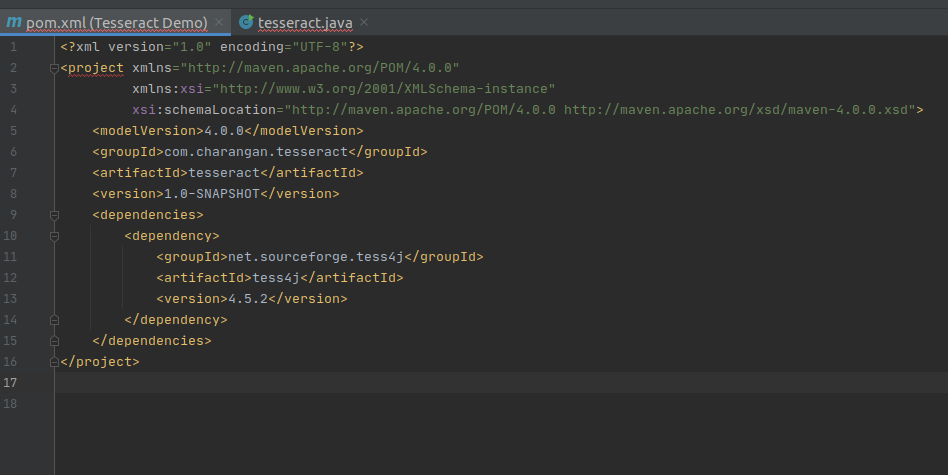
Modified pom.xml
Once we have an empty class, we can start adding some code to it. Here is the import statement for the instantiation of the Tesseract object.
Import Tess4J for our Project File
and also we need to import the below statement to avoid exceptions rising while recognizing the text.
Import Tess4J Exception
I am going to use files for recognition which are on my local computer. So I need to import the below statement to handle files.
Import Java File Lib
Now, my IntelliJ IDEA view is

After all, packages imported
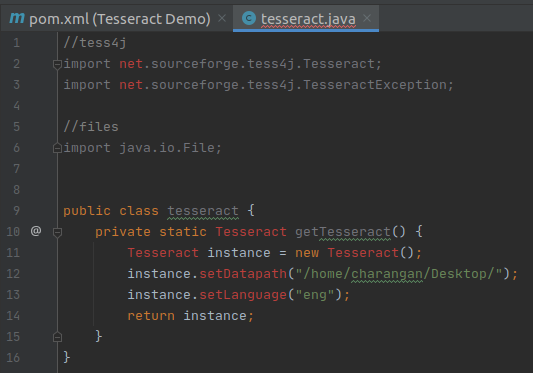
I will define a static method for Tesseract inside the class and Inside this method, make a new instance of Tesseract from the Maven library.
New Instance of Tesseract from the Maven Library
Next, I will add traineddata details to this instance like where the training data for this library can be found. As I mentioned earlier, I have downloaded the traineddata for English and stored it on my Desktop. So add the below two lines of code after instance creation inside the method.
Note: According to your traineddata file’s directory, the path will change.
Set Traineddaata Path
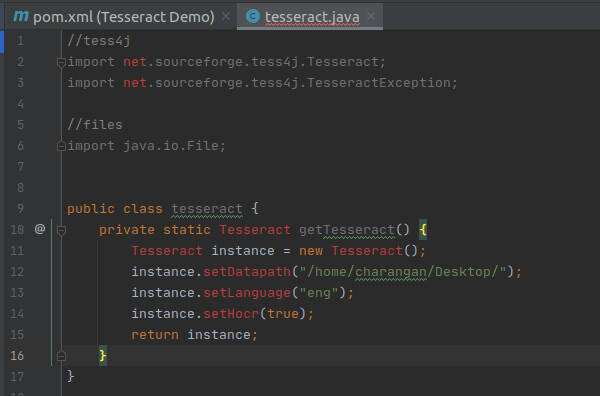
Finally, return the instance. Now my screen will be:
Return Plain Text
The above method returns the text as plain text from the resource. If you want to return the result as an HTML, you need to tell Tesseract that the output we need is in the format something called the hOCR(HTML). Basically, the hOCR format is a simple XML-based format.
We can make it an hOCR format by adding the below statement above the return statement.
Add hOCR Output Method
Return hOCR Format
Finally, I put the main function below to make it usable and call the static method inside it.
Tesseract Main Method
Now, what we have to do is provide a file to Tesseract which it can parse and read its Text. In this example, I am going to try with an image that is stored in my Ubuntu Desktop.
So, after knowing about the input file path, creating a new file instance, and setting the file path, I also need to pass the file to tesseract for recognition and write a java print statement to get the output. Finally, your code view will be:
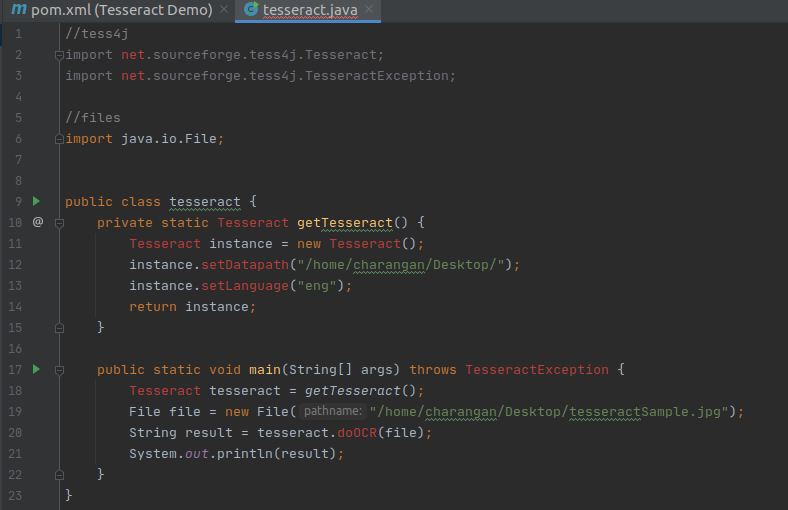
With the main function
Since I settled all things correctly, still IntelliJ IDEA shows some errors in my files. It’s nothing but, we have to reload the project to load all dependency packages and sources.
Right-click on pom.xml file -> Maven -> Reload Project
Now, the problem is solved.
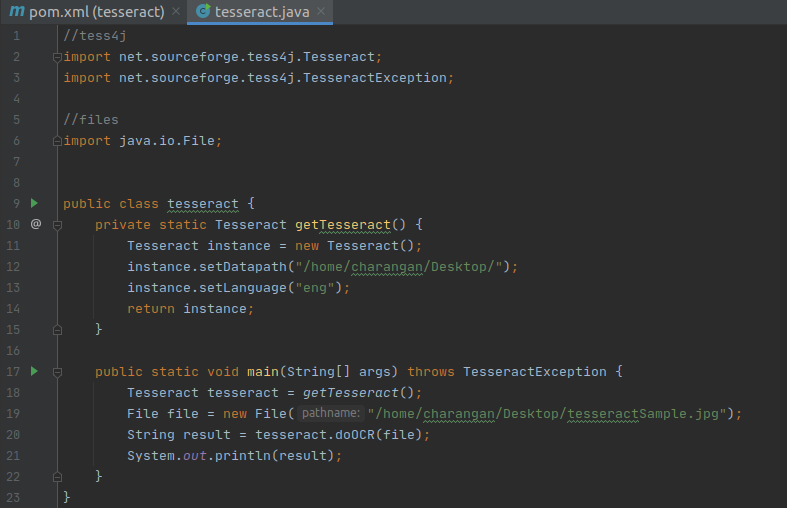
No errors after reloading the project
If we look closely, there is nothing we did much. That is the power of this wrapper for the Tesseract library I am provided with. Now we are ready to run our sample OCR program.
Note: Confirm that your project is set to the latest version of Java like Java 11. If you get an error regarding the Java version, you can simply set it to the latest version.
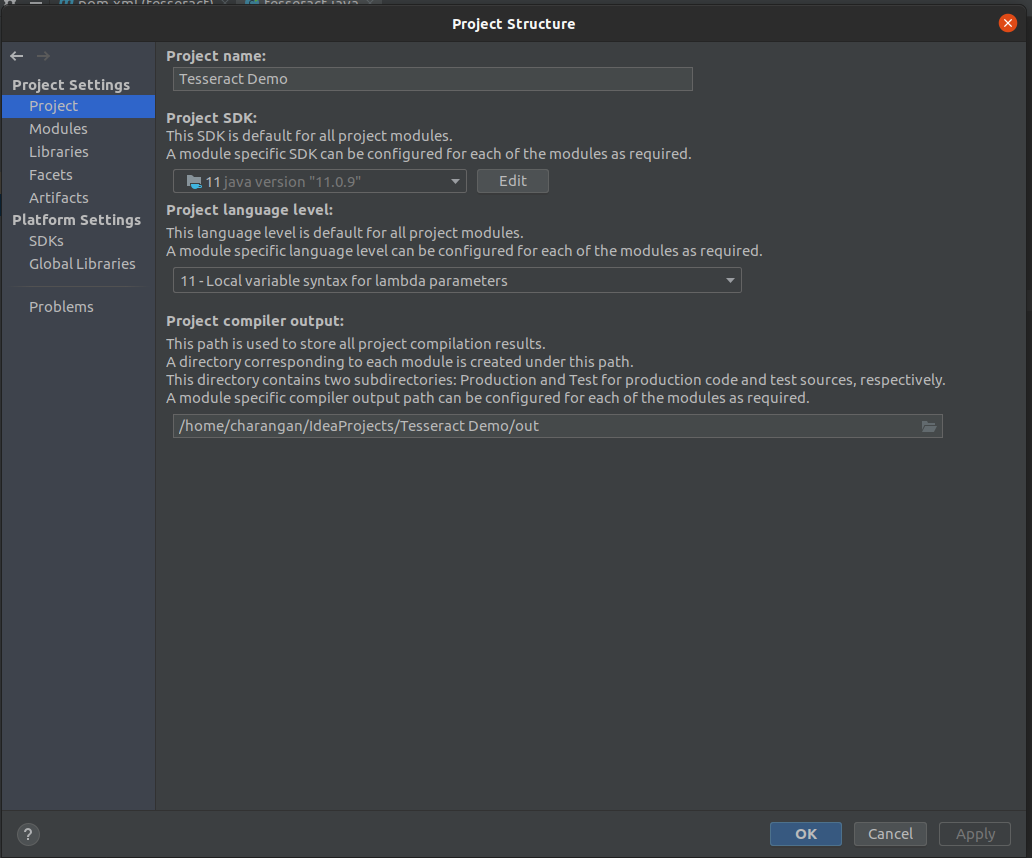
Go File -> Project Structure.
You will see a dialog box given below, Make sure that the Java version under Project and Modules section is set to the latest version of Java like Java 11.
Project Setting -> Project
Project
Project Setting -> Modules
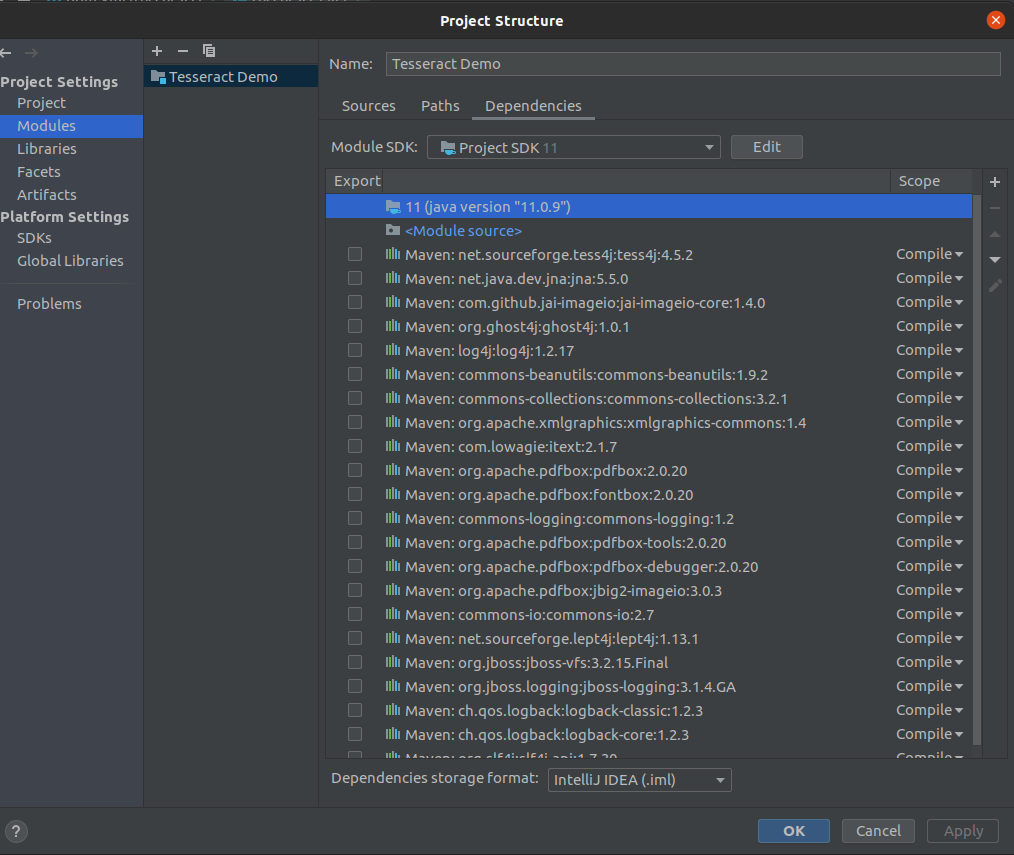
Module
And also make sure that the Java Compiler setting also by pressing Ctrl + Alt + S. You will popup a dialog box, then navigate to Java Compiler as given below and check if the target bytecode version is set above to 1.5 for your project.
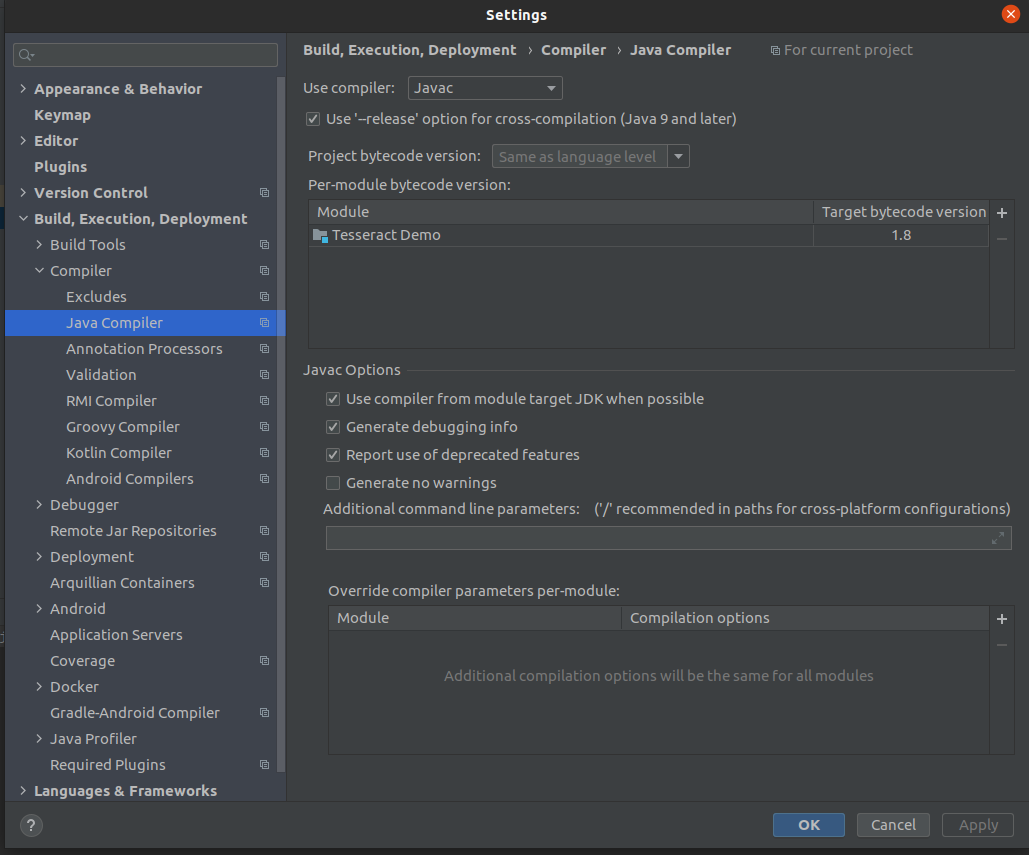
Target bytecode
Fine. Now the time to take a test drive through our sample application, so I am going to use google’s logo as my sample input.
Note: Try to avoid PNG images and use JPG/JPEG images instead if you’re working with images at all. This is because Tesseract is very bad at reading PNG images due to its compression techniques.

source: https://www.putnamlib.org/images/google.jpg/@@images/image.jpeg
Once I run the project, I get this simple output as:
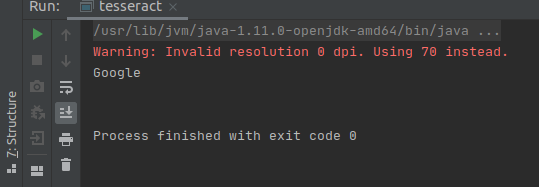
Output
Распознавание текста с помощью Tesseract и Python
Создадим файл с именем ocr.py:
Теперь применим OCR к изображению, используя pytesseract:
Вызов оператора pytesseract.image_to_string преобразует изображение в строку текста
Обратите внимание, что была передана ссылка на временный файл картинки
print(text) – распечатывает результата распознавания скрипта в терминал. В ваших собственных приложениях вы можете выполнить некоторые дополнительные действия, например, проверку орфографии или обработку естественного языка.
В заключении, строки с cv2.imshow обрабатывают исходное и предварительно обработанное изображение на экране в отдельных окнах. input(‘pause…’) сообщает программе, что нужно ожидать пользовательского нажатия клавиши перед выходом из сценария.
Image Preparation
If you need to convert images, use the popular open-source https://imagemagick.org
-
Install using HomeBrew (instead of downloading, gunzip, variables, etc.):
brew install imagemagick
-
Because ImageMagick depends on Ghostscript fonts, install them as well:
brew install ghostscript
-
To convert a file (such as a pdf) into a high-resolution image, use Imagemagick’s convert command:
convert -density 300 test.pdf -depth 8 -strip -background white -alpha off out.tiff
This also takes off Alpha channels and outputs to a TIFF format file.
Alternative parameters are “-monochrome” to convert to black-and-white.
The last parameter is the output file.
Resources for this section include:
Using Tesseract-OCR to extract text from images
Further Reading
- Best trained model for LSTM Tesseract 4.0
- Dropbox approach to OCR 4.2017
- Overview of Tesseract OCR Engine Legacy
- Comparison of OCR Accuracy on Early Printed Books using the
Open Source Engines Calamari and OCRopus - Efficient, Lexicon-Free OCR using Deep Learning
- Suitability of OCR Engines in Information Extraction Systems — A Comparative Evaluation
- DeepText Benchmark
- OCR Project List
- Tesseract Github Latest Release
- CVPR 2019 — Character Region Awareness for Text Detection (CRAFT)
- Credit Card OCR with OpenCV and Python
- Image Preprocessing
- OCR using Tesseract on Raspberry Pi
- Tesseract OCR for Non-English Languages
- How to Do OCR from the Linux Command Line Using Tesseract
- An Overview of the Tesseract OCR Engine
Использование OCR
Раньше оцифровка документов осуществлялась путем ручного набора текста на компьютере. Благодаря OCR этот процесс упрощается, поскольку документ можно сканировать, обрабатывать, а текст извлекать и сохранять в редактируемой форме, например в текстовом документе.
Если у вас есть сканер документов на вашем телефоне, например Adobe Scan, вы, вероятно, сталкивались с использованием технологии OCR.
Аэропорты также могут использовать OCR для автоматизации процесса распознавания паспортов и извлечения из них информации.
Другие варианты использования OCR включают автоматизацию процессов ввода данных, обнаружения и распознавания автомобильных номеров.
Limitations of Tesseract
Tesseract works best when there is a clean segmentation of the foreground text from the background. In practice, it can be extremely challenging to guarantee these types of setup. There are a variety of reasons you might not get good quality output from Tesseract like if the image has noise on the background. The better the image quality (size, contrast, lightning) the better the recognition result. It requires a bit of preprocessing to improve the OCR results, images need to be scaled appropriately, have as much image contrast as possible, and the text must be horizontally aligned. Tesseract OCR is quite powerful but does have the following limitations.
Tesseract limitations summed in the list.
- The OCR is not as accurate as some commercial solutions available to us.
- Doesn’t do well with images affected by artifacts including partial occlusion, distorted perspective, and complex background.
- It is not capable of recognizing handwriting.
- It may find gibberish and report this as OCR output.
- If a document contains languages outside of those given in the -l LANG arguments, results may be poor.
- It is not always good at analyzing the natural reading order of documents. For example, it may fail to recognize that a document contains two columns, and may try to join text across columns.
- Poor quality scans may produce poor quality OCR.
- It does not expose information about what font family text belongs to.
Other Platforms
Tesseract may work on more exotic platforms too. You can either try compiling it yourself, or take a look at the list of other projects using Tesseract.
Running Tesseract
Tesseract is a command-line program, so first open a terminal or command prompt. The command is used like this:
So basic usage to do OCR on an image called ‘myscan.png’ and save the result to ‘out.txt’ would be:
Or to do the same with German:
It can even be used with multiple languages traineddata at a time eg. English and German:
You can also create a searchable pdf directly from tesseract ( versions >=3.03):
More information about the various options is available in the Tesseract manpage.
Other Languages
Tesseract has been trained for , check for your language in the Tessdata repository.
It can also be trained to support other languages and scripts; for more details see TrainingTesseract.
Development
Also, it is free software, so if you want to pitch in and help, please do!
If you find a bug and fix it yourself, the best thing to do is to attach the patch to your bug report in the Issues List
Usage
Initialize and re-use the tesseract API instance to score multiple
images:
from tesserocr import PyTessBaseAPI

images =

with PyTessBaseAPI() as api:
    for img in images:
        api.SetImageFile(img)
        print(api.GetUTF8Text())
        print(api.AllWordConfidences())
# api is automatically finalized when used in a with-statement (context manager).
# otherwise api.End() should be explicitly called when it's no longer needed.
exposes several tesseract API methods. Make sure you
read their docstrings for more info.
Basic example using available helper functions:
import tesserocr
from PIL import Image

print(tesserocr.tesseract_version())  # print tesseract-ocr version
print(tesserocr.get_languages())  # prints tessdata path and list of available languages

image = Image.open('sample.jpg')
print(tesserocr.image_to_text(image))  # print ocr text from image
# or
print(tesserocr.file_to_text('sample.jpg'))
and can be used with to
concurrently process multiple images which is highly efficient.
GetComponentImages example:
from PIL import Image
from tesserocr import PyTessBaseAPI, RIL

image = Image.open('/usr/src/tesseract/testing/phototest.tif')
with PyTessBaseAPI() as api:
    api.SetImage(image)
    boxes = api.GetComponentImages(RIL.TEXTLINE, True)
    print('Found {} textline image components.'.format(len(boxes)))
    for i, (im, box, _, _) in enumerate(boxes):
        # im is a PIL image object
        # box is a dict with x, y, w and h keys
        api.SetRectangle(box, box, box, box)
        ocrResult = api.GetUTF8Text()
        conf = api.MeanTextConf()
        print(u"Box: x={x}, y={y}, w={w}, h={h}, "
              "confidence: {1}, text: {2}".format(i, conf, ocrResult, **box))
Orientation and script detection (OSD):
from PIL import Image
from tesserocr import PyTessBaseAPI, PSM

with PyTessBaseAPI(psm=PSM.AUTO_OSD) as api:
    image = Image.open("/usr/src/tesseract/testing/eurotext.tif")
    api.SetImage(image)
    api.Recognize()

    it = api.AnalyseLayout()
    orientation, direction, order, deskew_angle = it.Orientation()
    print("Orientation: {:d}".format(orientation))
    print("WritingDirection: {:d}".format(direction))
    print("TextlineOrder: {:d}".format(order))
    print("Deskew angle: {:.4f}".format(deskew_angle))
or more simply with page segmentation mode:
from tesserocr import PyTessBaseAPI, PSM

with PyTessBaseAPI(psm=PSM.OSD_ONLY) as api:
    api.SetImageFile("/usr/src/tesseract/testing/eurotext.tif")

    os = api.DetectOS()
    print("Orientation: {orientation}\nOrientation confidence: {oconfidence}\n"
          "Script: {script}\nScript confidence: {sconfidence}".format(**os))
more human-readable info with tesseract 4+ (demonstrates LSTM engine usage):
from tesserocr import PyTessBaseAPI, PSM, OEM

with PyTessBaseAPI(psm=PSM.OSD_ONLY, oem=OEM.LSTM_ONLY) as api:
    api.SetImageFile("/usr/src/tesseract/testing/eurotext.tif")

    os = api.DetectOrientationScript()
    print("Orientation: {orient_deg}\nOrientation confidence: {orient_conf}\n"
          "Script: {script_name}\nScript confidence: {script_conf}".format(**os))
Iterator over the classifier choices for a single symbol:
from __future__ import print_function

from tesserocr import PyTessBaseAPI, RIL, iterate_level

with PyTessBaseAPI() as api:
    api.SetImageFile('/usr/src/tesseract/testing/phototest.tif')
    api.SetVariable("save_blob_choices", "T")
    api.SetRectangle(37, 228, 548, 31)
    api.Recognize()

    ri = api.GetIterator()
    level = RIL.SYMBOL
    for r in iterate_level(ri, level):
        symbol = r.GetUTF8Text(level)  # r == ri
        conf = r.Confidence(level)
        if symbol:
            print(u'symbol {}, conf: {}'.format(symbol, conf), end='')
        indent = False
        ci = r.GetChoiceIterator()
        for c in ci:
            if indent:
                print('\t\t ', end='')
            print('\t- ', end='')
            choice = c.GetUTF8Text()  # c == ci
            print(u'{} conf: {}'.format(choice, c.Confidence()))
            indent = True
        print('---------------------------------------------')
Подготовка
Вам потребуется:
- Проверить, что PDF документ не позволяет извлечь текст обычным способом.
- Преобразовать страницы PDF документа в изображения высокого разрешения.
- Выполнить распознавание текста на изображениях и получить текст без форматирования.
Для Tesseract потребуется дополнительная настройка:
В Linux установите или скомпилируйте самостоятельно проекты «libleptonica-dev» и «libtesseract-dev». Скомпилированные библиотеки добавьте в ваш проект. Например, под Ubuntu 20.04:
В macOS установите Tesseract с помощью brew:
После этого нужно добавить файлы для некоторых зависимостей в проект:
liblibdl.so должна оказаться уровнем выше относительно libleptonica-1.78.0.so и libtesseract41.so
В проекте для каждого из *.so файлов нужно установить свойство «Copy to output directory» в «Always copy».
Обратите внимание, что с Tesseract может быть установлена иная версия зависимостей. Например, в моем случае была установлена Leptonica 1.79.0 вместо требуемой 1.78.0
Это нормально, если установленные версии совместимы с Leptonica 1.78 и Tesseract 4.1.
Что мы будем использовать?
Для этого проекта OCR мы будем использовать библиотеку Python-Tesseract или просто PyTesseract, которая является оболочкой для Google Tesseract-OCR Engine.
Я выбрал его, потому что он полностью открыт и разрабатывается и поддерживается Google. Следуйте этим инструкциям, чтобы установить Tesseract на свой компьютер, поскольку от него зависит PyTesseract.
Мы также будем использовать веб-фреймворк Flask для создания нашего простого OCR-сервера, на котором мы можем делать снимки через веб-камеру или загружать фотографии для распознавания символов.
Мы также собираемся использовать Pipenv, поскольку он также выполняет настройку виртуальной среды и управление требованиями.
Помимо этого, мы также будем использовать библиотеку Pillow, которая является ответвлением Python Imaging Library (PIL) для обработки открытия и обработки изображений во многих форматах.
В этом посте мы сконцентрируемся на PyTesseract, хотя есть и другие библиотеки Python, которые могут помочь вам извлекать текст из изображений, например:
- Textract: который может извлекать данные из PDF-файлов, но является тяжелым пакетом.
- Pyocr: предлагает больше вариантов обнаружения, таких как предложения, цифры или слова.
Adding Trained Data
In order to better hone its predictions within the limits of a given language, Tesseract requires language-specific training data to perform its OCR.
Navigate to Love In A Snap/Resources in Finder. The tessdata folder contains a bunch of English and French training files. The love poem you’ll process during this tutorial is mainly in English, but also contains a bit of French. Très romantique!
Your poem vil impress vith French! Ze language ov love! *Haugh* *Haugh* *Haugh*
Now, you’ll add tessdata to your project. Tesseract OCR iOS requires you to add tessdata as a referenced folder.
- Drag the tessdata folder from Finder to the Love In A Snap folder in Xcode’s left-hand Project navigator.
- Select Copy items if needed.
- Set the Added Folders option to Create folder references.
- Confirm that the target is selected before clicking Finish.
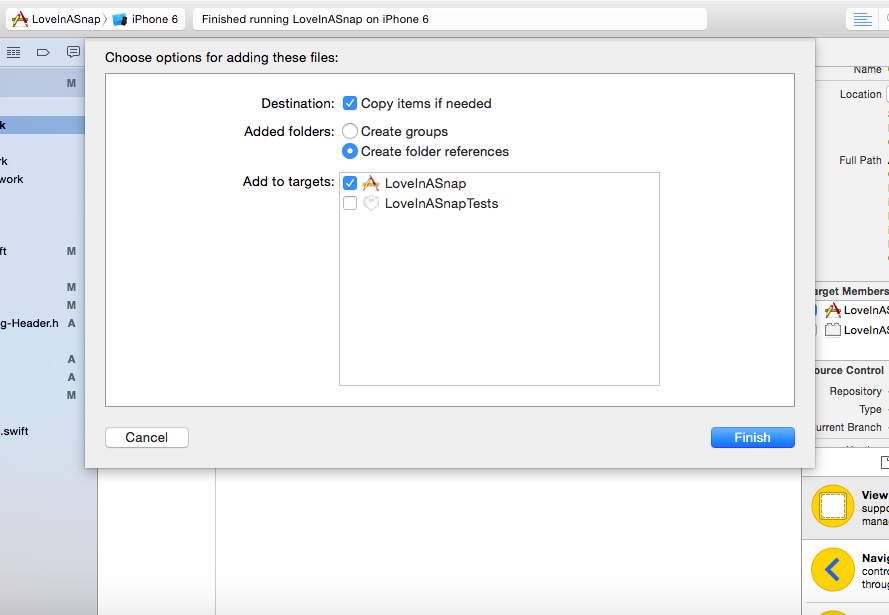
Add tessdata as a referenced folder
You should now see a blue tessdata folder in the navigator. The blue color indicates that the folder is referenced rather than an Xcode group.
Now that you’ve added the Tesseract framework and language data, it’s time to get started with the fun coding stuff!
6.2 Setup Tesseract (Implementing)
So lets add the required functions to TesseractWrapper, and call them from Init(). Along with a handle to the tesseract instance and a constructor. Also returning a bool depending on whether Init was successful or not.
private static extern IntPtr TessBaseAPICreate();private static extern int TessBaseAPIInit3(IntPtr handle, string dataPath, string language);IntPtr tessHandle;public TesseractWrapper(){tessHandle = IntPtr.Zero;}public bool Init(string lang, string dataPath){try { tessHandle = TessBaseAPICreate(); int init = TessBaseAPIInit3(tessHandle, dataPath, lang); if (init != 0) { Debug.LogError("Tess Init Failed"); return false; } return true; } catch (Exception e) { Debug.LogError(e); return false; }}
You can observe that TessBaseAPIInit3() requires a data path and language which needs to be passed in as parameters so let’s change TesseractDriver accordingly.
public void Setup(){ _tesseract = new TesseractWrapper(); string datapath = Application.streamingAssetsPath + "/tessdata/"; if (_tesseract.Init("eng", datapath)) { Debug.Log("Init Successful"); }}
Note I’m using “eng” to specify my tessdata language, similarly you can specify yours. If all goes well you will be greeted with…
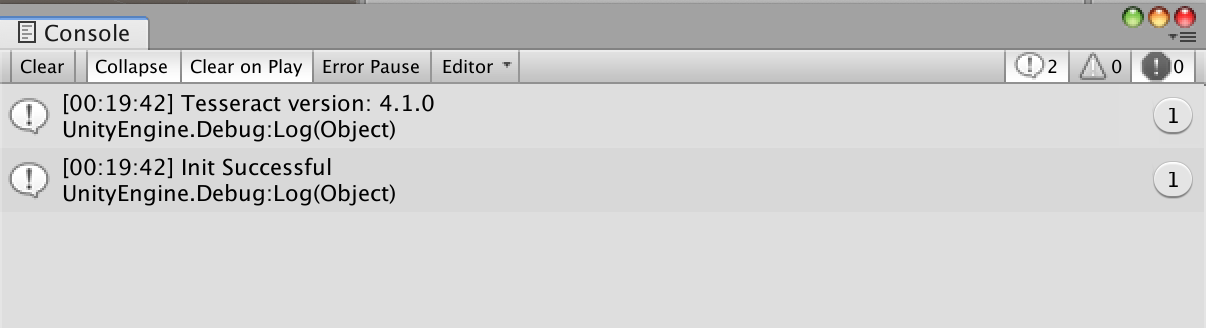
This means your Tesseract version is setup/working with the tessdata provided
Provide ground truth
Place ground truth consisting of line images and transcriptions in the folder
. This list of files will be split into training and
evaluation data, the ratio is defined by the variable.
Images must be TIFF and have the extension or PNG and have the
extension , or .
Transcriptions must be single-line plain text and have the same name as the
line image but with the image extension replaced by .
The repository contains a ZIP archive with sample ground truth, see
ocrd-testset.zip. Extract it to and run
.
NOTE: If you want to generate line images for transcription from a full
page, see tips in issue 7 and
in particular .
Adding the Tesseract Framework
First, you’ll have to install Tesseract OCR iOS via CocoaPods, a widely used dependency manager for iOS projects.
If you haven’t already installed CocoaPods on your computer, open Terminal, then execute the following command:
sudo gem install cocoapods
Enter your computer’s password when requested to complete the CocoaPods installation.
Next, into the Love In A Snap starter project folder. For example, if you’ve added Love In A Snap to your desktop, you can enter:
cd ~/Desktop/"Love In A Snap/Love In A Snap Starter"
Next, enter:
pod init
This creates a Podfile for your project.
Replace the contents of Podfile with:
platform :ios, '12.1'

target 'Love In A Snap' do
  use_frameworks!

  pod 'TesseractOCRiOS'

end
This tells CocoaPods that you want to include TesseractOCRiOS as a dependency for your project.
Back in Terminal, enter:
pod install
This installs the pod into your project.

As the terminal output instructs, “Please close any current Xcode sessions and use `Love In A Snap.xcworkspace` for this project from now on.” Open Love In A Snap.xcworkspace in Xcode.
Adding Plugins
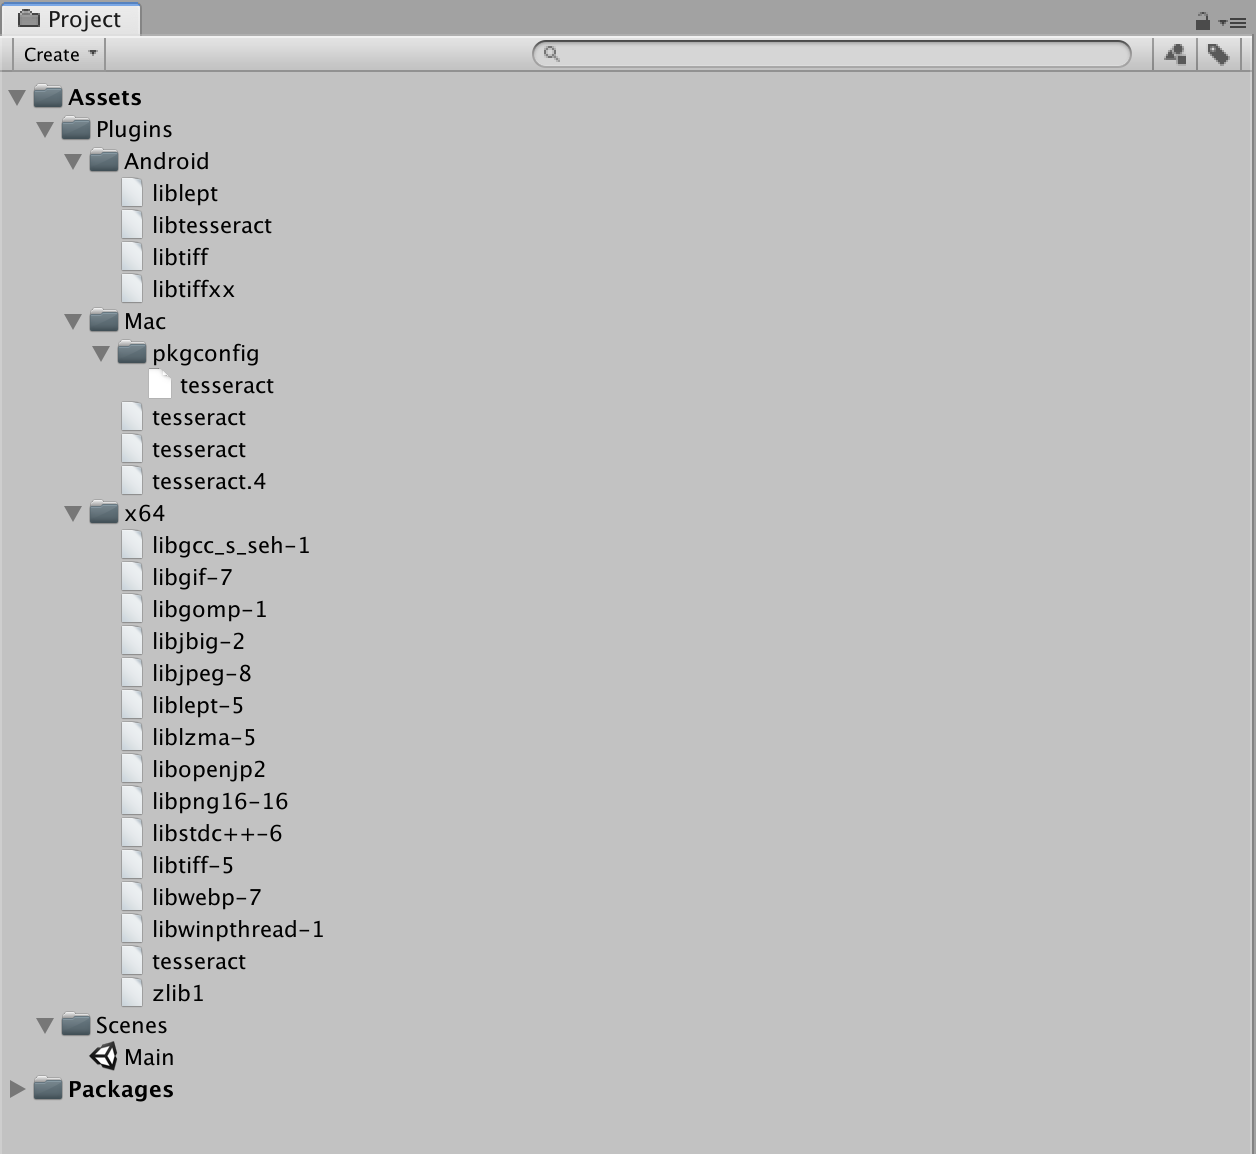
This project contains Tesseract 4.1.0 plugins inclusive of dependencies for Mac, Windows x64 and Android… but incase you need it for a different version or for a different platform you can do so by Installing Tesseract via pre-built binary package or build it from source on your platform or a Docker.For Android, I built it via installing Tesseract into an Android Docker. To give credit where credit is due, took “inspirations” from https://github.com/rhardih/bad. You would need to modify the MakeFile and DockerFile if you want to change the something like version.The DLLs have internal dependencies with each other so changing the names is a bad idea.
Two types of models
The repository contains two types of models,
- those for a single language and
- those for a single script supporting one or more languages.
Most of the script models include English training data as well as the script, but not Cyrillic, as that would have a major ambiguity problem.
On Debian and Ubuntu, the language based traineddata packages are named where LANG is the three letter language code eg. tesseract-ocr-eng (English language), tesseract-ocr-hin (Hindi language), etc.
On Debian and Ubuntu, the script based traineddata packages are named where SCRIPT is the four letter script code eg. tesseract-ocr-script-latn (Latin Script), tesseract-ocr-script-deva (Devanagari Script), etc.
Data files for a particular script
Initial capitals in the filename indicate the one model for all languages in that script. These are now available under script subdirectory.
- Latin is all latin-based languages, except vie.
- Vietnamese is for latin-based Vietnamese language.
- Fraktur is basically a combination of all the latin-based languages that have an ‘old’ variant.
- Devanagari is for hin+san+mar+nep+eng.
LSTM training details for different languages and scripts
For Latin-based languages, the existing model data provided has been trained on about 400000 textlines spanning about 4500 fonts. For other scripts, not so many fonts are available, but they have still been trained on a similar number of textlines. eg. Latin ~4500 fonts, Devanagari ~50 fonts, Kannada 15.
With a theory that poor accuracy on test data and over-fitting on training data was caused by the lack of fonts, the training data has been mixed with English, so that some of the font diversity might generalize to the other script. The overall effect was slightly positive, hence the script models include English language also.
Example — jpn and Japanese
‘jpn’ contains whatever appears on the www that is labelled as the language, trained only with fonts that can render Japanese.
Japanese contains all the languages that use that script (in this case just the one) PLUS English.The resulting model is trained with a mix of both training sets, with the expectation that some of the generalization to 4500 English training fonts will also apply to the other script that has a lot less.
‘jpn_vert’ is trained on text rendered vertically (but the image is rotated so the long edge is still horizontal).
‘jpn’ loads ‘jpn_vert’ as a secondary language so it can try it in case the text is rendered vertically. This seems to work most of the time as a reasonable solution.
See the Tesseract wiki for additional information.
All data in the repository are licensed under the
Apache-2.0 License, see file LICENSE.
Train
which is basically a shortcut for
Run to see all the possible targets and variables:
Change directory assumptions
To override the default path name requirements, just set the respective variables in the above list:
If you want to use shell variables to override the make variables (for example because
you are running tesstrain from a script or other makefile), then you can use the flag:
Make model files (traineddata)
When the training is finished, it will write a file which can be used
for text recognition with Tesseract. Note that this file does not include a
dictionary. The executable therefore prints an warning.
It is also possible to create additional files from intermediate
training results (the so called checkpoints). This can even be done while the
training is still running. Example:
This will create two directories and in
with a best (double based) and fast (int based) model for each checkpoint.
It is also possible to create models for selected checkpoints only. Examples:
Add and and replace by the output directory if needed.
Improving Book OCR by Adaptive Language and Image Models
Publication Year: 2012
In order to cope with the vast diversity of book content and typefaces, it is important for OCR systems to leverage the strong consistency within a book but adapt to variations across books. In this work, we describe a system that combines two parallel correction paths using document-specific image and language models. Each model adapts to shapes and vocabularies within a book to identify inconsistencies as correction hypotheses, but relies on the other for effective cross-validation. Using the open source Tesseract engine as baseline, results on a large dataset of scanned books demonstrate that word error rates can be reduced by 25% using this approach.
Что такое оптическое распознавание символов?
Оптическое распознавание символов включает в себя обнаружение текстового содержимого на изображениях и перевод изображений в закодированный текст, который компьютер может легко понять. Изображение, содержащее текст, сканируется и анализируется, чтобы идентифицировать символы в нем. После идентификации символ преобразуется в машинно-кодированный текст.
Как этого добиться на самом деле? Для нас текст на изображении легко различим, и мы можем обнаруживать символы и читать текст, но для компьютера это все серии точек.
Изображение сначала сканируется, а текст и графические элементы преобразуются в растровое изображение, которое по сути представляет собой матрицу из черных и белых точек. Затем изображение предварительно обрабатывается, где яркость и контраст регулируются для повышения точности процесса.
Изображение теперь разделено на зоны, идентифицирующие интересующие области, например, где находятся изображения или текст, и это помогает начать процесс извлечения. Области, содержащие текст, теперь могут быть разбиты на строки, слова и символы, и теперь программное обеспечение может сопоставлять символы с помощью сравнения и различных алгоритмов обнаружения. Конечный результат – это текст на изображении, которое нам дано.
Процесс может быть неточным на 100% и может потребоваться вмешательство человека для исправления некоторых элементов, которые не были отсканированы правильно. Исправление ошибок также может быть достигнуто с помощью словаря или даже обработки естественного языка (NLP).
Теперь вывод можно преобразовать в другие носители, такие как текстовые документы, PDF-файлы или даже аудиоконтент, с помощью технологий преобразования текста в речь.
