Rainmeter
Содержание:
- Installing Automatically
- Other enhancements and fixes in Rainmeter 4.1
- Refresh
- Files and Folders
- Action options
- Format
- Finding Skins
- Opinions: Best Rainmeter Skins?
- The Game mode tab
- Options
- Major additions and changes in Rainmeter 4.3
- Application bangs
- Configs
- The Skins tab
- Going Further
- Usage
- Major additions and changes in Rainmeter 4.5.0
- Deprecated Options
- Values
Installing Automatically
Skins in the Rainmeter Skin Packager (.rmskin) format can be easily and automatically installed with the Rainmeter Skin Installer. During a normal Rainmeter installation, the .rmskin extension is associated in Windows with the Skin Installer program, and simply double-clicking the file will install it in Rainmeter.

This dialog lists each component that will be installed. These may include:
- Skins : At least one skin will always be included and installed in the Rainmeter\Skins folder. The author of the package may indicate that one or more skins will automatically be loaded when the installation is complete.
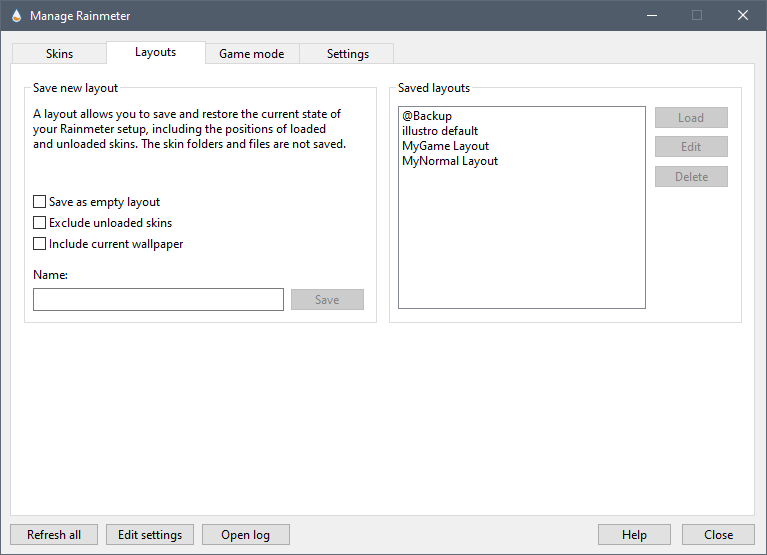
- Layouts : If the author has added a to the package it will be installed in the Rainmeter\Layouts folder. If Apply included layout is selected, the layout will be applied to Rainmeter following installation.
- Plugins : If the author has added custom plugins to the package the appropriate 32bit/64bit architecture version of the plugin .dll files will be installed to the Rainmeter\Plugins folder.
Legacy .rmskin format components. No longer supported in new Rainmeter 2.4 .rmskin files:
- Fonts : If an author has included font files with the package, they will be installed in the Windows\Fonts folder. This may be disabled by unchecking Install fonts to system in the Advanced pull-down menu.
- Addons : If an author has included addon executable files with the package, they will be installed in the Rainmeter\Addons folder.
If any of the skins to be installed already exist, they will be moved to a Backup folder before installation. This may be disabled by unchecking Backup skins in the Advanced pull-down menu.
Click Install to complete the installation of the package.
Note: If Rainmeter is being run as a installation, start SkinInstaller.exe from the Rainmeter program folder, and browse to the .rmskin file to install it.
Other enhancements and fixes in Rainmeter 4.1
CoreTemp Plugin: The author of both the CoreTemp application and Rainmeter plugin, Arthur Liberman, added CPU core-specific values to the data available in the plugin. See CoreTemp plugin for details.
Manage dialog: When a skin is selected in the Skins list, the Enter key will toggle loading and unloading the skin.
Illustro default skins: Changed the URL used to get the user’s WAN IP address in the Network skin in Illustro. Note that Illustro will not be installed or updated on existing Rainmeter installations, only on new installations, and this change should be manually made if Illustro is currently being used.
PCRE Regular Expressions: Added UCP support to the regular expression library, to enable \X \P \p in expressions.
Net measures: Added a new option to return the value of NetIn / NetOut / NetTotal measures in bits rather than the default bytes.
Formulas: Added new math function to convert radians to degrees.
Shape meter: Added Path1 alternative of the Path shape. It will use a different form of the when the shape is filled with a color or gradient. This determines what parts of a shape with intersecting segments are «inside» the shape and what are «outside», for purposes of filling the shape with the defined color or gradient. See for details.
Bitmap meter: Changed the allowable measure value when from a C-language int data type (2,147,483,647 maximum) to int64 (9,223,372,036,854,775,807 maximum).
Variables: New built-in variable. The path and executable for the text editor defined in in Rainmeter settings, or the text editor associated with .ini files in Windows. The default will be Windows Notepad.exe.
Refresh
The action is important in Rainmeter. The effect of refreshing a skin is the same as if you had unloaded and then re-loaded the skin. When this happens, all variables and other options are reset according to their original values in the skin file, and all measures restart from the beginning. Refreshing a skin is also necessary to apply any changes that have been made to a skin’s files.
You can refresh any skin by selecting in the context menu, or browsing to the skin in Manage and clicking the button in the top-right.
It may be ugly, but it’s different.
Try refreshing the Clock skin that you edited before. You will see the skin’s font face instantly change.
You have now edited your first skin! This is the same basic process that you will use to customize, modify, and eventually create skins of your own.
Files and Folders
All skins are stored in Rainmeter’s «Skins» folder. If Rainmeter has been installed normally, the default location of the Skins folder is:
If Rainmeter is installed as a , the Skins folder is found in the installation folder. The Skins folder can also be changed in Rainmeter’s .
A skin is stored as a named .ini text file e.g. SkinName.ini in its own named folder within Skins, as in: .
All of these folder paths may be referenced in a skin as built-in-variables.
Variants
If a single folder contains multiple , …etc. files, they are each considered variants of the same skin. Only one variant can be active at a time, and all variants use the same settings. Separate skins not to be treated as variants must be stored in separate folders.
Variants:
Separate skins:
@Resources
Any supporting files used by the skin, such as images, addon executables, sounds, or Lua scripts, should also be stored in the skin folder. Complex skins are recommended to store supporting files in a folder called @Resources inside the folder. The @Resources folder is used by Rainmeter to load custom fonts and .
Config
Each skin is identified with a certain config name. The config name is based on the path from the main Skins folder to the skin file. For example, if a skin is located at…
…then the config name would be:
Because skins may have any number of variants, many Rainmeter features, especially bangs, refer to a specific skin by its config name, rather than the skin’s filename.
Root config
Skins may also be stored in subfolders within the same root config folder. They share the same @Resources folder, and are packaged and installed together. Otherwise, Rainmeter treats each subfolder as a separate config.
For example, the following skins belong to the «illustro» suite:
This means that they are both located in the same root config folder, «illustro,» in the main Skins directory.
The root config folder for a skin will ALWAYS be directly under . No matter how many levels of folders your suite of skins may have, there will always be a single, shared root config folder for that suite of skins, directly under the ..Skins\ folder. This is where the @Resources folder must be.
Each skin has a unique config name:
But since they belong to the same root config, they share the same @Resources folder:
A suite is an informal term for skins that are organized together in this manner. Suites are often used by skin authors to make a set of skins that share a common style, or complement each other in some way. If a root config folder contains only one file, then the config and root config are the same, and the skin can be stored, packaged and installed by itself.
Action options
Options in a skin which cause Rainmeter to take some action. Actions may be triggered by user input such as mouse actions or changing values and system events within the skin, such as IfActions or .
Normally the value of an action option is going to be one or more bangs, or the execution of external commands in Windows. When multiple bangs are defined on the same action option, enclose them in square brackets .
LeftMouseUpAction=!HideMeter SomeMeterLeftMouseUpAction=LeftMouseUpAction= |
For bangs that take parameters, the arguments should be separated by a space. Parameters that contain spaces must use quotes around the parameter.
LeftMouseUpAction=LeftMouseUpAction=LeftMouseUpAction=LeftMouseUpAction=LeftMouseUpAction= |
External Windows commands can be executed by specifying the path to the executable and any parameters. Enclose the command in square brackets , and enclose any values with spaces in quotes.
LeftMouseUpAction=LeftMouseUpAction=["https://forum.rainmeter.net"] |
Magic Quotes
A parameter to a bang that contains embedded quotes should be surrounded by a what we call «»»magic quotes»»». A pair of triple quotes.
LeftMouseUpAction=LeftMouseUpAction= |
There are other instances where embedded characters like or in a parameter of a bang might cause Rainmeter to improperly detect the beginning of a or (formula) and become confused. Magic Quotes can help with this as well. All characters between «»»Magic Quotes»»» are treated strictly literal.
Escaping a #Variable# or
When using or in an action option, the current value of the variable or measure will be used. To have the literal string «#VarName#» or «» used, in a !SetOption value for instance, surround the variable or measure name with asterisk characters.
LeftMouseUpAction=!SetOption SomeMeter FontSize LeftMouseUpAction=!SetOption SomeMeter FontSize LeftMouseUpAction=!SetOption SomeMeter FontSize LeftMouseUpAction=!SetOption SomeMeter FontSize |
Normal variables
Nested variables
Format
The file is written as a standard INI file, which uses the following format:
Key=Value |
Each property of the skin is defined by a section. Each key is an option that modifies that property. The following sections may be used in skins:
-
Defines options that affect the entire skin.
-
Defines text strings that can be used throughout the skin.
-
Measures
Objects that retrieve (or «measure») information of some kind. -
Meters
Objects that display information and other visual elements. -
Define options that may be used by several meters.
-
Defines the name, version, license, and other non-functional information about the skin.
A skin must have at least one meter. All other properties are optional, and may not even be present, depending on what is needed for the skin. For skins that are publicly distributed, the section is strongly recommended.
There are only a few rules about using the INI format:
- All section names in a skin must be unique.
- All option names within a section must be unique.
- Section and option names should include alphanumeric characters only (no spaces or punctuation).
- Option values must be kept on a single line.
«Quotes» are not needed around strings used as an option value. Rainmeter will ignore quotes around option values.
Finding Skins
There is no official, central repository of Rainmeter skins. Rainmeter is an open platform, and skins can be found all over the Internet, from large screenshot galleries to small personal blogs and websites. That said, there are a few major sites where the Rainmeter community tends to gather:
-
Rainmeter.net
The Rainmeter homepage showcases some skins and suites from authors in the community. -
Rainmeter Forum
Other members of the community like to share their creations on the official boards. -
DeviantArt
Probably the biggest and best collection of skins, deviantArt not only has a special Rainmeter category, but also a dedicated Rainmeter Group, which is run by members of the community and features a curated stream of skins, screenshots, tutorials, interviews and more. All skins on deviantArt are checked for before they are accepted by the group. -
Lifehacker
Not only is the Lifehacker community full of Rainmeter users, but Lifehacker’s editors frequently post featured desktops and how-to guides for popular skins under the Rainmeter tag. Be sure to browse the Lifehacker Desktop Show & Tell pool on Flickr, as well.
Malware
Rainmeter is built on an open software ecosystem. And like other open software, we occasionally have to deal with malware in our midst. Other than Rainmeter.net, the websites listed above allow anyone to upload and publish their own skins, and most sites have no policy of verifying either the identity of the uploader or the integrity of the files. We rely on members of the community to be watchful for malware and report it when found.
We recommend that you follow some simple, common-sense tips to make sure that your computer stays malware-free:
-
Whenever possible, only download skins in the Rainmeter Skin Installer .rmskin format. Recent versions of Rainmeter require new skin packages to be created by Rainmeter’s official Skin Packager, which helps reduce the risk of tampering. Many older skins may still be published as .zip files that must be installed manually—these files are at greater risk of containing malware, and you should look for a newer version of the skin, if possible. You should never download a .exe file that claims to be a Rainmeter skin installer.
-
Make sure the skin publisher is trustworthy. An account that is new, or has very few downloads, page views, or profile detals may be suspicious. Users that disable or delete comments on their submissions are also suspicious. In contrast, a long-standing author who has many comments and downloads is more likely to be safe.
-
If comments are enabled on the submission, check them to see if other users have reported the skin as malware. Likewise, if you discover that a skin is dangerous, please take a moment to warn your fellow Rainmeter users, by posting a message in the comments and reporting the submission to the side administrators. Sites like deviantArt and Flickr include an easy «Report Spam» button on every page.
-
If you are suspicious of a skin for any reason, upload the file to VirusTotal, which will scan the file with over 40 anti-malware services and report the results to you. (Note that false positives are common; only report skins that are flagged as dangerous by a significant number of tests.)
Opinions: Best Rainmeter Skins?
In order to make sure that all of these themes work smoothly on your computer, you just have to do two simple tasks. The first one is to install a Rainmeter application on your system and then download any of these skins via the given link. Make sure that the skin which you download has an extension of .rmskin. All the themes mentioned here are good in their own ways like if you’re looking for something geeky or more detailed, you must go for SYSMonitor, Aliens, Rainmeter Win10, and Tron Tron.
If you want a decent theme with some few but important widgets then Amatical, Ultralight, Rusa Jantan are the ones that you should really prefer. Talking about the cool designing factor, Wisp and LIM!T is pretty amazing in this genre. If you want nothing, just a full desktop screen without a taskbar you know which theme to go for. Here we are sure that you’ll definitely find a theme that best suits you. So, download and enjoy it.
Also See: Top 10 Best Video Players For Windows
The Game mode tab
Game mode is used to unload some or all skins when running a full-screen game, in order to save Rainmeter CPU and GPU resources while playing.
This can be configured to be automatically triggered by checking the box, which will automatically enter Game mode when any full-screen D3D game is active on the primary monitor.
In addition, one or more processes of your choice that are not full-screen D3D games can be entered one process per line in the text box, and when any of those processes are running, game mode will be triggered.
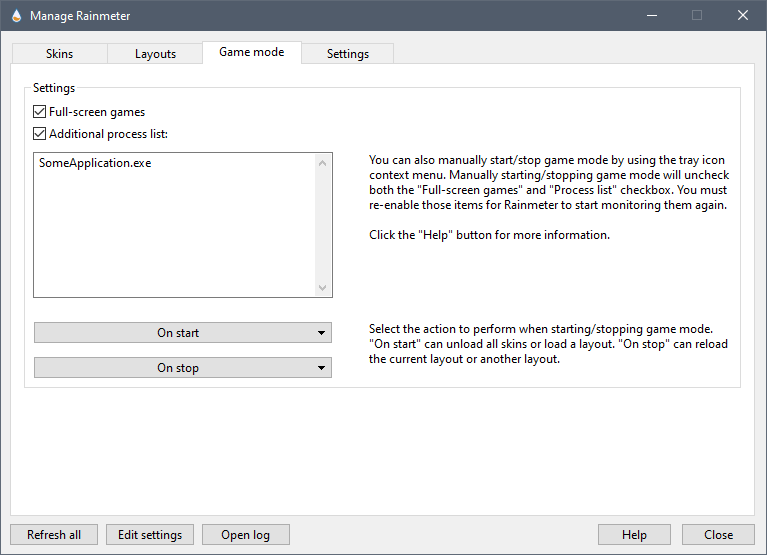
On start
What happens when Game mode starts is controlled by the pulldown. This can be set to the default or any defined that you create.

On stop
What happens when Game mode stops is controlled by the pulldown. This can be set to the default , which will load the skins that were running before Game mode was triggered, or any defined that you create.
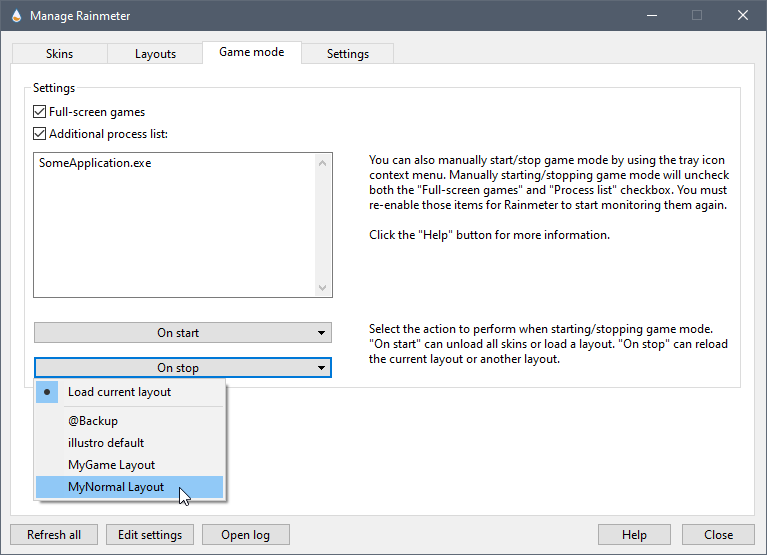
Simply create the you want to use for Game mode and , and select them from these pulldowns.
Game mode can also be started and stopped manually, as well as fully configured, from the Rainmeter tray icon context menu.

Note that if you manually start or stop Game mode, the checkboxes for automatic triggering will be turned off, and you will need to enable them again, either from the context menu, or from Manage.
Options
-
Type of the meter (e.g. or ). This option is required and may not be changed dynamically.
-
Specifies one or more sections as MeterStyles from which option values are inherited. Multiple MeterStyles are delimited with pipes ().
- , , …
-
«Binds» the meter to one or more measures. This means that the meter displays the values of these measures in some way. The exact form of the display depends on the type of meter. See each meter type’s page for details about what kind of values are valid for that type, and how the values are displayed.
- , Default:
-
Specifies the x (horizontal) and y (vertical) position of the meter in pixels relative to the top-left edge of the skin.
Relative positioning: If the value is appended with , the position is relative to the top/left edge of the previous meter. If the value is appended with , the position is relative to the bottom/right edge of the previous meter.
Examples: : Meter begins 150 horizontal pixels from the left edge of the skin window. : Meter begins 75 vertical pixels from the top edge of the skin window. : Meter begins 10 horizontal pixels to the right of the previous meter. : Meter begins at the same vertical position as the previous meter.
- ,
-
Specifies the width and height of the meter in pixels. The and must be defined for all meters except the following: String, Shape, and meters which can display an image file. These meters can determine the width and height automatically.
- Format:
-
Adds padding in pixels around any or all sides of a meter. The width and height of the meter will dynamically be adjusted to the new size. The padding will be drawn using the defined with .
Format:
Example:
- Default:
-
If set to , the meter is hidden. The visibility can also be changed with the .
Note: This is done by setting the width and height of the meter to zero, so some care should be taken when using the relative positioning suffix on or on any following meters. While in effect a «singularity», the hidden meter still exists and occupies a position in space.
-
Define a meter to be used as a «container» for the «content» of this meter.
Example: .
See the Container option for details on this functionality.
- Default:
-
Frequency at which the meter is updated. The option in the section of the skin is multiplied by the specified value to determine how often the meter is updated.
Example: If (in the section) and , the meter is updated every 30 seconds.
If or any negative number, then the meter is only updated once when the skin is loaded or refreshed.
-
to execute each time the meter is updated.
Note: This may be based on the values in in the section and any on the meter, or if the meter is updated with a or other relevant bang.
- , Default:
-
of the meter background. If is also specified, the background is a composed of and .
Hint: can be used to make transparent areas of the meter clickable.
-
Angle of the gradient in degrees when both and are defined.
- Default:
-
If enabled, draws a bevel around the edges of the rectangle specified by and . Valid values are:
- : No bevel
- : Raised
- : Sunken
- Default:
-
If set to , antialising (edge smoothing) is used when the meter is drawn.
- Default:
-
If set to , the meter is dynamic.
See also:
- Default:
-
Defines a 3×2 matrix which can be used to transform the meter. Transformations include: scaling, skewing, and translating (ie. moving). There must be exactly 6 values separated by semicolons .
TransformationMatrix={scale x};{skew y};{skew x};{scale y};{move x};{move y}
Combining these can have drastic effects on the meter it is applied to.
See also: Transformation Matrix
Examples:
- : This will flip along the line .
- : This will flip along the line .
- : This will scale by at .
Note: All transformations are relative to the top left corner of the window and not to the meter itself. So if you want to rotate the meter by its center the translation component in the matrix must be relative to the top left corner of the window.
Also note that the even if the meter’s visual location and orientation is changed by the transformation the place where it would be located without the transformation will still be used to define the window size and register the mouse clicks. This might change in the future though.
-
Defines a group or series of groups that the meter belongs to. For more information please see the Groups page.
Major additions and changes in Rainmeter 4.3
Direct2D and Hardware Acceleration
Rainmeter 4.3 has changed entirely from using an older GDI+ graphics engine in Windows to the more modern and capable Direct2D (known as D2D for short). Not only does D2D offer additional capabilities we will be taking advantage of in the near future, but it also allows us to optionally support hardware acceleration. (known as HWA for short) This means that some of the processing, and the memory used, can be offloaded from the CPU to the GPU, and things will be rendered or «draw» significantly faster.
Hardware acceleration defaults to «off». This to help us to identify general issues that might come up with the conversion from GDI+ to D2D, and isolate any problems that are strictly related to hardware acceleration. Hardware acceleration can be turned «on» in the , and we recommend it. Future versions will change the default to «on» in Rainmeter.
Hardware acceleration and Intel HD integrated graphics: There is a known issue with certain Intel HD integrated graphics chips, often seen on laptop computers, and hardware acceleration. This is due to a bug in the drivers for these chips from Intel, and the problem can generally be solved by updating your system to the most recent version of the graphics drivers from Intel. Details and suggestions for this issue are at: Intel HD Graphics drawing issue(s) with hardware acceleration
Reporting problems with Direct2D: We would be very interested in anything you see that is «different» for you when using Rainmeter 4.3. Things that looked different in Rainmeter 4.2. The goal here is to ensure that we fully protect backwards compatibility with existing skins in the change from GDI+ to D2D. Any skin you run in Rainmeter 4.2 should look and work exactly the same in Rainmeter 4.3. Please report these issues in this forum area: Rainmeter 4.3 D2D Issues.
New Container Functionality
Added a new Container option to all meter types. This will allow you to place the contents of a meter inside another meter, acting as both a «container» and a «mask». See the documentation for important details and a .rmskin with several examples.
Application bangs
- Parameter:
-
Opens the About
TabName (optional): Name of the tab to open. Valid values are: Log (default), Skins, Plugins, and Version. The value Measures is deprecated and will open the Skins tab.
window.
Example: - Parameters:
-
Opens the Manage window.
- (optional): Name of the tab to open. Valid values are: (default), , and .
- (optional): . If specified the list on the left will jump to and select the named config. If Config is specified, then TabName is required.
- (optional): A skin .ini file in a named config. If specified the list on the left will jump to and select the named skin .ini file. If File is specified, then TabName and Config are required.
Example:
- Opens the at the current mouse location.
- Parameters:
-
Writes a message to the .
- (required): The string to be written to the log. If the string contains spaces, enclose the string in quotes.
- (optional): Specifies the type of error. Valid values are: (default), , , and .
Example:
- Resets the network statistics.
- Parameters:
- Loads the named . A layout can also be loaded from the Windows command line:Example:
- Does a full refresh of all skins and reloads the list of configs and Rainmeter.ini settings. This is the same as «Refresh All» from the system tray context menu. The main difference from is that the skins folder is rescanned.
- Quits Rainmeter.
- Parameter:
-
Plays the given sound file once.
Note: While listed in this section for simplicity, the Play commands are not bangs, and do not require or allow the character at the beginning. Rainmeter uses a single-threaded call to embedded Windows functionality to play the sound, and only one sound at a time can be managed, Rainmeter-wide. Playing a sound in any skin will stop any other currently playing sounds.
Example: - Parameter:
-
Plays the given sound file in a loop.
Example: - Stops any currently playing sound started by Rainmeter.
Configs
A skin can grow to become an enormously complex project by the time it’s done. It may accumulate any number of images, icons, fonts, plugins, addons, scripts, and even included code that is strewn across multiple files and shared by other skins.
But at the core of every skin is a single .ini file. Named —where «SkinName» is the name of the skin—this is a text file that contains the fundamental code that Rainmeter uses to create a working skin.
Because a skin may have any number of , skins are typically identified not by their file name, but by the folder where they are located. This is known as the skin’s . To quickly find out a skin’s config name, just check the context menu—the first item is the config name. For example, the illustro «Clock» skin’s config name is .
Each skin also has a . This refers to the one folder that contains all of the skins belonging to a «suite,» such as illustro. When the skins in a suite are organized together in this way, they can be exported to a package, and then installed on another system, as a single collection. They can also share fonts, images and other resources in a way that separate skins cannot. For a simple skin that is not part of such a «suite,» the config and root config are the same.
Here’s a quick reference chart to help you remember the relationship between skins, configs, variants and roots, using illustro as an example:
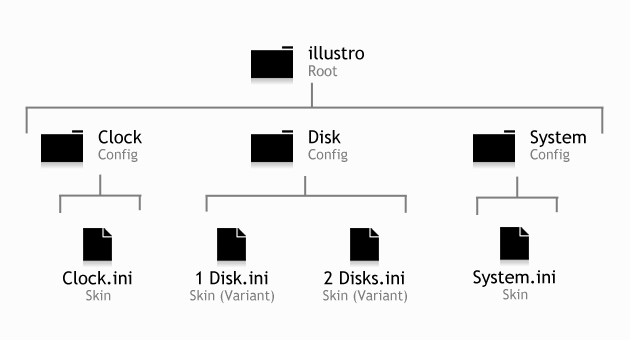
Root config folders are all organized in Rainmeter’s main :
Accordingly, you can identify any skin by its file path, according to a simple rule:

The illustro «Clock» skin in the Skins folder. Remember that skins are identified by their config name, e.g. «illustro\Clock».
The Skins tab

There are four main areas in this tab.
The skins list
List of currently installed skins. This contains all found when Rainmeter is started or refreshed.
The list consists of the folder for each skin, and the skin .ini files for each config.
- Clicking on a skin .ini file will make that skin active in the Manage tab.
- Double-clicking a skin .ini file will unload the skin if it is running, or load it if not.
- Right clicking on a config folder will allow opening the folder in Windows Explorer.
- Right clicking on a skin .ini file will allow loading, unloading or editing the skin.
The list is updated when Rainmeter is refreshed.
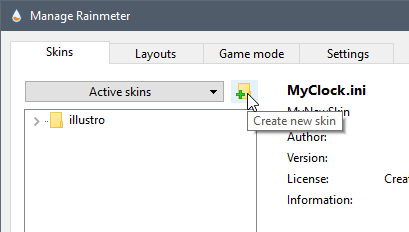
Create new skin
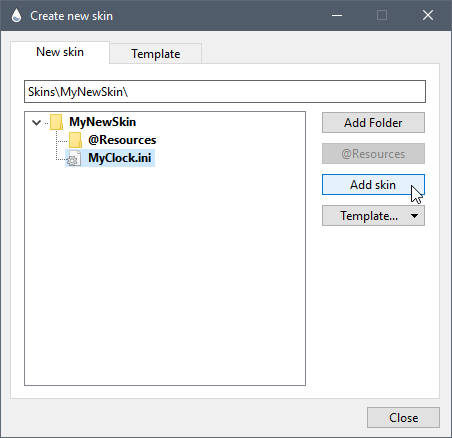
The «Create new skin» button open a dialog where you can easily add new skin folders and skin .ini files to Rainmeter.
New skin .ini files added will use a default or custom template as desired.
New items will be added to Rainmeter, and a full refresh of the application and all skins will take place. Your new folders and skins will appear in the Skins panel of Manage and are ready to be edited or loaded.
See New Skin for details.
Active skins
This pull-down will contain a list of all currently loaded and active skins in Rainmeter.
Clicking on a skin will make that skin active in the Manage tab.
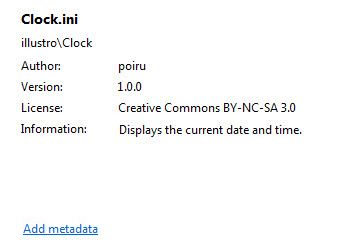
Metadata
Displays the information in the section of the selected skin.
This includes Name, Config, Author, Version, License and Information fields.
If a skin does not contain a section, the Add metadata link in this area will add an empty section with all fields.
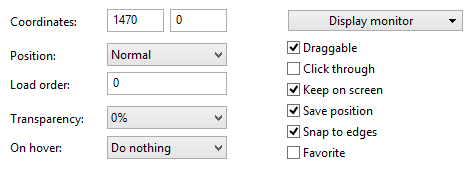
Skin Settings
For a selected active skin, shows the current values of various settings. Changes will immediately effect the skin on the desktop.
- Coordinates: The location of the skin on the screen in pixels.
- Position: The of the skin on the desktop relative to other windows.
- Load order: The of the skin on the desktop relative to other skins.
- Transparency: The of the skin.
- On hover: The behavior of the skin.
- Draggable: The setting for the skin.
- Click through: The setting for the skin.
- Keep on screen: The setting for the skin.
- Save position: The setting for the skin.
- Snap to edges: The setting for the skin.
- Favorite: Adds or removes the current skin in a list of accessed with the Rainmeter context menu.
- Display monitor: Settings for the monitor on which the skin is displayed.Use default: Primary monitor: Removes the directive from settings.@0, @1, @2, … , @32: Adds the specified monitor number to WindowX/WindowY settings. represents «The Virtual Screen».Auto-select based on window position: If checked, the WindowX/WindowY settings are made automatically based on the position of the meter’s window. This setting will be unchecked when a specific monitor is selected.
Buttons used to control skins:
- Unload / Load: Unload (make inactive) the selected skin if it is currently active, or load it if not.
- Refresh: Refresh the selected active skin.
- Edit: Edit the selected skin with the text editor associated with .ini files.
Going Further
If you don’t find the option that you want to change in the section, and the author has provided no other instructions, then your objective goes beyond merely «customizing» a skin: you will need to actually modify the skin away from the original author’s design.
This is not only possible—we actually encourage it! Breaking down the pieces of someone else’s creation and building something new with them is one of the best ways to learn Rainmeter. Modifying skins and creating new skins involve basically the same skills and require an understanding of the same core concepts. It is the tweakers, the experimenters, who get the most out of the tools that Rainmeter has to offer.
Continue to: Creating Skins »
« Back to: Using Rainmeter
Usage
Unlike meters, measures do not display anything by themselves. You cannot «see» a measure in a skin. The measure simply provides the information as a , which can be used in several ways:
-
A meter can be . In this way, the meter will automatically display the value in a way that is appropriate for the type of meter. This also takes the measure’s range and scale into account (if applicable).
-
The measure value can be referenced as a section variable. In this way, the value can be used in almost any meter or measure option. As a section variable, the value is used «literally,» which means it does not automatically account for the range or scale.
-
A measure can trigger an action when the value passes into a certain range.
Some measure types may have their own special rules. These are detailed in their individual articles.
Major additions and changes in Rainmeter 4.5.0
Game mode
This will allow you to minimize (really eliminate) all CPU, GPU, Disk and Network usage by Rainmeter while you are for instance playing a full-screen game. See for details.
Start Rainmeter using Safe Start
You can now hold down while starting Rainmeter to load in mode if you have a skin loaded that is preventing Rainmeter from starting normally.
Default starting values for configs
Added the ability to set default / starting values for the skin position and other options defined in the sections in Rainmeter.ini. See Default Settings in the documentation for details.
Setting flags for WebParser
Added a option to parent WebParser measures to enable setting some flags that change the behavior of WebParser when connecting to a remote resource. Details at
Deprecated Options
- Number of Bytes per second
-
This option replicates the behavior of setting on the measure. There is no reason to prefer this over MaxValue.
While this option does not automatically divide the value by 8 to convert from bits to bytes, and is just set with bytes to start with, most sites that allow you to measure your total bandwidth, like speedtest.net, will return values in bits per second, and it is easier to just use those values in bits in MaxValue and let Rainmeter do the math.
Values
A measure actually provides two values: a string, or «raw text,» and a number, which can be used in calculation formulas. Depending on the type of measure, these values may be the same, which means you can use them interchangeably; or, they may be completely different. The article for each measure type explains what is provided for both the number and string values.
-
When a meter is , it automatically uses the correct value for its type.
-
When using Section Variables, different syntax is used to refer to a measure’s string or number value.
-
The Substitute option affects only the string value of the current measure.
-
IfAction options use only the number value of the current measure.
-
The option in a Calc measure uses only the number values of other measures, unless section variables are used instead.
Although a string value is not a «true» number, it can be used like a number in formulas and options, as long as it contains only numeric characters and . (Otherwise, it is treated as zero.) Likewise, a number value can be displayed or stored to a variable as a string of text, although this may cause the value to lose precision.
